![]()
Download Article
![]()
Download Article
This wikiHow teaches you how to create an iCloud account by signing up for an Apple ID on an iPhone or iPad, a Mac, or via iCloud.com. When you sign up for an Apple ID, your free iCloud account is created for you; all you need to do is sign in.
-

1
Open your device’s Settings. It’s a gray app that contains an image of gears (⚙️) and is typically found on your home screen.
-

2
Tap Sign in to your (device). It’s at the top of the menu.[1]
- If you’re running an older version of iOS, instead tap iCloud and then tap Create a new Apple ID.
Advertisement
-

3
Tap Don’t have an Apple ID or forgot it? below the password field.
-

4
Tap Create Apple ID. It’s at the top of the pop-up menu.
-

5
Enter your birth date. Swipe up or down on the month, day, and year sections to enter a valid birth date and then tap Next in the top-right corner.
-

6
Enter your First and Last name. Then tap Next.
-

7
Enter a current email address or create a new iCloud email address. This email address will become the Apple ID you’ll use to sign in to iCloud.
- Then tap Next.
-

8
Enter a valid password. Then tap Next.
-

9
Enter your phone number. Select whether you want to verify your phone number with a Text Message or a Phone Call. Then tap Next.
-

10
Enter the Verification Code. Then tap Next.
-

11
Tap Agree. It’s in the bottom-right of the Terms and Conditions page. Then tap Agree on the pop-up menu.
-

12
Enter your device’s passcode. This is the unlock code you established for your device when you set it up.
- The screen will display the message «Signing into iCloud» as it accesses your data.
-

13
Merge your data. If you have data on your phone such as calendars, reminders, contacts, and notes that you’d like merged with your new iCloud account, tap Merge; if not, tap Don’t Merge.
- You will then be signed into your newly created iCloud account. You can now set up iCloud on your iPhone or iPad with your new iCloud account.
Advertisement
-

1
Click on the Apple menu. It’s the icon in the upper-left of your screen.
-

2
Click on System Preferences. It’s in the second section of the drop-down menu.
-

3
Click on iCloud. It’s on the left side of the window.
-

4
Click on Create Apple ID…. It’s below the «Apple ID» field in the dialog box.
-

5
Enter your birth date. Use the drop-down menus in the dialog box to do so.
-

6
Click on Next. It’s in the lower-right corner of the dialog box.
-

7
Enter your first and last name. Do so in the fields at the top of the dialog box.
-

8
Enter an email address. This email address will become the Apple ID you use to sign in to iCloud.
- If you’d like an @iCloud.com email address, click on Get a free iCloud email address… beneath the password field.
-

9
Enter a password and confirm it. Do so in the fields near the bottom of the dialog box.
- Your password must have at least 8 characters (including a number and an uppercase and lowercase letter) with no spaces. It also shouldn’t have three consecutive characters (222), be your Apple ID, or a previous password you’ve used in the last year.
-

10
Click on Next. It’s in the lower-right corner of the dialog box.
-

11
Create three security questions. Use the three drop-down menus in the dialog box to select the security questions, then type the answers in the fields beneath the drop down menus.
- Choose questions that you’ll remember the answers for.
- Answers are case-sensitive.
-

12
Click on Next. It’s in the lower-right corner of the dialog box.
-

13
Check the box next to «I have read and agree….» It’s in the lower-left part of the dialog box.
-

14
Click on Agree. It’s in the lower-right corner of the dialog box.
-

15
Check your email. Check for a message that was sent to the email address you entered for your Apple ID.
-

16
Open the email message from Apple. The subject line will likely be «Verify your Apple ID.»
-

17
Click on Verify now >. It’s a link in the body of the email message.
-

18
Enter your password. Type the password you created for your Apple ID in the «Password» field in the browser window.
-

19
Click on Continue. It’s near the bottom-center of the browser window.
- You should see an «Email address verified» message on your screen.
- Follow onscreen prompts to configure iCloud on your Mac.
-

20
-

21
Enter your Apple ID and password.
-

22
Click on ➲. It’s on the right side of the password field. You can now use your iCloud account.
Advertisement
-

1
Go to www.icloud.com. Do so from any browser, including computers running Windows or Chromebooks.
-

2
Click on Create yours now.. It’s below the Apple ID and Password fields and to the right of «Don’t have an Apple ID?»
-

3
Enter an email address. This email address will become the Apple ID you use to sign in to iCloud.
-

4
Enter a password and confirm it. Do so in the fields near the center of the dialog box.
- Your password must have at least 8 characters (including a number and an uppercase and lowercase letter) with no spaces. It also shouldn’t have three consecutive characters (222), be your Apple ID, or a previous password you’ve used in the last year.
-

5
Enter your first and last name. Do so in the fields near the middle of the dialog box.
-

6
Enter your birth date. Do so in the field near the middle of the dialog box.
-

7
Scroll down and create three security questions. Use the three drop-down menus in the dialog box to select the security questions, then type the answers in the fields beneath the drop down menus.
- Choose questions that you’ll remember the answers for.
- Answers are case-sensitive.
-

8
Scroll down and select your country. Do so in the drop-down menu.
-

9
Scroll down and check or uncheck the Apple notifications boxes. Checking the boxes means you’ll receive occasional email updates and announcements from Apple.
-

10
Scroll down and enter the jumbled characters. Do so in the field at the bottom of the dialog box to prove you’re not a bot.
-

11
Click on Continue. It’s in the lower-right corner of the dialog box.
-

12
Check your email. Check for a message that was sent to the email address you entered for your Apple ID.
-

13
Open the email message from Apple. The subject line will likely be «Verify your Apple ID.»
-

14
Enter the code. Type the six-digit code in the email message into the boxes on your browser screen.
-

15
Click on Continue. It’s in the lower-right corner of the dialog box.
-

16
Check the box next to «I have read and agree….» It’s near the bottom of the dialog box.
-

17
Click on Agree. It’s in the lower-right corner of the dialog box.
-

18
-

19
Enter your Apple ID and password.
-

20
Click on ➲. It’s on the right side of the password field. You can now use your iCloud account.
Advertisement
Add New Question
-
Question
How old does one have to be to open an iCloud account?

Moana Waialiki
Community Answer
13 years old is the minimum age Apple stipulates.
-
Question
What’s the difference between and Apple ID and an iCloud account?

Your Apple ID is a comprehensive account that covers all Apple products, including iCloud. When you create an Apple ID, you are automatically creating an associated iCloud account as well. Your Apple ID allows you to access your iCloud account on any compatible devices.
-
Question
Can I create an iCloud account (Apple ID) in Windows?

Yes, you can use the Apple ID website to create a new Apple ID and iCloud account from any computer or device.
See more answers
Ask a Question
200 characters left
Include your email address to get a message when this question is answered.
Submit
Advertisement
Thanks for submitting a tip for review!
About This Article
Article SummaryX
1. Open Settings.
2. Tap Sign in to your device.
3. Tap Don’t have an Apple ID or forget it?
4. Tap Create Apple ID.
5. Follow the on-screen instructions.
Did this summary help you?
Thanks to all authors for creating a page that has been read 417,463 times.
Is this article up to date?
![]()
Download Article
![]()
Download Article
This wikiHow teaches you how to create an iCloud account by signing up for an Apple ID on an iPhone or iPad, a Mac, or via iCloud.com. When you sign up for an Apple ID, your free iCloud account is created for you; all you need to do is sign in.
-
1
Open your device’s Settings. It’s a gray app that contains an image of gears (⚙️) and is typically found on your home screen.
-
2
Tap Sign in to your (device). It’s at the top of the menu.[1]
- If you’re running an older version of iOS, instead tap iCloud and then tap Create a new Apple ID.
Advertisement
-
3
Tap Don’t have an Apple ID or forgot it? below the password field.
-
4
Tap Create Apple ID. It’s at the top of the pop-up menu.
-
5
Enter your birth date. Swipe up or down on the month, day, and year sections to enter a valid birth date and then tap Next in the top-right corner.
-
6
Enter your First and Last name. Then tap Next.
-
7
Enter a current email address or create a new iCloud email address. This email address will become the Apple ID you’ll use to sign in to iCloud.
- Then tap Next.
-
8
Enter a valid password. Then tap Next.
-
9
Enter your phone number. Select whether you want to verify your phone number with a Text Message or a Phone Call. Then tap Next.
-
10
Enter the Verification Code. Then tap Next.
-
11
Tap Agree. It’s in the bottom-right of the Terms and Conditions page. Then tap Agree on the pop-up menu.
-
12
Enter your device’s passcode. This is the unlock code you established for your device when you set it up.
- The screen will display the message «Signing into iCloud» as it accesses your data.
-
13
Merge your data. If you have data on your phone such as calendars, reminders, contacts, and notes that you’d like merged with your new iCloud account, tap Merge; if not, tap Don’t Merge.
- You will then be signed into your newly created iCloud account. You can now set up iCloud on your iPhone or iPad with your new iCloud account.
Advertisement
-
1
Click on the Apple menu. It’s the icon in the upper-left of your screen.
-
2
Click on System Preferences. It’s in the second section of the drop-down menu.
-
3
Click on iCloud. It’s on the left side of the window.
-
4
Click on Create Apple ID…. It’s below the «Apple ID» field in the dialog box.
-
5
Enter your birth date. Use the drop-down menus in the dialog box to do so.
-
6
Click on Next. It’s in the lower-right corner of the dialog box.
-
7
Enter your first and last name. Do so in the fields at the top of the dialog box.
-
8
Enter an email address. This email address will become the Apple ID you use to sign in to iCloud.
- If you’d like an @iCloud.com email address, click on Get a free iCloud email address… beneath the password field.
-
9
Enter a password and confirm it. Do so in the fields near the bottom of the dialog box.
- Your password must have at least 8 characters (including a number and an uppercase and lowercase letter) with no spaces. It also shouldn’t have three consecutive characters (222), be your Apple ID, or a previous password you’ve used in the last year.
-
10
Click on Next. It’s in the lower-right corner of the dialog box.
-
11
Create three security questions. Use the three drop-down menus in the dialog box to select the security questions, then type the answers in the fields beneath the drop down menus.
- Choose questions that you’ll remember the answers for.
- Answers are case-sensitive.
-
12
Click on Next. It’s in the lower-right corner of the dialog box.
-
13
Check the box next to «I have read and agree….» It’s in the lower-left part of the dialog box.
-
14
Click on Agree. It’s in the lower-right corner of the dialog box.
-
15
Check your email. Check for a message that was sent to the email address you entered for your Apple ID.
-
16
Open the email message from Apple. The subject line will likely be «Verify your Apple ID.»
-
17
Click on Verify now >. It’s a link in the body of the email message.
-
18
Enter your password. Type the password you created for your Apple ID in the «Password» field in the browser window.
-
19
Click on Continue. It’s near the bottom-center of the browser window.
- You should see an «Email address verified» message on your screen.
- Follow onscreen prompts to configure iCloud on your Mac.
-
20
-
21
Enter your Apple ID and password.
-
22
Click on ➲. It’s on the right side of the password field. You can now use your iCloud account.
Advertisement
-
1
Go to www.icloud.com. Do so from any browser, including computers running Windows or Chromebooks.
-
2
Click on Create yours now.. It’s below the Apple ID and Password fields and to the right of «Don’t have an Apple ID?»
-
3
Enter an email address. This email address will become the Apple ID you use to sign in to iCloud.
-
4
Enter a password and confirm it. Do so in the fields near the center of the dialog box.
- Your password must have at least 8 characters (including a number and an uppercase and lowercase letter) with no spaces. It also shouldn’t have three consecutive characters (222), be your Apple ID, or a previous password you’ve used in the last year.
-
5
Enter your first and last name. Do so in the fields near the middle of the dialog box.
-
6
Enter your birth date. Do so in the field near the middle of the dialog box.
-
7
Scroll down and create three security questions. Use the three drop-down menus in the dialog box to select the security questions, then type the answers in the fields beneath the drop down menus.
- Choose questions that you’ll remember the answers for.
- Answers are case-sensitive.
-
8
Scroll down and select your country. Do so in the drop-down menu.
-
9
Scroll down and check or uncheck the Apple notifications boxes. Checking the boxes means you’ll receive occasional email updates and announcements from Apple.
-
10
Scroll down and enter the jumbled characters. Do so in the field at the bottom of the dialog box to prove you’re not a bot.
-
11
Click on Continue. It’s in the lower-right corner of the dialog box.
-
12
Check your email. Check for a message that was sent to the email address you entered for your Apple ID.
-
13
Open the email message from Apple. The subject line will likely be «Verify your Apple ID.»
-
14
Enter the code. Type the six-digit code in the email message into the boxes on your browser screen.
-
15
Click on Continue. It’s in the lower-right corner of the dialog box.
-
16
Check the box next to «I have read and agree….» It’s near the bottom of the dialog box.
-
17
Click on Agree. It’s in the lower-right corner of the dialog box.
-
18
-
19
Enter your Apple ID and password.
-
20
Click on ➲. It’s on the right side of the password field. You can now use your iCloud account.
Advertisement
Add New Question
-
Question
How old does one have to be to open an iCloud account?
Moana Waialiki
Community Answer
13 years old is the minimum age Apple stipulates.
-
Question
What’s the difference between and Apple ID and an iCloud account?
Your Apple ID is a comprehensive account that covers all Apple products, including iCloud. When you create an Apple ID, you are automatically creating an associated iCloud account as well. Your Apple ID allows you to access your iCloud account on any compatible devices.
-
Question
Can I create an iCloud account (Apple ID) in Windows?
Yes, you can use the Apple ID website to create a new Apple ID and iCloud account from any computer or device.
See more answers
Ask a Question
200 characters left
Include your email address to get a message when this question is answered.
Submit
Advertisement
Thanks for submitting a tip for review!
About This Article
Article SummaryX
1. Open Settings.
2. Tap Sign in to your device.
3. Tap Don’t have an Apple ID or forget it?
4. Tap Create Apple ID.
5. Follow the on-screen instructions.
Did this summary help you?
Thanks to all authors for creating a page that has been read 417,463 times.
Is this article up to date?
iCLOUD TERMS AND CONDITIONSWelcome to iCloud
THIS LEGAL AGREEMENT BETWEEN YOU AND APPLE GOVERNS YOUR USE OF THE iCLOUD PRODUCT, SOFTWARE, SERVICES, AND WEBSITES (COLLECTIVELY REFERRED TO AS THE “SERVICE”). IT IS IMPORTANT THAT YOU READ AND UNDERSTAND THE FOLLOWING TERMS. BY CLICKING "AGREE," YOU ARE AGREEING THAT THESE TERMS WILL APPLY IF YOU CHOOSE TO ACCESS OR USE THE SERVICE.
Apple is the provider of the Service, which permits you to utilize certain internet services, including storing your personal content (such as iCloud email, contacts, calendars, and photos) and making it accessible on your compatible devices and computers, and certain location based services, only under the terms and conditions set forth in this Agreement. As soon as you enable iCloud, your content will be automatically sent to and stored by Apple, so you can later access that content or have content wirelessly pushed to your other iCloud-enabled devices or computers. "Apple" as used herein means:
* Apple Inc., located at 1 Infinite Loop, Cupertino, California, for users in North, Central, and South America (excluding Canada);
* Apple Canada, located at 7495 Birchmount Road, Markham, ON L3R 5G2 for users in Canada;
* iTunes K.K., located at 3-20-2 Nishishinjuku, Shinjuku, Tokyo for users in Japan;
* Apple Pty Limited, located at Level 13, Capital Centre, 255 Pitt Street, Sydney NSW 2000, Australia, for users in Australia and New Zealand; and
* iTunes Sarl, located at 8 rue Heinrich Heine, L-1720 Luxembourg, for all other users.
REQUIREMENTS FOR USE OF THE SERVICE
The Service is available to individuals aged 13 years or older. If you are 13 or older but under the age of majority in your country of residence, you must review this Agreement with your parent or guardian to make sure that you and your parent or guardian understand it. Parents or guardians should also remind any minors that conversing with strangers on the internet can be dangerous and take appropriate precautions to protect children, including monitoring their use of the Service.
To use the Service, you cannot be a person barred from receiving the Service under the laws of the United States or other applicable jurisdictions, including the country in which you reside or from where you use the Service. By accepting this Agreement, you represent that you understand and agree to the foregoing.
Use of the Service requires compatible devices, Internet access, and certain software (fees may apply); may require periodic updates; and may be affected by the performance of these factors. Apple reserves the right to limit the number of Accounts that may be associated with a device. High-speed Internet access is strongly recommended for use. The latest version of required software is recommended to access the Service and may be required for certain transactions or features. You agree that meeting these requirements, which may change from time to time, is your responsibility.
Use of Location-based Services
Apple and its partners and licensors may provide certain features or services through the Service that rely upon device-based location information, which use GPS (where available), along with crowd-sourced Wi-Fi hotspot and cell tower locations. To provide such features or services, where available, Apple and its partners and licensors must collect, use, transmit, process and maintain your location data, including the real-time geographic location of your device, and you hereby agree and consent to Apple's and its partners' and licensors' collection, use, transmission, processing and maintenance of such location data to provide such services. In addition, by enabling and/or using any location-based services or features within the Service (e.g. Find My iPhone, Find My Friends), you agree and consent to Apple and its partners and licensors transmitting, collecting, using, processing and maintaining information related to your iCloud account (“Account”), and any devices registered thereunder, for purposes of providing such location-based service or feature to you, and use of your location data and location search queries to provide and improve location-based and road traffic-based products and services. Such information may include, but is not limited to, your Apple ID, device ID and name, device type and real-time geographic location of your device at time of your request. You may withdraw this consent at any time by not using the location-based features and turning off the Find My iPhone, Find My Friends, or Location Services settings (as applicable) on your device and computer. When using third party services that use or provide location data as part of the Service, you are subject to and should review such third party's terms and privacy policy on use of location data by such third party services. Any location data provided by the Service is not intended to be relied upon in situations where precise location information is needed or where erroneous, inaccurate, time-delayed or incomplete location data may lead to death, personal injury, property or environmental damage. Apple shall use reasonable skill and due care in providing the Service, but neither Apple nor any of its content providers guarantees the availability, accuracy, completeness, reliability, or timeliness of location data or any other data displayed by the Service.
Find My iPhone
The Find My iPhone and Find My Mac features are intended for your personal use only. When enabled on your device or Mac, this feature can be used to locate, send a message to, play a sound on, or remotely lock or wipe your own device or Mac. Devices must be on and connected to the Internet (via a data network such as 3G or a registered Wi-Fi network) to be located. Macs must be on and not asleep, connected to the Internet, with Wi-Fi on and within the range of a registered Wi-Fi network to be located. If your device has been remotely wiped, you cannot locate, send a message to, or cancel the remote wipe for that device. Location requests will impact battery life of the located device or Mac. If you believe your device or Mac has been stolen you should seek assistance from your local law enforcement and use the remote passcode lock or remote wipe feature to protect your data. Once you have requested your device’s location, and the device has been located on a map, you can view the last location of your device after your initial request for a period of up to 24 hours. Apple then deletes that information within 7 days of your initial request. THE LOCATION-BASED SERVICES OF THIS FEATURE ARE NOT INTENDED OR SUITABLE FOR USE AS AN EMERGENCY LOCATOR SYSTEM.
Find My Friends
The Find My Friends app, available for download from the App Store (compatible hardware and software required), allows you to share your location with a limited number of other users via your devices, upon acceptance of requests from those users. You may also view the location of a limited number of other users who have accepted your requests to do so, via their devices. You may also choose to temporarily share your location with a limited number of groups, and see locations of all members of those groups. You may temporarily hide your device’s location from other users by selecting Hide From Followers under the Me tab in the Find My Friends app. You may revoke acceptance of another user’s permission to see your location by removing that user from the list of followers on the Me tab in the Find My Friends app. You may turn off the feature by signing out or uninstalling the Find My Friends app from your device. You may also use restrictions in iOS settings to prevent unauthorized changes to the settings you have selected, including acceptance of follow requests or hiding location. Location requests will impact battery life of the located device. THE LOCATION-BASED SERVICES OF THIS FEATURE ARE NOT INTENDED OR SUITABLE FOR USE AS AN EMERGENCY LOCATOR SYSTEM.
Backup
Automatic backup is available for devices, and occurs periodically, when the device is screenlocked, connected to a power source, and connected to the Internet via a Wi-Fi network. iCloud will store your last three backups. Backup is limited to device settings, device characteristics, Camera Roll, messages (iMessage, SMS, and MMS), ringtones, app data, location settings (such as location-based reminders that you have set up), and Home screen and app organization. Content purchased from the iTunes Store, App Store, or iBookstore is not backed up, but may be eligible for download from those services, subject to account requirements, availability, and the applicable terms and conditions. Media obtained from other sources (such as ripped music or home videos) are not backed up, but can be synced to your computer by using iTunes. Your iCloud email, contacts, calendars, bookmarks, and documents are stored in, and can be accessed from, iCloud. Apple shall use reasonable skill and due care in providing the Service, but, TO THE GREATEST EXTENT PERMISSIBLE BY APPLICABLE LAW, APPLE DOES NOT GUARANTEE OR WARRANT THAT ANY CONTENT YOU MAY STORE OR ACCESS THROUGH THE SERVICE WILL NOT BE SUBJECT TO INADVERTENT DAMAGE, CORRUPTION, LOSS, OR REMOVAL IN ACCORDANCE WITH THE TERMS OF THIS AGREEMENT, AND APPLE SHALL NOT BE RESPONSIBLE SHOULD SUCH DAMAGE, CORRUPTION, LOSS, OR REMOVAL OCCUR. It is your responsibility to maintain appropriate alternate backup of your information and data.
When iCloud Backup is enabled, your device will not back up to iTunes automatically during a sync, but you may choose to manually initiate a back up to iTunes.
Photo Stream
When Photo Stream is enabled on your device or computer, new photos taken on your device or imported to your computer will be uploaded to iCloud, and then automatically downloaded to your other devices or computers on which Photo Stream is also enabled. The downloaded photos will appear in a Photo Stream view or folder on the device. Photo resolution may vary according to the device to which they are downloaded. A Wi-Fi connection is required for use on devices. Apple reserves the right to place limits on the number and/or size of photos that can be uploaded during a given time period in order to limit unintended or excessive use of the service.
Uploaded photos will be kept in your Account for thirty (30) days. Photos will be permanently deleted from your Photo Stream thirty (30) days after they are uploaded. Devices store a limited number of the most recent photos in a Photo Stream album or view; the oldest photos in excess of the current limitation will be automatically deleted as new Photo Stream photos are downloaded. Downloaded photos can be manually saved to the iOS Camera Roll or a new album on your device or computer prior to deletion from Photo Stream.
Changing the Service
Apple reserves the right to modify or terminate the Service (or any part thereof), either temporarily or permanently. Apple may post on our website and/or will send an email to the primary address associated with your Account to provide notice of any material changes to the Service. It is your responsibility to check your iCloud and/or primary email address registered with Apple for any such notices. You agree that Apple shall not be liable to you or any third party for any modification or cessation of the Service. If you have paid to use the Service and we terminate it or materially downgrade its functionality, we will provide you with a pro rata refund of any pre-payment.
Limitations on Use
You agree to use the Service only for purposes as permitted by this Agreement and any applicable law, regulation, or generally accepted practice in the applicable jurisdiction. Your Account is allocated 5GB of storage capacity as described in the iCloud feature pages. Additional storage is available for purchase, as described below. Exceeding any applicable or reasonable limitation of bandwidth, or storage capacity (for example, backup or e-mail account space) is prohibited and may prevent you from backing up to iCloud, add documents, or receive new email sent to your me.com address. To view your current storage and data transfer or bandwidth allocations, go to System Preferences and select iCloud on your Mac or use iCloud Control Panel on your PC, or select iCloud, and then “Storage and Backup” in Settings on your device. If your use of the Service or other behavior intentionally or unintentionally threatens Apple’s ability to provide the Service or other systems, Apple shall be entitled to take all reasonable steps to protect the Service and Apple’s systems, which may include suspension of your access to the Service. Repeated violations of the limitations may result in termination of your Account.
Availability of the Service
The Service, or any feature or part thereof, may not be available in all languages or in all countries and Apple makes no representation that the Service, or any feature or part thereof, is appropriate or available for use in any particular location. To the extent you choose to access and use the Service, you do so at your own initiative and are responsible for compliance with any applicable laws, including, but not limited to, any applicable local laws.
Public Beta
From time to time, Apple may choose to offer new and/or updated features of the Service (the “Beta Features”) as part of a Public Beta Program (the “Program”) for the purpose of providing Apple with feedback on the quality and usability of the Beta Features. You understand and agree that your participation in the Program is voluntary and does not create a legal partnership, agency, or employment relationship between you and Apple, and that Apple is not obligated to provide you with any Beta Features. Apple may make such Beta Features available to Program participants by online registration or enrollment via the Service. You understand and agree that Apple may collect and use certain information from your Account, devices and peripherals in order to enroll you in a Program and/or determine your eligibility to participate. You understand that once you enroll in a Program you may be unable to revert back to the earlier non-beta version of a given Beta Feature. In the event such reversion is possible, you may not be able to migrate data created within the Beta Feature back to the earlier non-beta version. Your use of the Beta Features and participation in the Program is governed by this Agreement and any additional license terms that may separately accompany the Beta Features. The Beta Features are provided on an “AS IS” and “AS AVAILABLE” basis and may contain errors or inaccuracies that could cause failures, corruption or loss of data and/or information from your device and from peripherals (including, without limitation, servers and computers) connected thereto. Apple strongly encourages you to backup all data and information on your device and any peripherals prior to participating in any Program. You expressly acknowledge and agree that all use of the Beta Features is at your sole risk. YOU ASSUME ALL RISKS AND ALL COSTS ASSOCIATED WITH YOUR PARTICIPATION IN ANY PROGRAM, INCLUDING, WITHOUT LIMITATION, ANY INTERNET ACCESS FEES, BACKUP EXPENSES, COSTS INCURRED FOR THE USE OF YOUR DEVICE AND PERIPHERALS, AND ANY DAMAGE TO ANY EQUIPMENT, SOFTWARE, INFORMATION OR DATA. Apple may or may not provide you with technical and/or other support for the Beta Features. If support is provided it will be in addition to your normal support coverage for the Service and only available through the Program. You agree to abide by any support rules or policies that Apple provides to you in order to receive any such support. Apple reserves the right to modify the terms, conditions or policies of the Program (including ceasing the Program) at any time with or without notice, and may revoke your participation in the Program at any time. You acknowledge that Apple has no obligation to provide a commercial version of the Beta Features, and that should such a commercial version be made available, it may have features or functionality different than that contained in the Beta Features. As part of the Program, Apple will provide you with the opportunity to submit comments, suggestions, or other feedback regarding your use of the Beta Features. You agree that in the absence of a separate written agreement to the contrary, Apple will be free to use any feedback you provide for any purpose.
Subscription Storage Upgrades
Additional storage is available for purchase on a subscription basis.
Fees
The Service accepts credit cards and certain payment accounts (where available) for payment, and will automatically charge the payment method associated with your Apple ID (e.g., the payment method associated with your iTunes or App Store account), if available. Apple may obtain preapproval for an amount up to the amount of the transaction. Storage upgrade fees are billed annually, in advance of provision of the service. Billing occurs at the time of or shortly after your transaction. You agree that you will pay for the upgrades you purchase through the Service, and that Apple may charge your credit card or payment account for any upgrades purchased and for any additional amounts (including any taxes and late fees, as applicable) that may be accrued by or in connection with your Account, and that Apple may continue to charge your credit card or payment account for all fees or charges associated with your subscription on an annual basis until you change or cancel the subscription. This means that unless you change or cancel your subscription prior to the next annual billing date, we will charge your credit card or payment account the then-current fees on that next annual billing date.
About thirty (30) days prior to your annual billing date, we will notify you by email to the email address associated with your Apple ID that your Account is about to be billed and to remind you that your credit card or payment account will be billed the indicated fees on the annual billing date. You can change your subscription by upgrading or downgrading your storage under iCloud in your Account Information on your device, or under Internet Accounts on your computer. The applicable storage fee for an upgraded storage plan will take effect immediately; downgrades to your storage plan will take effect on the next annual billing date. YOU ARE RESPONSIBLE FOR THE TIMELY PAYMENT OF ALL FEES AND FOR PROVIDING APPLE WITH VALID CREDIT CARD OR PAYMENT ACCOUNT DETAILS FOR PAYMENT OF ALL FEES. All fees will be billed to the credit card or payment account you designate during the registration process. If Apple is unable to successfully charge your credit card or payment account for fees due, Apple reserves the right to revoke or restrict access to your stored Content, delete your stored Content, or terminate your Account. If you want to designate a different credit card or payment account or if there is a change in your credit card or payment account status, you must change your information online in the Account Information section of iCloud; this may temporarily disrupt your access to the Services while Apple verifies your new payment information.
Your total price will include the price of the upgrade plus any sales, use, goods and services (GST), value added (VAT), or other similar tax, under applicable law and based on the tax rate in effect at the time you purchase the upgrade. We will charge tax when required to do so under the tax rules applicable to the Service.
Account Information and Billing Inquiries
You may consult your Account management page on your device for details on your Account information including payment method and billing currency. Apple will send an electronic invoice to your iCloud email address whenever any Service fees are charged to your Account. If you believe you have been billed in error for the Service please try and notify us within 45 days of the billing date by contacting iCloud Support at www.apple.com/support/icloud.
Cancellations and Refunds
All fees and charges paid by you in relation to the Service are nonrefundable, except as required by law or as otherwise stated herein. You may contact Apple for a full refund within 15 days of an initial upgrade purchase or within 45 days of a subsequent yearly payment. To request a refund as described herein go to www.apple.com/support/icloud for more details. Applicable local law may vary this policy. Please contact customer support for details.
You can cancel your subscription by downgrading your storage to the free 5GB plan under Storage Plan in your iCloud Account Information on your device, from your iCloud Account view in System preferences on your Mac, or from your iCloud Account view in the iCloud Control Panel for Windows on your PC. Your paid subscription will be cancelled on your next annual billing date. Partial refunds are available where required by law.
Changes in Price
Apple may at any time, upon notice required by applicable law, change the price of the storage upgrades or any part thereof, or institute new charges or fees. Price changes and institution of new charges implemented during your subscription billing year will apply to subsequent subscription billing years and to all new subscribers after the effective date of the change. If you do not agree to any such price changes, then you must cancel and stop using the storage upgrade.
Your Use of the Service
Your Account
As a registered user of the Service, you may establish an Account. Don’t reveal your Account information to anyone else. You are solely responsible for maintaining the confidentiality and security of your Account and for all activities that occur on or through your Account, and you agree to immediately notify Apple of any security breach of your Account. You further acknowledge and agree that the Service is designed and intended for personal use on an individual basis and you should not share your Account and/or password details with another individual. Provided we have exercised reasonable skill and due care, Apple shall not be responsible for any losses arising out of the unauthorized use of your Account resulting from you not following these rules.
In order to use the Service, you must enter your Apple ID and password to authenticate your Account. You agree to provide accurate and complete information when you register with, and as you use, the Service (“Service Registration Data”), and you agree to update your Service Registration Data to keep it accurate and complete. Failure to provide accurate, current and complete Service Registration Data may result in the suspension and/or termination of your Account. You agree that Apple may store and use the Service Registration Data you provide for use in maintaining and billing fees to your Account.
Additional Obligations or Terms of Use
Particular components or features of the Service provided by Apple and/or its licensors, including but not limited to the ability to download previous purchases and iTunes Match (additional fees apply), require separate software or other license agreements or terms of use. You must read, accept, and agree to be bound by any such separate agreement as a condition of using these particular components or features of the Service.
No Conveyance
Nothing in this Agreement shall be construed to convey to you any interest, title, or license in an Apple ID, email address, domain name, iChat ID, or similar resource used by you in connection with the Service.
No Right of Survivorship
You agree that your Account is non-transferable and that any rights to your Apple ID or Content within your Account terminate upon your death. Upon receipt of a copy of a death certificate your Account may be terminated and all Content within your Account deleted. Contact support at www.apple.com/support/icloud for further assistance.
No Resale of Service
You agree that you will not reproduce, copy, duplicate, sell, resell, rent or trade the Service (or any part thereof) for any purpose.
Apple Privacy Policy
You understand that by using the Service, you consent and agree to the collection and use of certain information about you and your use of the Service in accordance with Apple’s Privacy Policy. You further consent and agree that Apple may collect, use, transmit, process and maintain information related to your Account, and any devices or computers registered thereunder, for purposes of providing the Service, and any features therein, to you. Information collected by Apple when you use the Service may also include technical or diagnostic information related to your use that may be used by Apple to support, improve and enhance Apple’s products and services. For more information please read our full privacy policy at http://www.apple.com/privacy/. You further understand and agree that this information may be transferred to the United States and/or other countries for storage, processing and use by Apple, its affiliates, and/or their service providers. Please note that personal information regarding individuals who reside in a member state of the European Economic Area (EEA) is jointly controlled by Apple Sales International in Cork, Ireland, and Apple UK Limited in Uxbridge, United Kingdom.
Content and Your Conduct
Content
"Content" means any information that may be generated or encountered through use of the Service, such as data files, device characteristics, written text, software, music, graphics, photographs, images, sounds, videos, messages and any other like materials. You understand that all Content, whether publicly posted or privately transmitted on the Service is the sole responsibility of the person from whom such Content originated. This means that you, and not Apple, are solely responsible for any Content you upload, download, post, email, transmit, store or otherwise make available through your use of the Service. You understand that by using the Service you may encounter Content that you may find offensive, indecent, or objectionable, and that you may expose others to Content that they may find objectionable. Apple does not control the Content posted via the Service, nor does it guarantee the accuracy, integrity or quality of such Content. You understand and agree that your use of the Service and any Content is solely at your own risk.
Your Conduct
You agree that you will NOT use the Service to:
a. upload, download, post, email, transmit, store or otherwise make available any Content that is unlawful, harassing, threatening, harmful, tortious, defamatory, libelous, abusive, violent, obscene, vulgar, invasive of another’s privacy, hateful, racially or ethnically offensive, or otherwise objectionable;
b. stalk, harass, threaten or harm another;
c. if you are an adult, request personal or other information from a minor (any person under the age of 18 or such other age as local law defines as a minor) who is not personally known to you, including but not limited to any of the following: full name or last name, home address, zip/postal code, telephone number, picture, or the names of the minor's school, church, athletic team or friends;
d. pretend to be anyone, or any entity, you are not — you may not impersonate or misrepresent yourself as another person (including celebrities), entity, another iCloud user, an Apple employee, or a civic or government leader, or otherwise misrepresent your affiliation with a person or entity (Apple reserves the right to reject or block any Apple ID or e-mail address which could be deemed to be an impersonation or misrepresentation of your identity, or a misappropriation of another person's name or identity);
e. engage in any copyright infringement or other intellectual property infringement (including uploading any content to which you do not have the right to upload), or disclose any trade secret or confidential information in violation of a confidentiality, employment, or nondisclosure agreement;
f. post, send, transmit or otherwise make available any unsolicited or unauthorized email messages, advertising, promotional materials, junk mail, spam, or chain letters, including, without limitation, bulk commercial advertising and informational announcements;
g. forge any TCP-IP packet header or any part of the header information in an email or a news group posting, or otherwise putting information in a header designed to mislead recipients as to the origin of any Content transmitted through the Service (“spoofing");
h. upload, post, email, transmit, store or otherwise make available any material that contains viruses or any other computer code, files or programs designed to harm, interfere or limit the normal operation of the Service (or any part thereof), or any other computer software or hardware;
i. interfere with or disrupt the Service (including accessing the Service through any automated means, like scripts or web crawlers), or any servers or networks connected to the Service, or any policies, requirements or regulations of networks connected to the Service (including any unauthorized access to, use or monitoring of data or traffic thereon);
j. plan or engage in any illegal activity; and/or
k. gather and store personal information on any other users of the Service to be used in connection with any of the foregoing prohibited activities.
Removal of Content
You acknowledge that Apple is not responsible or liable in any way for any Content provided by others and has no duty to pre-screen such Content. However, Apple reserves the right at all times to determine whether Content is appropriate and in compliance with this Agreement, and may pre-screen, move, refuse, modify and/or remove Content at any time, without prior notice and in its sole discretion, if such Content is found to be in violation of this Agreement or is otherwise objectionable.
Backup Your Content
You are responsible for backing up, to your own computer or other device, any important documents, images or other Content that you store or access via the Service. Apple shall use reasonable skill and due care in providing the Service, but Apple does not guarantee or warrant that any Content you may store or access through the Service will not be subject to inadvertent damage, corruption or loss.
Access to Your Account and Content
Apple reserves the right to take steps Apple believes are reasonably necessary or appropriate to enforce and/or verify compliance with any part of this Agreement. You acknowledge and agree that Apple may, without liability to you, access, use, preserve and/or disclose your Account information and Content to law enforcement authorities, government officials, and/or a third party, as Apple believes is reasonably necessary or appropriate, if legally required to do so or if we have a good faith belief that such access, use, disclosure, or preservation is reasonably necessary to: (a) comply with legal process or request; (b) enforce this Agreement, including investigation of any potential violation thereof; (c) detect, prevent or otherwise address security, fraud or technical issues; or (d) protect the rights, property or safety of Apple, its users, a third party, or the public as required or permitted by law.
Copyright Notice - DMCA
If you believe that any Content in which you claim copyright has been infringed by anyone using the Service, please contact Apple's Copyright Agent as described in our Copyright Policy at http://www.apple.com/legal/trademark/claimsofcopyright.html. Apple may, in its sole discretion, suspend and/or terminate Accounts of users that are found to be repeat infringers.
Violations of this Agreement
If while using the Service, you encounter Content you find inappropriate, or otherwise believe to be a violation of this Agreement, you may report it by sending an email to abuse@me.com.
Content Submitted or Made Available by You on the Service
License from You
Except for material we may license to you, Apple does not claim ownership of the materials and/or Content you submit or make available on the Service. However, by submitting or posting such Content on areas of the Service that are accessible by the public or other users with whom you consent to share such Content, you grant Apple a worldwide, royalty-free, non-exclusive license to use, distribute, reproduce, modify, adapt, publish, translate, publicly perform and publicly display such Content on the Service solely for the purpose for which such Content was submitted or made available, without any compensation or obligation to you. You agree that any Content submitted or posted by you shall be your sole responsibility, shall not infringe or violate the rights of any other party or violate any laws, contribute to or encourage infringing or otherwise unlawful conduct, or otherwise be obscene, objectionable, or in poor taste. By submitting or posting such Content on areas of the Service that are accessible by the public or other users, you are representing that you are the owner of such material and/or have all necessary rights, licenses, and authorization to distribute it.
Changes to Content
You understand that in order to provide the Service and make your Content available thereon, Apple may transmit your Content across various public networks, in various media, and modify or change your Content to comply with technical requirements of connecting networks or devices or computers. You agree that the license herein permits Apple to take any such actions.
Trademark Information
Apple, the Apple logo, iCloud, the iCloud logo and other Apple trademarks, service marks, graphics, and logos used in connection with the Service are trademarks or registered trademarks of Apple Inc. in the US and/or other countries. A list of Apple's trademarks can be found here - http://www.apple.com/legal/trademark/appletmlist.html. Other trademarks, service marks, graphics, and logos used in connection with the Service may be the trademarks of their respective owners. You are granted no right or license in any of the aforesaid trademarks, and further agree that you shall not remove, obscure, or alter any proprietary notices (including trademark and copyright notices) that may be affixed to or contained within the Service.
Software
Apple’s Proprietary Rights
You acknowledge and agree that Apple and/or its licensors own all legal right, title and interest in and to the Service, including but not limited to graphics, user interface, the scripts and software used to implement the Service, and any software provided to you as a part of and/or in connection with the Service (the “Software”), including any and all intellectual property rights that exist therein, whether registered or not, and wherever in the world they may exist. You further agree that the Service (including the Software, or any other part thereof) contains proprietary and confidential information that is protected by applicable intellectual property and other laws, including but not limited to copyright. You agree that you will not use such proprietary information or materials in any way whatsoever except for use of the Service in compliance with this Agreement. No portion of the Service may be reproduced in any form or by any means, except as expressly permitted in these terms.
License From Apple
Apple grants you a personal, non-exclusive, non-transferable, limited license to use the Software as provided to you by Apple as a part of the Service and in accordance with this Agreement; provided that you do not (and do not permit anyone else to) copy, modify, rent, loan, distribute, create a derivative work of, reverse engineer, decompile, or otherwise attempt to discover the source code (unless expressly permitted or required by law), sell, lease, sublicense, assign, grant a security interest in or otherwise transfer any right in the Software, and you shall not exploit the Service in any unauthorized way whatsoever, including, but not limited to, by trespass or burdening network capacity. THE USE OF THE SOFTWARE OR ANY PART OF THE SERVICE, EXCEPT FOR USE OF THE SERVICE AS PERMITTED IN THIS AGREEMENT, IS STRICTLY PROHIBITED AND INFRINGES ON THE INTELLECTUAL PROPERTY RIGHTS OF OTHERS AND MAY SUBJECT YOU TO CIVIL AND CRIMINAL PENALTIES, INCLUDING POSSIBLE MONETARY DAMAGES, FOR COPYRIGHT INFRINGEMENT.
Export Control
Use of the Service and Software, including transferring, posting, or uploading data, software or other Content via the Service, may be subject to the export and import laws of the United States and other countries. You agree to comply with all applicable export and import laws and regulations. In particular, but without limitation, the Software may not be exported or re-exported (a) into any U.S. embargoed countries or (b) to anyone on the U.S. Treasury Department's list of Specially Designated Nationals or the U.S. Department of Commerce Denied Person’s List or Entity List. By using the Software or Service, you represent and warrant that you are not located in any such country or on any such list. You also agree that you will not use the Software or Service for any purposes prohibited by United States law, including, without limitation, the development, design, manufacture or production of missiles, nuclear, chemical or biological weapons. You further agree not to upload to your Account any data or software that cannot be exported without prior written government authorization, including, but not limited to, certain types of encryption software. This assurance and commitment shall survive termination of this Agreement.
Updates
As part of the Service, you may from time to time receive updates to the Software from Apple which may be automatically downloaded and installed to your device or computer. These updates may include bug fixes, feature enhancements or improvements, or entirely new versions of the Software. You agree that Apple may automatically deliver such updates to you as part of the Service and you shall receive and install them as required.
Termination
Termination by You
You may terminate your Account and/or stop using the Service at any time. If you wish to stop using iCloud on your device, you may remove your iCloud account from the device by opening Settings on your device, tapping iCloud, and tapping the Delete Account button. To terminate your Account contact iCloud Support at www.apple.com/support/icloud. Any fees paid by you prior to your termination are nonrefundable (except as expressly permitted otherwise by this Agreement), including any fees paid in advance for the billing year during which you terminate. Termination of your Account shall not relieve you of any obligation to pay any accrued fees or charges.
Termination by Apple
Apple may at any time, under certain circumstances and without prior notice, immediately terminate or suspend all or a portion of your Account and/or access to the Service. Cause for such termination shall include: (a) violations of this Agreement or any other policies or guidelines that are referenced herein and/or posted on the Service; (b) a request by you to cancel or terminate your Account; (c) a request and/or order from law enforcement, a judicial body, or other government agency; (d) where provision of the Service to you is or may become unlawful; (e) unexpected technical or security issues or problems; (f) your participation in fraudulent or illegal activities; or (g) failure to pay any fees owed by you in relation to the Service. Any such termination or suspension shall be made by Apple in its sole discretion and Apple will not be responsible to you or any third party for any damages that may result or arise out of such termination or suspension of your Account and/or access to the Service. In addition, Apple may terminate your Account upon prior notice via email to the address associated with your Account if (a) your Account has been inactive for one (1) year; or (b) there is a general discontinuance or material modification to the Service or any part thereof. Any such termination or suspension shall be made by Apple in its sole discretion and Apple will not be responsible to you or any third party for any damages that may result or arise out of such termination or suspension of your Account and/or access to the Service, though it will refund pro rata any pre-paid fees or amounts.
Effects of Termination
Upon termination of your Account you will lose all access to the Service and any portions thereof, including, but not limited to, your Account, Apple ID, email account, and Content. In addition, after a period of time, Apple will delete information and data stored in or as a part of your account(s). Any individual components of the Service that you may have used subject to separate software license agreements will also be terminated in accordance with those license agreements.
Links and Other Third Party Materials
Links
Certain Content, components or features of the Service may include materials from third parties and/or hyperlinks to other web sites, resources or Content. Because Apple may have no control over such third party sites and/or materials, you acknowledge and agree that Apple is not responsible for the availability of such sites or resources, and does not endorse or warrant the accuracy of any such sites or resources, and shall in no way be liable or responsible for any Content, advertising, products or materials on or available from such sites or resources. You further acknowledge and agree that Apple shall not be responsible or liable in any way for any damages you incur or allege to have incurred, either directly or indirectly, as a result of your use and/or reliance upon any such Content, advertising, products or materials on or available from such sites or resources.
Google Maps Service
Use of the Google Maps service is subject to the following additional terms: Google Maps Terms of Service available at http://maps.google.com/help/terms_maps.html and Google Maps Legal Notices at http://maps.google.com/help/legalnotices_maps.html.
Disclaimer of Warranties
SOME JURISDICTIONS DO NOT ALLOW THE EXCLUSION OF CERTAIN WARRANTIES, AS SUCH, TO THE EXTENT SUCH EXCLUSIONS ARE SPECIFICALLY PROHIBITED BY APPLICABLE LAW, SOME OF THE EXCLUSIONS SET FORTH BELOW MAY NOT APPLY TO YOU.
APPLE SHALL USE REASONABLE SKILL AND DUE CARE IN PROVIDING THE SERVICE. THE FOLLOWING DISCLAIMERS ARE SUBJECT TO THIS EXPRESS WARRANTY.
APPLE DOES NOT GUARANTEE, REPRESENT, OR WARRANT THAT YOUR USE OF THE SERVICE WILL BE UNINTERRUPTED OR ERROR-FREE, AND YOU AGREE THAT FROM TIME TO TIME APPLE MAY REMOVE THE SERVICE FOR INDEFINITE PERIODS OF TIME, OR CANCEL THE SERVICE IN ACCORDANCE WITH THE TERMS OF THIS AGREEMENT.
YOU EXPRESSLY UNDERSTAND AND AGREE THAT THE SERVICE IS PROVIDED ON AN "AS IS" AND "AS AVAILABLE" BASIS. APPLE AND ITS AFFILIATES, SUBSIDIARIES, OFFICERS, DIRECTORS, EMPLOYEES, AGENTS, PARTNERS AND LICENSORS EXPRESSLY DISCLAIM ALL WARRANTIES OF ANY KIND, WHETHER EXPRESS OR IMPLIED, INCLUDING BUT NOT LIMITED TO THE IMPLIED WARRANTIES OF MERCHANTABILITY, FITNESS FOR A PARTICULAR PURPOSE, AND NON-INFRINGEMENT. IN PARTICULAR, APPLE AND ITS AFFILIATES, SUBSIDIARIES, OFFICERS, DIRECTORS, EMPLOYEES, AGENTS, PARTNERS AND LICENSORS MAKE NO WARRANTY THAT (I) THE SERVICE WILL MEET YOUR REQUIREMENTS; (II) YOUR USE OF THE SERVICE WILL BE TIMELY, UNINTERRUPTED, SECURE OR ERROR-FREE; (III) ANY INFORMATION OBTAINED BY YOU AS A RESULT OF THE SERVICE WILL BE ACCURATE OR RELIABLE; AND (IV) ANY DEFECTS OR ERRORS IN THE SOFTWARE PROVIDED TO YOU AS PART OF THE SERVICE WILL BE CORRECTED.
APPLE DOES NOT REPRESENT OR GUARANTEE THAT THE SERVICE WILL BE FREE FROM LOSS, CORRUPTION, ATTACK, VIRUSES, INTERFERENCE, HACKING, OR OTHER SECURITY INTRUSION, AND APPLE DISCLAIMS ANY LIABILITY RELATING THERETO.
ANY MATERIAL DOWNLOADED OR OTHERWISE OBTAINED THROUGH THE USE OF THE SERVICE IS ACCESSED AT YOUR OWN DISCRETION AND RISK, AND YOU WILL BE SOLELY RESPONSIBLE FOR ANY DAMAGE TO YOUR DEVICE, COMPUTER, OR LOSS OF DATA THAT RESULTS FROM THE DOWNLOAD OF ANY SUCH MATERIAL. YOU FURTHER ACKNOWLEDGE THAT THE SERVICE IS NOT INTENDED OR SUITABLE FOR USE IN SITUATIONS OR ENVIRONMENTS WHERE THE FAILURE OR TIME DELAYS OF, OR ERRORS OR INACCURACIES IN, THE CONTENT, DATA OR INFORMATION PROVIDED BY THE SERVICE COULD LEAD TO DEATH, PERSONAL INJURY, OR SEVERE PHYSICAL OR ENVIRONMENTAL DAMAGE.
Limitation of Liability
SOME JURISDICTIONS DO NOT ALLOW THE EXCLUSION OR LIMITATION OF LIABILITY BY SERVICE PROVIDERS. TO THE EXTENT SUCH EXCLUSIONS OR LIMITATIONS ARE SPECIFICALLY PROHIBITED BY APPLICABLE LAW, SOME OF THE EXCLUSIONS OR LIMITATIONS SET FORTH BELOW MAY NOT APPLY TO YOU.
APPLE SHALL USE REASONABLE SKILL AND DUE CARE IN PROVIDING THE SERVICE. THE FOLLOWING LIMITATIONS DO NOT APPLY IN RESPECT OF LOSS RESULTING FROM (A) APPLE'S FAILURE TO USE REASONABLE SKILL AND DUE CARE; (B) APPLE'S GROSS NEGLIGENCE, WILFUL MISCONDUCT OR FRAUD; OR (C) DEATH OR PERSONAL INJURY.
YOU EXPRESSLY UNDERSTAND AND AGREE THAT APPLE AND ITS AFFILIATES, SUBSIDIARIES, OFFICERS, DIRECTORS, EMPLOYEES, AGENTS, PARTNERS AND LICENSORS SHALL NOT BE LIABLE TO YOU FOR ANY DIRECT, INDIRECT, INCIDENTAL, SPECIAL, CONSEQUENTIAL OR EXEMPLARY DAMAGES, INCLUDING, BUT NOT LIMITED TO, DAMAGES FOR LOSS OF PROFITS, GOODWILL, USE, DATA, COST OF PROCUREMENT OF SUBSTITUTE GOODS OR SERVICES, OR OTHER INTANGIBLE LOSSES (EVEN IF APPLE HAS BEEN ADVISED OF THE POSSIBILITY OF SUCH DAMAGES), RESULTING FROM: (I) THE USE OR INABILITY TO USE THE SERVICE (II) ANY CHANGES MADE TO THE SERVICE OR ANY TEMPORARY OR PERMANENT CESSATION OF THE SERVICE OR ANY PART THEREOF; (III) THE UNAUTHORIZED ACCESS TO OR ALTERATION OF YOUR TRANSMISSIONS OR DATA; (IV) THE DELETION OF, CORRUPTION OF, OR FAILURE TO STORE AND/OR SEND OR RECEIVE YOUR TRANSMISSIONS OR DATA ON OR THROUGH THE SERVICE; (V) STATEMENTS OR CONDUCT OF ANY THIRD PARTY ON THE SERVICE; AND (VI) ANY OTHER MATTER RELATING TO THE SERVICE.
Indemnity
You agree to defend, indemnify and hold Apple, its affiliates, subsidiaries, directors, officers, employees, agents, partners, contractors, and licensors harmless from any claim or demand, including reasonable attorneys’ fees, made by a third party, relating to or arising from: (a) any Content you submit, post, transmit, or otherwise make available through the Service; (b) your use of the Service; (c) any violation by you of this Agreement; (d) any action taken by Apple as part of its investigation of a suspected violation of this Agreement or as a result of its finding or decision that a violation of this Agreement has occurred; or (e) your violation of any rights of another. This means that you cannot sue Apple, its affiliates, subsidiaries, directors, officers, employees, agents, partners, contractors, and licensors as a result of its decision to remove or refuse to process any information or Content, to warn you, to suspend or terminate your access to the Service, or to take any other action during the investigation of a suspected violation or as a result of Apple’s conclusion that a violation of this Agreement has occurred. This waiver and indemnity provision applies to all violations described in or contemplated by this Agreement. This obligation shall survive the termination or expiration of this Agreement and/or your use of the Service. You acknowledge that you are responsible for all use of the Service using your Account, and that this Agreement applies to any and all usage of your Account. You agree to comply with this Agreement and to defend, indemnify and hold harmless Apple from and against any and all claims and demands arising from usage of your Account, whether or not such usage is expressly authorized by you.
Notices
Apple may provide you with notices regarding the Service, including changes to this Agreement, by email to your iCloud email address (and/or other alternate email address associated with your Account if provided), by regular mail, or by postings on our website and/or the Service.
Governing Law
Except to the extent expressly provided in the following paragraph, this Agreement and the relationship between you and Apple shall be governed by the laws of the State of California, excluding its conflicts of law provisions. You and Apple agree to submit to the personal and exclusive jurisdiction of the courts located within the county of Santa Clara, California, to resolve any dispute or claim arising from this Agreement. If (a) you are not a U.S. citizen; (b) you do not reside in the U.S.; (c) you are not accessing the Service from the U.S.; and (d) you are a citizen of one of the countries identified below, you hereby agree that any dispute or claim arising from this Agreement shall be governed by the applicable law set forth below, without regard to any conflict of law provisions, and you hereby irrevocably submit to the non-exclusive jurisdiction of the courts located in the state, province or country identified below whose law governs:
If you are a citizen of:
Governing law and forum:
Any European Union country or Switzerland, Norway or Iceland
The laws and courts of your usual place of residence
Specifically excluded from application to this Agreement is that law known as the United Nations Convention on the International Sale of Goods.
General
This Agreement constitutes the entire agreement between you and Apple, governs your use of the Service and completely replaces any prior agreements between you and Apple in relation to the Service. You may also be subject to additional terms and conditions that may apply when you use affiliate services, third-party content, or third-party software. If any part of this Agreement is held invalid or unenforceable, that portion shall be construed in a manner consistent with applicable law to reflect, as nearly as possible, the original intentions of the parties, and the remaining portions shall remain in full force and effect. The failure of Apple to exercise or enforce any right or provision of this Agreement shall not constitute a waiver of such right or provision. You agree that, except as otherwise expressly provided in this Agreement, there shall be no third-party beneficiaries to this agreement.
CHANGES
Apple reserves the right at any time to modify this Agreement and to impose new or additional terms or conditions on your use of the Service. If you do not agree with them, you must stop using the Service and contact customer support to retrieve your Content. Your continued use of the Service will be deemed acceptance of such modifications and additional terms and conditions.
ELECTRONIC CONTRACTING
Your use of the Service includes the ability to enter into agreements and/or to make transactions electronically. YOU ACKNOWLEDGE THAT YOUR ELECTRONIC SUBMISSIONS CONSTITUTE YOUR AGREEMENT AND INTENT TO BE BOUND BY AND TO PAY FOR SUCH AGREEMENTS AND TRANSACTIONS. YOUR AGREEMENT AND INTENT TO BE BOUND BY ELECTRONIC SUBMISSIONS APPLIES TO ALL RECORDS RELATING TO ALL TRANSACTIONS YOU ENTER INTO ON THIS SERVICE, INCLUDING NOTICES OF CANCELLATION, POLICIES, CONTRACTS, AND APPLICATIONS. In order to access and retain your electronic records, you may be required to have certain hardware and software, which are your sole responsibility.
Last revised: October 12, 2011
© Copyright 2011 Apple Inc. All rights reserved. Less…
It is important that you read and understand the following terms. By clicking "Agree," you are agreeing that these terms will apply if you choose to access or use the iCloud service. More… Содержание
- Создание почты на iPhone
- Создание учетной записи на Mac
- Создание аккаунта на Windows
- Создание через компьютер
- Регистрация на Mac
- Создание через телефон
- Преимущества почты iCloud
- Как создать электронную почту @icloud.com
- Как создать почту iCloud на iPhone и iPad
- Для чего используется
- Создание учетной записи
- Основные функции
- Достоинства облачного сервиса
- Открытие ID на iPhone и iPad
- Топ-3 вопросов от пользователей
- Безопасность на высшем уровне
- Заключение
- Видео-инструкция
Чтобы создать учетную запись Apple на Айфоне, добавьте в настройках аккаунтов профиль Айклауда:
- Откройте раздел «Почта и календари» в настройках.

- Нажмите «Добавить учетную запись».
- Выберите сервис iCloud.

- Нажмите «Создать Apple ID».

- Укажите дату рождения, имя и фамилию. Указывайте реальные сведения, так как они могут понадобиться при восстановлении доступа к iCloud на iPhone в случае утери пароля.
- Выберите получение бесплатного адреса e-mail в iCloud.
- Напишите имя новой учетной записи. Если его невозможно использовать, вы получите об этом уведомление. В таком случае выберите другое имя.
- Введите пароль от аккаунта. Чтобы сделать его безопасным, следуйте рекомендациям — не менее 8 символов, минимум одна цифра, одна строчная буква и одна прописная буква.
- Выберите контрольные вопросы и напишите ответы. Это гарантирует восстановление пароля при его потере.
- Укажите резервный e-mail, который при необходимости также будет использован для восстановления доступа к iCloud.
- Включите «Обновления», чтобы получать апдейты и новости Apple.
- Прочтите и примите Условия и положения.
- Подтвердите адрес резервного e-mail.
Можно создать несколько учетных записей iCloud и переключаться между ними на устройстве. Адрес e-mail на iCloud одновременно является идентификатором Apple ID, то есть с его помощью вы получаете доступ к хранилищу iCloud, App Store, функции Найти iPhone, iMessage, FaceTime и другим функциям. Чтобы активировать Apple ID, подключите бесплатный аккаунт в меню «iCloud» в настройках iPhone.
Создание учетной записи на Mac
Создавать учетные записи iCloud можно на в среде OS X на Mac. Разберемся, как создать почту и активировать аккаунт Apple ID:
- Откройте системные настройки.
- Зайдите в раздел «iCloud». Нажмите «Создать Apple ID».
- Укажите страну проживания и дату рождения. Данные никто проверять не будет, но рекомендуется вписывать реальные сведения, или запоминать информацию — она пригодится при восстановлении пароля.
- Выберите получение бесплатного адреса в iCloud. Впишите имя почтового ящика, имя, фамилию и дважды пароль.
- Выберите 3 вопроса и дайте на них ответы. Обязательно укажите резервный e-mail.
- Подтвердите резервный e-mail.
Чтобы создаваемые на Mac аккаунты можно было использовать в качестве Apple ID, подключите их в меню «iCloud» в системных настройках Mac.
Создание аккаунта на Windows
Зарегистрировать Apple ID можно с любого устройства через веб-интерфейс. Чтобы на iCloud создать новую учетную запись на Windows:
- Запустите браузер, откройте сайт iCloud.
- В строке «Нет Apple ID» нажмите «Создать».
- Введите имя, фамилию, страну проживания и дату рождения.
- Укажите имя Apple ID (действующий e-mail, к которому вы имеете доступ)и пароль.
- Выберите контрольные вопросы и введите ответы.
- Напишите символы с картинки и нажмите «Продолжить».
На указанный e-mail будет отправлено письмо со ссылкой для подтверждения регистрации. Как видите, создать почту iCloud на Windows нельзя, зато вы можете использовать адрес с другого почтового сервиса в качестве идентификатора и получить доступ к некоторым приложениям Apple.
Если вы создавали Apple ID с компьютера на Windows, то для полноценного использования учетной записи вам тоже придется активировать ее через настройки iPhone, iPad или Mac. Это касается и регистрации в программу iCloud для Windows.
Учетная запись ICloud – облачное хранилище компании Apple, облегчающее жизнь владельцам смартфонов и планшетов с операционной системой iOS и компьютерам, работающим на MacOS. Сервис позволяет хранить личные данные и перезаписывать резервные копии хранящейся на внутренней памяти информации, составлять заметки и офисные документы, синхронизировать контакты и даже общаться – аккаунт в iCloud позволяет писать и принимать письма в формате стандартной электронной почты.
Набор возможностей впечатляющий, но даже столь внушительный список меркнет на фоне функции найти «iPhone (iPad, iPod и Mac)», позволяющей в режиме реального времени отслеживать местоположение потерянного или украденного устройства, а заодно – удаленно блокировать личные данные. Тотальная безопасность и максимальный комфорт. Ну, как, в таком случае, отказываться от iCloud? Не настало ли время стать полноправным последователем сервиса?
Содержание
Создание через компьютер
Создание iCloud аккаунта для операционной системы Windows начинается на официальном сайте iCloud:
- На главной странице в нижней части открытого окна браузера необходимо найти кнопку «Создать Apple ID»;
- На экране тут же появится информационный блок с громадным количеством пустых текстовых полей, которые, разумеется, придется заполнить правдивой информацией (проверять веденные данные никто, конечно же, не станет, но если в дальнейшем зарегистрированная учетная запись станет основной, то придется или все менять в настройках, или же, в случае потери доступа, тысячу раз доказывать службе поддержке из Apple собственную правоту);
- Имя, Фамилия, текущее местоположение, дата рождения – тут стандартно. Заполнить каждую графу разрешают или на русском, или на английском, тут уж как нравится;
- С Apple ID тоже все предсказуемо – подойдет любое имя или прозвище, введенное на английском и разделенное собачкой «@». С паролем сложнее – нужно придумать комбинацию из 6-8 символов с заглавной и строчными буквами. Для дополнительной уверенности в безопасности личных данных, стоит продумать все до мелочей!
- Последняя часть регистрации – выбрать три контрольных вопроса (вариантов масса – название любимого футбольного клуба, номер школы, прозвище дворовой кошки, главное запомнить или записать ответы, ведь иногда через контрольные вопросы Apple позволяет подтвердить факт владения аккаунтом), расставить галочки напротив информационных подписок (анонсы новинок, рекомендации о подходящем развлекательном контенте и прочее), и ввести символы с изображения капчи.
Все необходимые действия – осуществлены. Но доступ к основным сервисам iCloud не откроется до тех пор, пока с помощью зарегистрированного аккаунта не будет осуществлена авторизация на iPhone, iPad, iPod или Mac. Соответственно, регистрация на компьютере решат одну проблему – позволяет сэкономить кучу времени при работе с данными и текстом (физическая клавиатура всяко удобнее электронной!).
Регистрация на Mac
- Открыть панель с системными «Настройками» операционной системы;
- Выбрать раздел «iCloud», нажать на доступный пункт меню «Создать Apple ID»;
- Приступить к заполнению личных данных. Выбрать страну, дату рождения, заполнить текстовые поля с именем и фамилией. Данные, как и в остальных случаях, важно запоминать!
- Следующий этап – генерация нового e-mail в сервисе iCloud, затем останется снова выбрать контрольные вопросы и ответы, а после – указать резервный почтовый ящик для связи и, как инструмент для дополнительной защиты личных данных;
- Последний штрих – пройти авторизацию, используя получившийся аккаунт, в тех же настройках.
Создание через телефон
Если компьютера под рукой не оказалось, то повторить описанный выше порядок действий можно и на смартфоне, главное не отставать от инструкции:
- Начинается алгоритм из раздела «Настройки», пункта «Пароли и учетные записи»;
- В появившемся меню разработчики из Apple предлагают взаимодействовать (просматривать, редактировать и даже пересылать) с сохраненными паролями и доступными аккаунтами электронной почты. iCloud тут уже доступен (так как является частью идентификатора Apple ID и позволяет провести активацию мобильной техники при первом включении). Но, если по каким-то причинам понадобился новый аккаунт iCloud, то придется нажать на пункт меню «Добавить учетную запись»;
- Следующий шаг – выбрать из раскрывшегося меню наиболее подходящий вариант;
- Дальше остается нажать на вариант «создать Apple ID» и приступить к заполнению личной информации;
- Пройтись придется по совершенно разным блокам – тут и выбор имени и фамилии, и необходимость указать дату рождения, и обязательно выбор паролей с прозвищами, да даже текущее местоположение и то попросят назвать. Дело ни в коем случае не завершится без выбора контрольных вопросов (ответы на которые стоит обязательно сохранить в каком-нибудь запылившемся блокноте или ежедневнике, на всякий случай);
- Последний штрих – выбрать, на какие сервисы хочется подписаться, а заодно добавить дополнительный адрес электронной почты, если возникнут проблемы с восстановлением логина или пароля, то с помощью дополнительного профиля связать со службой поддержки станет намного проще;
- После регистрации останется принять все условия и требования сервиса и приступить к работе.
Важно! Разработчики из Apple разрешают взаимодействовать с разными профилями iCloud (то есть, Apple ID), спокойно переключаясь между профилями в разделе с «Настройками» (меню авторизации расположено прямо в верхней части, рядом с именем текущего аккаунта.
Каждый из перечисленных способов прекрасно справляется с задачей и позволяет всего за несколько минут открыть доступ к обширнейшим возможностям сервиса iCloud. Осталось посвятить немного времени регистрации через Windows, MacOS или портативные устройства с iOS.
Электронная почта из инструмента для общения превратилась в средство первой необходимости: мы используем ее для общения с друзьями, для построения и развития бизнеса, для регистрации на различных сайтах и доступа к платежным системам и интернет-банкингу. Современному пользователю без электронной почты не обойтись, поклоннику устройств и сервисов Apple не обойтись без адреса электронной почты с @icloud.com на конце.
Под катом информация как создать почту iCloud на iPhone/iPad и компьютерах Mac, и активировать учетную запись iCloud.
Содержание:
- Как создать электронную почту @icloud.com в iOS на iPhone и iPad.
- Как создать электронную почту iCloud в OS X на компьютере Mac.
- Как зарегистрировать адрес электронной почты @icloud.com на компьютере Windows.
iCloud пришел на смену интернет-сервису MobileMe и доступен пользователям 12 октября 2011 года. С этого момента каждый владелец iPhone, iPad и компьютера Mac может зарегистрировать адрес электронной почты в зоне @icloud.com и использовать почтовую службу Apple вместе с другими функциями облачного сервиса (Найти iPhone, облачное резервное копирование, синхронизация контактов, заметок, календаря, фото, закладок Safari).
Преимущества почты iCloud
Нужна ли вам почта iCloud решайте сами, у меня она есть и вот почему:
- Бесплатная (только 5 ГБ, все что свыше — за отдельную плату).
- Полностью отсутствует реклама (Gmail и Яндекс отдыхают).
- Глубоко интегрирована в iOS (iPhone и iPad) и OS X (компьютеры Mac).
- Можно создавать псевдонимы для борьбы со спамом (виртуальные почтовые ящики).
Как создать электронную почту @icloud.com
Зарегистрировать учетную запись электронной почты iCloud.com можно только на устройствах от компании Apple: iPhone, iPod Touch и iPad c iOS 5.0 и выше, и компьютерах Mac с OS X Lion 10.7.4 или более поздней версии. На Windows-ПК создать адрес @icloud.com нельзя.
Существует 2 способа создания почты iCloud:
- в iOS на iPhone и iPad;
- в OS X на компьютере Mac.
Как создать почту iCloud на iPhone и iPad
Подключите iPhone или iPad к интернету (желательно по Wi-Fi или 3G, хотя и GPRS для регистрации сгодится).
- Перейдите в «Настройки -> Почта, адреса, календари -> Добавить учетную запись» и выберите тип учетной записи «iCloud».
- Нажмите на «Создать Apple ID», укажите дату своего рождения, а также Имя и Фамилию. Советую указывать реальные данные, они понадобятся при обращении в службу поддержки Apple для подтверждения вашей личности при восстановлении пароля к Apple ID.
- На странице «Apple ID» выберите пункт «Получить беспл. e-mail в iCloud» и нажмите «Далее».
- Укажите имя для вашего почтового ящика, нажмите «Далее» и подтвердите создание адреса электронной почты.
- Если выбранное вами имя уже занято, при проверке вы будете уведомлены об этом соответствующим сообщением. В этом случае выберите другое имя.
- Дважды укажите пароль к почтовому ящику. Обратите внимание на качество пароля для Apple ID:
- должен быть из 8 и более символов.
- должен содержать как минимум одну цифру, одну прописную и одну строчную буквы. Например такой: «49MJWDdQ».
Если вы забудете или потеряете пароль к своей учетной записи, его легко изменить.
- Далее выберите 3 контрольных вопроса и ответьте на них. Опять же советую выбирать вопросы, ответы на которые вы хорошо помните и указывать правильные ответы. Это гарантирует вам успешное восстановление пароля к вашей учетной записи (есть 2 способа как изменить пароль к Apple ID, один из них при помощи ответов на контрольные вопросы).
- Укажите резервный адрес электронной почты, который будет использоваться для вашей идентификации или восстановления пароля к учетной записи и нажмите «Далее». Данный e-mail используется в целях обеспечения безопасности.
- Включите выключатель «Обновления» и получайте новости и программные обновления Apple, а также свежую информацию о продуктах и услугах Apple.
- Ознакомьтесь с Условиями и положениями. Без их принятия зарегистрировать почту iCloud вы не сможете, поэтому если вы приняли решение пользоваться продуктами и сервисами Apple документ можете не читать — жмите «Принять», а затем подтвердите.
- На этом регистрация адреса электронной почты @icloud.com завершена. Резервный адрес электронной почты необходимо подтвердить, для этого перейдите по ссылке из соответствующего уведомления и введите зарегистрированный e-mail и пароль.


Адрес электронной почты @icloud.com является одновременно и идентификатором Apple ID. Его можно использовать для доступа функциям и службам Apple: магазин App Store, iCloud, Найти iPhone, FaceTime, iMessage, Game Center и другие. Полный список служб и функций Apple, доступ к которым осуществляется с помощью Apple ID доступен по ссылке. Для того, чтобы использовать зарегистрированный e-mail в качестве Apple ID, активируйте учетную запись Apple ID — подключите ее в настройках iPhone в меню iCloud.
Идентификатор Apple ID, оканчивающийся на @icloud.com, является более безопасным и в случае если вашу учетную запись взломают (подберут пароль), злоумышленники не смогут его изменить (адрес электронной почты оканчивающийся на @icloud.com, @me.com или @mac.com изменить невозможно). Пароль всегда можно сбросить при помощи резервного адреса электронной почты, ответив на контрольные вопросы, или с помощью службы поддержки Apple. При обращении в службу поддержки необходимо подтвердить свою личность — указать дату рождения, Имя и Фамилию.
Подключите учетную запись @icloud.com в настройках вашего iPhone, iPad и компьютера Mac в меню «iCloud» и никто, и никогда не сможет удаленно заблокировать ваше устройство с помощью функции «Найти iPhone» (включить режим пропажи) и блокировки активации, и не получит доступ к вашим фото, контактам, заметкам, календарю, связке ключей и резервным копиям хранящимся в iCloud.
Как создать почту iCloud на компьютере Mac
Для того, чтобы зарегистрировать адрес электронной почты @icloud.com в среде OS X на Mac:
- Перейдите в «Системные настройки» в меню «iCloud» и нажмите на надписи «Создать Apple ID».
- Выберите страну проживания и укажите полную дату вашего рождения. В очередной раз советую вводить реальные данные, чтобы при необходимости иметь возможность подтвердить свою личность при обращении в службу поддержки Apple.
- В строке «Apple ID» выберите пункт «Получить бесплатно e-mail в iCloud», в поле «E-mail» укажите «именную часть» почтового ящика, а затем Имя, Фамилию и пароль к учетной записи. Если вы хотите подписаться на рассылку новостей о продуктах и услугах Apple установите галочку в соответствующем поле и нажмите «Далее».
- Выберите 3 контрольных вопроса и дайте на них ответы, которые не забудете ни при каких обстоятельствах (необходимы для доступа к настройкам безопасности Apple ID и сброса пароля). Укажите резервный адрес электронной почты и нажмите «Далее».


Адрес электронной почты @icloud.com будет успешно зарегистрирован, о чем вы получите соответствующее уведомление. Для того, чтобы подтвердить резервный адрес электронной почты, перейдите по ссылке из письма и введите e-mail и пароль.
Если вы хотите использовать зарегистрированный адрес электронной почты в качестве идентификатора Apple ID для загрузки контента из App Store и iTunes Store, синхронизации контактов, фото, заметок, календаря, закладок Safari, связки ключей и функции «Найти iPhone», подключите учетную запись на Mac в системных настройках в меню «iCloud».
Как зарегистрировать адрес электронной почты @icloud.com на компьютере Windows
Создать почту iCloud на компьютере под управлением ОС Windows невозможно и никуда от этого не деться. Предварительно зарегистрируйте почтовый ящик @icloud.com на iPhone, iPad или компьютере Mac (как это сделать читайте выше), а затем через веб-браузер в среде Windows перейдите на сайт icloud.com в веб-приложение «Mail» (Почта).
Создать почту iCloud может любой желающий, она бесплатная (5 ГБ свободного пространства на сервере Apple), не содержит рекламы и эффективна в борьбе со спамом. Неудобства доставляет лишь то, что зарегистрировать адрес @icloud.com можно только на устройствах Apple: iPhone, iPad или Mac, подключенных к интернету.
Для чего используется
Учетная запись в iCloud — это главный идентификатор пользователя. Она используется во всех сервисах яблочной компании, а также для активации фирменных гаджетов. Сторонний пользователь не сможет самостоятельно выйти из вашего аккаунта, что позволяет обезопасить устройство.
Также Apple ID используется для удаленного доступа к потерянному устройству. В ранее опубликованной статье мы рассказывали о том, как это сделать.
Создание учетной записи
Зарегистрировать новый профиль на компьютере можно двумя способами. Рассмотрим каждый из них более подробно.
Через сайт
Чтобы создать аккаунт через ПК, необходимо выполнить следующие действия:
- Зайдите на сайт профиля Apple → «Создание Apple ID».
- Заполните поля в регистрационном окне:
- ФИО;
- дата рождения;
- почтовый ящик;
- контрольные вопросы;
- и т.д.
- Нажмите «Продолжить».
- Введите проверочный код с почтового ящика → «Продолжить».
- Учетная запись создана.
Обратите внимание! В окне сайта можно изменить свои данные и способ оплаты.
Через iTunes
Второй способ — регистрация через сервис iTunes.
Обратите внимание! Для примера используется MacOS с встроенной программой. Если у вас Windows — установите iTunes.
- Откройте программу → вкладка «Учетная запись» → «Войти».
- Создать новый Apple ID.
- Заполните формы в окне → нажмите «Продолжить».
- Заполните вторую форму с расширенной информацией → нажмите «Продолжить».
- Выберите способ оплаты → нажмите «Продолжить»
- Примите лицензионное соглашение.
- Введите код, который пришел на email → «Подтвердить».
- Готово.

Айклауд — это фирменное облачное хранилище, которое с 12.10.2011 находится в свободном доступе для всех владельцев Эпл (достойная замена когда-то популярному MobileMe). Создать учётную запись icloud благодаря приведённому ниже руководству можно всего за несколько минут.
Сервис делает личный контент доступным для всех смартфонов, планшетов или ПК, подключённых к одному общему Apple ID. В облаке можно безопасно сохранять копии практически всех данных, которые хранятся в локальной памяти гаджета. Изменения, внесённые в айклауд, автоматически применяться во всех синхронизированных устройствах.
Далее поговорим о достоинствах «облака», а также узнаем, как создать айклауд на айфон и не только.
Основные функции
Нужен электронный ящик или дополнительное место для своих медиафайлов? Тогда Вам стоит пройти регистрацию в системе. Используйте её для:
- ведения неформальной переписки с друзьями и родственниками;
- делового общения с коллегами и начальством;
- авторизации на различных ресурсах;
- доступа к онлайн-банкингу и различным электронным платёжным системам.

Среди других полезных функций:
- поиск айфона (в случае кражи телефона можно удалённо зайти в его систему и удалить важные файлы, а также полностью заблокировать его);
- резервное копирование файлов;
- приложение, позволяющее отслеживать локации определённых людей (для осуществления своеобразной слежки понадобится соглашение пользователей);
- синхронизация из: списка контактов, закладок Safari, фотографий, заметок, календаря.
Как видите, данный ресурс — это целый комплекс полезных функций, делающих использование современных «яблочных» гаджетов ещё удобнее и эффективнее. При покупке подержанной техники (или в силу других причин) «реквизиты» аккаунта могут потеряться. Не лишайте себя всех преимуществ современных технологий, ведь получить новый apple id можно в течение нескольких минут! Далее — подробнее о преимуществах.
Достоинства облачного сервиса

Почему следует создать учетную запись icloud, и чем она отличается от альтернативных вариантов? Достаточно привести всего три преимущества рассматриваемого объекта:
- бесплатное пользование продуктом (максимум 5 ГБ места, хотите больше — платите по специальному тарифу);
- нет надоедливой рекламы, чего не скажешь о Gmail и, тем более, Яндексе;
- доступен эффективный механизм для борьбы со спамом (псевдонимы, виртуальные почтовые ящики).
Открытие ID на iPhone и iPad
@icloud.com — идентификатор Эпл айди, при помощи которого можно быстро аутентифицироваться в магазинах Апп Стор, Гейм Центр и других фирменных службах. Для этого следует активировать ID, подключив учетную запись icloud на айфоне.

«Облако» позволяет существенно экономить средства. К примеру, больше не нужно платить деньги, чтобы установить дорогостоящее приложение из официального магазина. Для этого достаточно узнать данные айди своего друга/родственника, который уже проплатил программу, и зайти в его «учётку» со своего телефона. Но этот способ не всегда удобен в силу нескольких причин. У Вас, как минимум, может не оказаться вышеупомянутого друга с нужным приложением.
Инструкция

Как зарегистрироваться в icloud с собственного телефона или планшета? Следуйте простому алгоритму:
- Подключитесь к сети Интернет.
- Зайдите в «Настройки», затем в раздел почты и календарей. Добавьте новый аккаунт в соответствующем поле (отметьте тип аккаунта как ай-клауд).
- Сделайте свой ID. Укажите дату рождения, имя и фамилию. На этом этапе юзеры часто делают серьёзную ошибку, указывая неправдивые имена и т.д. Помните, для восстановления кода от «учётки» понадобится подтвердить свою личность. Сделать это с вымышленным именем будет достаточно сложно.
- Кликните на «Получить беспл. e-mail в айклауд».
- Запишите имя будущего адреса (здесь можно изощряться как угодно).
- Укажите код для нового ящика. Будьте внимательны, комбинация знаков должна соответствовать следующим параметрам:
- быть не короче восьми символов (можно и желательно больше);
- вмещать в себя не менее одной цифры, прописной и строчной буквы. Результат должен выглядеть примерно так: «2727аmАD». Не тратьте излишне времени на придумывание комбинации — в будущем Вы сможете легко изменить её.
- Выберите три контрольных вопроса и дайте на них ответы. Процедура обеспечивает дополнительную ступень защиты. Указанные ответы в своё время могут понадобиться для восстановления пароля.
- Введите виртуальный почтовый адрес, которым уже пользуетесь. Он будет резервным, и понадобится для Вашей аутентификации и восстановления пароля (когда завершите процесс, подтвердите запасной ящик. Для этого перейдите по ссылке в письме, которое поступит по указанному Вами адресу).
- Включите «обновления» для регулярного получения новостей, программных обновлений и новых сведениях о продуктах американской корпорации.
- Внимательно прочитайте основные положения об использовании продукта. Нажмите на кнопку «Принять».
- Регистрация завершена!
Как видите, абсолютно каждый человек без какой-либо базы знаний может создать учетную запись icloud.
Топ-3 вопросов от пользователей

№1: «Как выйти из старого аккаунта?»
Перейдите в настройки, затем в «облако». Прокрутив страничку вниз, увидите надпись: «Выйти». Смело нажимайте на эту кнопку (в некоторых версиях iOS необходимо кликнуть на «Удалить учётную запись»).
№2: «Как зарегистрироваться в icloud с настольного компьютера Мас?»
Для этого устройства инструкция идентична вышеописанной. Чтобы сделать это на ПК, перейдите в «Системные настройки», а затем в «ай-клауд».
№3: «А что насчёт входа с ПК Windows?»
Ресурс доступен только для брендовой продукции. Поэтому установить icloud на компьютере с Windows не удастся. Но Вы можете сделать это, к примеру, с айфона, а затем через стандартный браузер на ПК перейти на сайт Интернет-сервиса. Там Вы найдёте приложение, в котором можно будет открыть icloud-аккаунт, зарегистрированный ранее.
Безопасность на высшем уровне
Почему всё больше людей отдают предпочтение именно Эпл ID, а не другим идентификаторам? Он гарантирует высокий уровень безопасности личных данных. Даже если профиль будет взломан путём подбора пароля, изменить и заполучить новый apple id мошенникам не удастся. А пароль Вы сможете сбросить в любое время. Как создать новый код? Для его изменения воспользуйтесь:
- отправкой соответствующего письма на запасную почту;
- ответами на те контрольные вопросы, которые выбирались при регистрации;
- службой поддержки компании.
Усиливайте уровень безопасности своего устройства, подключив новый аккаунт в настройках своего смартфона, айпада или ПК (Мас) в меню облака. После этого никому не удастся заблокировать Вас в удалённом режиме. А это значит, что все личные данные (фотографии, заметки, номера мобильных и так далее) останутся доступными лишь Вам.
Заключение

Надеюсь вы по достоинству оценили старания инженеров американской компании, заботящихся о простой процедуре регистрации новых владельцев умной техники. Процедура не сложна, для знакомых с компьютерами, людьми, 5-10 минут времени и вы получаете полноценно действующий смартфон.
Если есть еще вопросы, внизу оставлю видео-инструкцию, по ней вы в деталях разберетесь в механизме конфигурации.
Видео-инструкция
Используемые источники:
- http://profiapple.ru/ios/instrukcii/uchetnye-zapisi/sozdanie-uchetnoj-zapisi-icloud-na-iphone-mac-i-windows.html
- https://myapples.ru/icloud/sozdat
- https://iphonegeek.me/instructions/dlya-chajnikov/1028-pochta-icloud-kak-zaregistrirovat-adres-elektronnoy-pochty-icloudcom-na-iphone-ipad-kompyutere-mac-i-windows.html
- https://geekon.media/sozdanie-apple-id-na-kompyutere/
- https://inform59.ru/sozdat-uchetnuyu-zapis-icloud/
Как просто и быстро создать рабочий аккаунт iCloud
На чтение 5 мин. Просмотров 4k. Опубликовано 06.07.2018
Учетная запись ICloud – облачное хранилище компании Apple, облегчающее жизнь владельцам смартфонов и планшетов с операционной системой iOS и компьютерам, работающим на MacOS. Сервис позволяет хранить личные данные и перезаписывать резервные копии хранящейся на внутренней памяти информации, составлять заметки и офисные документы, синхронизировать контакты и даже общаться – аккаунт в iCloud позволяет писать и принимать письма в формате стандартной электронной почты.
Набор возможностей впечатляющий, но даже столь внушительный список меркнет на фоне функции найти «iPhone (iPad, iPod и Mac)», позволяющей в режиме реального времени отслеживать местоположение потерянного или украденного устройства, а заодно – удаленно блокировать личные данные. Тотальная безопасность и максимальный комфорт. Ну, как, в таком случае, отказываться от iCloud? Не настало ли время стать полноправным последователем сервиса?
Содержание
- Создание через компьютер
- Регистрация на Mac
- Создание через телефон
Создание через компьютер
Создание iCloud аккаунта для операционной системы Windows начинается на официальном сайте iCloud:
- На главной странице в нижней части открытого окна браузера необходимо найти кнопку «Создать Apple ID»;
- На экране тут же появится информационный блок с громадным количеством пустых текстовых полей, которые, разумеется, придется заполнить правдивой информацией (проверять веденные данные никто, конечно же, не станет, но если в дальнейшем зарегистрированная учетная запись станет основной, то придется или все менять в настройках, или же, в случае потери доступа, тысячу раз доказывать службе поддержке из Apple собственную правоту);
- Имя, Фамилия, текущее местоположение, дата рождения – тут стандартно. Заполнить каждую графу разрешают или на русском, или на английском, тут уж как нравится;
- С Apple ID тоже все предсказуемо – подойдет любое имя или прозвище, введенное на английском и разделенное собачкой «@». С паролем сложнее – нужно придумать комбинацию из 6-8 символов с заглавной и строчными буквами. Для дополнительной уверенности в безопасности личных данных, стоит продумать все до мелочей!
- Последняя часть регистрации – выбрать три контрольных вопроса (вариантов масса – название любимого футбольного клуба, номер школы, прозвище дворовой кошки, главное запомнить или записать ответы, ведь иногда через контрольные вопросы Apple позволяет подтвердить факт владения аккаунтом), расставить галочки напротив информационных подписок (анонсы новинок, рекомендации о подходящем развлекательном контенте и прочее), и ввести символы с изображения капчи.
Все необходимые действия – осуществлены. Но доступ к основным сервисам iCloud не откроется до тех пор, пока с помощью зарегистрированного аккаунта не будет осуществлена авторизация на iPhone, iPad, iPod или Mac. Соответственно, регистрация на компьютере решат одну проблему – позволяет сэкономить кучу времени при работе с данными и текстом (физическая клавиатура всяко удобнее электронной!).
Регистрация на Mac
- Открыть панель с системными «Настройками» операционной системы;
- Выбрать раздел «iCloud», нажать на доступный пункт меню «Создать Apple ID»;
- Приступить к заполнению личных данных. Выбрать страну, дату рождения, заполнить текстовые поля с именем и фамилией. Данные, как и в остальных случаях, важно запоминать!
- Следующий этап – генерация нового e-mail в сервисе iCloud, затем останется снова выбрать контрольные вопросы и ответы, а после – указать резервный почтовый ящик для связи и, как инструмент для дополнительной защиты личных данных;
- Последний штрих – пройти авторизацию, используя получившийся аккаунт, в тех же настройках.
Создание через телефон
Если компьютера под рукой не оказалось, то повторить описанный выше порядок действий можно и на смартфоне, главное не отставать от инструкции:
- Начинается алгоритм из раздела «Настройки», пункта «Пароли и учетные записи»;
- В появившемся меню разработчики из Apple предлагают взаимодействовать (просматривать, редактировать и даже пересылать) с сохраненными паролями и доступными аккаунтами электронной почты. iCloud тут уже доступен (так как является частью идентификатора Apple ID и позволяет провести активацию мобильной техники при первом включении). Но, если по каким-то причинам понадобился новый аккаунт iCloud, то придется нажать на пункт меню «Добавить учетную запись»;
- Следующий шаг – выбрать из раскрывшегося меню наиболее подходящий вариант;
- Дальше остается нажать на вариант «создать Apple ID» и приступить к заполнению личной информации;
- Пройтись придется по совершенно разным блокам – тут и выбор имени и фамилии, и необходимость указать дату рождения, и обязательно выбор паролей с прозвищами, да даже текущее местоположение и то попросят назвать. Дело ни в коем случае не завершится без выбора контрольных вопросов (ответы на которые стоит обязательно сохранить в каком-нибудь запылившемся блокноте или ежедневнике, на всякий случай);
- Последний штрих – выбрать, на какие сервисы хочется подписаться, а заодно добавить дополнительный адрес электронной почты, если возникнут проблемы с восстановлением логина или пароля, то с помощью дополнительного профиля связать со службой поддержки станет намного проще;
- После регистрации останется принять все условия и требования сервиса и приступить к работе.
Важно! Разработчики из Apple разрешают взаимодействовать с разными профилями iCloud (то есть, Apple ID), спокойно переключаясь между профилями в разделе с «Настройками» (меню авторизации расположено прямо в верхней части, рядом с именем текущего аккаунта.
Каждый из перечисленных способов прекрасно справляется с задачей и позволяет всего за несколько минут открыть доступ к обширнейшим возможностям сервиса iCloud. Осталось посвятить немного времени регистрации через Windows, MacOS или портативные устройства с iOS.
Учетная запись iCloud представляет собой почтовый аккаунт, который предоставляет доступ к большому количеству функций iOS, являясь одновременно идентификатором Apple ID. На iCloud создать учетную запись можно через телефон или компьютер.
Создание почты на iPhone
Чтобы создать учетную запись Apple на Айфоне, добавьте в настройках аккаунтов профиль Айклауда:
- Откройте раздел «Почта и календари» в настройках.
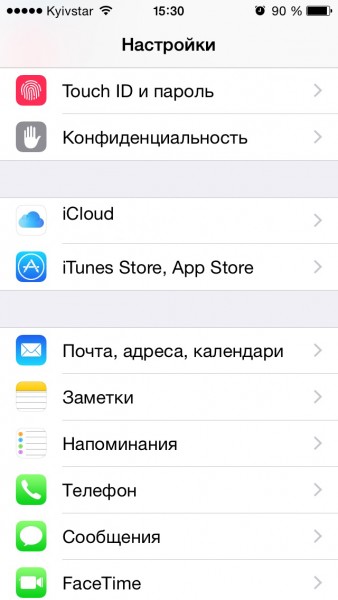
- Нажмите «Добавить учетную запись».
- Выберите сервис iCloud.
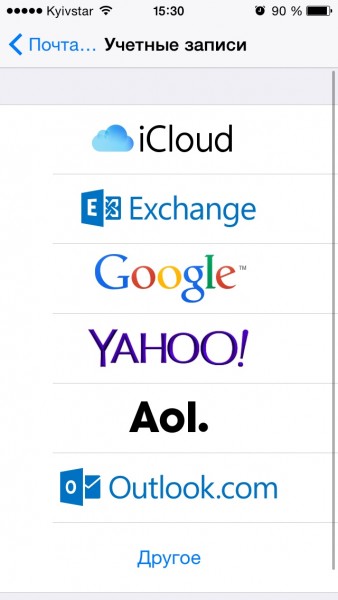
- Нажмите «Создать Apple ID».
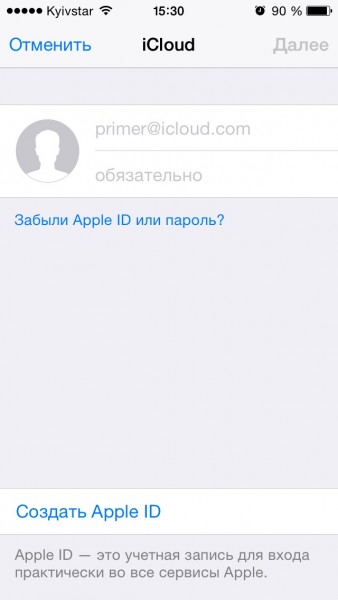
- Укажите дату рождения, имя и фамилию. Указывайте реальные сведения, так как они могут понадобиться при восстановлении доступа к iCloud на iPhone в случае утери пароля.

- Выберите получение бесплатного адреса e-mail в iCloud.
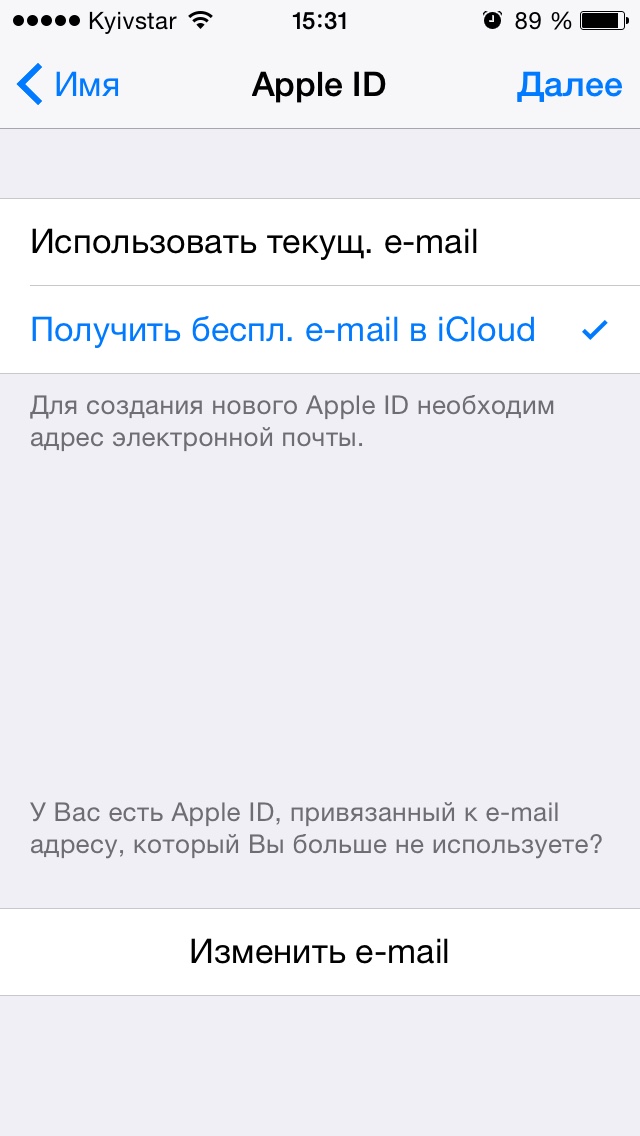
- Напишите имя новой учетной записи. Если его невозможно использовать, вы получите об этом уведомление. В таком случае выберите другое имя.
- Введите пароль от аккаунта. Чтобы сделать его безопасным, следуйте рекомендациям — не менее 8 символов, минимум одна цифра, одна строчная буква и одна прописная буква.
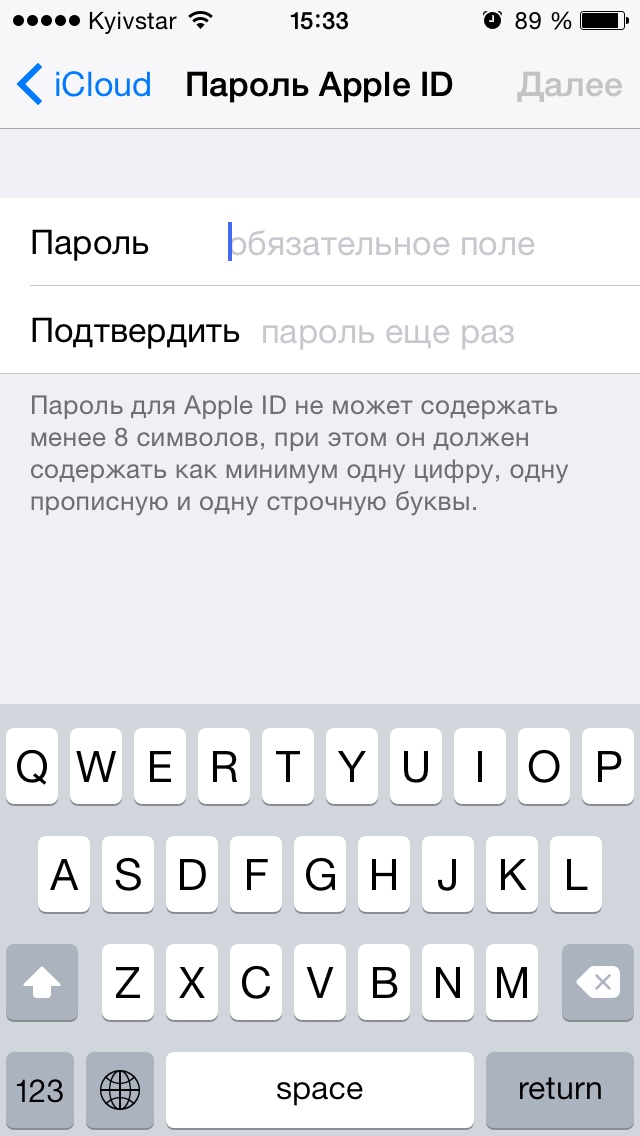
- Выберите контрольные вопросы и напишите ответы. Это гарантирует восстановление пароля при его потере.
- Укажите резервный e-mail, который при необходимости также будет использован для восстановления доступа к iCloud.
- Включите «Обновления», чтобы получать апдейты и новости Apple.
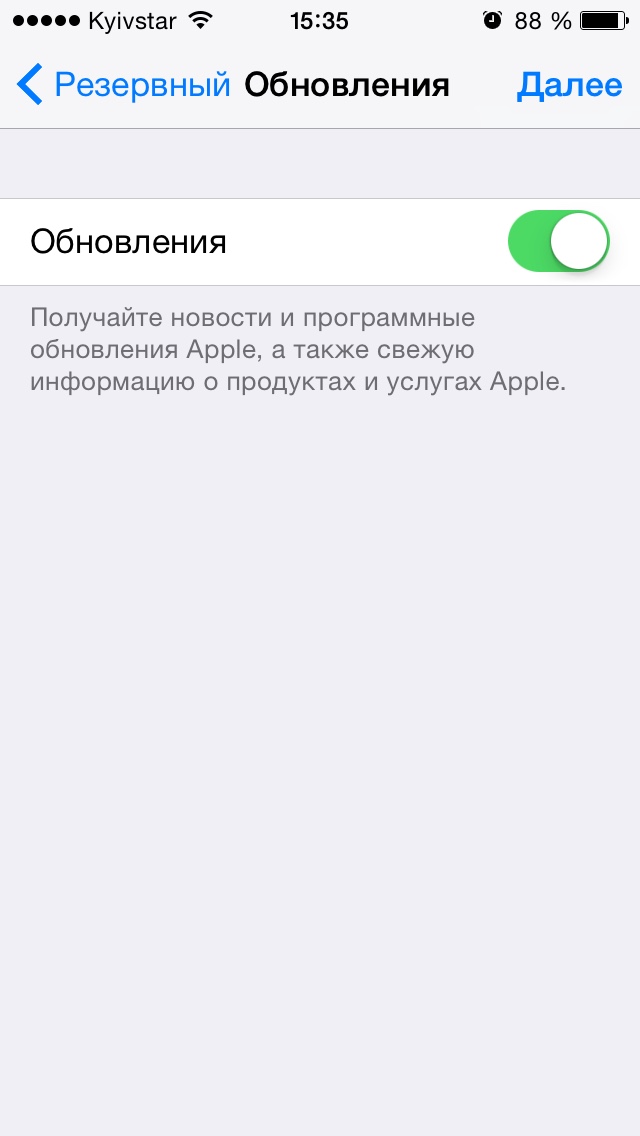
- Прочтите и примите Условия и положения.
- Подтвердите адрес резервного e-mail.
Можно создать несколько учетных записей iCloud и переключаться между ними на устройстве. Адрес e-mail на iCloud одновременно является идентификатором Apple ID, то есть с его помощью вы получаете доступ к хранилищу iCloud, App Store, функции Найти iPhone, iMessage, FaceTime и другим функциям. Чтобы активировать Apple ID, подключите бесплатный аккаунт в меню «iCloud» в настройках iPhone.
Создание учетной записи на Mac
Создавать учетные записи iCloud можно на в среде OS X на Mac. Разберемся, как создать почту и активировать аккаунт Apple ID:
- Откройте системные настройки.
- Зайдите в раздел «iCloud». Нажмите «Создать Apple ID».
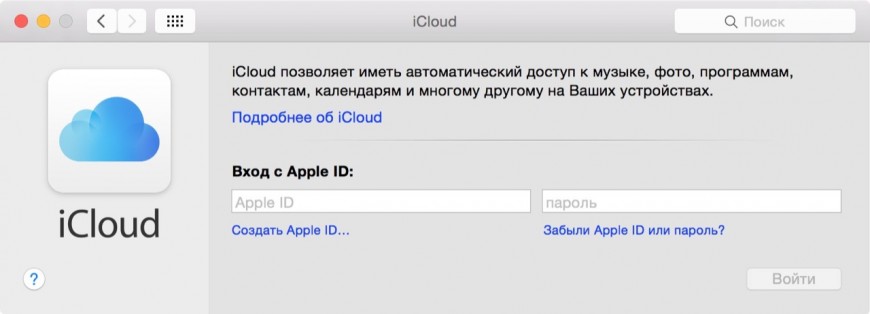
- Укажите страну проживания и дату рождения. Данные никто проверять не будет, но рекомендуется вписывать реальные сведения, или запоминать информацию — она пригодится при восстановлении пароля.
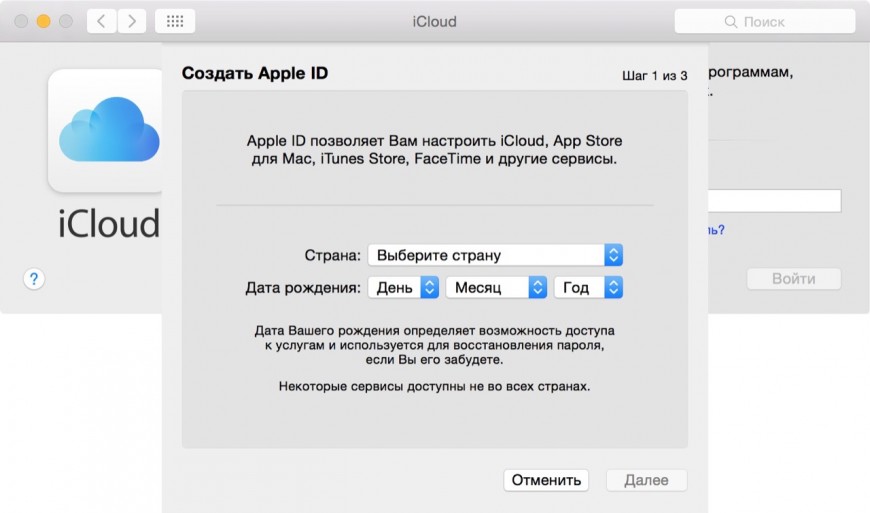
- Выберите получение бесплатного адреса в iCloud. Впишите имя почтового ящика, имя, фамилию и дважды пароль.
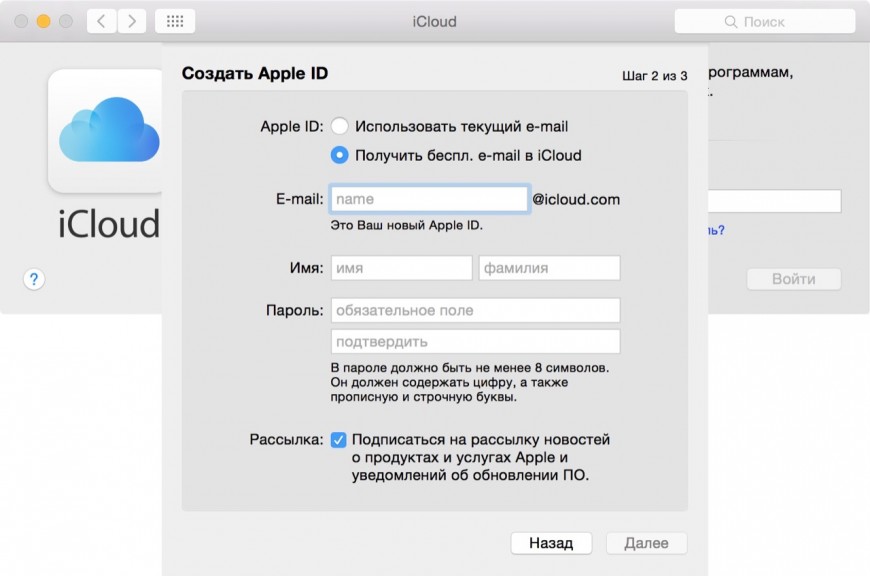
- Выберите 3 вопроса и дайте на них ответы. Обязательно укажите резервный e-mail.
- Подтвердите резервный e-mail.
Чтобы создаваемые на Mac аккаунты можно было использовать в качестве Apple ID, подключите их в меню «iCloud» в системных настройках Mac.
Создание аккаунта на Windows
Зарегистрировать Apple ID можно с любого устройства через веб-интерфейс. Чтобы на iCloud создать новую учетную запись на Windows:
- Запустите браузер, откройте сайт iCloud.
- В строке «Нет Apple ID» нажмите «Создать».
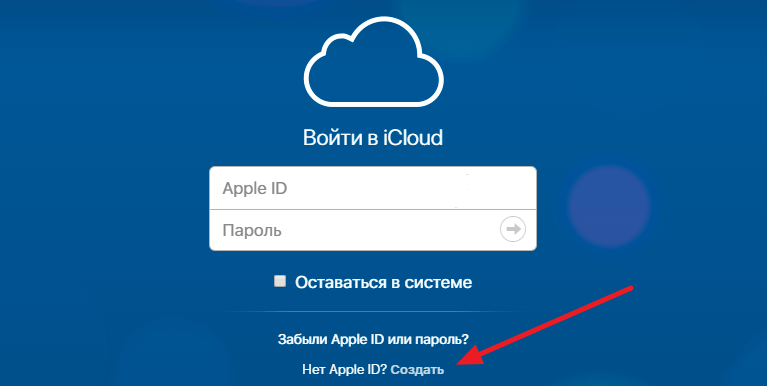
- Введите имя, фамилию, страну проживания и дату рождения.
- Укажите имя Apple ID (действующий e-mail, к которому вы имеете доступ)и пароль.
- Выберите контрольные вопросы и введите ответы.
- Напишите символы с картинки и нажмите «Продолжить».
На указанный e-mail будет отправлено письмо со ссылкой для подтверждения регистрации. Как видите, создать почту iCloud на Windows нельзя, зато вы можете использовать адрес с другого почтового сервиса в качестве идентификатора и получить доступ к некоторым приложениям Apple.

Если вы создавали Apple ID с компьютера на Windows, то для полноценного использования учетной записи вам тоже придется активировать ее через настройки iPhone, iPad или Mac. Это касается и регистрации в программу iCloud для Windows.