![]()
Published: Jul 14, 2020
— Updated: Mar 16, 2022
In this article, I’m going to show how to validate mobile number in Laravel. Let’s get started:
Table of Contents
- Ways of Validation
- Example
Ways of Validation
We ca follow some ways to validate mobile number. Have a look at some ways:
// way 1
$this->validate($request, [
    'phone' => 'required|digits:10'
]);

// way 2
$this->validate($request, [
    'phone' => 'required|min:10|numeric'
]);

// way 3
$this->validate($request, [
    'phone' => 'required|numeric|between:9,11'
]);

// way 4
$this->validate($request, [
    'phone' => 'required|regex:/(01)[0-9]{9}/'
]);

// way 5
$this->validate($request, [
    'phone' => 'required|regex:/^([0-9s-+()]*)$/|min:10'
]);
Example
Let’s make a simple form:
<!doctype html>
<html lang="en">
  <head>
  <meta charset="utf-8">
  <meta name="viewport" content="width=device-width, initial-scale=1, shrink-to-fit=no">
  <title>Phone Number Validation in Laravel</title>
  <link rel="stylesheet" href="https://cdnjs.cloudflare.com/ajax/libs/twitter-bootstrap/4.1.3/css/bootstrap.min.css" />
</head>
<body>
<div class="container">
    <h2 style="margin-top: 10px;">Phone Number Validation in Laravel - MyNotePaper.com</h2>
    <br>
    @if ($message = Session::get('success'))
    <div class="alert alert-success alert-block">
        <button type="button" class="close" data-dismiss="alert">×</button>
          <strong>{{ $message }}</strong>
    </div>
    <br>
    @endif

    <form method="post" action="{{url('store')}}">
      @csrf
      <div class="form-group">
        <label for="formGroupExampleInput">Name</label>
        <input type="text" name="name" class="form-control" id="formGroupExampleInput" placeholder="Please enter name">
        <span class="text-danger">{{ $errors->first('name') }}</span>
      </div>

      <div class="form-group">
        <label for="formGroupExampleInput2">Email</label>
        <input type="email" name="email" class="form-control" id="formGroupExampleInput2" placeholder="Please enter password">
        <span class="text-danger">{{ $errors->first('email') }}</span>
      </div>

      <div class="form-group">
        <label for="formGroupExampleInput2">Phone Number</label>
        <input type="text" name="phone" class="form-control" id="formGroupExampleInput2" placeholder="Please enter mobile number">
        <span class="text-danger">{{ $errors->first('phone') }}</span>
      </div>

      <div class="form-group">
       <button type="submit" class="btn btn-success">Submit</button>
      </div>
    </form>
</div>
</body>
</html>
Apply validation rules in controller:
public function store(Request $request)
{
    $request->validate([
            'name' => 'required',
            'phone' => 'required|digits:10',
            'email' => 'required|email|unique'
        ]);

    $input = $request->all();
    $user = User::create($input);

    return back()->with('success', 'User added successfully.');
}
We can use any validation ways from the above.
The routes will look like:
Route::get('form','[email protected]');
Route::post('store','[email protected]');
That’s it. Thanks for reading. ?
Laravel Validation for phone number example. In this tutorial, you will learn how to use validation for phone number in laravel apps.
In any laravel form, you have phone or mobile number field. At that time, you need to requirement to add phone number validation in laravel application. so this tutorial will guide you step by step how to add mobile validation in laravel using laravel rule and regex. you can easily use with your controller method.
At last of tutorial, you will see 5 more way to validate phone number in laravel apps.
Follow the below steps and implement phone number validation in laravel apps:
- Add Routes
- Create Controller
- Create Blade View
Step 1: Add Routes
First of all, Navigate to routes folder and open web.php file. Then update the following routes into web.php file, as follow:
Route::get('form','[email protected]');
Route::post('store','[email protected]');
Step 2: Create Controller & Method
Now, open your command prompt and run the following command:
php artisan make:controller UserController
This command will create controller named UserController.php file.
So navigate to appHttpControllers folder and open UserController.php file. Then update the following methods into it:
namespace AppHttpControllers;

use IlluminateHttpRequest;
use AppUser;

class HomeController extends Controller
{
    /**
     * Show the application dashboard.
     *
     * @return IlluminateHttpResponse
     */
    public function index()
    {
        return view('user');
    }

    /**
     * Show the application dashboard.
     *
     * @return IlluminateHttpResponse
     */
    public function store(Request $request)
    {
        $request->validate([
                'name' => 'required',
                'phone' => 'required|digits:10',
                'email' => 'required|email|unique:users'
            ]);

        $input = $request->all();
        $user = User::create($input);

        return back()->with('success', 'User added successfully.');
    }
Step 3: Create Blade View
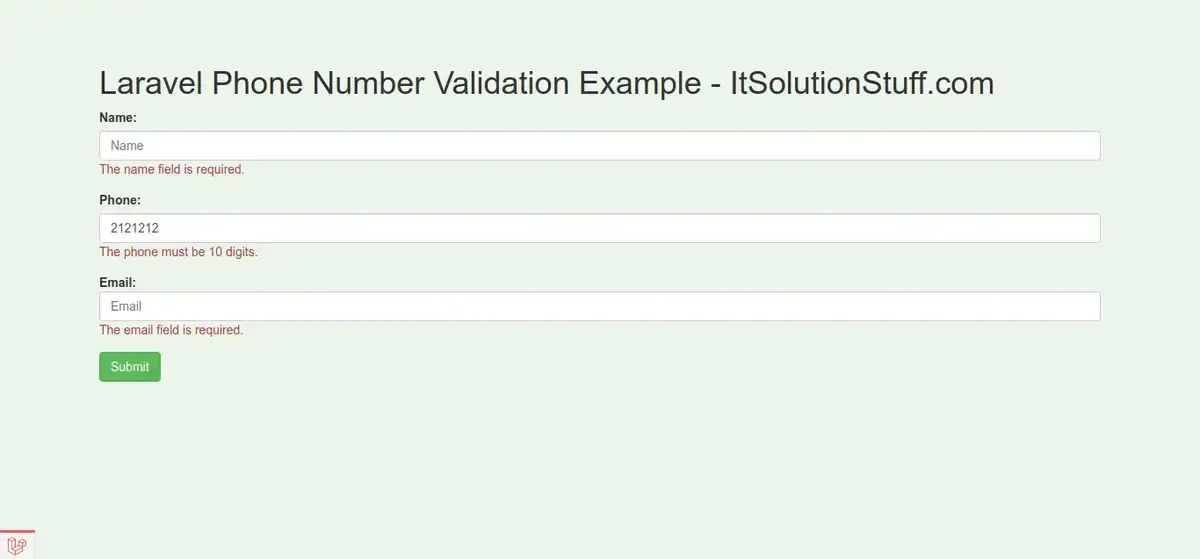
Now, Navigate to resources/views and create new blade view file named user.blade.php and update the following code into it:
<!doctype html>
<html lang="en">
  <head>
  <meta charset="utf-8">
  <meta name="viewport" content="width=device-width, initial-scale=1, shrink-to-fit=no">
  <meta name="csrf-token" content="{{ csrf_token() }}">
  <title>Laravel 7 Phone Number Validation Example - Tutsmake.com</title>
  <link rel="stylesheet" href="https://cdnjs.cloudflare.com/ajax/libs/twitter-bootstrap/4.1.3/css/bootstrap.min.css" />
</head>
<body>
<div class="container">
    <h2 style="margin-top: 10px;">Laravel 7 Phone Number Validation Example - Tutsmake.com</h2>
    <br>
    <br>
    @if ($message = Session::get('success'))
    <div class="alert alert-success alert-block">
        <button type="button" class="close" data-dismiss="alert">×</button>
          <strong>{{ $message }}</strong>
    </div>
    <br>
    @endif

    <form method="post" action="{{url('store')}}">
      @csrf

      <div class="form-group">
        <label for="formGroupExampleInput">Name</label>
        <input type="text" name="name" class="form-control" id="formGroupExampleInput" placeholder="Please enter name">
        <span class="text-danger">{{ $errors->first('name') }}</span>
      </div>

      <div class="form-group">
        <label for="formGroupExampleInput2">Email</label>
        <input type="email" name="email" class="form-control" id="formGroupExampleInput2" placeholder="Please enter password">
        <span class="text-danger">{{ $errors->first('email') }}</span>
      </div>

      <div class="form-group">
        <label for="formGroupExampleInput2">Phone Number</label>
        <input type="text" name="phone" class="form-control" id="formGroupExampleInput2" placeholder="Please enter mobile number">
        <span class="text-danger">{{ $errors->first('phone') }}</span>
      </div>

      <div class="form-group">
       <button type="submit" class="btn btn-success">Submit</button>
      </div>
    </form>
</div>
</body>
</html>
The below also provide a different way for laravel phone number validation methods, you can also use instead of the above methods:
    //first solution
    $this->validate($request, [
      'phone' => 'required|digits:10'
    ]);

   //second solution
    $this->validate($request, [
        'phone' => 'required|numeric|between:9,11'
    ]);

   /third solution
    $this->validate($request, [
        'phone' => 'required|min:10|numeric'
    ]);

    //fourth solution
    $this->validate($request, [
        'phone' => 'required|regex:/(01)[0-9]{9}/'
    ]);

    //fifth solution
     $this->validate($request, [
        'phone' => 'required|regex:/^([0-9s-+()]*)$/|min:10'
]); 
My name is Devendra Dode. I am a full-stack developer, entrepreneur, and owner of Tutsmake.com. I like writing tutorials and tips that can help other developers. I share tutorials of PHP, Python, Javascript, JQuery, Laravel, Livewire, Codeigniter, Node JS, Express JS, Vue JS, Angular JS, React Js, MySQL, MongoDB, REST APIs, Windows, Xampp, Linux, Ubuntu, Amazon AWS, Composer, SEO, WordPress, SSL and Bootstrap from a starting stage. As well as demo example.
View all posts by Admin
- PHP 7.4 or newer (ideally version 8).
- Experience developing with Laravel.
- A free or paid Twilio account. If you are new to Twilio click here to create a free account now and receive a $10 credit when you upgrade to a paid account.
- Composer installed globally (and Git so that Composer works fully)
- cURL
$attribute: The name of the attribute (which we won’t use).$value: The attribute’s value.$attribute: The attribute’s name$value: The attribute’s value$fail: A callback function to execute if validation fails- validation
- Laravel
- phone number
- Lookup
Data validation is essential to any application, regardless of its size and purpose. Without it, you risk using data that’s forged by malicious actors, contains only junk—or is a combination of both. And it doesn’t matter where the data comes from either; whether from a web form, retrieved from a database, or read from an environment setting.
Gladly, validation is extremely common in modern software development, so much so that there are numerous third-party packages available on Packagist, and PHP’s major frameworks all have a validation component. With them, you can validate email addresses, passwords, dates, IP addresses, numbers and so much more!
However, what happens when the package or framework doesn’t support your use case, such as validating a phone number? In that case, you roll your own!
In this tutorial, we’re going to build a custom Laravel validation rule object that validates a phone number from any country in the world, and then show you several ways of using it.
We’re not verifying if a phone number is in the possession of a given person, active, and so on. We’re just validating if a given string forms a valid phone number.
Prerequisites
To complete the tutorial, you will need the following things:
Create the base Laravel application
The first thing to do is to bootstrap a Laravel application. There are several ways to do that, such as the Laravel installer and Laravel Sail. However, one of the simplest is with Composer, by running the commands below.
composer create-project laravel/laravel twilio-phone-number-validator
cd twilio-phone-number-validator
php artisan serve
The commands will create the application in a new directory named twilio-phone-number-validator. To save a bit of time, the commands also change to the new directory and use the Artisan console to launch the application listening on localhost on port 8000.
If you open http://localhost:8000 in your browser of choice, it should look similar to the screenshot below.

Retrieve and register environment variables
With the base application ready to go, you next need to retrieve your Twilio credentials and store them in Laravel’s configuration. We need the credentials as the Lookup API requires authentication.
First, add the code below to the end of your .env file, located in the application’s root directory.
TWILIO_AUTH_SID="xxxxxxxxxxxxxxxxxxxxxxxxxxxxxxxxxx"
TWILIO_AUTH_TOKEN="xxxxxxxxxxxxxxxxxxxxxxxxxxxxxxxx"
Then, from the Twilio Console’s Dashboard, which you can see below, copy your «Account SID» and «Auth Token» and replace the respective placeholders in .env with them.

Add the required dependencies
Before we can write some custom code, we need to install the required dependencies. Gladly, there’s only one: Twilio’s PHP Helper Library. To install it, run the command below.
composer require twilio/sdk
Create a lookup service
Now, let’s write some code!
We’ll start by creating a small service class to encapsulate the logic for interacting with Twilio’s Lookup API. Yes, we could write the code directly in a controller, but doing so isn’t the most inspiring. It’s not the most flexible either.
By using a lookup service, we can validate the number in a variety of different ways and contexts, should the need arise. To do that, from the command line, create a new nested directory structure, app/Service/Twilio, by running the commands below.
mkdir -p app/Service/Twilio
If you’re using Microsoft Windows, use the following commands instead.
Next, create a new file, app/Service/Twilio/PhoneNumberLookupService.php, in your editor or IDE and paste the following code into it. Then, let’s step through what it’s doing together.
<?php

namespace AppServiceTwilio;

use TwilioExceptionsTwilioException;
use TwilioRestClient;

class PhoneNumberLookupService
{
    private $client;

    public function __construct(string $authSID, string $authToken)
    {
        $this->client = new Client($authSID, $authToken);
    }

    public function validate(string $phoneNumber): bool
    {
        if (empty($phoneNumber)) {
            return false;
        }

        try {
            $this->client
                ->lookups
                ->v1
                ->phoneNumbers($phoneNumber)
                ->fetch();
        } catch (TwilioException $e) {
            return false;
        }

    return true;
    }
}
PhoneNumberLookupService has one purpose: to validate a phone number, which it does in the validate method.
It starts by initializing a class-member variable, $client, which is a Twilio Client object, using the Twilio account SID and auth token which were stored in .env earlier. This is how the application will make authenticated calls to Twilio’s Lookup API.
The validate method contains the core validation logic, taking the phone number to check as its sole parameter. If the phone number is empty, it immediately returns false. This is because an empty string would never validate successfully. So we save a request—and respect the user’s time—by exiting early.
If the string isn’t empty, a request is made to Twilio’s Lookup API using the initialized Twilio Client object. The call is wrapped in a try/catch block because a TwilioException will be thrown if the phone number isn’t valid. If an exception is thrown, we catch it and return false. If an exception isn’t thrown, we know that the phone number is valid, so true is returned.
As the request returns information in the response, it might seem wasteful to throw that information away. However, using the Lookup API can be far less work than creating a regular expression capable of validating every possible phone number yourself. Plus, the Lookup API doesn’t provide a pure validation endpoint.
This is especially the case when you consider that requests for carrier and caller name information aren’t free. Carrier information costs $0.005 per phone number looked up. Caller name information (currently available only in the US) costs $0.01 per phone number looked up.
Create a custom validation rule
With the lookup service finished, we’re now going to create a custom validation rule that will use it to validate a phone number.
First, in the terminal, run the command below to have Artisan create the core of the class in app/Rules/PhoneNumberLookup.php.
php artisan make:rule PhoneNumber
Then, replace the body of the class with the code below (formatted for readability).
private $service;

public function __construct(
    PhoneNumberLookupService $phoneNumberLookupService
) {
    $this->service = $phoneNumberLookupService;
}

public function passes($attribute, $value): bool
{
    return $this->service->validate($value);
}

public function message()
{
    return 'The phone number has to be in either national or international format.';
}
The constructor takes a PhoneNumberLookupService object, $phoneNumberLookupService, to initialize a class member variable of the same name.
The passes method determines if the rule passes or not; an apt method name, no? It takes two arguments:
The method passes $value to $phoneNumberLookupService‘s validate method and returns the result, which determines if the phone number is valid or not.
The message method provides a suitable validation error message which is displayed to the user, should the phone number fail validation. It’s quite a generic message, but it’s suitable for this tutorial.
NOTE: Check out how to customize and localize error messages, if you want to display the message in multiple languages.
Before we move on, don’t forget to add the required use statement below, if your text editor or IDE doesn’t auto-complete them for you.
use AppServiceTwilioPhoneNumberLookupService;
Create a new controller
Now that the plumbing code, if you will, has been written, we’ll create a new controller class, named PhoneNumberController, that will use the new Rule to validate a request which contains a phone number.
Use Artisan to generate the core of the controller in app/Http/Controllers by running the command below.
php artisan make:controller PhoneNumberController
Then, use the code below as the body of the new class.
public function show(Request $request)
{
    $lookupService = new PhoneNumberLookupService(
        env('TWILIO_AUTH_SID'),
        env('TWILIO_AUTH_TOKEN')
    );

    $validated = $request->validate([
        'phone_number' => ['required', 'string', new PhoneNumberLookup($lookupService)],
    ]);
}
Then, add the use statement below.
use AppServiceTwilioPhoneNumberLookupService;
The show method first instantiates a new PhoneNumberLookupService, using the Twilio account SID and auth token retrieved using the env helper. It then attempts to validate the phone_number attribute in the request’s body using two existing Laravel validation rules (required, string) and our custom rule.
If you prefer, you could use a closure instead, which you can see in the example below.
'phone_number' => ['required', 'string', function ($attribute, $value, $fail) use ($lookupService) {
    if (! $lookupService->validate($value)) {
        $fail(sprintf('The value provided (%s) is not a valid phone number.', $value));
    }
}],
The closure receives three arguments:
For the closure to pass, PhoneNumberLookupService‘s validate method must successfully validate the phone number. If it doesn’t, then the $fail callback is run.
Register a route for the controller
To use the new controller we have to register a route for it. To do that, add the code below to the end of routes/api.php.
Route::post(
    '/validate-phone-number',
    [AppHttpControllersPhoneNumberController::class, 'show']
);
The route allows POST requests to /api/validate-phone-number, which will be handled by PhoneNumberController‘s show method.
Test the code
There are a host of ways to test the code, such as using Postman or PhpStorm’s Terminal. However, let’s use cURL—my favorite command-line tool! Run the command below, replacing <your phone number> with your phone number.
curl -i -X POST -F 'phone_number=<your phone number>' http://localhost:8000/api/validate-phone-number
If everything works as expected, you will see output in your terminal similar to the example below; the important part is the HTTP/1.1 200 OK status code.
HTTP/1.1 200 OK
Host: localhost:8000
Date: Wed, 14 Jul 2021 09:35:39 GMT
Connection: close
Next, let’s see an example of an unsuccessful request, by running the command below, which sends «+1» as the phone number.
curl -i -X POST -F 'phone_number=+1' http://localhost:8000/api/validate-phone-number
This will never validate successfully, so you will see output in your terminal similar to the example below; the important part being the HTTP/1.1 302 Found status code.
HTTP/1.1 302 Found
Host: localhost:8000
Date: Wed, 14 Jul 2021 09:57:24 GMT
Connection: close
X-Powered-By: PHP/7.4.21
Cache-Control: no-cache, private
Date: Wed, 14 Jul 2021 09:57:24 GMT
Location: http://localhost:8000
X-RateLimit-Limit: 60
X-RateLimit-Remaining: 58
Content-Type: text/html; charset=UTF-8
Access-Control-Allow-Origin: *

<!DOCTYPE html>
<html>
    <head>
        <meta charset="UTF-8" />
        <meta http-equiv="refresh" content="0;url='http://localhost:8000'" />
        <title>Redirecting to http://localhost:8000</title>
    </head>
    <body>
        Redirecting to <a href="http://localhost:8000">http://localhost:8000</a>.
    </body>
</html>%
Simplify instantiation by using a Service Provider
There’s nothing necessarily wrong with instantiating the PhoneNumberLookupService object directly in the controller—if we’re only going to use it there.
But, often, a better approach is to use a Service Provider along with constructor injection. So let’s create a Service Provider and make the lookup service available as a service in Laravel’s Service Container.
First, run the command below to have Artisan create the core of a new Service Provider for us, in app/Providers/PhoneNumberLookupServiceProvider.php.
php artisan make:provider TwilioLookupServiceProvider
Then, open the new file and replace the register method with the following code.
public function register()
{
    $this->app->singleton(PhoneNumberLookupService::class, function ($app) {
        return new PhoneNumberLookupService(
            env('TWILIO_AUTH_SID'),
            env('TWILIO_AUTH_TOKEN')
        );
    });
}
When run, the closure in the second argument will instantiate a new PhoneNumberLookupService object. Its constructor receives the Twilio Auth SID and Token, registered in .env, which it will use to initialize the class’ Client object.
The new PhoneNumberLookupService object will then be registered as a service named PhoneNumberLookupService with Laravel’s service container.
NOTE: Don’t forget to add the use statement below, if your text editor or IDE doesn’t auto-complete them for you.
use AppServiceTwilioPhoneNumberLookupService;
Register the Service Provider
With the Service Provider created, we next need to register it so that Laravel will use it when the application is launched. To do that, in config/app.php add the following at the end of the «Application Service Providers» section.
AppProvidersTwilioLookupServiceProvider::class
Refactor PhoneNumberController
With the Service Provider in place and integrated into our application, let’s refactor PhoneNumberController to use it, by adding the following code to the top of the class.
private $service;

public function __construct(PhoneNumberLookupService $service)
{
    $this->service = $service;
}
This change makes use of Laravel’s Zero Configuration Resolution to retrieve a PhoneNumberLookupService object from the Service Container and pass it to the controller’s constructor when it’s instantiated. This, in turn, uses it to initialize a private member variable, named $service.
Next, replace the show method’s body with the code below.
$validated = $request->validate([
    'phone_number' => [
        'required',
        'string',
        new PhoneNumber($this->service)
    ],
]);
It’s not too different from the first iteration. This time, PhoneNumber is initialized with the class-member variable initialized in the constructor, not one that we directly instantiated in the method itself.
Test the code
With the changes made, use cURL, as before, to test that a valid phone number still validates successfully. I’ve included the cURL example below to save you time retrieving it.
curl -i -X POST -F 'phone_number=<your phone number>' http://localhost:8000/api/validate-phone-number
That’s how to build a phone number validator with Laravel
With a custom validation rule and some glue code in a controller, you can check if any phone in the world is real, pretty darn quickly. What’s more, by adding in a custom Service Provider, you can use the validation logic anywhere in your Laravel application, as and when the need arises. Powerful and flexible!
I hope that this has inspired you to create your own custom validation rule and am excited to hear about what you build!
Matthew Setter is a PHP Editor in the Twilio Voices team and a polyglot developer. He’s also the author of Mezzio Essentials and Docker Essentials. When he’s not writing PHP code, he’s editing great PHP articles here at Twilio. You can find him at msetter@twilio.com; he’s also settermjd on Twitter and GitHub.
Related Posts
October 8, 2020
Category : Laravel
In this tutorial we will go over the demonstration of laravel phone number validation. it’s simple example of laravel mobile number validation. This article goes in detailed on 10 digit mobile number validation in laravel. you will learn phone number validation in laravel.
we most of the requirement to add phone number validation in our laravel application. so i will show how to add mobile validation in laravel 6, laravel 7, laravel 8 and laravel 9 using regex. you can easily use with your controller method.
I will give you two way to add phone number validation in laravel. so i will just show you controller code and preview here. so you can also follow form validation with laravel with this code: Laravel Form Validation Example.
You can see bellow preview:
Preview:
Example 1:
<?php
namespace AppHttpControllers;
use IlluminateHttpRequest;
use AppUser;
class HomeController extends Controller
{
/**
* Show the application dashboard.
*
* @return IlluminateHttpResponse
*/
public function create()
{
return view('createUser');
}
/**
* Show the application dashboard.
*
* @return IlluminateHttpResponse
*/
public function store(Request $request)
{
$request->validate([
'name' => 'required',
'phone' => 'required|digits:10',
'email' => 'required|email|unique:users'
]);
$input = $request->all();
$user = User::create($input);
return back()->with('success', 'User created successfully.');
}
}
Example 2:
<?php
namespace AppHttpControllers;
use IlluminateHttpRequest;
use AppUser;
use Validator;
class HomeController extends Controller
{
/**
* Show the application dashboard.
*
* @return IlluminateHttpResponse
*/
public function create()
{
return view('createUser');
}
/**
* Show the application dashboard.
*
* @return IlluminateHttpResponse
*/
public function store(Request $request)
{
$request->validate([
'name' => 'required',
'phone' => 'required|regex:/^([0-9s-+()]*)$/|min:10',
'email' => 'required|email|unique:users'
]);
$input = $request->all();
$user = User::create($input);
return back()->with('success', 'User created successfully.');
}
}
I hope it can help you…
In this tutorial you will learn about the Laravel 7 Phone Number Validation Example and its application with practical example.
In this Laravel 7 Phone Number Validation Example tutorial I’ll show you how to create custom phone number validation in laravel. In this tutorial you will learn to create phone number validation in laravel. In step by step tutorial I’ll demonstrate you to implement custom phone number validation in laravel.
Table Of Contents−
- Laravel 7 Phone Number Validation Example
- Step 1: Add Routes
- Step 2: Create Controller & Method
- Step 3: Create Blade View
Step 1: Add Routes
In this step we need to define routes in “routes/web.php” file. Lets open “routes/web.php” file and add the following routes in it.
routes/web.php
Step 2: Create Controller & Method
Now, lets create a controller named UserController using command given below –
| php artisan make:controller UserController |
This command will create controller named UserController.php file. So navigate to appHttpControllers folder and open UserController.php file. Then update the following methods into it:
| 1 2 3 4 5 6 7 8 9 10 11 12 13 14 15 16 17 18 19 20 21 22 23 24 25 26 27 28 29 30 31 32 33 34 35 | namespace AppHttpControllers; use IlluminateHttpRequest; use AppUser; class HomeController extends Controller { /** * Show the application dashboard. * * @return IlluminateHttpResponse */ public function index() { return view(‘user’); } /** * Show the application dashboard. * * @return IlluminateHttpResponse */ public function store(Request $request) { $request->validate([ ‘name’ => ‘required’, ‘phone’ => ‘required|digits:10’, ’email’ => ‘required|email|unique:users’ ]); $input = $request->all(); $user = User::create($input); return back()->with(‘success’, ‘User added successfully.’); } |
Step 3: Create Blade View
Now, Navigate to resources/views and create new blade view file named user.blade.php and update the following code into it:
| 1 2 3 4 5 6 7 8 9 10 11 12 13 14 15 16 17 18 19 20 21 22 23 24 25 26 27 28 29 30 31 32 33 34 35 36 37 38 39 40 41 42 43 44 45 46 47 48 49 50 | <!doctype html> <html lang=«en»> <head> <meta charset=«utf-8»> <meta name=«viewport» content=«width=device-width, initial-scale=1, shrink-to-fit=no»> <meta name=«csrf-token» content=«{{ csrf_token() }}»> <title>Laravel 7 Phone Number Validation Example</title> <link rel=«stylesheet» href=«https://cdnjs.cloudflare.com/ajax/libs/twitter-bootstrap/4.1.3/css/bootstrap.min.css» /> </head> <body> <div class=«container»> <h2 style=«margin-top: 10px;»>Laravel 7 Phone Number Validation Example</h2> <br> <br> @if ($message = Session::get(‘success’)) <div class=«alert alert-success alert-block»> <button type=«button» class=«close» data—dismiss=«alert»>×</button> <strong>{{ $message }}</strong> </div> <br> @endif <form method=«post» action=«{{url(‘store’)}}»> @csrf <div class=«form-group»> <label for=«formGroupExampleInput»>Name</label> <input type=«text» name=«name» class=«form-control» id=«formGroupExampleInput» placeholder=«Please enter name»> <span class=«text-danger»>{{ $errors->first(‘name’) }}</span> </div> <div class=«form-group»> <label for=«formGroupExampleInput2»>Email</label> <input type=«email» name=«email» class=«form-control» id=«formGroupExampleInput2» placeholder=«Please enter password»> <span class=«text-danger»>{{ $errors->first(’email’) }}</span> </div> <div class=«form-group»> <label for=«formGroupExampleInput2»>Phone Number</label> <input type=«text» name=«phone» class=«form-control» id=«formGroupExampleInput2» placeholder=«Please enter mobile number»> <span class=«text-danger»>{{ $errors->first(‘phone’) }}</span> </div> <div class=«form-group»> <button type=«submit» class=«btn btn-success»>Submit</button> </div> </form> </div> </body> </html> |
The below also provide a different way for laravel phone number validation methods, you can also use instead of the above methods:
| 1 2 3 4 5 6 7 8 9 10 11 12 13 14 15 16 17 18 19 20 21 22 23 24 | //first solution $this->validate($request, [ ‘phone’ => ‘required|digits:10’ ]); //second solution $this->validate($request, [ ‘phone’ => ‘required|numeric|between:9,11’ ]); /third solution $this->validate($request, [ ‘phone’ => ‘required|min:10|numeric’ ]); //fourth solution $this->validate($request, [ ‘phone’ => ‘required|regex:/(01)[0-9]{9}/’ ]); //fifth solution $this->validate($request, [ ‘phone’ => ‘required|regex:/^([0-9s-+()]*)$/|min:10′ ]); |