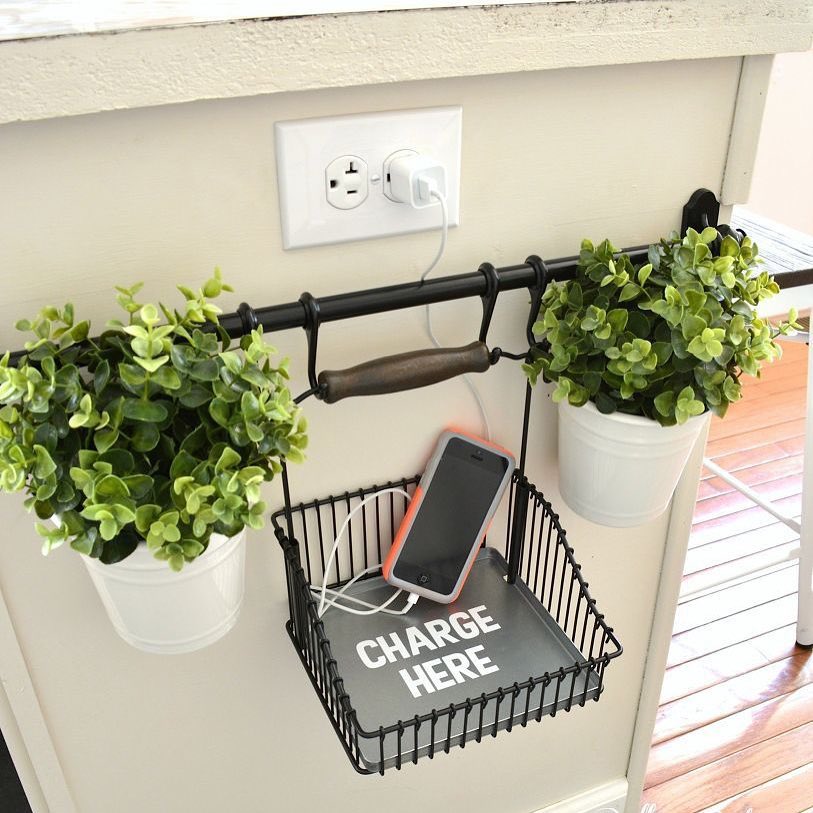
Сегодня каждый может купить розетку с USB для удобной зарядки смартфона. Но повлиять на расположение розеток у себя в доме может не каждый. Иногда приходится мириться с тем что есть. К тому же заряжаем смартфоны мы и за пределами собственного дома. А когда заряда осталось 2% выбирать не приходится от какой розетки и где заряжать. Эти полезные лайфхаки как повесить телефон на зарядку как раз для ситуаций когда надо заряжать смартфон от неудобной розетки в неудобном месте.
Кстати Вы уверенны что правильно заряжаете свой смартфон? Проверить себя Вы можете в статье – как правильно заряжать и разряжать телефон.
Лайфхаки как повесить телефон на зарядку
Зарядка телефона – это наша ежедневная рутина, о которой 20 лет назад никто не догадывался. В итоге не всем везёт иметь в доме место для удобной зарядки телефона. Часто розетка находится или высоко или низко. Но не все готовы смириться с такой повседневностью, в результате появляются разные способы как сделать удобным этот ежедневный ритуал. CorgIT.xyz выбрал самые неординарные способы как повесить телефон на зарядку из подручных средств.
*Но убедитель что выбраные материал – диэлектрик, то есть не проводил ток!
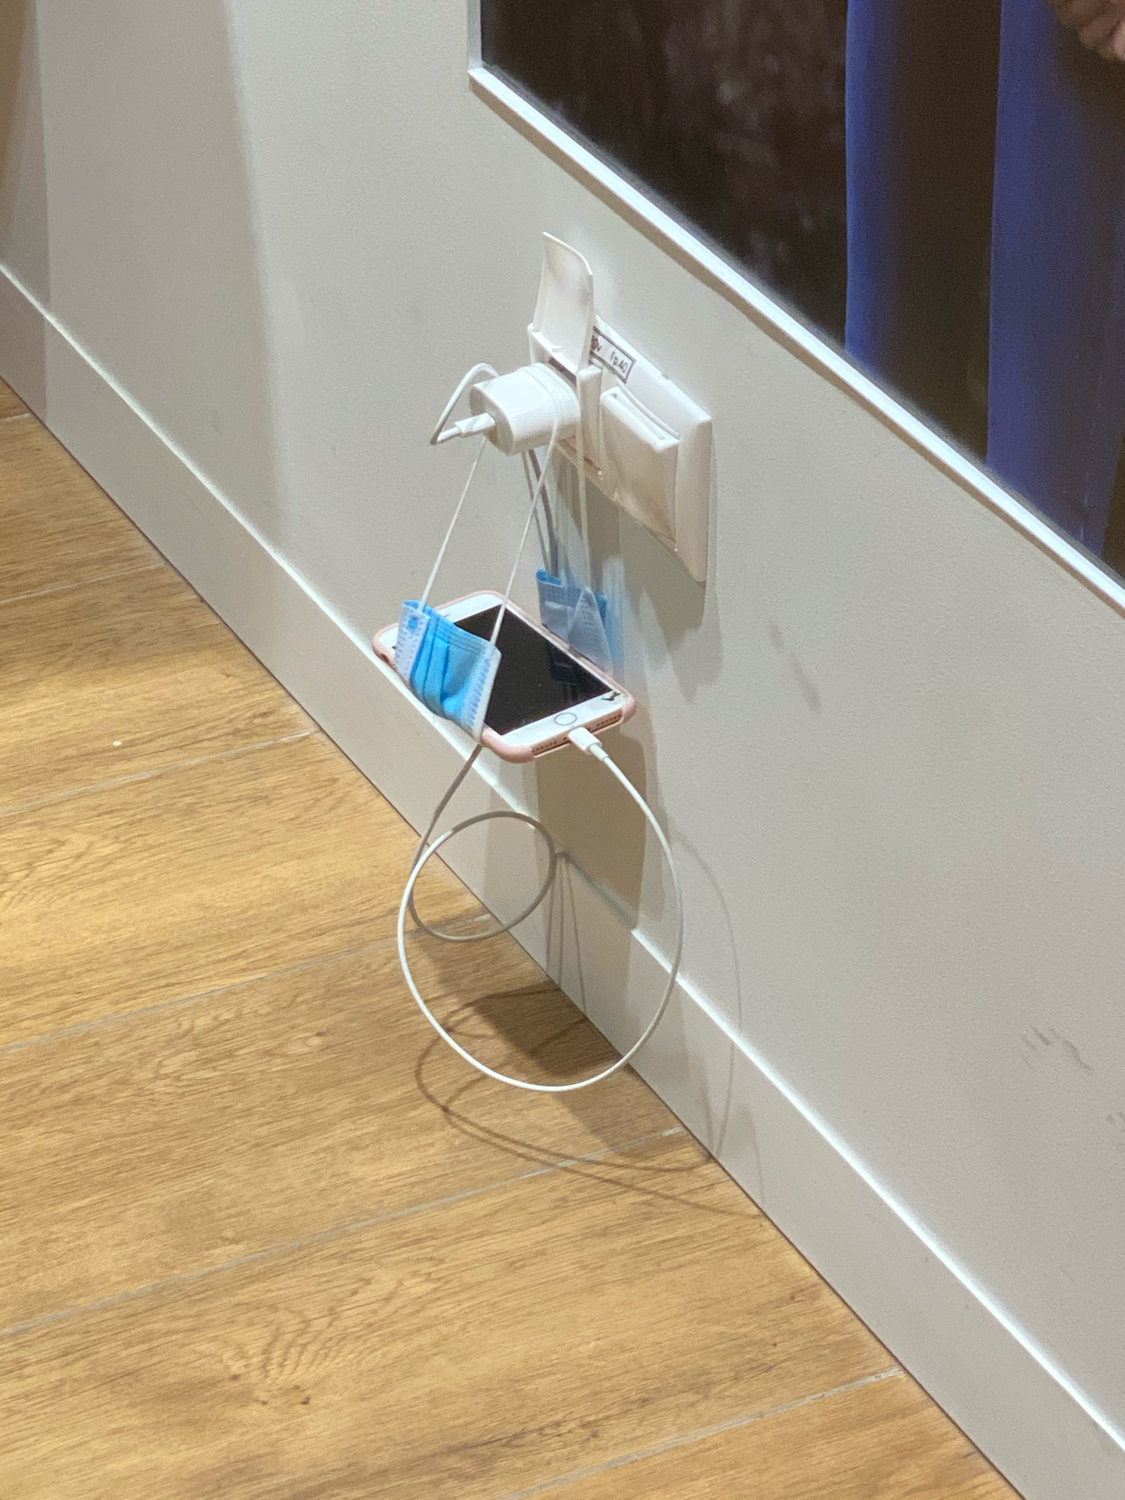
№1. Лайфхак с медицинской маской
Такой предмет личной гигиены как одноразовая маска стал для нас такой же повседневностью и рутиной, как ежедневная зарядка смартфона. Более того маски могут быть очень полезны в быту. Например стать держателем для телефона на зарядке:
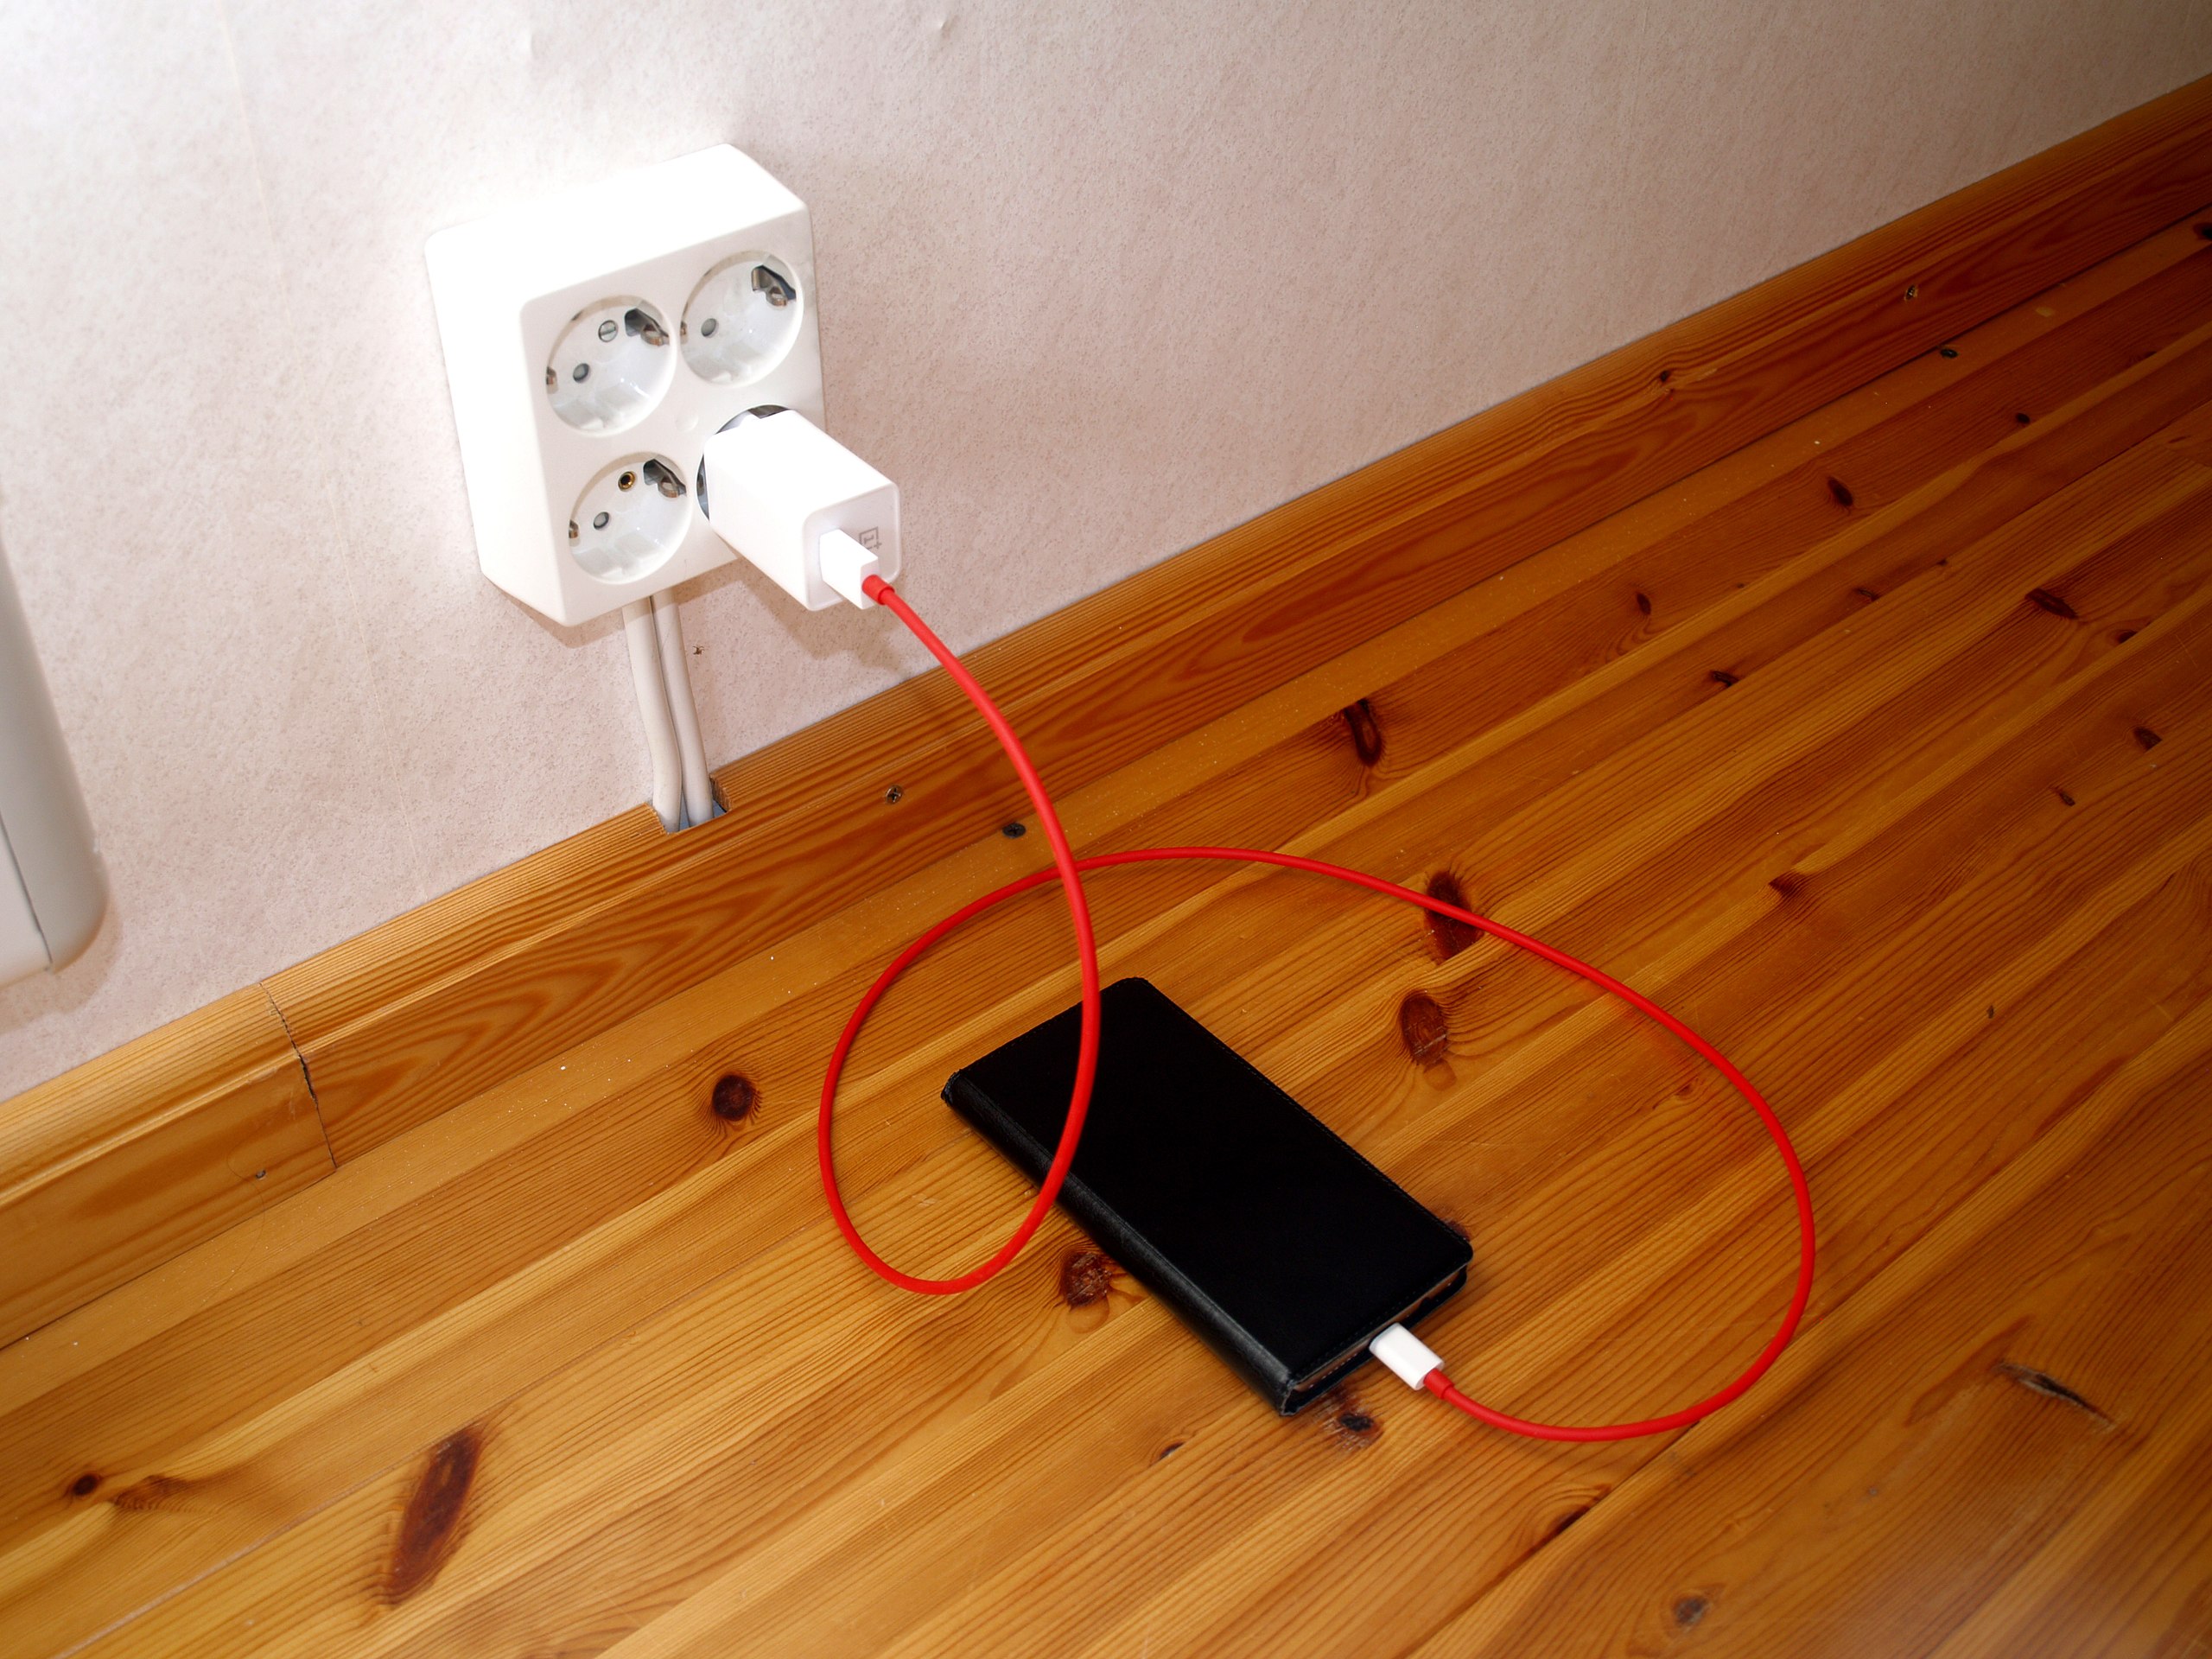
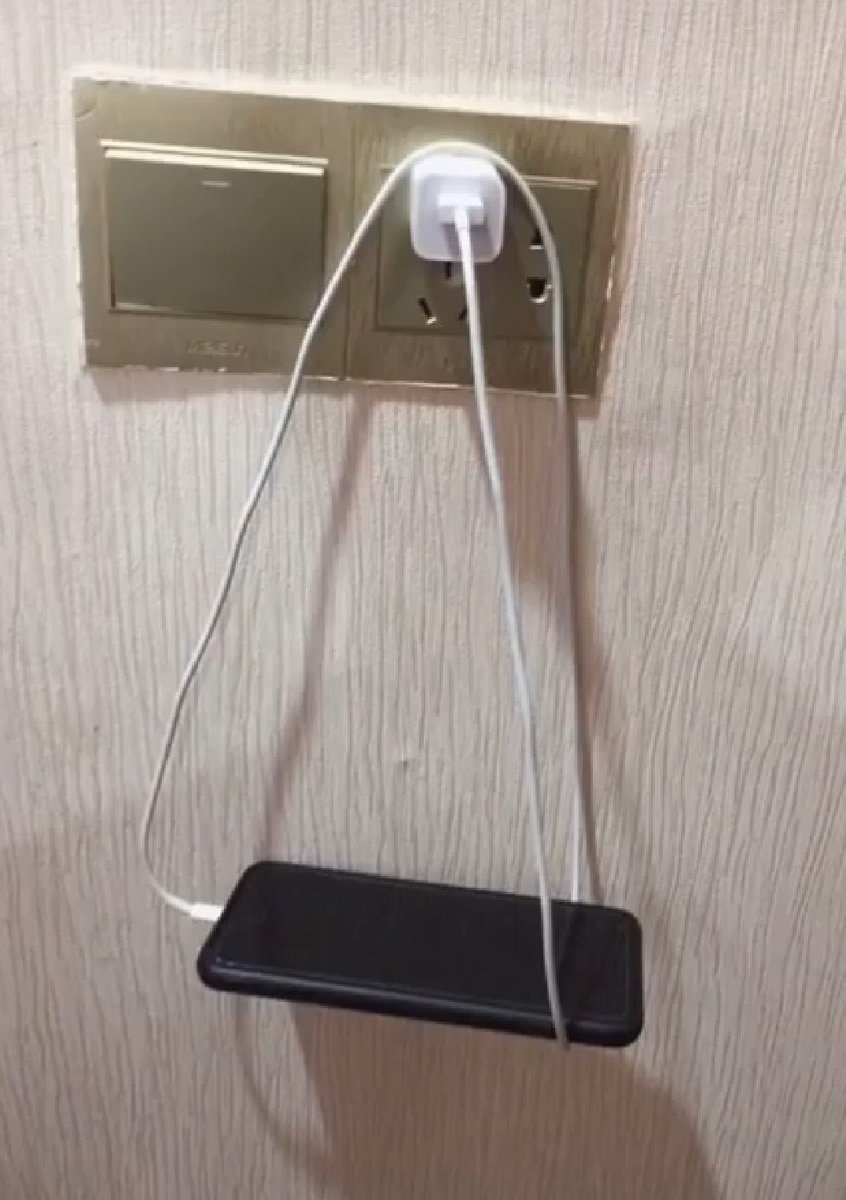
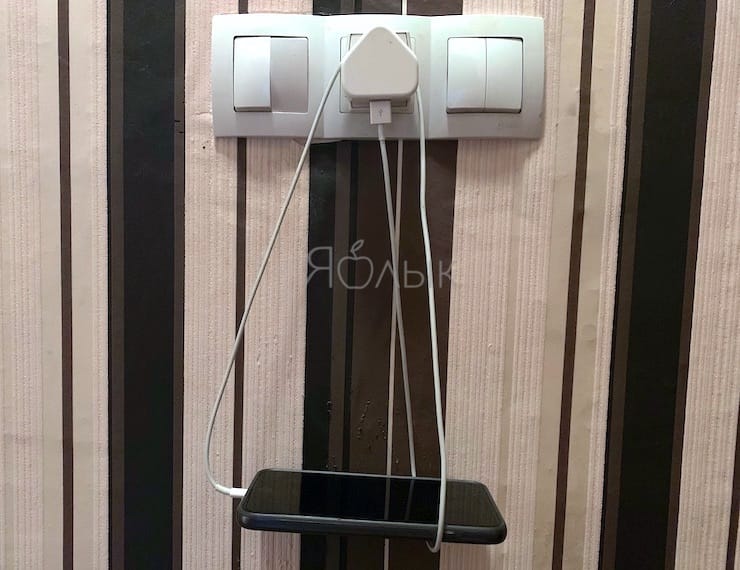
№2. Лайфхак с кабелем от зарядки
Повесить телефон на провод от зарядки – это самый популярный интернет-совет как повесить телефон на зарядке. Но с коротким кабелем такой трюк не пройдет:
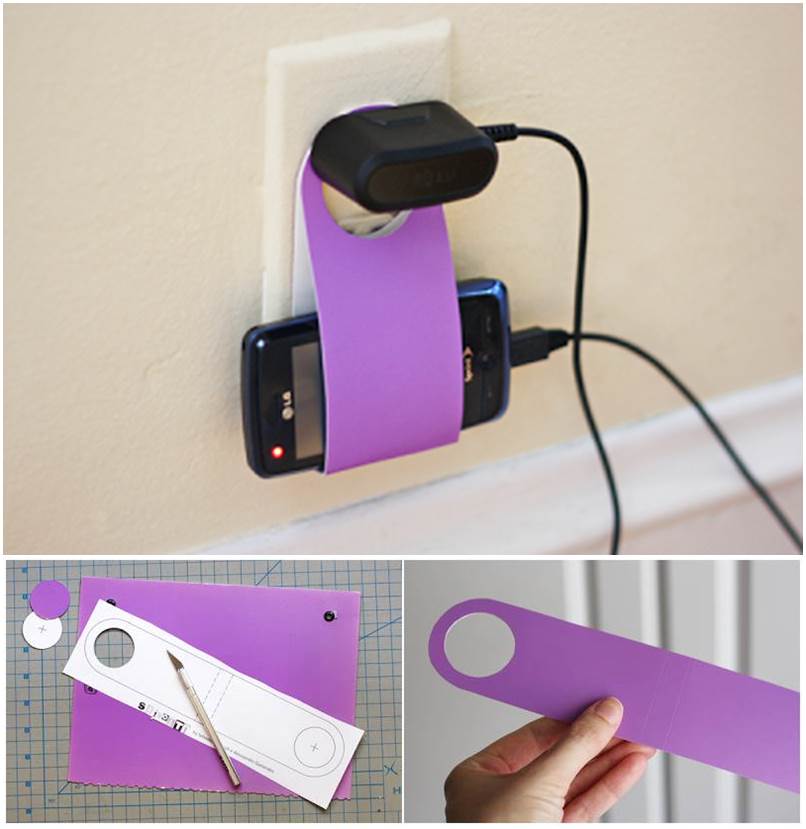
№3. Лайфхак с бумагой
Современные смартфоны весят в пределах 200 г. Лист бумаги вполне способен выдержать такую нагрузку.
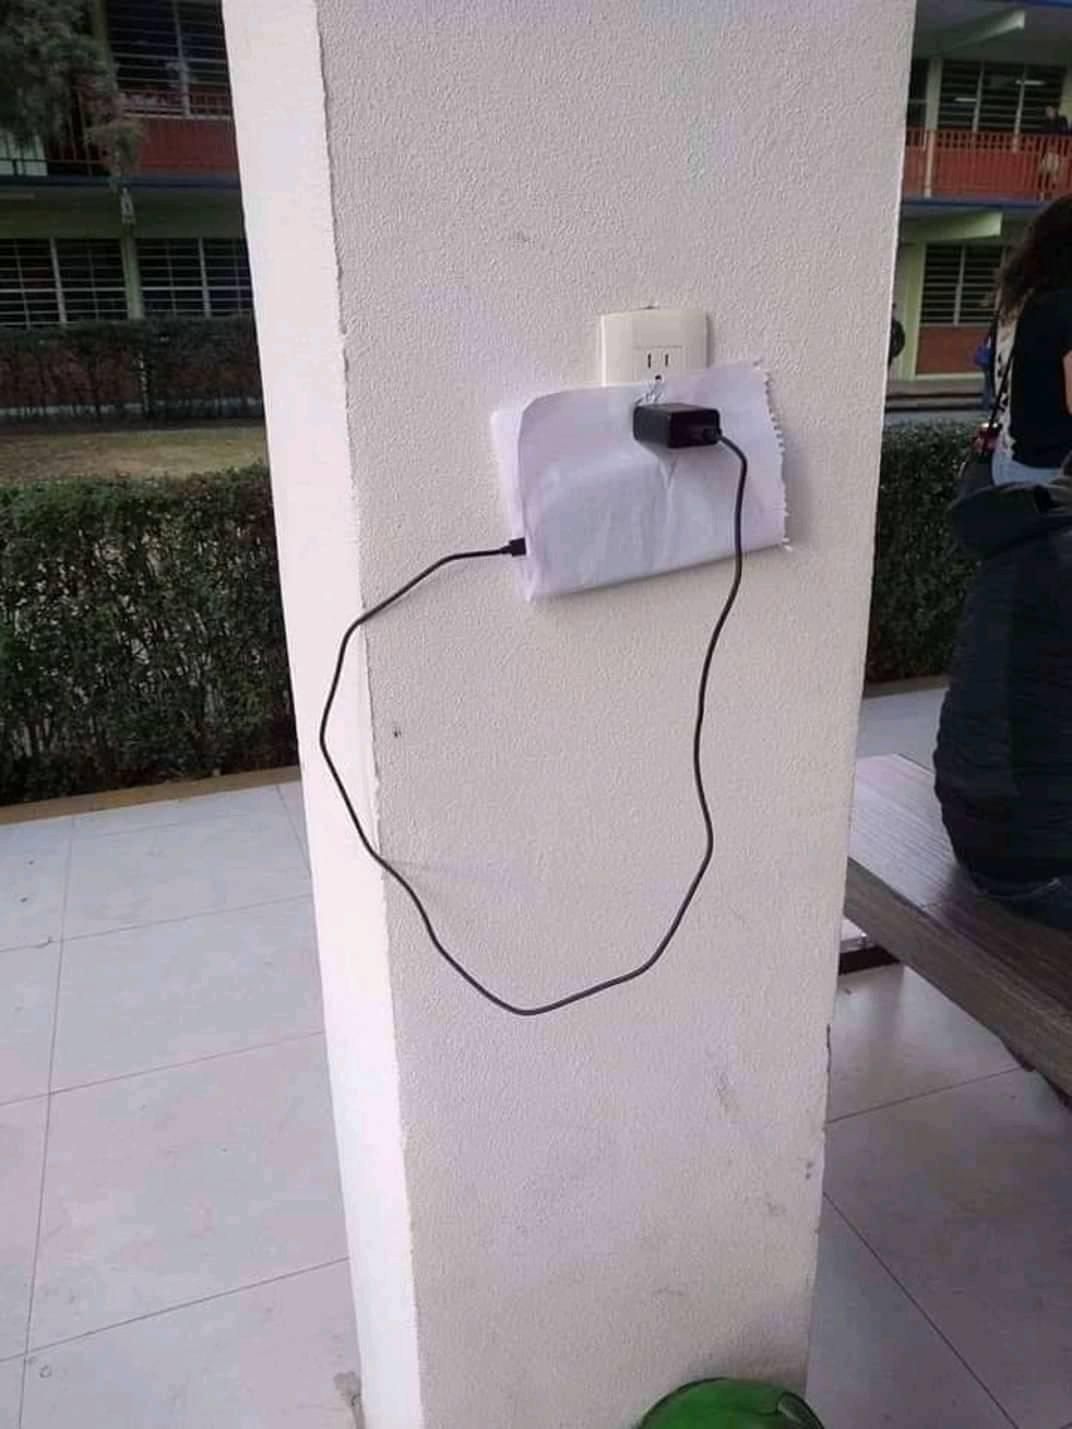
Более того можно вырезать держатель для телефона:
№4. Лайфхак с пластиковой банкой
Не только из бумаги можно вырезать держатель для смартфона на зарядке. Более того, может получится даже очень симпатичный аксессуар:
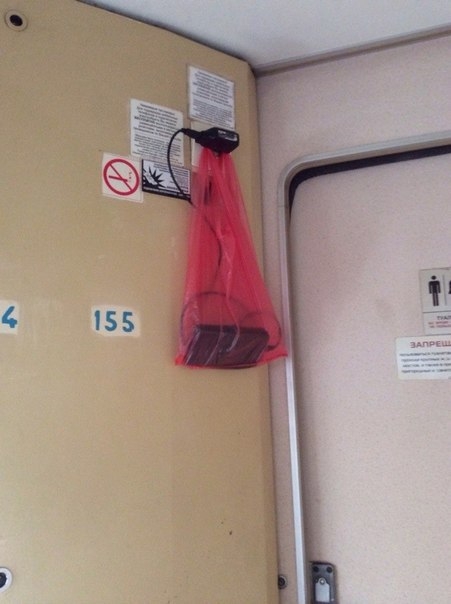
№5. Лайфхак с целлофановым пакетом
Целлофановый пакет-майка еще одно нестандартное решение этой повседневной ситуации. К тому же, он более надежный, так как тут смартфон максимально защищен от падения с высоты.
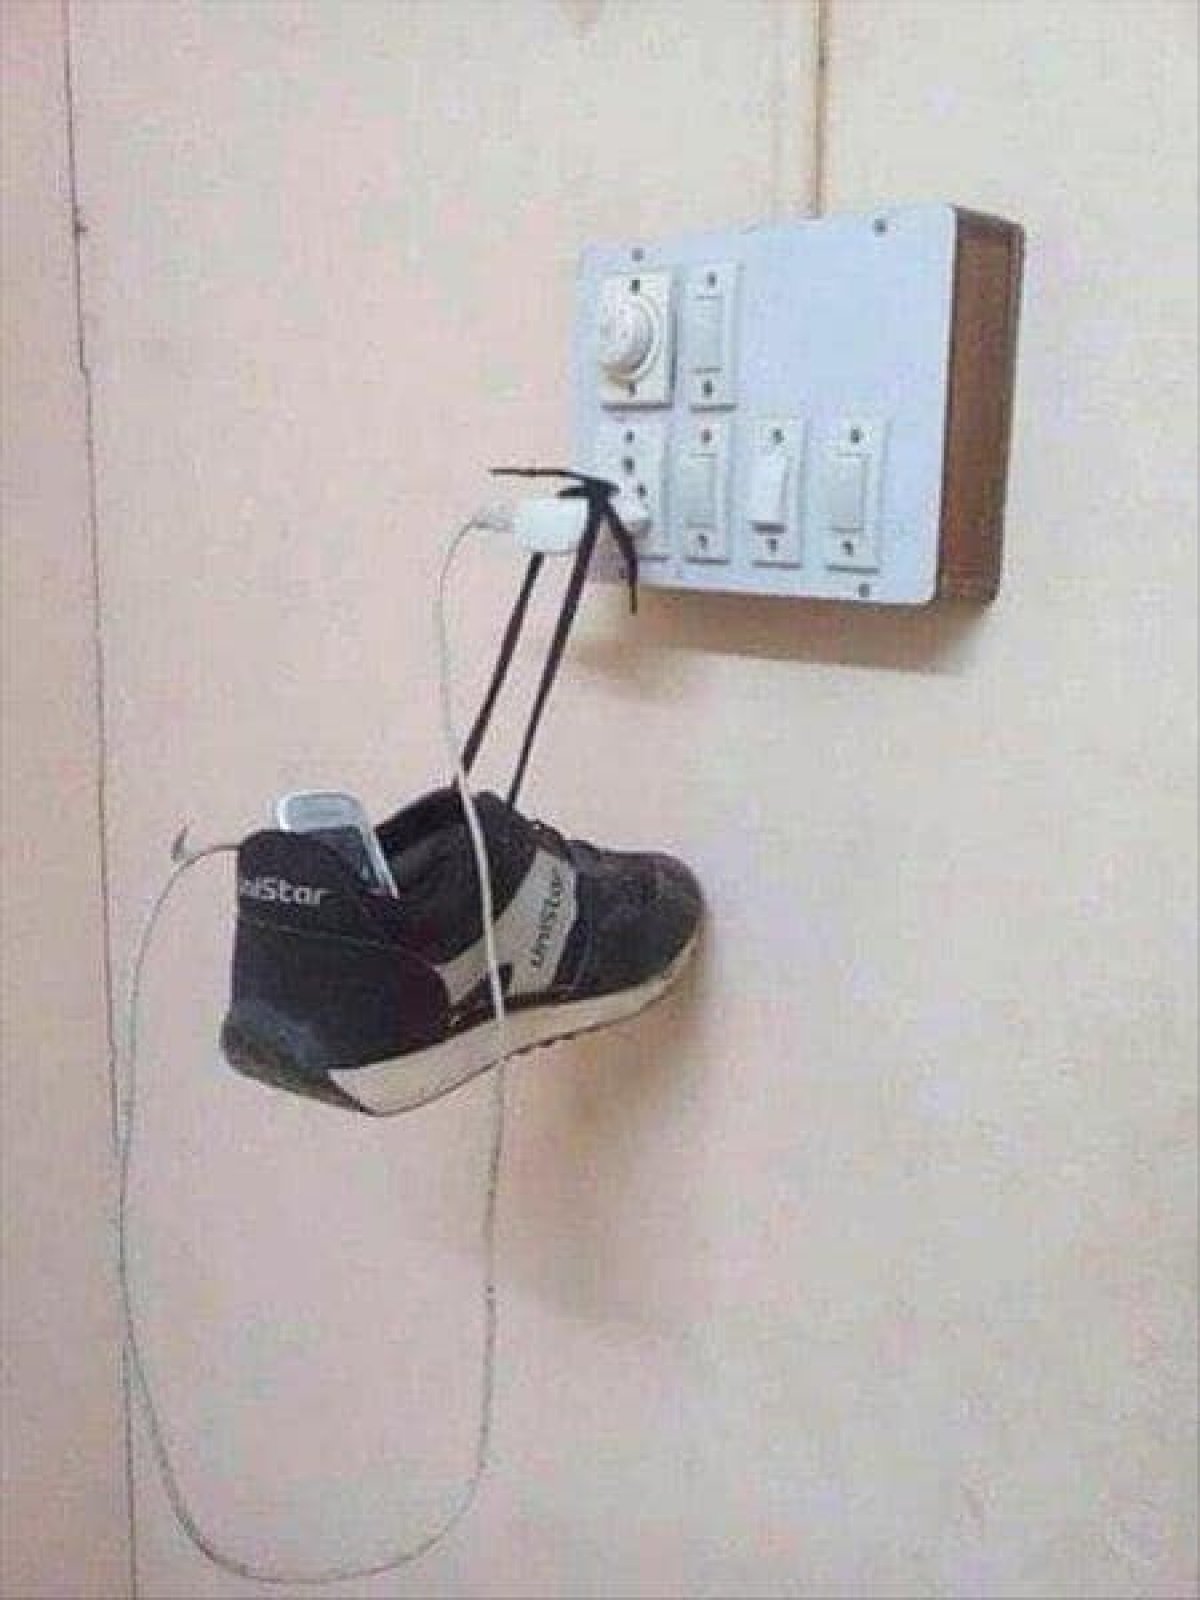
№6. Лайфхак с кроссовком
Это самый креативный из этих лайфхаков для телефона. Большинство людей при необходимости способны придумает способ как закрепить телефон на зарядки. Но явно не каждый додумается использовать кроссовок для этого:
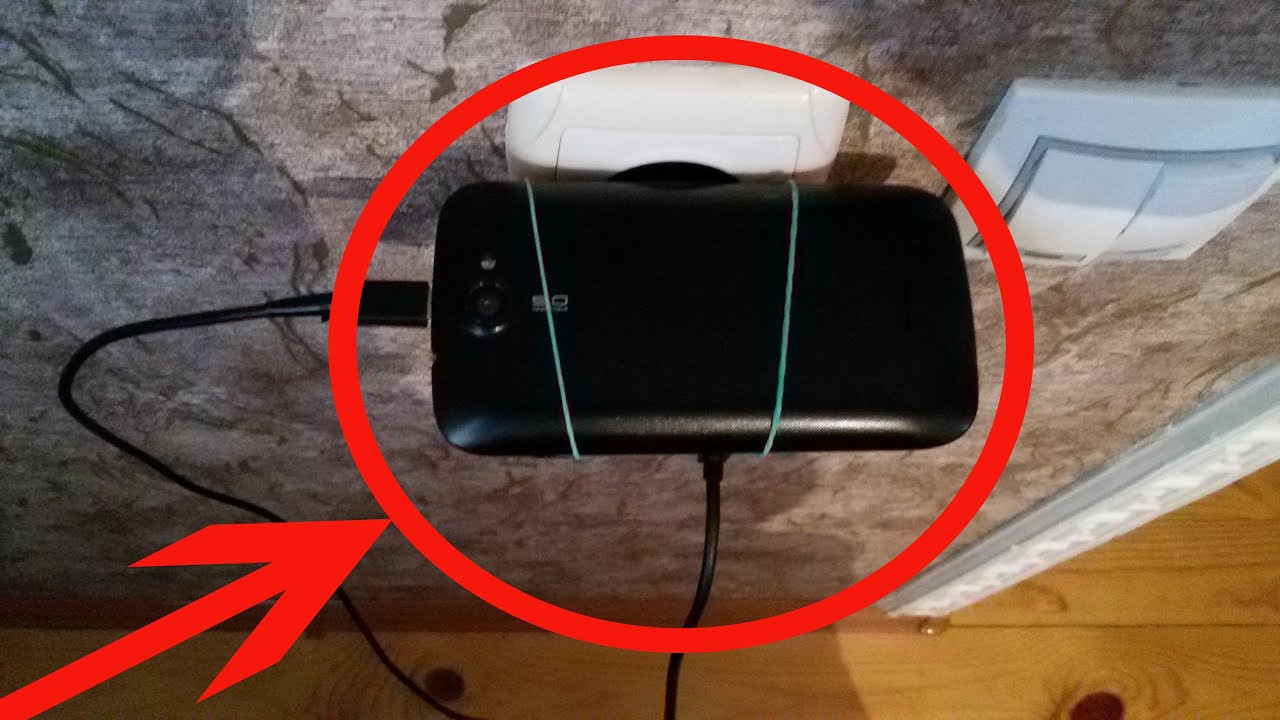
Если у Вас массивный блок питания у зарядного устройства, то этот лайфхак как повесить телефон на зарядке при помощи канцелярской резинки для Вас:
 И все же сегодня реализовать его будет сложно, так как даже самые компактные смартфоны слишком большие для такого лайфхака.
Но самый простой и эффективный способ, который будет рациональный и разумный – это купить специальную подставку-держатель для телефона. На AliExpress они доступны в самых разных вариациях из силикона и пластика. Они могут быть настенными или вешаться прямо на блок питания зарядки.
А также можно раз и навсегда решить проблему удобного места для зарядки телефона и установить красивую полку для этого:
ПОДПИСЫВАЙТЕСЬ на наш телеграм-канал и другие социальные сети.
Якщо ви знайшли помилку, будь ласка, виділіть фрагмент тексту та натисніть Ctrl+Enter.
Смартфон для большинства современных людей является вещью незаменимой и неотъемлемой, ведь без него гораздо труднее выстоять очередь в государственном учреждении, скоротать время в поликлинике или на учебе. И порой каждому из нас приходится проявлять смекалку, чтобы зарядить свой гаджет при отсутствии комфортных для этого условий.
♥ ПО ТЕМЕ: Лучший Xiaomi: 15 самых популярных устройств Сяоми.
Найти свободную розетку без труда можно в любом заведении, учреждении или даже на улице, но вот пристроить к ней свой девайс бывает не так уж просто. Например, когда розетка расположена высоко от пола, а никакого стола или другого предмета мебели по близости не имеется. В таких случаях люди ухитряются подвесить смартфон в обыкновенный пакет-«маечку», а пациенты отечественных больничных учреждений, например, используют в качестве своеобразного гамака для гаджетов одноразовые медицинские маски.
Впрочем, зарядить телефон от неудобно расположенной розетки можно и без посторонних предметов, для этого достаточно сделать петлю из кабеля (если его длина позволяет) и уже в нее аккуратно положить смартфон.
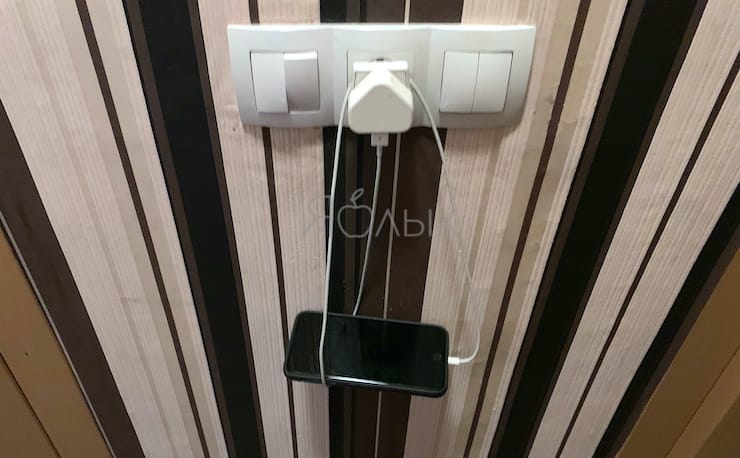
При этом следует быть осторожным — с европейского типа адаптера для iPhone, к примеру, провод может соскользнуть и тогда девайс окажется на полу.

Естественно, постоянно практиковать подобные лайфхаки не очень полезно для зарядного кабеля и опасно для смартфона, поэтому в домашних условиях гораздо лучше использовать специальные подставки, благо, купить их можно совсем недорого.
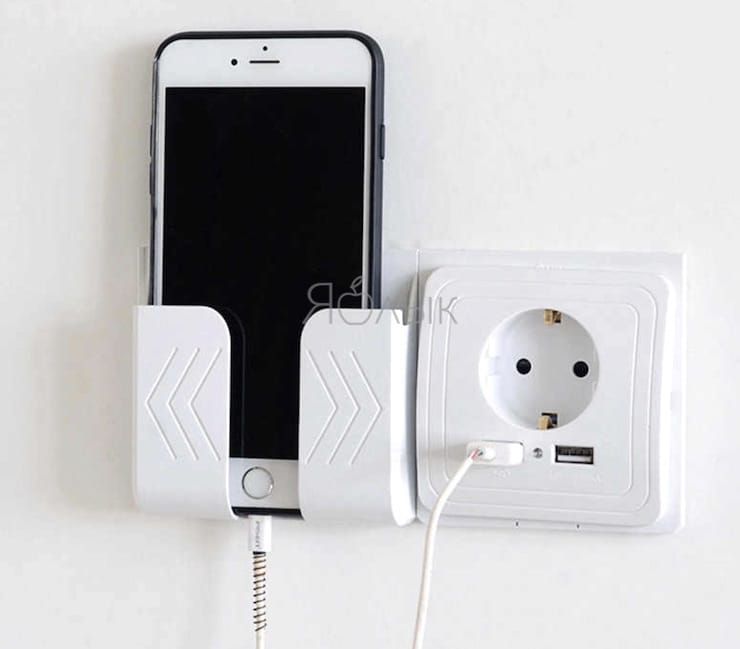
Купить держатель для смартфона
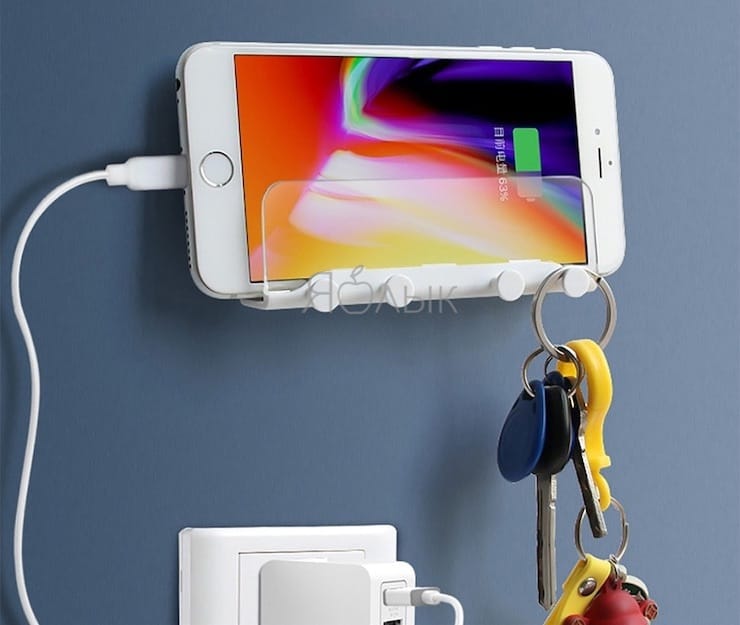
Купить держатель для смартфона
Кроме того, в интернет-магазинах можно найти копеешные присоски, при помощи которых смартфон легко крепится на любую гладкую и плоскую поверхность, что позволяет брать его с собой в душ (если речь идет о влагостойких моделях, само-собой), крепить на стену в кухне или мастерской, и т.д.

Купить держатель-присоску для смартфона
Смотрите также:
- Идеи для подарка: 20 полезных аксессуаров для владельцев iPhone.
- Автомобильная зарядка для iPhone и гаджетов на Android: как выбрать + 10 лучших вариантов.
- Внешний аккумулятор (повербанк) для телефона и ноутбука: 10 лучших вариантов.
![]()
Download Article
![]()
Download Article
Want a safer way to charge your phone on an outlet that’s a little too high off the floor for your charger? All it takes is a few seconds, your charging cord, and a hanging phone charger trick that involves creating a seat for your phone out of nothing. Alternatively, you can buy or craft something that will make charging your phone next to the outlet a breeze. In any case, we’ve got you covered. Read on to learn how you can charge your phone without resting it on some precarious makeshift ledge or leaving it dangling in the air.
Things You Should Know
- For a quick and easy trick, loop your charger’s cord in a circle and wrap the phone over the charger. Let the phone rest in the bottom of the loop on top of the cord.
- You can buy a sleek and simple phone holder that attaches to your wall for $10-20 if you want a simple, permanent solution to your problem.
- If you’re feeling crafty, you can cut a phone holder out of a used shampoo bottle or sew one out of fabric.
-

1
Plug your charger in and form a loop with the cord. Plug the charger into the outlet and plug the other end into your phone. Form a large loop with the cord by bringing the phone up and to the left so you’re your phone is on top of the charger.[1]
- This hack is a little risky if your phone case is super heavy. If you’ve got one of those giant industrial cases that can survive a fall from the top of a skyscraper, you may want to remove it before doing this.
-

2
Set your phone down in the bottom of the loop. Keep one hand on the loose end of the loop to keep it underneath the charger. Wrap the cord over the charger’s body and pull the phone down on the right towards the bottom of the loop.[2]
- This should look a little bit like a swing for your phone. The bottom of the loop is the “seat” and the charger itself is the bar holding the swing.
Advertisement
-

3
Balance your phone on the cord and let it charge. Lay your phone across the bottom of the loop and very gently allow the phone to weigh the cord down a bit to remove the slack. Then, adjust the loop and phone until your phone is laying flat in the air and let go![3]
- Keep your hands underneath the phone for a few seconds in case it falls as the phone settles.
- While this works, keep in mind that you are letting your phone dangle in the air by a single cord. There’s always a risk your phone falls. If you can, leave a pillow or something soft underneath the phone.
Advertisement
-

1
Buy a loop mount for an outlet for a simple, cheap solution. Want a lightweight, simple shelf for your phone that you can attach to any outlet? Look for a lightweight wall mount that loops around the outlet or the charger online and pick one up. It shouldn’t cost more than $10-20.[4]
- There are rubber shelves that hang on the charging port when it’s plugged in, like this phone holder by Bobino.
- Alternatively, there are shelves that loop around your entire outlet, like this shelf manufactured by Wali.
-

2
Install a cheap wall pocket for your phone with screws or tape. If you have a wall outlet you regularly use in your home, why not install a permanent wall mount for it? There are plenty of small wall units for this precise problem! If you don’t want to screw anything into the wall, pick up a holder with a sticky tape backing and stick it on to your wall. Alternatively, you can use a holder that requires screws for a permanent option.[5]
- There are plenty of phone holders in this style that come in all different shapes and colors. This particular mount is extremely well-reviewed and only costs $9!
-

3
Hang a magnetic holder for a slick, modern option. Want something a little cooler than a boring old shelf? Go magnetic! For most of these holders, you simply peel off some sticky tape and stick one side of a magnet on to the wall next to your outlet. Then, you attach a tiny magnet to the back of your phone case. When you want to charge it, simply plug the cord in and then stick your phone to the magnet![6]
- According to New York Times, the iOttie magnetic mount is the best phone holder for the car.[7]
- According to New York Times, the iOttie magnetic mount is the best phone holder for the car.[7]
Advertisement
-

1
Remove the labels from an old bottle and rinse it out thoroughly. Find an old lotion or shampoo bottle and peel off any labels. Rinse out the bottle to be sure there isn’t any residue left. Dry the bottle thoroughly with a cloth or let it air dry.[8]
- If there’s sticky residue left from the labels, use a warm water and soap to get rid of it.
-

2
Create an upside-down U shape on one side of the bottle near the top. Use a permanent marker to draw the upside-down U so that the curve of the U is about 1–2 inches (2.5–5.1 cm) from the top of the bottle. While the curve of the upside-down U should take up as much of the bottle’s width as possible, the legs of the U only need to go halfway down the length of the bottle.[9]
- The U shape will be the portion of the bottle that you’ll attach to the wall.
-

3
Flip the bottle over and draw a horizontal line halfway down the bottle. Use a permanent marker to draw a straight line right across the middle of the bottle. Connect the upside-down U shape and horizontal line on the left and right sides of the bottle so that they’re both connected.[10]
- This should look a little bit like a basic plateau.
- The horizontal line will become the opening of the pocket for the phone.
-

4
Trace your charger inside the upside-down U shape. This is where the holder will fit over the hook or adapter. Place your power adapter in the center of the U shape’s curve and trace around it to create a hole large enough to fit over it.[11]
- Another way to get an accurate square is to measure your adapter and transfer the measurements to the bottle.
- If you make a mistake while using the permanent marker, use a paper towel or cotton ball soaked in acetone to erase the lines.
-

5
Cut the bottle according to your markings using sharp scissors. Go along the lines you made with the permanent marker and cut off the top of the bottle so that you create a pocket where your phone will sit. Don’t worry if the cut edges of your bottle aren’t perfect or pretty—you can always cover them up later if you’d like.[12]
- Use a precision knife instead of scissors, if desired.
-

6
Decorate the bottle with washi tape or stickers for a playful look. If you don’t care for the plastic bottle vibe, add a few decorations to the bottle to finish it off like tape, ribbons, or any other craft supplies you have. For example, you might add washi tape along the edges of the bottle to make them softer, tie a ribbon around the bottle for a cute look, or cover the plastic bottle in your favorite stickers or glitter.[13]
- Use acetone and a cotton ball to remove the permanent marker from the bottle if you didn’t perfectly cut.
-

7
Use spray paint or acrylic paint on the bottle to cover it completely. While this takes a little more time, it will help make sure your phone holder looks less like a plastic bottle. Use a paint or foam brush to cover the outside of the bottle in acrylic paint or use a can of spray paint to quickly transform the bottle.[14]
- You could even paint patterns or flowers on your bottle for a unique design.
-

8
Attach an adhesive hook to your wall to hang the holder. Purchase a removable hook from your local big box store, remove the adhesive, and place it next to your outlet. Hang the phone holder on the hook using the hollow circle at the top of the bottle and place your phone in the pocket you made by cutting the plastic.[15]
- It’s okay to hang your new phone holder overtop the adapter if you’re only charging it for a few minutes. Otherwise, hanging it next to the outlet is safer so the holder doesn’t accidentally touch the metal prongs and cause melting or other damage.
Advertisement
-

1
Cut 2 fabrics to make 11 in × 6 in (28 cm × 15 cm) upside-down U shapes. Use a pen or marker to draw a large upside-down U on 2 pieces of fabric. Make the U roughly 11 in (28 cm) long and 6 in (15 cm) wide so there’s plenty of room for your phone. Use sharp scissors to cut each piece of fabric.[16]
- Use any type of fabric you’d like to make the holder.
-

2
Sew the fabrics together to create the back of your holder. Place each of the upside-down U shapes on top of one another so they’re all perfectly even. Use a needle and thread or a sewing machine to sew around each edge of the shape to keep them together.[17]
- It doesn’t matter which type of stitch you use to sew the fabrics together as long as they’re secure.
- Use sewing pins to keep the fabric in place while you’re sewing if you’d like.
-

3
Cut 7 by 6 in (18 by 15 cm) rectangles and sew them together. Pick out 2-3 pieces of fabric and draw a rectangle on them that’s 7 in (18 cm) long and 6 in (15 cm) wide. Once they’re all cut out, place them on top of one another and sew them together.[18]
- The multiple layers of fabric will help make a thicker and sturdier phone holder.
- Use sewing pins to keep the rectangle in place against the upside-down U shape.
-

4
Place the thick rectangle on top of the U shape so it’s centered. Situate your upside-down U shape so the fabric that you’d like displayed is facing upwards. Set the rectangle on top of the U shape at the bottom, lining up the edges so they’re perfectly in line with the backing.[19]
- The upside-down U and the rectangle are both 6 in (15 cm) wide, so they should fit nicely inside one another.
-

5
Sew the left, right, and bottom edges of the rectangle onto the U shape. Use a needle and thread or a sewing machine to carefully sew the rectangle onto the upside-down U. Only sew the left, right, and bottom edge of the rectangle, leaving the top edge loose to create the pocket.[20]
-

6
Cut a large hole in the top of the upside-down U shape. Create a hole large enough to fit over the hook you’ll use or your phone charger’s adapter. Use scissors to cut out the center and add ribbon or string around the hole to hide the cut edges of the fabric if you’d like.[21]
- Place a circular object or your charger’s plug on top of the fabric and trace around it with a pen, if needed.
- Glue or sew ribbon around the edges of the hole to make them look better.
-

7
Add decorative elements like ribbons onto the edges, if you’d like. If you want to hide the sewn edges of your phone holder, glue ribbon around each edge. Use hot glue to finish it quickly, or even sew the ribbon onto each edge so it’s super secure.[22]
-

8
Hang the phone holder on a hook next to a charger to use it. Purchase an adhesive hook and attach it right next to your outlet. Place your phone in your new phone holder using the pocket and put the holder on the hook. Plug the charger in, and you’re all set![23]
- It’s best not to put fabric directly on top of the adapter in case it accidentally touches the metal prongs, which can be a fire hazard. Always put the fabric holder next to the charger if possible.
Advertisement
Add New Question
-
Question
How do I use a belt to hold my phone?

This answer was written by one of our trained team of researchers who validated it for accuracy and comprehensiveness.
wikiHow Staff Editor
Staff Answer
You could theoretically wrap the belt around the charger and try to balance your phone on that, but this sounds like an extremely risky way to charge your phone. If you’re just talking about holding the phone when it’s off the charger, you could just tuck the phone in your belt. Again, this sounds exceptionally risky, though. We wouldn’t recommend using a belt in either situation.
Ask a Question
200 characters left
Include your email address to get a message when this question is answered.
Submit
Advertisement
-
There are a lot of myths out there about the dangers of using your phone when it’s charging. In reality, it’s perfectly fine to do this. You aren’t damaging your body or your phone if you use it while it’s plugged in.[24]
Thanks for submitting a tip for review!
Advertisement
About This Article
Thanks to all authors for creating a page that has been read 37,237 times.
If you buy through links on our site, we may earn a commission.
Is this article up to date?
![]()
Download Article
![]()
Download Article
Want a safer way to charge your phone on an outlet that’s a little too high off the floor for your charger? All it takes is a few seconds, your charging cord, and a hanging phone charger trick that involves creating a seat for your phone out of nothing. Alternatively, you can buy or craft something that will make charging your phone next to the outlet a breeze. In any case, we’ve got you covered. Read on to learn how you can charge your phone without resting it on some precarious makeshift ledge or leaving it dangling in the air.
Things You Should Know
- For a quick and easy trick, loop your charger’s cord in a circle and wrap the phone over the charger. Let the phone rest in the bottom of the loop on top of the cord.
- You can buy a sleek and simple phone holder that attaches to your wall for $10-20 if you want a simple, permanent solution to your problem.
- If you’re feeling crafty, you can cut a phone holder out of a used shampoo bottle or sew one out of fabric.
-
1
Plug your charger in and form a loop with the cord. Plug the charger into the outlet and plug the other end into your phone. Form a large loop with the cord by bringing the phone up and to the left so you’re your phone is on top of the charger.[1]
- This hack is a little risky if your phone case is super heavy. If you’ve got one of those giant industrial cases that can survive a fall from the top of a skyscraper, you may want to remove it before doing this.
-
2
Set your phone down in the bottom of the loop. Keep one hand on the loose end of the loop to keep it underneath the charger. Wrap the cord over the charger’s body and pull the phone down on the right towards the bottom of the loop.[2]
- This should look a little bit like a swing for your phone. The bottom of the loop is the “seat” and the charger itself is the bar holding the swing.
Advertisement
-
3
Balance your phone on the cord and let it charge. Lay your phone across the bottom of the loop and very gently allow the phone to weigh the cord down a bit to remove the slack. Then, adjust the loop and phone until your phone is laying flat in the air and let go![3]
- Keep your hands underneath the phone for a few seconds in case it falls as the phone settles.
- While this works, keep in mind that you are letting your phone dangle in the air by a single cord. There’s always a risk your phone falls. If you can, leave a pillow or something soft underneath the phone.
Advertisement
-
1
Buy a loop mount for an outlet for a simple, cheap solution. Want a lightweight, simple shelf for your phone that you can attach to any outlet? Look for a lightweight wall mount that loops around the outlet or the charger online and pick one up. It shouldn’t cost more than $10-20.[4]
- There are rubber shelves that hang on the charging port when it’s plugged in, like this phone holder by Bobino.
- Alternatively, there are shelves that loop around your entire outlet, like this shelf manufactured by Wali.
-
2
Install a cheap wall pocket for your phone with screws or tape. If you have a wall outlet you regularly use in your home, why not install a permanent wall mount for it? There are plenty of small wall units for this precise problem! If you don’t want to screw anything into the wall, pick up a holder with a sticky tape backing and stick it on to your wall. Alternatively, you can use a holder that requires screws for a permanent option.[5]
- There are plenty of phone holders in this style that come in all different shapes and colors. This particular mount is extremely well-reviewed and only costs $9!
-
3
Hang a magnetic holder for a slick, modern option. Want something a little cooler than a boring old shelf? Go magnetic! For most of these holders, you simply peel off some sticky tape and stick one side of a magnet on to the wall next to your outlet. Then, you attach a tiny magnet to the back of your phone case. When you want to charge it, simply plug the cord in and then stick your phone to the magnet![6]
- According to New York Times, the iOttie magnetic mount is the best phone holder for the car.[7]
- According to New York Times, the iOttie magnetic mount is the best phone holder for the car.[7]
Advertisement
-
1
Remove the labels from an old bottle and rinse it out thoroughly. Find an old lotion or shampoo bottle and peel off any labels. Rinse out the bottle to be sure there isn’t any residue left. Dry the bottle thoroughly with a cloth or let it air dry.[8]
- If there’s sticky residue left from the labels, use a warm water and soap to get rid of it.
-
2
Create an upside-down U shape on one side of the bottle near the top. Use a permanent marker to draw the upside-down U so that the curve of the U is about 1–2 inches (2.5–5.1 cm) from the top of the bottle. While the curve of the upside-down U should take up as much of the bottle’s width as possible, the legs of the U only need to go halfway down the length of the bottle.[9]
- The U shape will be the portion of the bottle that you’ll attach to the wall.
-
3
Flip the bottle over and draw a horizontal line halfway down the bottle. Use a permanent marker to draw a straight line right across the middle of the bottle. Connect the upside-down U shape and horizontal line on the left and right sides of the bottle so that they’re both connected.[10]
- This should look a little bit like a basic plateau.
- The horizontal line will become the opening of the pocket for the phone.
-
4
Trace your charger inside the upside-down U shape. This is where the holder will fit over the hook or adapter. Place your power adapter in the center of the U shape’s curve and trace around it to create a hole large enough to fit over it.[11]
- Another way to get an accurate square is to measure your adapter and transfer the measurements to the bottle.
- If you make a mistake while using the permanent marker, use a paper towel or cotton ball soaked in acetone to erase the lines.
-
5
Cut the bottle according to your markings using sharp scissors. Go along the lines you made with the permanent marker and cut off the top of the bottle so that you create a pocket where your phone will sit. Don’t worry if the cut edges of your bottle aren’t perfect or pretty—you can always cover them up later if you’d like.[12]
- Use a precision knife instead of scissors, if desired.
-
6
Decorate the bottle with washi tape or stickers for a playful look. If you don’t care for the plastic bottle vibe, add a few decorations to the bottle to finish it off like tape, ribbons, or any other craft supplies you have. For example, you might add washi tape along the edges of the bottle to make them softer, tie a ribbon around the bottle for a cute look, or cover the plastic bottle in your favorite stickers or glitter.[13]
- Use acetone and a cotton ball to remove the permanent marker from the bottle if you didn’t perfectly cut.
-
7
Use spray paint or acrylic paint on the bottle to cover it completely. While this takes a little more time, it will help make sure your phone holder looks less like a plastic bottle. Use a paint or foam brush to cover the outside of the bottle in acrylic paint or use a can of spray paint to quickly transform the bottle.[14]
- You could even paint patterns or flowers on your bottle for a unique design.
-
8
Attach an adhesive hook to your wall to hang the holder. Purchase a removable hook from your local big box store, remove the adhesive, and place it next to your outlet. Hang the phone holder on the hook using the hollow circle at the top of the bottle and place your phone in the pocket you made by cutting the plastic.[15]
- It’s okay to hang your new phone holder overtop the adapter if you’re only charging it for a few minutes. Otherwise, hanging it next to the outlet is safer so the holder doesn’t accidentally touch the metal prongs and cause melting or other damage.
Advertisement
-
1
Cut 2 fabrics to make 11 in × 6 in (28 cm × 15 cm) upside-down U shapes. Use a pen or marker to draw a large upside-down U on 2 pieces of fabric. Make the U roughly 11 in (28 cm) long and 6 in (15 cm) wide so there’s plenty of room for your phone. Use sharp scissors to cut each piece of fabric.[16]
- Use any type of fabric you’d like to make the holder.
-
2
Sew the fabrics together to create the back of your holder. Place each of the upside-down U shapes on top of one another so they’re all perfectly even. Use a needle and thread or a sewing machine to sew around each edge of the shape to keep them together.[17]
- It doesn’t matter which type of stitch you use to sew the fabrics together as long as they’re secure.
- Use sewing pins to keep the fabric in place while you’re sewing if you’d like.
-
3
Cut 7 by 6 in (18 by 15 cm) rectangles and sew them together. Pick out 2-3 pieces of fabric and draw a rectangle on them that’s 7 in (18 cm) long and 6 in (15 cm) wide. Once they’re all cut out, place them on top of one another and sew them together.[18]
- The multiple layers of fabric will help make a thicker and sturdier phone holder.
- Use sewing pins to keep the rectangle in place against the upside-down U shape.
-
4
Place the thick rectangle on top of the U shape so it’s centered. Situate your upside-down U shape so the fabric that you’d like displayed is facing upwards. Set the rectangle on top of the U shape at the bottom, lining up the edges so they’re perfectly in line with the backing.[19]
- The upside-down U and the rectangle are both 6 in (15 cm) wide, so they should fit nicely inside one another.
-
5
Sew the left, right, and bottom edges of the rectangle onto the U shape. Use a needle and thread or a sewing machine to carefully sew the rectangle onto the upside-down U. Only sew the left, right, and bottom edge of the rectangle, leaving the top edge loose to create the pocket.[20]
-
6
Cut a large hole in the top of the upside-down U shape. Create a hole large enough to fit over the hook you’ll use or your phone charger’s adapter. Use scissors to cut out the center and add ribbon or string around the hole to hide the cut edges of the fabric if you’d like.[21]
- Place a circular object or your charger’s plug on top of the fabric and trace around it with a pen, if needed.
- Glue or sew ribbon around the edges of the hole to make them look better.
-
7
Add decorative elements like ribbons onto the edges, if you’d like. If you want to hide the sewn edges of your phone holder, glue ribbon around each edge. Use hot glue to finish it quickly, or even sew the ribbon onto each edge so it’s super secure.[22]
-
8
Hang the phone holder on a hook next to a charger to use it. Purchase an adhesive hook and attach it right next to your outlet. Place your phone in your new phone holder using the pocket and put the holder on the hook. Plug the charger in, and you’re all set![23]
- It’s best not to put fabric directly on top of the adapter in case it accidentally touches the metal prongs, which can be a fire hazard. Always put the fabric holder next to the charger if possible.
Advertisement
Add New Question
-
Question
How do I use a belt to hold my phone?
This answer was written by one of our trained team of researchers who validated it for accuracy and comprehensiveness.
wikiHow Staff Editor
Staff Answer
You could theoretically wrap the belt around the charger and try to balance your phone on that, but this sounds like an extremely risky way to charge your phone. If you’re just talking about holding the phone when it’s off the charger, you could just tuck the phone in your belt. Again, this sounds exceptionally risky, though. We wouldn’t recommend using a belt in either situation.
Ask a Question
200 characters left
Include your email address to get a message when this question is answered.
Submit
Advertisement
-
There are a lot of myths out there about the dangers of using your phone when it’s charging. In reality, it’s perfectly fine to do this. You aren’t damaging your body or your phone if you use it while it’s plugged in.[24]
Thanks for submitting a tip for review!
Advertisement
About This Article
Thanks to all authors for creating a page that has been read 37,237 times.
If you buy through links on our site, we may earn a commission.
Is this article up to date?
1 На рейлинге
Простой и изящный способ организации места для зарядки смартфона — рейлинг и подвесная полочка-корзина. Повторить такое решение в собственном доме не составит труда, при этом затраты будут минимальны, а результат точно порадует.

Фото: Instagram organizerjanet
2 В выдвижном ящике
Чуть более трудозатратный вариант, позволяющий, однако, полностью скрыть с глаз все зарядки и провода, — станция для гаджетов в выдвижном ящике (письменного стола, комода или кухонного гарнитура).

Фото: Instagram thehouseinthehollow
Если у вас довольно много разнообразных электроприборов, требующих подзарядки, выберите ящик повместительнее. Весьма изящное, а главное, практичное решение проблемы проводов, не правда ли?

Фото: Instagram organizerjanet
3 На полочке
Любителей располагать телефон на подзарядку на ночь — и непременно рядом с кроватью! — порадует другое аккуратное решение: прикроватная мини-полочка с разъемом для подключения гаджетов. Цепляется такая полка на бортик кровати — и дает возможность расположить смартфон и еще пару необходимых мелочей (скажем, пульт от телевизора или кондиционера).

Фото: Instagram 88main
Впрочем, выбрать можно и совсем компактный вариант, вроде этой мини-полки, которая крепится прямо на стену рядом с розеткой.

Полка для смартфона. Цена: 98 руб. Фото: AliExpress
4 На док-станции — органайзере
Современные производители аксессуаров для дома прекрасно понимают, что без смартфона современный человек уже никуда, и потому предлагают немало стильных решений для организации стильной и удобной станции для подзарядки гаджетов.
Существуют разнообразные док-станции с функцией органайзеров, позволяющие, помимо телефона, аккуратно расположить часы, кольца, визитницу и прочие важные мелочи.

Фото: Instagram grootgadgets
5 За кашпо
Другой хитрый ход, позволящий спрятать зарядки для смартфонов в интерьере, — док-станции в виде кашпо с суккулентами.

Дизайн: suitetreatments.com
Посмотрите, какая стильная декоративная вещица, а главное, никто не догадается, что она скрывает в себе массу проводов.

Дизайн: suitetreatments.com
6 В стильном чехле
Еще одна идея, помогающая прятать провода в интерьере, — стильный чехол, скрывающий всевозможные зарядки и маскирующий их под декоративный аксессуар.

Дизайн: IKEA
7 В специальной коробке
Впрочем, существуют и стилистические нейтральные коробки для проводов, помогающие аккуратно организовать местечко для подзарядки гаджетов.

Дизайн: IKEA
Присмотритесь к такому варианту с AliExpress. В нём можно спрятать целый удлинитель и использовать для подзарядки разных устройств.

Бокс для проводов. Цена: 838 руб. Фото: AliExpress
8 Беспроводные технологии
Современное решение — аккуратная и стильная док-станция для беспроводной зарядки смартфона или планшета. Конечно, вряд ли такое решение подойдет для тех, у кого целый арсенал гаджетов, требующих подзарядки. Зато выручит тех, кому хочется стильно организовать рабочее место или пространство на прикроватной тумбочке — и решить вопрос с проводами от телефонного зарядного устройства.
9 На полках
Самые обыкновенные полки тоже могут выручить в деле организации места для телефонных зарядок.
Плюсы такого решения:
- полки можно разместить практически везде (подобрав актуальную длину и ширину);
- найти модели, подходящие по цвету и стилистике к вашему интерьеру, не составит труда;
- стоимость такого решения — весьма демократичная.
Автор:
12 сентября 2020 09:35
Без смартфона нельзя представить себе современного человека, но далеко не у каждого есть подставка для гаджета. Она нужна не всегда, зато когда понадобится — её можно сделать своими руками.

Источник:
Неважно, по какой причине вам понадобилась подставка для смартфона, если нет заводского аксессуара, то всегда есть возможность быстро смастерить аналог из подручных средств. Причём зачастую речь идёт не об одноразовых подставках, а о тех, что можно использовать долгое время.
Канцелярские зажимы

Источник:
Канцелярские зажимы или биндеры помогут быстро и легко соорудить подставку для смартфона. Достаточно дополнить их любой пластиковой или даже бумажной карточкой, и крепление для гаджета готово. Можно соорудить и более сложную конструкцию из одних только биндеров — как хотите.
Бумага или картон

Источник:
Если вспомнить традиционное японское искусство оригами или же нагуглить в интернете схему самодельной подставки из бумаги, то крепление под смартфон можно соорудить буквально голыми руками с помощью одних только ножниц и более-менее плотной бумаги или картона.
Винные пробки

Источник:
При наличии нескольких винных пробок, небольшого количества клея, ножа и свободного времени можно сделать подставку для смартфона буквально в течение нескольких минут. Получится достаточно стильный аксессуар.
Втулка от туалетной бумаги

Источник:
Картонная втулка от туалетной бумаги парой движений ножа превращается во вполне состоятельную подставку для смартфона. А если добавить ещё пару пластиковых стаканчиков, то получится и вовсе портативная колонка.
Канцелярские скрепки

Источник:
Если под рукой нет зажимов-биндеров, но имеется как минимум пара больших канцелярских скрепок, то сгодятся и они. Парой движений их можно превратить в пригодные для удержания смартфона подставки.
Пластиковая карта

Источник:
Когда кровь из носу нужна подставка, а под рукой нет ничего, кроме пластиковых карт, то и их можно превратить в держатель для смартфона. Лучше, конечно, для этого использовать ненужные дисконтные карты или на худой конец подарочные сертификаты, а банковские карты оставить на самый крайний случай, потому что после доработки использовать их по основному назначению вряд ли получится.
Конструктор Lego

Источник:
При наличии достаточного количества кубиков и богатой фантазии легко собрать настоящую многофункциональную док-станцию. Что хорошо — её так же легко превратить обратно в конструктор. И это, пожалуй, самый универсальный способ создать подставку для смартфона своими руками.
Футляр от аудиокассеты

Источник:
В наши дни проще найти конструктор Lego, чем футляр от аудиокассеты, но если он есть под рукой, то фактически подставка готова. Не надо даже ничего дорабатывать — достаточно вынуть кассету и развернуть её футляр для установки смартфона.
Карандаши и резинки

Источник:
В офисе, где много карандашей и резинок, но нет ни одной подставки для смартфона, её можно сделать из того, что есть. Потребуется просто связать несколько карандашей резинками в стойки и скрепить их между собой всё теми же резинками.
Рулон скотча

Источник:
Вероятно, самый очевидный и простой вариант подручной подставки для гаджета. Достаточно просто опереть смартфон на рулон скотча или поставить смартфон внутрь и освободить тем самым руки. Даже дорабатывать ничего не придётся.
Логично, что 10 представленными выше способами варианты создания подставок не исчерпываются. Держателем для гаджета может стать практически всё, что есть под рукой, если проявить фантазию.
Источник:
Ссылки по теме: