Если вы заметили, что динамик смартфона стал тише работать, и приходится увеличивать громкость, тому есть логичная причина: скорее всего сетка динамика смартфона забилась грязью. Предлагаем простой способ почистить ее и вернуть гаджету нормальную громкость.
Как засоряется решетка?
Очень просто: вы, наверняка, часто носите аппарат в кармане. В карманах всегда собираются волокна ткани, так что на сетке динамика легко застревают микроволоски. Да и на столе, где тоже часто бывает смартфон, тоже не всегда идеальная чистота. При этом вы постоянно прижимаете динамик к уху, так что он еще и смачивается кожным жиром. В результате сетка очень быстро забивается, что и влияет на громкость и качество звука.
Как почистить динамик телефона в домашних условиях
Как обычно, лучше делать это периодически, не дожидаясь критических последствий. Тем более, что для очистки нужно совсем немного времени. Вам пригодятся вполне обычные и доступные компоненты: спирт, ватные палочки, зубная щетка с тонкими щетинками и малярный скотч, а также прозрачный скотч.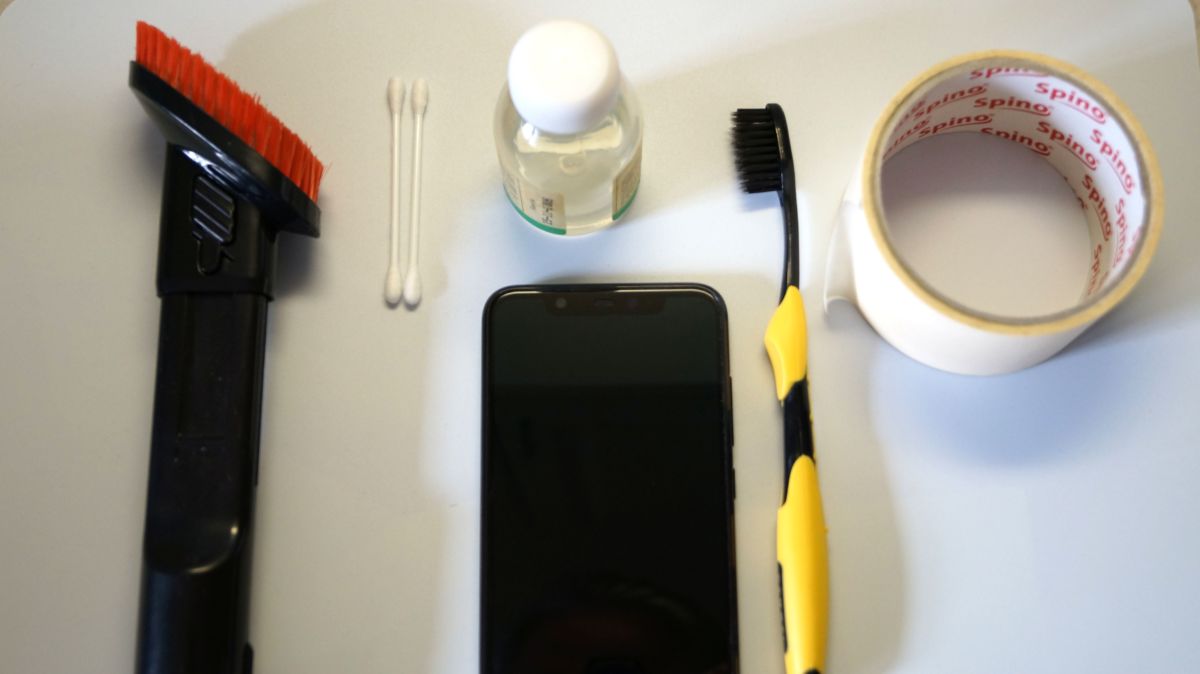

Первый этап: удаляем пыль пылесосом
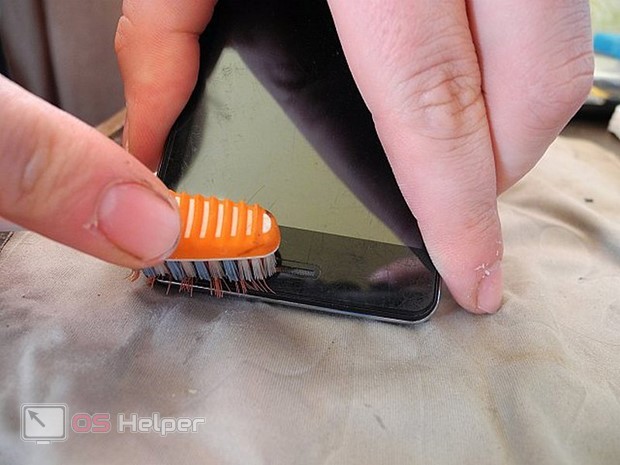
Как это ни странно, но обычный бытовой пылесос с ворсистой насадкой может быть лучшим решением для чистки динамика. Особенно, если он глубоко утоплен за поверхность экрана. Если пылесос миниатюрный (как, например, Xiaomi Mi Vacuum Cleaner) — еще проще. Аккуратно, стараясь не касаться жестким пластиком щетки экрана смартфона несколько раз пройдитесь щеткой в районе динамика (и заодно у USB-порта). Большая часть пыли должна исчезнуть.
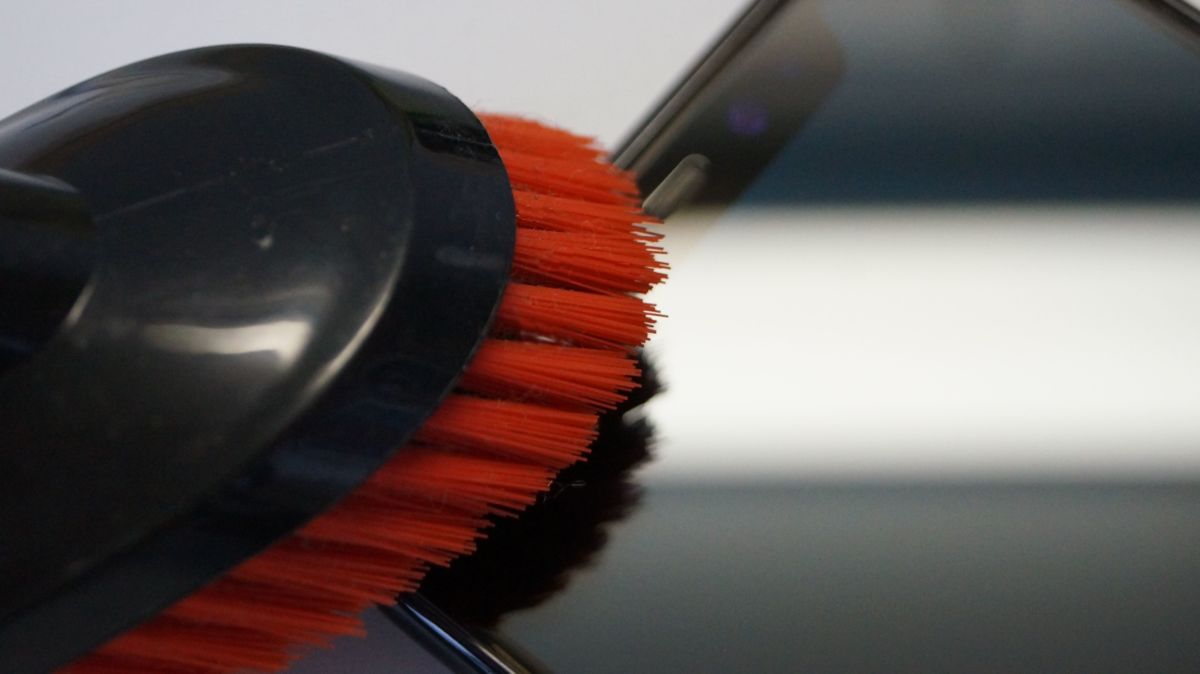 Затем настает очередь чистки зубной щеткой. Для такой работы желательно приобрести специальную зубную щетку с заостренными кончиками щетины.
 Второй этап: протираем спиртом
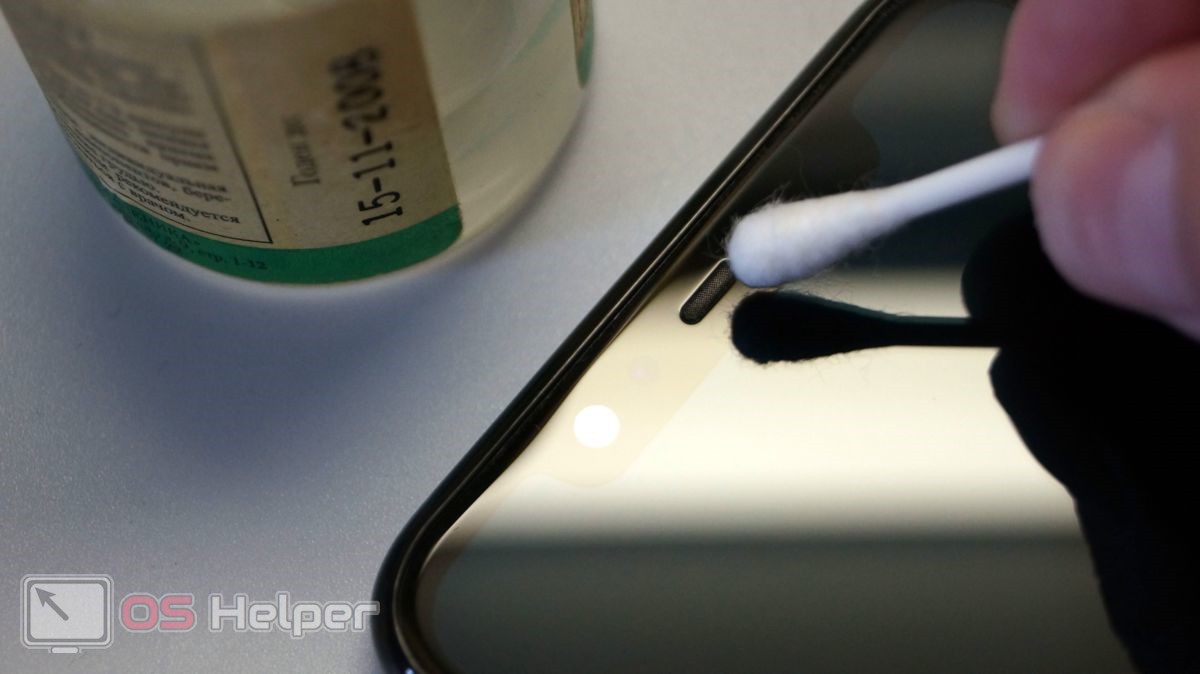
Спирт можно приобрести в любой аптеке, чаще его называют «медицинский антисептический раствор». Там же можно купить и ватные палочки. Чтобы жидкость не проникла к самому динамику, лишь слегка смочите палочку и аккуратно, без усилий, протрите ей динамик. Дайте ему просохнуть примерно 3 минуты.

Если у вас есть увеличительное стекло, после этой процедуры рассмотрите внимательно динамик. Он должен уже сверкать чистой поверхностью. Но если в отверстиях еще осталась грязь, придется применить более кардинальный способ.

Третий этап: приклеиваем малярный скотч
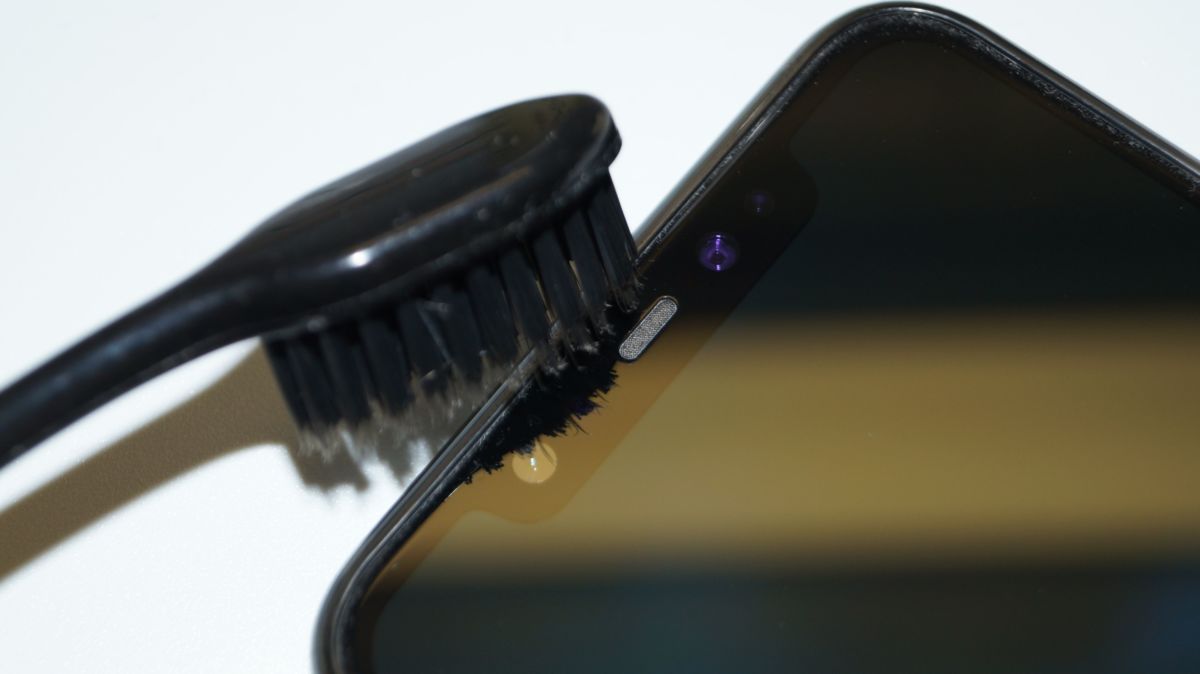
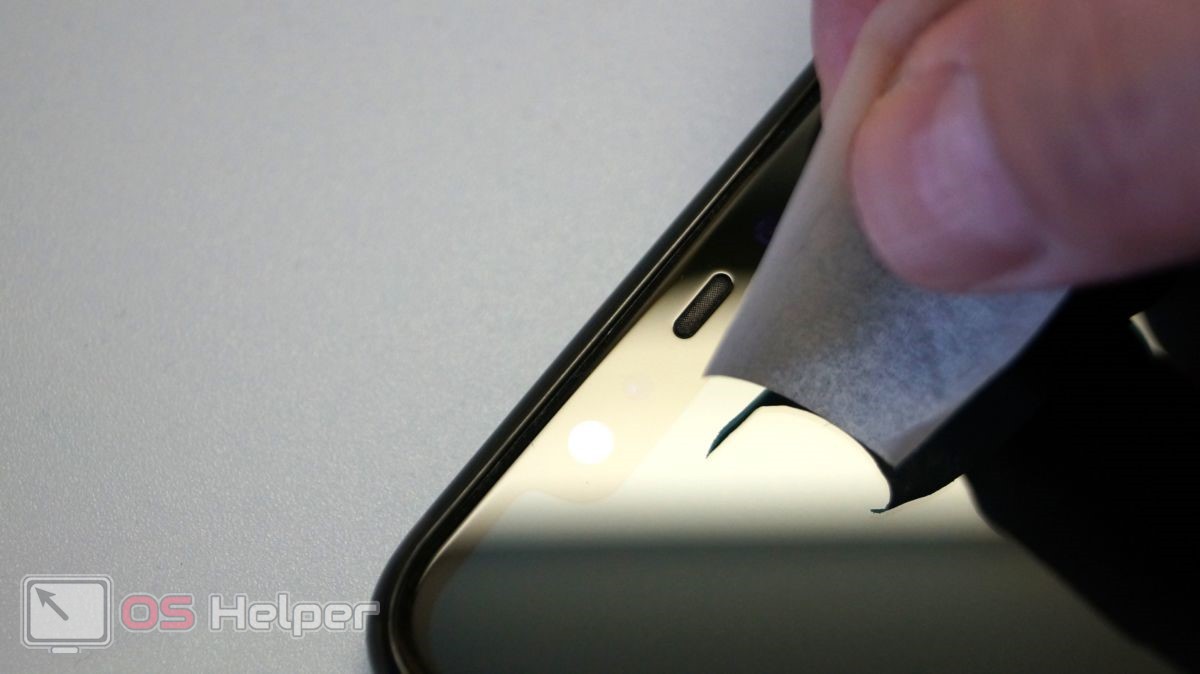
Очистить решетку от грязи можно с помощью малярного скотча. Но только в том случае, если она не сильно заглублена. Липкий слой не оставит следов на экране, но приклеит жир и пыль из щелей сетки динамика.
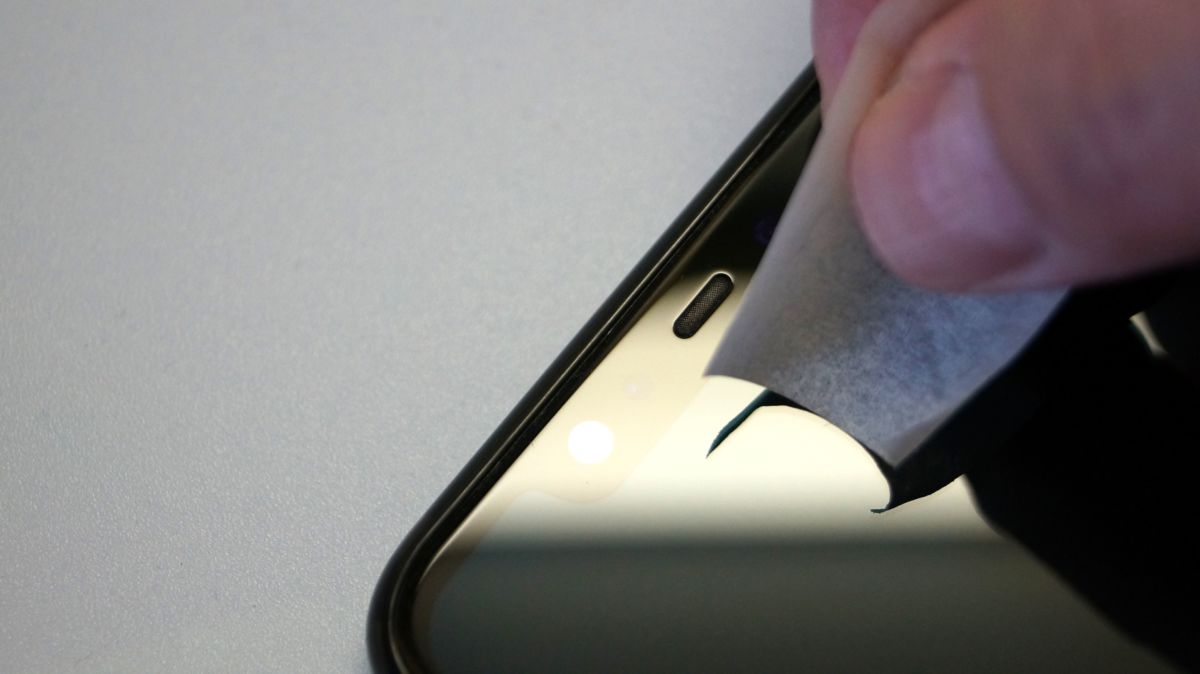 Просто наклейте скотч липкой стороной к динамику и плотно прогладьте (той же ватной палочкой) в районе сетки динамика. Повторите процедуру несколько раз, меняя липкую область. Для этой процедуры можно использовать и прозрачный скотч, но нужно быть уверенным, что липкий слой от него не отделяется и не останется на поверхности дисплея. Если останется, его можно удалить тем же спиртом.
Что делать, если ничего не получилось
Не всегда «подручные средства» эффективно работают. Если видимых изменений в состоянии сетки нет, придется нести аппарат в сервис. Обычно процедура очистки стоит недорого, около 1500 руб. И, как правило, страдают те, кто запустил ситуацию. Вот вам еще один повод периодически очищать сетку динамика в домашних условиях.
Кстати, от пыли не помешает чистить и персональный компьютер. И это тоже несложно — почитайте наш гид, и у вас все получится.
На чтение 4 мин Просмотров 1.5к. Опубликовано 19.06.2019
![]() При длительной эксплуатации труднодоступные места на корпусе смартфона начинают постепенно засоряться. В особенности это касается сетки микрофона и динамика. Загрязнение не только портит внешний вид устройства, но и снижает качество связи при разговоре. Сегодня мы поговорим о том, как почистить динамик на телефоне подручными средствами.
При длительной эксплуатации труднодоступные места на корпусе смартфона начинают постепенно засоряться. В особенности это касается сетки микрофона и динамика. Загрязнение не только портит внешний вид устройства, но и снижает качество связи при разговоре. Сегодня мы поговорим о том, как почистить динамик на телефоне подручными средствами.
Содержание
- Зубная щетка
- Спирт и перекись водорода
- Скотч и иголки
- Другие средства
- Видеоинструкция
- Заключение
Зубная щетка
Начнем с сухой чистки, которая доступна любому владельцу телефона. Вам понадобится старая зубная щетка, которая позволит добраться до углубленного разъема динамика. Старайтесь не задевать пластиком экран и корпус телефона, чтобы случайно не нанести царапины. Для этой процедуры лучше всего подойдет небольшая щетка с заостренным ворсом.
Мнение эксперта
Дарья Ступникова
Специалист по WEB-программированию и компьютерным системам. Редактор PHP/HTML/CSS сайта os-helper.ru.
Спросить у Дарьи
Также рекомендуем почистить и другие уязвимые места смартфона. Например, очень часто пыль и грязь скапливаются на зарядном разъеме устройства.
Ни в коем случае нельзя мочить зубную щетку перед процедурой очистки или во время работы. С помощью тонких кончиков щетины вы рискуете занести небольшие капли жидкости внутрь корпуса. Повышенному риску подвержены смартфоны без защиты от влаги.
Спирт и перекись водорода
Если на динамике телефона вы обнаружили засохшую грязь вместе с пылью, то перед удалением ее можно размягчить с помощью спирта или перекиси водорода. Эти средства можно приобрести в любой аптеке вашего города. Помимо чистящего средства потребуются обычные ватные палочки. Слегка смочите один конец палочки в спирте и аккуратно проведите по сетке динамика телефона. Ватная палочка должна быть лишь слегка влажная, но не полностью смоченная в спирте. Иначе при сильном нажиме вы рискуете выдавить часть жидкости, которая попадет внутрь корпуса.
После процедуры оставьте телефон сохнуть на 3-5 минут. Затем возьмите увеличительное стекло и проверьте, остались ли следы от грязи. Если загрязнения не были удалены полностью, то повторите чистку. Если вариант со спиртом или перекисью водорода не помогает, то переходите к следующим способам.
Скотч и иголки
Варианты с малярным скотчем или удалением грязи с помощью иголки подойдут не для всех моделей телефонов. Во-первых, чтобы скотч удалил верхний слой грязи, он должен плотно прилегать к поверхности. А во многих устройствах разъем и сетка динамика утоплены внутрь корпуса на несколько миллиметров.
Во-вторых, способ с очисткой с помощью иглы подойдет не каждому пользователю, поскольку здесь нужна предельная аккуратность. Лучше всего в работе использовать лупу, чтобы случайно не проткнуть сетку слишком глубоко.
Другие средства
Напоследок, мы предлагаем вам ознакомиться с парой неординарных методов, которые достаточно эффективно помогут в чистке динамика. Один из вариантов – это использованная жевательная резинка. Ее нужно прилепить к отверстию, после чего содрать вместе с пылью. Этот способ можно использовать в качестве вспомогательного (после чистки спиртом и щеткой).

Следующим вариантом является специальная маска для лица, удаляющая «черные точки». Принцип действия у черной маски точно такой же, как и у жевательной резинки. Однако средство проникает на несколько миллиметров между отверстиями сетки, из-за чего очищает динамик гораздо эффективнее. Нанесите тонкий слой маски и удалите пленку через 5 минут.
Но для полноценной чистки необходимо разбирать корпус девайса и удалять загрязнения изнутри. Мы советуем обратиться за помощью в сервис, а не пытаться разобрать телефон самостоятельно.
Видеоинструкция
Если вас интересует наглядное руководство в формате видео, то не пропускайте данный ролик про чистку динамика на телефоне.
Заключение
Теперь во время разговора по телефону вы будете отчетливо слышать голос собеседника и не станете переспрашивать каждую фразу, раздражая человека. А если после чистки качество связи ухудшилось или не изменилось, то стоит срочно обратиться в сервисный центр. Возможно, проблема плохой связи заключается не в загрязнении динамика и сетки, а в аппаратных или программных повреждениях. Обязательно отнесите телефон на диагностику и устраните проблему, чтобы в неожиданной ситуации не оказаться без мобильной связи!
Если у вас есть вопросы или любые комментарии по теме статьи, то обязательно пишите об этом ниже. Мы читаем все сообщения и регулярно общаемся с посетителями нашего портала!
![]()
Download Article
An in-depth guide to cleaning and minimizing damage to your phone speakers
![]()
Download Article
- Removing Speaker Dirt with Household Items
- Blowing out Dirt with Compressed Air
- Cleaning the Speakers from the Inside
- Removing Water with Silica Gel
- Removing Water with a Video
|
|
|
|
Over time, your smartphone speakers collect lint, dust, and all kinds of dirt that you probably don’t see. When you leave them uncleaned for long enough, you’ll start to hear your sound getting muffled. This can also happen if you accidentally get water in your phone. Before heading to the repair shop, there are a few great do-it-yourself techniques for cleaning your speakers from both the outside and inside of the phone. This wikiHow will show you how to properly clean your phone speaker whether it’s affected by dirt, dust, or water.
Things You Should Know
- Clean dirt and debris from your phone’s speaker by using a can of air, a cotton swab, or a toothbrush.
- To clean the speakers from the inside, make sure you are comfortable with taking your phone apart.
- Remove water from your speakers by using a desiccant or by playing a specific tone to encourage sound waves.
-

1
Locate the speakers on your phone. iPhone speakers are typically located on the bottom to the left and right of the charger port. Samsung speakers are typically on the bottom as well, but usually restricted to the left or right of the charger port. Ear speakers are almost always located on the top of the front face of the phone where you place your ear.
- Take note of alternative speaker locations, such as the side near the volume button or on the bottom of the phone’s front face.
- You may want to clean your phone screen first to remove any excess debris.
-

2
Rub a cotton swab on the outside of your speakers.[1]
Gently move it in circular motions over your speaker holes while applying a bit of pressure. Continue this process until all the dirt is out. If the speaker holes are big enough, press the swab into the holes. But don’t press too hard—just enough that the cotton at the tip enters the slot. Once inside, rub the swab left and right while applying a bit of pressure. [2]
- Switch cotton swabs when they get dirty.
- For better results, dab a small amount of rubbing alcohol onto your cotton swab.[3]
Advertisement
-

3
Compress sticky tac into a small ball and press it onto the speaker holes. Break off a 1 inch (2.5 cm) piece of sticky tac and start squeezing it into a ball. Keep compressing it until it’s soft and malleable. Afterward, press it down onto the speaker holes. Apply enough pressure that the sticky tac gets into the speaker. Hold it down for 2 to 3 seconds and remove it—you should see dirt stuck to the sticky tac. Continue this process until no more dirt comes out of the speakers.[4]
- Move your sticky tac around so that you’re always using its clean surface.
- Purchase sticky tac from office supply stores or online suppliers.
-

4
Clean small speaker grills using a medium bristle toothbrush. Tilt the brush toward either the top or bottom of your phone. Keep it parallel to the top of your phone and move it in up and down motions. Afterward, turn your toothbrush vertical (parallel to the side of your phone) and clean by moving it in left and right motions.[5]
- Angle the brush upward and scrub with the bottom bristles for tough dirt.
- Always use a medium bristle brush—soft bristles aren’t good enough to remove dirt, while the stronger ones are too thick to reach into the small speaker holes.
Advertisement
-

1
Purchase a can of compressed air. You can find compressed air cans at office supply stores, electronics stores, and online suppliers. Test it by aiming it downward and pressing the nozzle down. Get a feel for how much air comes out with each spray.[6]
- Purchase a can with a straw for increased accuracy.
- This is also a great way to clean a television screen.
-

2
Connect the straw to the nozzle of the can to improve accuracy. Screw the thin straw onto the nozzle of your compressed air can. Give it a test by aiming it downward and pressing the nozzle down. The air should blow from the tip of the straw.[7]
- Tighten the straw if you can feel air coming out of the sides of the nozzle as you spray.
- Skip the straw if you’re comfortable aiming your compressed air can without it.
-

3
Blow compressed air into the speaker slot in 3 to 4 short blasts. Keep the nozzle or tip of the straw at least 1⁄2 inch (1.3 cm) from the speaker opening. This will remove excess dirt that was pressed into the speaker from your cotton swab.[8]
- Don’t blow too close to the speaker or you can damage the phone’s internal electrical components.
- If you’re using the straw, hold it with your non-dominant hand to keep it steady as you blow air.
Advertisement
-

1
Remove the back lid from your phone with a suction cup and spudger. Heat the perimeter of your phone for about 15 seconds using a hairdryer on low heat. Afterward, apply a suction cup to the back. With the screen facing down, gently pull the suction handle toward you. At the same time, insert the flat end of a spudger in between the perimeter opening and lever it toward you. Continue levering the back piece—while still pulling on the suction cup—until it pops off.[9]
- You can purchase a spudger—a tool with a wide flat-head screwdriver end that is used as a wedge—from home hardware stores
- If you’re having trouble, apply more heat to the perimeter to loosen the glue holding to two phone pieces in place.
- With older and cheaper phone models, you can pry the back off with your hands. For newer and more expensive phones with glass backs, this isn’t possible.
-

2
Unhook the metal covers and speakers they are protecting. Both the ear speaker and phone speakers are typically held in place by metal covers. Remove the screws holding the covers in place using a #3 Phillips screwdriver and take them off. From here, gently pull the speakers out.[10]
- Gently pry the speakers out using a spudger if you’re having trouble.
-

3
Wipe down the speakers with a microfiber cloth dipped in rubbing alcohol. Dab a small amount of rubbing alcohol onto a microfiber cloth. Gently scrub the speaker pieces until they are clean. For the openings, blow into them gently from the outside. Afterward, dip a cotton swab into alcohol and gently rub it through the speaker openings.
- You can also use a soft cloth or lint-free paper towel. However, they are not as effective at picking up dirt.
- Be sure to let the speakers and openings dry before putting your speaker back together.
-

4
Remove the second back piece if you still can’t access your speakers. In some phones—typically Samsung brands—you need to remove a second back piece to access your speaker openings. These phones will have 10 to 13 more screws to remove, although the exact number varies by model and manufacturer. Use a #3 Phillips 4 inch (10 cm) screwdriver to turn each screw counterclockwise until they come loose. Afterward, pull off the second back piece.[11]
- Pull off the plastic film covering the screws if your phone has one.
- Once the second back piece is off, you can access and clean speaker openings and speakers. However, in some cases you will only be able to clean the openings.
- Snap the back piece back on when you’re finished cleaning the speakers and reattach the screws. Afterward, you can reattach the metal covers to the speakers and snap the back lid back on.
Advertisement
-

1
Turn off your phone. If your device was turned on when it was dropped in the water, you’ll need to turn it off as soon as possible.
-

2
Dry the phone with a towel. As long as the phone is turned off, it should be safe to handle. Make sure to dry the outside completely.
- If you have an Android device, be sure to take out the battery and SIM card if you’re able.
-

3
Place the phone in a sealed plastic bag with silica gel packs. Silica gel packs can be purchased online, or you may find some in packaging around your house. These packs are small, white, and usually have a printed Do not eat warning on them.
- If you don’t have silica gel packs, you can use dry, uncooked rice or another drying agent instead.
-

4
Leave the phone in the bag for at least 24 hours. It’s best to use a spot with some sunlight as this will help pull the moisture from your phone.
- Do not expose your phone to direct sunlight for an excessive amount of time.
- When there is no condensation in the bag, you can remove the device.
-

5
Turn on the phone. After inspecting your phone for residual water, you can turn it on.
- If you find that there is water lingering in your speakers, use the next method.
Advertisement
-

1
Ensure your phone has been dried properly. You can save a wet phone by acting quickly and using a desiccant.
- Use this method if you have water in your speaker and your charging port is not damaged.
- The tones will generate sound waves that can eject the water from your device.
-

2
Open the tone video in your mobile browser. If you have the YouTube app, it may open in the app automatically.
- There are a variety of tones marketed towards removing water from your speakers. If this tone does not work for your device, you can use the search bar to find another similar video.
-

3
Play the video. Be sure your device has its volume set to its max. This will ensure the tones play properly and create the sound waves you need to push the water out.
-

4
Repeat if necessary. You may need to adjust the device’s position throughout the playback. Always keep the speaker holes face down to ensure the water leaves your device.
Advertisement
Ask a Question
200 characters left
Include your email address to get a message when this question is answered.
Submit
Advertisement
Video
Things You’ll Need
- Cotton swabs
- Sticky tac
- Medium bristle toothbrush
- Compressed air can (with straw for better accuracy)
- Suction cup
- Spudger
- Phillips #3 4 inch (10 cm) screwdriver
-
If you’re still having trouble with your speakers after cleaning them, bring your phone to a repair shop.
-
Phone designs can vary, especially with newer models. Regardless of the design, never cut off any wires or connector cables, and don’t do anything you aren’t sure of. A working phone is better than a dirty one!
Advertisement
About This Article
Thanks to all authors for creating a page that has been read 354,185 times.
Is this article up to date?
![]()
Download Article
An in-depth guide to cleaning and minimizing damage to your phone speakers
![]()
Download Article
- Removing Speaker Dirt with Household Items
- Blowing out Dirt with Compressed Air
- Cleaning the Speakers from the Inside
- Removing Water with Silica Gel
- Removing Water with a Video
|
|
|
|
Over time, your smartphone speakers collect lint, dust, and all kinds of dirt that you probably don’t see. When you leave them uncleaned for long enough, you’ll start to hear your sound getting muffled. This can also happen if you accidentally get water in your phone. Before heading to the repair shop, there are a few great do-it-yourself techniques for cleaning your speakers from both the outside and inside of the phone. This wikiHow will show you how to properly clean your phone speaker whether it’s affected by dirt, dust, or water.
Things You Should Know
- Clean dirt and debris from your phone’s speaker by using a can of air, a cotton swab, or a toothbrush.
- To clean the speakers from the inside, make sure you are comfortable with taking your phone apart.
- Remove water from your speakers by using a desiccant or by playing a specific tone to encourage sound waves.
-
1
Locate the speakers on your phone. iPhone speakers are typically located on the bottom to the left and right of the charger port. Samsung speakers are typically on the bottom as well, but usually restricted to the left or right of the charger port. Ear speakers are almost always located on the top of the front face of the phone where you place your ear.
- Take note of alternative speaker locations, such as the side near the volume button or on the bottom of the phone’s front face.
- You may want to clean your phone screen first to remove any excess debris.
-
2
Rub a cotton swab on the outside of your speakers.[1]
Gently move it in circular motions over your speaker holes while applying a bit of pressure. Continue this process until all the dirt is out. If the speaker holes are big enough, press the swab into the holes. But don’t press too hard—just enough that the cotton at the tip enters the slot. Once inside, rub the swab left and right while applying a bit of pressure. [2]
- Switch cotton swabs when they get dirty.
- For better results, dab a small amount of rubbing alcohol onto your cotton swab.[3]
Advertisement
-
3
Compress sticky tac into a small ball and press it onto the speaker holes. Break off a 1 inch (2.5 cm) piece of sticky tac and start squeezing it into a ball. Keep compressing it until it’s soft and malleable. Afterward, press it down onto the speaker holes. Apply enough pressure that the sticky tac gets into the speaker. Hold it down for 2 to 3 seconds and remove it—you should see dirt stuck to the sticky tac. Continue this process until no more dirt comes out of the speakers.[4]
- Move your sticky tac around so that you’re always using its clean surface.
- Purchase sticky tac from office supply stores or online suppliers.
-
4
Clean small speaker grills using a medium bristle toothbrush. Tilt the brush toward either the top or bottom of your phone. Keep it parallel to the top of your phone and move it in up and down motions. Afterward, turn your toothbrush vertical (parallel to the side of your phone) and clean by moving it in left and right motions.[5]
- Angle the brush upward and scrub with the bottom bristles for tough dirt.
- Always use a medium bristle brush—soft bristles aren’t good enough to remove dirt, while the stronger ones are too thick to reach into the small speaker holes.
Advertisement
-
1
Purchase a can of compressed air. You can find compressed air cans at office supply stores, electronics stores, and online suppliers. Test it by aiming it downward and pressing the nozzle down. Get a feel for how much air comes out with each spray.[6]
- Purchase a can with a straw for increased accuracy.
- This is also a great way to clean a television screen.
-
2
Connect the straw to the nozzle of the can to improve accuracy. Screw the thin straw onto the nozzle of your compressed air can. Give it a test by aiming it downward and pressing the nozzle down. The air should blow from the tip of the straw.[7]
- Tighten the straw if you can feel air coming out of the sides of the nozzle as you spray.
- Skip the straw if you’re comfortable aiming your compressed air can without it.
-
3
Blow compressed air into the speaker slot in 3 to 4 short blasts. Keep the nozzle or tip of the straw at least 1⁄2 inch (1.3 cm) from the speaker opening. This will remove excess dirt that was pressed into the speaker from your cotton swab.[8]
- Don’t blow too close to the speaker or you can damage the phone’s internal electrical components.
- If you’re using the straw, hold it with your non-dominant hand to keep it steady as you blow air.
Advertisement
-
1
Remove the back lid from your phone with a suction cup and spudger. Heat the perimeter of your phone for about 15 seconds using a hairdryer on low heat. Afterward, apply a suction cup to the back. With the screen facing down, gently pull the suction handle toward you. At the same time, insert the flat end of a spudger in between the perimeter opening and lever it toward you. Continue levering the back piece—while still pulling on the suction cup—until it pops off.[9]
- You can purchase a spudger—a tool with a wide flat-head screwdriver end that is used as a wedge—from home hardware stores
- If you’re having trouble, apply more heat to the perimeter to loosen the glue holding to two phone pieces in place.
- With older and cheaper phone models, you can pry the back off with your hands. For newer and more expensive phones with glass backs, this isn’t possible.
-
2
Unhook the metal covers and speakers they are protecting. Both the ear speaker and phone speakers are typically held in place by metal covers. Remove the screws holding the covers in place using a #3 Phillips screwdriver and take them off. From here, gently pull the speakers out.[10]
- Gently pry the speakers out using a spudger if you’re having trouble.
-
3
Wipe down the speakers with a microfiber cloth dipped in rubbing alcohol. Dab a small amount of rubbing alcohol onto a microfiber cloth. Gently scrub the speaker pieces until they are clean. For the openings, blow into them gently from the outside. Afterward, dip a cotton swab into alcohol and gently rub it through the speaker openings.
- You can also use a soft cloth or lint-free paper towel. However, they are not as effective at picking up dirt.
- Be sure to let the speakers and openings dry before putting your speaker back together.
-
4
Remove the second back piece if you still can’t access your speakers. In some phones—typically Samsung brands—you need to remove a second back piece to access your speaker openings. These phones will have 10 to 13 more screws to remove, although the exact number varies by model and manufacturer. Use a #3 Phillips 4 inch (10 cm) screwdriver to turn each screw counterclockwise until they come loose. Afterward, pull off the second back piece.[11]
- Pull off the plastic film covering the screws if your phone has one.
- Once the second back piece is off, you can access and clean speaker openings and speakers. However, in some cases you will only be able to clean the openings.
- Snap the back piece back on when you’re finished cleaning the speakers and reattach the screws. Afterward, you can reattach the metal covers to the speakers and snap the back lid back on.
Advertisement
-
1
Turn off your phone. If your device was turned on when it was dropped in the water, you’ll need to turn it off as soon as possible.
-
2
Dry the phone with a towel. As long as the phone is turned off, it should be safe to handle. Make sure to dry the outside completely.
- If you have an Android device, be sure to take out the battery and SIM card if you’re able.
-
3
Place the phone in a sealed plastic bag with silica gel packs. Silica gel packs can be purchased online, or you may find some in packaging around your house. These packs are small, white, and usually have a printed Do not eat warning on them.
- If you don’t have silica gel packs, you can use dry, uncooked rice or another drying agent instead.
-
4
Leave the phone in the bag for at least 24 hours. It’s best to use a spot with some sunlight as this will help pull the moisture from your phone.
- Do not expose your phone to direct sunlight for an excessive amount of time.
- When there is no condensation in the bag, you can remove the device.
-
5
Turn on the phone. After inspecting your phone for residual water, you can turn it on.
- If you find that there is water lingering in your speakers, use the next method.
Advertisement
-
1
Ensure your phone has been dried properly. You can save a wet phone by acting quickly and using a desiccant.
- Use this method if you have water in your speaker and your charging port is not damaged.
- The tones will generate sound waves that can eject the water from your device.
-
2
Open the tone video in your mobile browser. If you have the YouTube app, it may open in the app automatically.
- There are a variety of tones marketed towards removing water from your speakers. If this tone does not work for your device, you can use the search bar to find another similar video.
-
3
Play the video. Be sure your device has its volume set to its max. This will ensure the tones play properly and create the sound waves you need to push the water out.
-
4
Repeat if necessary. You may need to adjust the device’s position throughout the playback. Always keep the speaker holes face down to ensure the water leaves your device.
Advertisement
Ask a Question
200 characters left
Include your email address to get a message when this question is answered.
Submit
Advertisement
Video
Things You’ll Need
- Cotton swabs
- Sticky tac
- Medium bristle toothbrush
- Compressed air can (with straw for better accuracy)
- Suction cup
- Spudger
- Phillips #3 4 inch (10 cm) screwdriver
-
If you’re still having trouble with your speakers after cleaning them, bring your phone to a repair shop.
-
Phone designs can vary, especially with newer models. Regardless of the design, never cut off any wires or connector cables, and don’t do anything you aren’t sure of. A working phone is better than a dirty one!
Advertisement
About This Article
Thanks to all authors for creating a page that has been read 354,185 times.
Is this article up to date?
На чтение 6 мин Просмотров 4.8к. Опубликовано 14.10.2021
Динамики на телефоне довольно быстро притягивают к себе много пыли, особенно если вы не пользуетесь чехлом и любите носить свой гаджет в сумках, рюкзаках или карманах. Если регулярно не очищать их от пыли, то скоро вы начнете замечать, что громкость и качество звука изменилось.
 Однако к чистке динамика нужно подойти со всей серьезностью, так как это деликатный компонент. Во-первых, его нужно чистить часто, иначе пыль начнет налипать, а убрать загрязнения будет сложнее. Во-вторых, при очистке нужно действовать осторожно, чтобы пыль не попала глубже и не ухудшила ситуацию.
Очистка динамиков затрудняется еще и тем, что сейчас крупные производители, такие как Apple (iPhone), Honor, Samsung, Xiaomi и другие поставляют на рынок неразборные телефоны. Динамик сам по себе сложно чистится, а в таких моделях приходится преодолевать еще и защитную сетку корпуса.
Читайте далее, чтобы узнать, как правильно стоит очищать динамики на своем телефоне.
Содержание
- Вариант №1: Зубная щетка
- Вариант №2: Скотч
- Вариант №3: Липкая масса BLU TACK
- Вариант №4: Сжатый воздух в баллончике
- Вариант №5: Вата, зубочистки и спирт
- Как избежать загрязнений на динамике телефона?
Вариант №1: Зубная щетка
Прежде чем приступать к чистке телефона, тщательно вымойте руки, чтобы они не были липкими, а затем высушите их полотенцем, которое не оставляет волокон. Это, правда, важно! Затем выключите телефон (это стоит делать каждый раз при любом виде чистки гаджета) и протрите его специальной влажной салфеткой, чтобы снаружи не осталось загрязнений. Если салфетка была слишком влажной, то дополнительно стоит протереть телефон салфеткой для очков или монитора.
Только после этого приступайте к чистке динамика и других технологичных отверстий на телефоне. Для этого отлично подходит сухая зубная щетка с мягкой щетиной. Старые зубные щетки – это плохой вариант, так как их щетинки со временем становится более жесткими и хрупкими. Лучший вариант – это зубные щетки, где прямо написано, что это мягкая щетина, или что они предназначены для чувствительных зубов.
Теперь аккуратно прочистите динамики и другие отверстия от пыли, но при этом избегайте сильного нажима, чтобы случайно не повредить телефон, а также чтобы щетинки не обламывались и не застревали в разъемах. Чтобы удалить мелкие частички пыли, просто встряхните телефон. Если у вас есть фен с режимом холодной сушки, то можно воспользоваться им. Также можно использовать пылесос, если на нем есть регулятор мощности и можно установить слабый режим.
В конце чистки вновь протрите телефон от попавших на него частичек пыли мягкой салфеткой для очков.
Вариант №2: Скотч
Налипшую пыль можно попробовать удалить с помощью скотча. Скрутите кусочек в конус липкой стороной наружу и поэтапно очистите все отверстия динамика. Но только почаще меняйте ленту, чтобы не занести в динамик еще больше грязи, чем было!
Этот способ здорово помогает, когда пыль «намагничивается» и не хочет покидать своих укромных уголков. Тогда липкая лента поможет быстро очистить большую часть загрязнений.
Вариант №3: Липкая масса BLU TACK
Это липучку можно купить в канцелярском магазине. Ее прямое назначение – быстрое крепление предметов к поверхности без следов для многократного использования.
Но еще ей здорово чистить наушники и динамики. Оторвите кусочек массы, хорошенько разомните в руках и скатайте из него шарик. Дальше действовать нужно быстро, но при этом аккуратно: приложите массу к динамику и надавите на нее с достаточной силой, чтобы она попал в отверстия; подождите несколько секунд и оторвите Блю Так от корпуса. Вы увидите, что вся грязь осталась на нашей липкой массе. Чтобы убедится в чистоте, повторите эту процедуру еще раз.
Вариант №4: Сжатый воздух в баллончике
Это средство специально разработано для очистки труднодоступных мест от пыли. В баллончике воздух сжат под высоким давлением, поэтому, когда вы нажимаете на распылительную головку, вы получаете мощный поток воздуха. Чтобы не распылять воздух впустую, обязательно используйте трубочку для точечного направления.
При использовании будьте аккуратны и не приближайте трубочку с баллончиком близко к динамику (должно оставаться не меньше 1 сантиметра), так как давление действительно большое и может повредить шлейфы телефона.
Вариант №5: Вата, зубочистки и спирт
Если загрязнения достаточно серьезные и они не хотят удаляться, то примените «тяжелую артиллерию». В этом вам помогут ватные палочки с тонким краем. Если же их нет, то возьмите зубочистку и намотайте немного ваты на краешек, не сильно утолщая его. Чтобы очистка происходила эффективнее, смочите кончик с ватой в спирте. Просто воду использовать не стоит, так как она может попасть внутрь корпуса и испортить ваш телефон. А вот спирт быстро испаряется, так что слегка увлажнив им кончик зубочистки вы не навредите своему гаджету.
При очистке обратите внимание на то, как быстро загрязняется вата. При малейшем загрязнении ее нужно заменить на чистую, чтобы ваша работа не была напрасной.
Достаточно часто, так как он быстро загрязняется
23.08%
Делаю это первый раз
38.46%
Проголосовало: 13
Как избежать загрязнений на динамике телефона?
Попадание пыли на динамик на самом деле не такая уж и страшная проблема, которую можно легко устранить с помощью приведенных выше примеров. Главный враг динамиков – это влажность. Именно она позволяет пыли наслаиваться и забивает грязь глубже в динамик.
Поэтому в первую очередь избегайте использования телефона во влажной среде. Например, не стоит пользоваться телефоном в ванной комнате. Если вы не можете принимать душ без музыки, то купите себе портативную колонку, которая стоит гораздо дешевле телефона. Другой неочевидный пример – разговор по телефону в холодную погоду. Когда вы дышите на холоде образуется конденсат, который легко может сесть на телефон.

Вячеслав Вяткин
Администратор данного веб ресурса. IT специалист с 10 летним стажем работы. Увлекаюсь созданием и продвижением сайтов!
Задать вопрос
Чтобы продлить срок службы динамиков на телефоне, постарайтесь избегать повышенной влажности воздуха, используйте чехол для защиты от пыли, а еще хотя бы раз в неделю очищайте все отверстия в корпусе, в том числе и динамики, приведенными нами выше методами. На самом деле это легко, когда вы делаете это часто, ведь загрязнений скапливается совсем немного.

Различные разъёмы и мелкие отверстия на телефоне достаточно быстро забиваются грязью и пылью. И чтобы они могли в полном объёме выполнять свою функцию, их нужно периодически чистить. В первую очередь это можно отнести к динамику. Ведь чего чистота напрямую влияет на качество звука, который мы из него слышим. Ячейки сеточки на динамике очень мелкие, поэтому почистить их непросто. Но, сделать это вполне реально, как с помощью специальных средств, так и подручных.
Чистим динамик на телефоне. 5 домашних способов
Если динамик на вашем телефоне не работает или, работает не так как надо, то чистка ему явно не помешает. Вполне возможно, что эта простая операция поможет вернуть ему былую громкость. А почистить его можно, например, с помощью вот этих способов.
1. Используем сжатый воздух
Сейчас в магазинах можно купить сжатый воздух в баллончиках для продувки пыли. Он предназначен специально для чистки таких «нежных» устройств, как сотовый телефон. Такой баллончик снабжён тонкой трубочкой. Её нужно будет закрепить на баллончике, направить в отверстие динамика и несколько раз нажать на кнопку. Этого, как правило, хватает, чтобы пыль из него вылетела наружу.
Читайте также: Как узнать прослушивают ли мобильный телефон или нет?
2. Используем изопропиловый спирт
Тоже продаётся в магазинах, и также используется для чистки динамика. Его целесообразно применять, если сеточка покрылась грязью.
Берём ватную палочку смачиваем её конец в изопропиловом спирте и несколько раз протираем сеточку динамика.
3. Чистим динамик с помощью пылесоса для настольного компьютера
Если такого специального пылесоса у вас нет, то можно воспользоваться обычным. Главное, чтобы у вас была на него насадка с узким «горлышком». Ведь чем уже будет отверстие, тем сильнее всасывающая сила. Просто поднесите насадку к сетке динамика и большую часть пыли пылесос без проблем удалит.
Читайте также: Google отслеживает нашу активность в Интернете. Вот простой способ её удалить

4. Используем зубную щётку
Метод, пожалуй, не такой эффективный, как предложенные выше, но его тоже можно использовать, особенно при грамотном сочетании с предыдущими способами чистки.
Для этого, лучше взять новую мягкую щётку, чтобы на её щетине не было пыли, и уж тем более остатков зубной пасты. При чистке, сильно на щётку не нажимайте, чтобы не поцарапать поверхность смартфона.
Читайте также: Как сделать красивое селфи телефоном девушке? [ИНФОГРАФИКА]
5. Используем для чистки телефона малярный скотч
Малярный скот от обычного отличается тем, что после использования его можно без проблем отклеить от поверхности. При этом, следов на ней он не оставляет. Оба эти свойства нам будут полезны при чистке динамика на телефоне.
Отрезаем кусочек скотча, приклеиваем его к динамику и резко отдираем. Частицы грязи и пыли с сетки динамика перейдут на липкую поверхность скотча. Повторить эту процедуру для большей эффективности следует несколько раз.
Читайте также: Как почистить смартфон от грязи и пыли?
Фото stock.adobe.com
И смотрим 2 видео. В первом вам покажут как можно почистить динамик на большинстве популярных телефонов (самсунг, хонор, xiaomi, хуавей, айфоне и т.д.) не разбирая его и не применяя всех этих средств. Очень советую посмотреть до конца.
А, втором вы увидите, как использовать зубную щётку для чистки динамика.
P.S. Расскажите своим друзьям про эти способы чистки динамика телефона от пыли. Поделитесь, пожалуйста, с ними постом в социальных сетях. Буду Вам очень признателен за это.