Всевозможные мобильные девайсы прочно вошли в жизнь современного человека. Трудно представить себе отсутствие смартфона или андроида, и хотя полностью вытеснить собой компьютерную технику они не могут, им вполне по силам взять на себя некоторых их функции, а помогает им в этом OTG-кабель.
Что такое OTG-кабель?
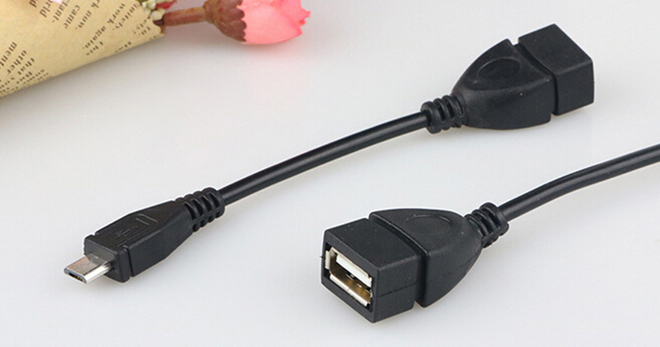
Речь идет о переходнике, оборудованном с одной стороны портом USB полноценного типа, а с другой – micro USB. Вот так выглядит OTG-кабель, что это интересует многих, особенно тех, кто хотел бы расширить возможности своего мобильного телефона. Узкой своей частью провод подключается непосредственно к смартфону или планшету, а широкой – к периферийному устройству. Поддержка подобной технологии появилась в USB в 2006 году и с тех пор получила широкое распространение, позволяя связывать друг с другом для электронных гаджета.

Как выглядит OTG-кабель?
Переходник имеет небольшие размеры, поэтому не займет много места в ящике стола или кармане, если требуется взять его с собой. USB OTG-кабель с одной стороны выглядит как штекер для зарядки мобильного телефона, а с другой как универсальная последовательная шина. При соединении двух устройств одно играет роль хоста, а другое – периферии. При этом данная технология позволяет им самим определять свое назначение в данный конкретный момент. OTG-кабель представляет возможность подключать внешние устройства без какого-либо посредничества.
Чем отличается OTG-кабель от обычного USB?
Появление USB открыло широкие возможности для пользователей. Еще совсем недавно о том, чтобы подключить телефон к компьютеру, можно было только мечтать, но сегодня это реальность. К тому же с приходом в жизнь универсальной последовательной шины смартфоны и другие девайсы с разным дизайном стали заряжаться стандартными зарядными устройствами. Mini USB OTG-кабель является модификацией обычного USB. Их суть сводится к одному – подключению периферийного устройства, но если предшественнику нужен персональный ПК, то усовершенствованному кабелю он не требуется.

ОTG-кабель – что можно подключить?
Понятно, для чего нужен OTG-кабель, а какие устройства он может связывать друг с другом? В роли персонального компьютера выступают смартфоны и планшеты, которыми гораздо удобнее пользоваться, особенно вне дома, а подключить к ним можно следующие девайсы:
- Жесткий диск или внешний накопитель.
- Компьютерную мышь и клавиатуру.
- Принтер.
- Монитор или экран телевизора.
- Джойстик или руль.
- Фотоаппарат и видеокамеру.
- Кардридер.
С помощью OTG-кабеля можно существенно расширить возможности своего смартфона. К примеру, скинуть какие-то данные с флеш-накопителя сразу на телефон, минуя станцию под названием персональный компьютер. Если хочется поделиться с друзьями впечатлениями с отдыха, то гораздо удобнее просматривать фото и видео на большом экране телевизора. Геймеры могут подключить джойстик или руль и наслаждаться играми за пределами своего дома, а журналисты по достоинству оценят возможность полноценно печатать тексты на клавиатуре.

Как узнать, поддерживает ли телефон OTG-кабель?
Надо сказать, что не все мобильные устройства поддерживают технологию ON-THE-GO. Это касается лишь последних версий Андроид и продвинутых флагманских девайсов, а бюджетные модели и гаджеты начального уровня в этом смысле проигрывают своим собратьям. Если планируется использование OTG-кабеля, то при покупке смартфона рекомендуется внимательно изучить его технические характеристики. Если и тогда у пользователя останутся вопросы, рекомендуется обратиться за консультацией к специалисту.
Как выбрать OTG-кабель?
Критерии выбора такого переходника следующие:
- Качество крепления micro USB-разъема. Из-за своих маленьких размеров он часто выходит из строя, поэтому эксплуатировать его нужно аккуратно.
- Материал проводов. OTG-кабель с внешним питанием может иметь жилы, изготовленные из самых разных материалов. Лучшим считается медь, обладающая большой пропускной способностью.
- Вид штекера. Длительный срок службы демонстрирует переходник не обычного, прямого вида, а повернутый под углом 90°.
- Качественное покрытие. Более надежной и долговечной в этом отношении считают резину.
OTG-кабель с дополнительным питанием
Найти в продаже так называемый активный USB ON-THE-GO, то есть OTG-кабель c питанием не так-то просто, а ведь некоторые модели телефонов, например, Motorola, поддерживающие Lapdock, требуют для стыковки с периферийным устройством конкретно такой переходник. К тому же есть особо «прожорливые» виды – например, жесткий диск, которые очень быстро разряжают аккумулятор. OTG Y кабель с дополнительным питанием решает эту проблему, но из-за сложностей с покупкой многие пытаются изготовить его своими руками.

Как сделать OTG-кабель?
Многие умельцы решаются на эксперимент, изготавливая такой переходник своими руками. Вот этапы работы:
- Взять маленький штекер от дата-кабеля, а большой – от USB-удлинителя.
- В штекере microUSB замкнуть контакт 4 с контактом 5.
- Как правило, предназначенные под пайку концы контактов маленького штекера разведены в шахматном порядке.
- Можно увидеть расположенные с одной стороны черный, зеленый и красный проводки.
- Подплавить изоляцию у черного провода и припаять один конец перемычки к контакту GND.
- Заглянуть на противоположную сторону. Подплавить изоляцию у незадействованного контакта, припаяв к нему второй конец перемычки.
- Чтобы окончательно сделать OTG-кабель своими руками, осталось припаять USB маму от удлинителя к полученному штекеру цвет в цвет.
- При наличии экранированных кабелей соединить их в экраны.

Как пользоваться кабелем-OTG?
Порядок действий тут такой:
- Подключить полноценный USB порт к периферийному устройству, а мини – к смартфону или планшету.
- После того, как OTG-кабель для Iphone будет подсоединен к обоим девайсам на дисплее телефона появится сообщение о готовности к работе присоединенного гаджета.
- Далее необходимо действовать в зависимости от типа подключенного устройства. Если это флешка, то можно просматривать файлы, копировать их, перемещать.
- Если планируется запустить принтер в работу, то предварительно нужно скачать и установить специальное приложение, которое необходимо для его эксплуатации.
Почему не работает OTG-кабель на телефоне?
Причины, по которым телефон «не видит» сопряженное устройство, могут быть следующими:
- Отсутствие поддержки технологии у мобильного устройства.
- OTG-переходник имеет нарушения целостности.
- Подключенный накопитель имеет слишком большой объем.
- Неисправность сопряженного устройства.
- Файловая система присоединенного устройства имеет неподходящий формат.
- Неподходящая версия операционной системы.
- В некоторых случаях работа невозможна без наличия Root-прав на Андроид.
Что такое OTG
Аббревиатура OTG расшифровывается как On-The-Go, что можно перевести как «на ходу». Это спецификация интерфейса USB, которая позволяет подключать различные USB-устройства к смартфону. В свою очередь, OTG-кабель — это переходник с разъема, который используется на смартфоне, на стандартный разъем USB Type A.
Нажми, чтобы узнать больше
OTG-кабели представлены в основном вариантами с micro USB или Type-C, но бывают также варианты на mini USB или других редких разъемах. Первые два актуальны для смартфонов (причем Type-C уже доминирует на рынке, в то время как micro USB устанавливают разве что в бюджетные модели). Что касается mini USB, то этот разъем уже практически не используется.
Что можно подключить через OTG
Так как операционная система Android довольно гибкая в плане совместимости с другими устройствами, то подключить можно самые разные гаджеты и аксессуары: от простых флешек до специализированных устройств вроде тепловизоров.
Наиболее распространенный сценарий — подключение флешки или внешнего жесткого диска. В последнем случае следует учитывать, что мощности смартфона может не хватить для полноценного питания устройства. В этом случае стоит приобрести кабель с дополнительным питанием, который можно подключить к пауэрбанку или другому источнику.
Нажми, чтобы узнать больше
Также можно подключить различные устройства ввода: игровой контроллер, мышь или клавиатуру. Несмотря на то что сейчас распространены беспроводные модели, которые беспроблемно работают со смартфонами, проводное подключение тоже может быть актуально. Если в наличии уже есть проводной геймпад, то докупить OTG-кабель будет не так накладно. Для подключения мыши и клавиатуры может пригодиться и OTG-разветвитель, который имеет сразу несколько портов, а также разъем для внешнего питания.
Нажми, чтобы узнать больше
Есть также OTG-картридеры, которые позволяют подключить к смартфону карту памяти. Это позволит, например, перенести фотографии с фотоаппарата или просмотреть на смартфоне запись с видеорегистратора.
Некоторые устройства не требуют OTG-переходника, так как уже обладают подходящим портом для подключения. В первую очередь это касается устройств с USB Type-C. Например, в продаже можно найти флеш-накопители с двойным разъемом или микрофоны, предназначенные для смартфонов.
Что еще нужно знать
При помощи переходника OTG можно использовать смартфон как внешний аккумулятор. К нему можно подключить любое другое устройство с питанием по USB. Отчасти это напоминает функцию реверсивной зарядки, с помощью которой от смартфона можно заряжать совместимые устройства по воздуху.
OTG используется не только в смартфонах и планшетах, но также в ноутбуках, магнитолах и другой компактной технике.
Нажми, чтобы узнать больше
Не стоит путать переходник OTG и специальный кабель c Type-C на HDMI. Последний позволяет подключить смартфон к телевизору или монитору. Но работает это только с теми устройствами, которые поддерживают DisplayPort (например, Samsung Galaxy S20 FE).
Существует также и множество других переходников с отличным от OTG предназначением. Например, с Type-C на разъем для наушников 3,5 мм. Это могут быть как обычные переходники, так и полноценные цапоусилители (подробнее об этом читайте в нашем материале «3 способа улучшить качество звучания наушников»).
Это тоже интересно:
В технических характеристиках планшетов и смартфонов часто говорится о поддержке OTG. Но что это за зверь такой и как пользоваться данной технологией? Читайте, как пользоваться OTG-кабелем и зачем вам это нужно.
Данная статья расскажет вам всё об OTG. Вы узнаете о том, когда появилась такая технология, в чём её отличия от обычного USB-подключения, а также о методах использования OTG-кабеля. Несколько слов будет сказано и о самостоятельном создании подобного провода — на самом деле, в этом нет ничего сложного.
OTG-кабель. Немного истории

Все мы привыкли к тому, что ноутбуки, моноблоки и настольные компьютеры располагают массой USB-разъемов. Они могут принадлежать к стандартам USB 2.0 или USB 3.0, но в любом случае они окажутся полноразмерными. Именно поэтому не составляет никакого труда подключить к компьютеру флэшку или различную периферию.
Некоторое время планшетные компьютеры на базе Android были весьма пухленькими. В результате на их корпусе находилось место для полноразмерного USB-порта. Например, такой элемент присутствовал на планшете Acer Iconia Tab A500. Но потом технологии развились до такой степени, что о полноразмерном разъеме пришлось забыть. Но при этом из операционной системы Android поддержка подключения флэшек и некоторых сторонних устройств никуда не делась. Как же пришлось действовать создателям смартфонов и планшетов? Они выдумали технологию OTG («On-The-Go»).
Принцип работы OTG-кабеля

Технология OTG подразумевает использование порта micro-USB не только для подключения зарядного устройства и синхронизации с компьютером. Поддерживающие технологию планшеты и смартфоны подают на этот разъем некоторое количество электроэнергии, которого хватает для питания других устройств. В результате к micro-USB можно подключить OTG-кабель, а к нему уже подсоединить, например, клавиатуру, компьютерную мышь или традиционную флэшку.
Когда это бывает полезно? Например, вы можете использовать экшн-камеру или зеркальный фотоаппарат. При этом вы хотите как можно быстрее опубликовать снимки или видео в социальной сети. В таком случае вы можете подсоединить свою аппаратуру к смартфону через ОТГ-переходник, скопировать нужные файлы, после чего опубликовать их силами операционной системы и соответствующего приложения. Грубо говоря, планшет или смартфон с поддержкой технологии OTG становится гораздо функциональнее. Но не стоит забывать, что это Android. Под него не пишут драйвера производители игровых рулей и какого-то другого специфического оборудования, заточенного исключительно под компьютеры на базе Windows или Mac OS. Даже подключение через ОТГ-кабель МФУ зачастую позволит пользоваться лишь базовой функцией — распечаткой того или иного документа, хранящегося в памяти смартфона.
Что представляет собой OTG-кабель?

Переходник OTG-кабель представляет собой небольшой шнурок. На одном его конце находится штекер micro-USB типа «папа». На другом же конце находится гнездо USB типа «мама». Но при этом данное изделие не является рядовым переходником. Нет, технология USB OTG подразумевает собой замкнутые 4-й и 5-й контакты. Если они таковыми не будут — Android попросту не определит устройство, которое вы к нему подключаете.
Чаще всего длина кабеля у переходника не превышает 10 см. Некоторые переходники вовсе не имеют в своём составе провода — они представляют собой монолитную конструкцию. Это очень удобно в случае подключения USB-флэшки — она не будет болтаться в воздухе.
Все ли устройства имеют поддержку OTG?
Необходимо отметить, что поддержку технологии OTG должны иметь оба устройсва. То есть, и смартфон, и подключаемая к нему периферия. Чаще всего эта технология заложена в спецификации USB 2.0, поэтому компьютерные мыши, клавиатуры, кардридеры и прочие подобные устройства подключаются к планшету или смартфону без каких-либо проблем. А уж о флэшках и говорить нечего — девайсом могут не определиться только какие-то совсем древние модели.
А вот с планшетами и смартфонами всё гораздо сложнее. Операционная система Android имеет подобную поддержку едва ли не с третьей версии. Но это на программном уровне. А вот на уровне «железа» такая поддержка реализована бывает далеко не всегда. Если технология не включена в спецификации устройства, то подключение OTG-кабеля ничего не даст — его приобретение будет пустой тратой денег.
Давайте в качестве примера проверим, какие находящиеся у нас под рукой Android-девайсы имеют поддержку OTG:
- LG Nexus 4 8Gb — не поддерживает;
- Samsung Galaxy Note 10.1 2014 Edition — поддерживает;
- Micromax Q4101 BOLT Warrior 1 Plus — не поддерживает;
- Samsung Galaxy A5 (2016) — поддерживает.
Такие вот разные результаты на устройствах, выпущенных в совершенно разные годы.
Как проверить поддержку OTG?

Обычно о поддержке технологии или об отсутствии таковой пишется в подробных технических характеристиках. Например, это может быть указано на страничке вашего устройства в «Яндекс.Маркете». Но лучше проследовать на официальный сайт производителя — там вы найдете такую информацию с большей долей вероятности.
Если ползать по разным сайтам не хочется, то на помощь придут маленькие приложения. В Google Play можно найти массу программ, которые тестируют смартфон или планшет на предмет наличия поддержки OTG. Вот ссылки лишь на пару самых популярных из них:
- USB OTG Check Compatibilite — показывает сообщение о наличии или отсутствии поддержки сразу после запуска;
- USB OTG Checker — сначала показывает рекламу, после чего требует нажатия кнопки «Check Device OS on USB OTG».
Как технология OTG используется чаще всего?

Поддержка OTG никогда не бывает лишней. Чаще всего она приходит на выручку в том случае, если девайс не имеет слота для карты microSD, при этом собственной памяти у него крайне мало. В таком случае у пользователя нет возможности скинуть на устройство фильм или какой-то другой очень тяжелый материал. Но можно скачать его на USB-флэшку. Затем эта флэшка через OTG-кабель подключается к смартфону, после чего можно смотреть содержащийся на ней фильм. Нужно только учитывать скромные возможности порта micro-USB — лучше не пытаться смотреть фильм в чрезвычайно высоком качестве, вес которого достигает 10-15 и более Гб.
Другой популярный способ использования технологии — это подключение геймпада. Операционная система Android понимает не все геймпады, но многие. Например, к некоторым смартфонам и планшетам можно подключить DualShock 3 от третьей PlayStation, существенно облегчив игровой процесс.
В случае необходимости что-то распечатать тоже приходит на помощь OTG-переходник. Конечно, только если ваш принтер не поддерживает беспроводную передачу данных, которая существенно проще.
Другая популярная причина использования OTG-кабеля описана ранее. Она заключается в необходимости просмотра материала, созданного при помощи видеокамеры или фотоаппарата, когда под рукой нет компьютера или его просто лень включать.
В продаже встречаются особые адаптеры USB-to-Ethernet. Он позволяет подключить к устройству интернет-кабель. Но в условиях массового распространения Wi-Fi сложно придумать ситуацию, когда такая возможность понадобится. Разве что у вашего роутера может выйти из строя модуль Wi-Fi — тогда вы подключите к нему планшет при помощи OTG-кабеля и соответствующего адаптера.
Никто не будет спорить с тем, что набирать текст удобнее всего при помощи полноценной клавиатуры. Некоторые подобные устройства работают при помощи Bluetooth, и они изначально предназначены для использования в паре со смартфоном или планшетом. Но проводная модель гораздо дешевле! Именно для её подключения придется обзавестись OTG-переходником.
Ещё к портативному устройству можно подсоединить USB-хаб. Или разветвитель, как его ещё называют. Так вы сможете подключить к одному разъему сразу несколько устройств — скажем, мышь, клавиатуру и кардридер.
Это лишь самые распространенные причины использования OTG-шнурка. Некоторые люди находят ему и совершенно нетривиальное применение.
Можно ли сделать OTG-кабель своими руками?
Сейчас некоторые китайские смартфоны поставляются вместе с OTG-переходником. Также в китайских интернет-магазинах регулярно проходят акции, в ходе которых вместе с практически любым смартфоном можно заказать ОТГ-кабель всего за $0,01. Купить его можно и отдельно — больших денег он обычно не стоит. И не обязательно для этого пользоваться интернет-магазином — таким аксессуаром вполне могут торговать где-то неподалеку от вашего дома.
Где купить дешево?
Результаты поиска по запросу :
Если же OTG-кабель требуется срочно, то его можно сделать из подручных средств. В частности, вам понадобятся:
- Обычный USB-удлинитель для компьютера;
- Кабель с разъемом micro-USB типа «папа» (он поставляется в комплекте с любым смартфоном);
- Нож;
- Изолента;
- Паяльник и принадлежности к нему.
Здесь мы не будем детально рассказывать о процессе создания переходника. Читая текст, вы всё же рискуете что-то не понять. Потом вы будете жаловаться на то, что девайс не видит OTG-кабель. А всё от того, что где-то была допущена малюсенькая ошибка. Поэтому мы советуем вам поискать соответствующие уроки на YouTube, повторяя действия автора шаг в шаг. Здесь же мы упомянем лишь о том, что вам нужно не забыть соединить у разъема micro-USB четвертый контакт с пятым. Отсчет контактов идет слева направо, если положить разъем скошенными гранями вверх.
Подведение итогов
Теперь вы понимаете, в чём именно заключается суть технологии OTG. Если говорить совсем вкратце, то она расширяет функционал планшета или смартфона, позволяя подсоединить к нему USB-флэшку или какую-либо периферию. С таким переходником вы сможете перекинуть снимки с зеркальной или беззеркальной камеры на смартфон, находясь на природе или в автомобиле. С ним можно посмотреть фильм, даже если встроенной памяти у устройства крайне мало, слота для карточки microSD нет, а беспроводной доступ в глобальную паутину отсутствует.
А вы ведь наверняка уже разжились OTG-переходником? Пользуетесь ли вы им? Или он давно собирает пыль в ящике компьютерного стола?
Вопросы и ответы
Если вы не нашли в статье ответ на свой вопрос, задайте в сервисе «Вопросы и ответы». Уведомление об ответе обязательно придет к вам на почту. Отвечают авторы и другие читатели!
![]()

USB On-The-Go adapter for USB-B Micro charging ports of and tablet computers without dedicated USB-A port
USB On-The-Go (USB OTG or just OTG) is a specification first used in late 2001 that allows USB devices, such as tablets or smartphones, to act as a host, allowing other USB devices, such as USB flash drives, digital cameras, mouse or keyboards, to be attached to them. Use of USB OTG allows those devices to switch back and forth between the roles of host and device. A mobile phone may read from removable media as the host device, but present itself as a USB Mass Storage Device when connected to a host computer.
USB OTG introduces the concept of a device performing both Host and Peripheral roles – whenever two USB devices are connected and one of them is a USB OTG device, they establish a communication link. The device controlling the link is called the Host, while the other is called the Peripheral.
USB OTG defines two roles for devices: OTG A-device and OTG B-device, specifying which side supplies power to the link, and which initially is the host. The OTG A-device is a power supplier, and an OTG B-device is a power consumer. In the default link configuration, the A-device acts as a USB host with the B-device acting as a USB peripheral. The host and peripheral modes may be exchanged later by using Host Negotiation Protocol (HNP).
The wiring for the ID pin defines the initial role of each device.[1]
Overview[edit]

A USB OTG setup involving a number of devices
Standard USB uses a Master/Slave architecture; a host acts as the Host device for the entire bus, and a USB device acts as a Peripheral. If implementing standard USB, devices must assume one role or the other, with computers generally set up as hosts, while (for example) printers normally function as a Peripheral. In the absence of USB OTG, cell phones often implemented Peripheral functionality to allow easy transfer of data to and from computers. Such phones could not readily be connected to printers as they also implemented the peripheral role. USB OTG directly addresses this issue.[1]
When a device is plugged into the USB bus, the host device sets up communications with the device and handles service provisioning (the host’s software enables or does the needed data-handling such as file managing or other desired kind of data communication or function). That allows the devices to be greatly simplified compared to the host; for example, a mouse contains very little logic and relies on the host to do almost all of the work. The host controls all data transfers over the bus, with the devices capable only of signalling (when polled) that they require attention. To transfer data between two devices, for example from a phone to a printer, the host first reads the data from one device, then writes it to the other.[citation needed]
While the master-slave arrangement works for some devices, many devices can act either as master or as slave depending on what else shares the bus. For instance, a computer printer is normally a slave device, but when a USB flash drive containing images is plugged into the printer’s USB port with no computer present (or at least turned off), it would be useful for the printer to take on the role of host, allowing it to communicate with the flash drive directly and to print images from it.[citation needed]
USB OTG recognizes that a device can perform both Host and Peripheral roles, and so subtly changes the terminology. With OTG, a device can be either a host when acting as a link master, or a link peripheral. The choice between host and peripheral roles is handled entirely by which end of the cable the device is connected to. The device connected to the «A» end of the cable at start-up, known as the «A-device», acts as the default host, while the «B» end acts as the default peripheral, known as the «B-device».[citation needed]
After initial startup, setup for the bus operates as it does with the normal USB standard, with the A-device setting up the B-device and managing all communications. However, when the same A-device is plugged into another USB system or a dedicated host becomes available, it can become a slave.[citation needed]
USB OTG does not preclude using a USB hub, but it describes host-peripheral role swapping only for the case of a one-to-one connection where two OTG devices are directly connected. Role swapping does not work through a standard hub, as one device will act as a host and the other as a peripheral until they are disconnected.[citation needed]
Specifications[edit]
USB OTG is a part of a supplement[2] to the Universal Serial Bus (USB) 2.0 specification originally agreed upon in late 2001 and later revised.[3] The latest version of the supplement also defines behavior for an Embedded Host which has targeted abilities and the same USB Standard-A port used by PCs.[citation needed]
SuperSpeed OTG devices, Embedded Hosts and peripherals are supported through the USB OTG and Embedded Host Supplement[4] to the USB 3.0 specification.[citation needed]
Protocols[edit]
The USB OTG and Embedded Host Supplement to the USB 2.0 specification introduced three new communication protocols:
- Attach Detection Protocol (ADP): Allows an OTG device, embedded host or USB device to determine attachment status in the absence of power on the USB bus, enabling both insertion-based behavior and the capability to display attachment status. It does so by periodically measuring the capacitance on the USB port to determine whether there is another device attached, a dangling cable, or no cable. When a large enough change in capacitance is detected to indicate device attachment, an A-device will provide power to the USB bus and look for device connection. At the same time, a B-device will generate SRP (see below) and wait for the USB bus to become powered.
- Session Request Protocol (SRP): Allows both communicating devices to control when the link’s power session is active; in standard USB, only the host is capable of doing so. That allows fine control over the power consumption, which is very important for battery-operated devices such as cameras and mobile phones. The OTG or embedded host can leave the USB link unpowered until the peripheral (which can be an OTG or standard USB device) requires power. OTG and embedded hosts typically have little battery power to spare, so leaving the USB link unpowered helps in extending the battery runtime.
- Host Negotiation Protocol (HNP): Allows the two devices to exchange their host/peripheral roles, provided both are OTG dual-role devices. By using HNP for reversing host/peripheral roles, the USB OTG device is capable of acquiring control of data-transfer scheduling. Thus, any OTG device is capable of initiating data-transfer over USB OTG bus. The latest version of the supplement also introduced HNP polling, in which the host device periodically polls the peripheral during an active session to determine whether it wishes to become a host.
- The main purpose of HNP is to accommodate users who have connected the A and B devices (see below) in the wrong direction for the task they want to perform. For example, a printer is connected as the A-device (host), but cannot function as the host for a particular camera, since it does not understand the camera’s representation of print jobs. When that camera knows how to talk to the printer, the printer will use HNP to switch to the slave role, with the camera becoming the host so pictures stored on the camera can be printed out without reconnecting the cables. The new OTG protocols cannot pass through a standard USB hub since they are based on electrical signaling via a dedicated wire.
The USB OTG and Embedded Host Supplement to the USB 3.0 specification introduces an additional communication protocol:
- Role Swap Protocol (RSP): RSP achieves the same purpose as HNP (i.e., role swapping) by extending standard mechanisms provided by the USB 3.0 specification. Products following the USB OTG and Embedded Host Supplement to the USB 3.0 specification are also required to follow the USB 2.0 supplement in order to maintain backwards compatibility. SuperSpeed OTG devices (SS-OTG) are required to support RSP. SuperSpeed Peripheral Capable OTG devices (SSPC-OTG) are not required to support RSP since they can only operate at SuperSpeed as a peripheral; they have no SuperSpeed host and so can only role swap using HNP at USB 2.0 data rates.
Device roles[edit]
USB OTG defines two roles for devices: OTG A-device and OTG B-device, specifying which side supplies power to the link, and which initially is the host. The OTG A-device is a power supplier, and an OTG B-device is a power consumer. In the default link configuration, the A-device acts as a USB host with the B-device acting as a USB peripheral. The host and peripheral modes may be exchanged later by using HNP or RSP. Because every OTG controller supports both roles, they are often called «Dual-Role» controllers rather than «OTG controllers».
For integrated circuit (IC) designers, an attractive feature of USB OTG is the ability to achieve more USB capabilities with fewer gates.
A «traditional» approach includes four controllers, resulting in more gates to test and debug:
- USB high speed host controller based on EHCI (a register interface)
- Full/low speed host controller based on OHCI (another register interface)
- USB device controller, supporting both high and full speeds
- Fourth controller to switch the OTG root port between host and device controllers
Also, most gadgets must be either a host or a device. OTG hardware design merges all of the controllers into one dual-role controller that is somewhat more complex than an individual device controller.
Targeted peripheral list (TPL)[edit]
A manufacturer’s targeted peripheral list (TPL) serves the aim of focusing a host device towards particular products or applications, rather than toward its functioning as a general-purpose host, as is the case for typical PCs. The TPL specifies products supported by the «targeting» host, defining what it needs to support, including the output power, transfer speeds, supported protocols, and device classes. It applies to all targeted hosts, including both OTG devices acting as a host and embedded hosts.
≠
Plug[edit]

Standard, mini, and micro USB plugs (not to scale). The white areas in the drawings represent hollow spaces. As the plugs are shown here, the USB logo (with optional letter A or B) is on the top of the overmold in all cases. Pin numbering (looking into receptacles) is mirrored from plugs, such that pin 1 on plug connects to pin 1 on the receptacle.
OTG mini plugs[edit]
The original USB OTG standard introduced a plug receptacle called mini-AB that was replaced by micro-AB in later revisions (Revision 1.4 onwards). It can accept either a mini-A plug or a mini-B plug, while mini-A adapters allows connection to standard-A USB cables coming from peripherals. The standard OTG cable has a mini-A plug on one end and a mini-B plug on the other end (it can not have two plugs of the same type).
The device with a mini-A plug inserted becomes an OTG A-device, and the device with a mini-B plug inserted becomes a B-device (see above). The type of plug inserted is detected by the state of the ID pin (the mini-A plug’s ID pin is grounded, while the mini-B plug’s is floating).
Pure mini-A receptacles also exist, used where a compact host port is needed, but OTG is not supported.
OTG micro plugs[edit]
With the introduction of the USB micro plug, a new plug receptacle called micro-AB was also introduced. It can accept either a micro-A plug or a micro-B plug. Micro-A adapters allow for connection to standard-A plugs, as used on fixed or standard devices. An OTG product must have a single micro-AB receptacle and no other USB receptacles.[5][6]
An OTG cable has a micro-A plug on one end, and a micro-B plug on the other end (it cannot have two plugs of the same type). OTG adds a fifth pin to the standard USB connector, called the ID-pin; the micro-A plug has the ID pin grounded, while the ID in the micro-B plug is floating. A device with a micro-A plug inserted becomes an OTG A-device, and a device with a micro-B plug inserted becomes a B-device. The type of plug inserted is detected by the state of the pin ID.
Three additional ID pin states are defined[5] at the nominal resistance values of 124 kΩ, 68 kΩ, and 36.5 kΩ, with respect to the ground pin. These permit the device to work with USB Accessory Charger Adapters that allows the OTG device to be attached to both a charger and another device simultaneously.[7]
These three states are used in the cases of:
- A charger and either no device or an A-device that is not asserting VBUS (not providing power) are attached. The OTG device is allowed to charge and initiate SRP but not connect.[7]
- A charger and an A-device that is asserting VBUS (is providing power) are attached. The OTG device is allowed to charge and connect but not initiate SRP.[7]
- A charger and a B-device are attached. The OTG device is allowed to charge and enter host mode.[7]
USB 3.0 introduced a backwards compatible SuperSpeed extension of the micro-AB receptacle and micro-A and micro-B plugs. They contain all pins of the non-Superspeed micro connectors and use the ID pin to identify the A-device and B-device roles, also adding the SuperSpeed pins.
OTG micro cables[edit]
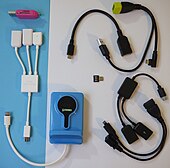
USB OTG adapters, hubs and card readers
When an OTG-enabled device is connected to a PC, it uses its own USB-A or USB Type-C cable (typically ending in micro-B, USB-C or Lightning plugs for modern devices). When an OTG-enabled device is attached to a USB slave device, such as a flash drive, the slave device must either end in the appropriate connection for the device, or the user must supply an appropriate adapter ending in USB-A. The adapter enables any standard USB peripheral to be attached to an OTG device. Attaching two OTG-enabled devices together requires either an adapter in conjunction with the slave device’s USB-A cable, or an appropriate dual-sided cable and a software implementation to manage it. This is becoming commonplace with USB Type-C devices.
Smartphone and tablet implementation[edit]
BlackBerry 10.2 implements Host Mode (like in the BlackBerry Z30 handset).[8] Nokia has implemented USB OTG in many of their Symbian cellphones such as Nokia N8, C6-01, C7, Oro, E6, E7, X7, 603, 700, 701 and 808 Pureview. Some high-end Android phones produced by HTC, and Sony under Xperia series also have it.[9] Samsung[10][11] Android version 3.1 or newer supports USB OTG, but not on all devices.[12][13]
- Host-powered: Sony Ericsson Xperia pro
- Needs external USB-power: Motorola Droid 4
Specifications listed on technology web sites (such as GSMArena, PDAdb.net, PhoneScoop, and others) can help determine compatibility. Using GSMArena as an example, one would locate the page for a given device, and examine the verbiage under Specifications → Comms → USB. If «USB Host» is shown, the device should be capable of supporting OTG-type external USB accessories.[14][15]
In many of the above implementations, the host device has only a micro-B receptacle rather than a micro-AB receptacle. Although non-standard, micro-B to micro-A receptacle adapters are widely available and used in place of the mandated micro-AB receptacle on these devices.[16]
Backward compatibility[edit]
USB OTG devices are backward-compatible with USB 2.0 (USB 3.0 for SuperSpeed OTG devices) and will behave as standard USB hosts or devices when connected to standard (non-OTG) USB devices. The main exception is that OTG hosts are only required to provide enough power for the products listed on the TPL, which may or may not be enough to connect to a peripheral that is not listed. A powered USB hub may sidestep the issue, if supported, since it will then provide its own power according to either the USB 2.0 or USB 3.0 specifications.
Some incompatibilities in both HNP and SRP were introduced between the 1.3 and 2.0 versions of the OTG supplement, which can lead to interoperability issues when using those protocol versions.
Charger compatibility[edit]
Some devices can use their USB ports to charge built-in batteries, while other devices can detect a dedicated charger and draw more than 500 mA (0.5 A), allowing them to charge more rapidly. OTG devices are allowed to use either option.[7]
See also[edit]
- Android Open Accessory Development Kit
- Mobile High-Definition Link, which repurposes the USB on-the-go ID pin
- Mobile phone accessories
- USB human interface device class
References[edit]
- ^ a b
Koeman, Kosta (22 November 2001). «Understanding USB On-The-Go». edn.com. EDN. Retrieved 20 June 2017. - ^ «On-The-Go and Embedded Host Supplement to the USB 2.0 Specification, Revision 2.0 plus ECN and errata». USB.org. 14 July 2011. Archived from the original on 5 May 2012. Retrieved 18 July 2005.
- ^ Heise, Heinz. «USB-On-the-Go-Specification Settled». Heise.de.[dead link]
- ^ «On-The-Go and Embedded Host Supplement to the USB Revision 3.0 Specification, Revision 1.1». USB.org. May 10, 2012.
- ^ a b «Universal Serial Bus Revision 2.0 specification». On-The-Go and Embedded Host Supplement to the USB Revision 2.0 Specification, Revision 2.0 version 1.1a. USB Implementers Forum, Inc. 27 July 2012. Retrieved 26 June 2017.[permanent dead link]
- ^ «Universal Serial Bus Revision 2.0 specification». Universal Serial Bus Micro-USB Cables and Connectors Specification, Revision 1.01. USB Implementers Forum, Inc. 4 April 2007. Retrieved 26 June 2017.[permanent dead link]
- ^ a b c d e «Battery Charging Specification». USB Implementers Forum, Inc. 15 April 2009. Archived from the original on 4 March 2016. Retrieved 23 September 2009.
- ^ «KB34983-Support for USB Embedded Host mode on BlackBerry 10 OS version 10.2». Archived from the original on 9 January 2020. Retrieved 12 November 2013.
- ^ «USB On the Go — HTC Blog». blog.htc.com. Archived from the original on 6 October 2014. Retrieved 30 September 2014.
- ^ «Samsung Galaxy S II Able To Use Standard USB OTG Cable For USB On-The-Go Access — TalkAndroid.com». www.talkandroid.com. Archived from the original on 10 September 2022. Retrieved 11 September 2013.
- ^ «Xperia S USB OTG demonstrated [Video] — Xperia Blog». www.xperiablog.net. 9 March 2012. Archived from the original on 5 September 2013. Retrieved 11 September 2013.
- ^ «Android Issue 738: I hope Android will implement and support the USB host feature». 30 May 2008. Archived from the original on 9 June 2013. Retrieved 30 May 2013.
- ^ «USB Host – Android Developers». developer.android.com. 30 May 2013. Archived from the original on 30 September 2011. Retrieved 30 May 2013.
- ^ http://www.gsmarena.com/ Archived 16 September 2017 at the Wayback Machine GSMArena
- ^ http://pdadb.net Archived 10 August 2006 at the Wayback Machine PDAdb.net
- ^ «Are Micro A USB plugs actually ever used?». Electrical Engineering Stack Exchange. Archived from the original on 10 September 2022. Retrieved 13 August 2020.
External links[edit]
- Official website
- «USB OTG Flash Drives». Kingston.
- Broida, Rick (5 February 2014). «How to tell if your Android phone or tablet supports USB On-The-Go». CNet.
Refers to two apps, to verify OTG compatibility, and to overcome (root) and enable OTG
![]()
USB On-The-Go adapter for USB-B Micro charging ports of and tablet computers without dedicated USB-A port
USB On-The-Go (USB OTG or just OTG) is a specification first used in late 2001 that allows USB devices, such as tablets or smartphones, to act as a host, allowing other USB devices, such as USB flash drives, digital cameras, mouse or keyboards, to be attached to them. Use of USB OTG allows those devices to switch back and forth between the roles of host and device. A mobile phone may read from removable media as the host device, but present itself as a USB Mass Storage Device when connected to a host computer.
USB OTG introduces the concept of a device performing both Host and Peripheral roles – whenever two USB devices are connected and one of them is a USB OTG device, they establish a communication link. The device controlling the link is called the Host, while the other is called the Peripheral.
USB OTG defines two roles for devices: OTG A-device and OTG B-device, specifying which side supplies power to the link, and which initially is the host. The OTG A-device is a power supplier, and an OTG B-device is a power consumer. In the default link configuration, the A-device acts as a USB host with the B-device acting as a USB peripheral. The host and peripheral modes may be exchanged later by using Host Negotiation Protocol (HNP).
The wiring for the ID pin defines the initial role of each device.[1]
Overview[edit]
A USB OTG setup involving a number of devices
Standard USB uses a Master/Slave architecture; a host acts as the Host device for the entire bus, and a USB device acts as a Peripheral. If implementing standard USB, devices must assume one role or the other, with computers generally set up as hosts, while (for example) printers normally function as a Peripheral. In the absence of USB OTG, cell phones often implemented Peripheral functionality to allow easy transfer of data to and from computers. Such phones could not readily be connected to printers as they also implemented the peripheral role. USB OTG directly addresses this issue.[1]
When a device is plugged into the USB bus, the host device sets up communications with the device and handles service provisioning (the host’s software enables or does the needed data-handling such as file managing or other desired kind of data communication or function). That allows the devices to be greatly simplified compared to the host; for example, a mouse contains very little logic and relies on the host to do almost all of the work. The host controls all data transfers over the bus, with the devices capable only of signalling (when polled) that they require attention. To transfer data between two devices, for example from a phone to a printer, the host first reads the data from one device, then writes it to the other.[citation needed]
While the master-slave arrangement works for some devices, many devices can act either as master or as slave depending on what else shares the bus. For instance, a computer printer is normally a slave device, but when a USB flash drive containing images is plugged into the printer’s USB port with no computer present (or at least turned off), it would be useful for the printer to take on the role of host, allowing it to communicate with the flash drive directly and to print images from it.[citation needed]
USB OTG recognizes that a device can perform both Host and Peripheral roles, and so subtly changes the terminology. With OTG, a device can be either a host when acting as a link master, or a link peripheral. The choice between host and peripheral roles is handled entirely by which end of the cable the device is connected to. The device connected to the «A» end of the cable at start-up, known as the «A-device», acts as the default host, while the «B» end acts as the default peripheral, known as the «B-device».[citation needed]
After initial startup, setup for the bus operates as it does with the normal USB standard, with the A-device setting up the B-device and managing all communications. However, when the same A-device is plugged into another USB system or a dedicated host becomes available, it can become a slave.[citation needed]
USB OTG does not preclude using a USB hub, but it describes host-peripheral role swapping only for the case of a one-to-one connection where two OTG devices are directly connected. Role swapping does not work through a standard hub, as one device will act as a host and the other as a peripheral until they are disconnected.[citation needed]
Specifications[edit]
USB OTG is a part of a supplement[2] to the Universal Serial Bus (USB) 2.0 specification originally agreed upon in late 2001 and later revised.[3] The latest version of the supplement also defines behavior for an Embedded Host which has targeted abilities and the same USB Standard-A port used by PCs.[citation needed]
SuperSpeed OTG devices, Embedded Hosts and peripherals are supported through the USB OTG and Embedded Host Supplement[4] to the USB 3.0 specification.[citation needed]
Protocols[edit]
The USB OTG and Embedded Host Supplement to the USB 2.0 specification introduced three new communication protocols:
- Attach Detection Protocol (ADP): Allows an OTG device, embedded host or USB device to determine attachment status in the absence of power on the USB bus, enabling both insertion-based behavior and the capability to display attachment status. It does so by periodically measuring the capacitance on the USB port to determine whether there is another device attached, a dangling cable, or no cable. When a large enough change in capacitance is detected to indicate device attachment, an A-device will provide power to the USB bus and look for device connection. At the same time, a B-device will generate SRP (see below) and wait for the USB bus to become powered.
- Session Request Protocol (SRP): Allows both communicating devices to control when the link’s power session is active; in standard USB, only the host is capable of doing so. That allows fine control over the power consumption, which is very important for battery-operated devices such as cameras and mobile phones. The OTG or embedded host can leave the USB link unpowered until the peripheral (which can be an OTG or standard USB device) requires power. OTG and embedded hosts typically have little battery power to spare, so leaving the USB link unpowered helps in extending the battery runtime.
- Host Negotiation Protocol (HNP): Allows the two devices to exchange their host/peripheral roles, provided both are OTG dual-role devices. By using HNP for reversing host/peripheral roles, the USB OTG device is capable of acquiring control of data-transfer scheduling. Thus, any OTG device is capable of initiating data-transfer over USB OTG bus. The latest version of the supplement also introduced HNP polling, in which the host device periodically polls the peripheral during an active session to determine whether it wishes to become a host.
- The main purpose of HNP is to accommodate users who have connected the A and B devices (see below) in the wrong direction for the task they want to perform. For example, a printer is connected as the A-device (host), but cannot function as the host for a particular camera, since it does not understand the camera’s representation of print jobs. When that camera knows how to talk to the printer, the printer will use HNP to switch to the slave role, with the camera becoming the host so pictures stored on the camera can be printed out without reconnecting the cables. The new OTG protocols cannot pass through a standard USB hub since they are based on electrical signaling via a dedicated wire.
The USB OTG and Embedded Host Supplement to the USB 3.0 specification introduces an additional communication protocol:
- Role Swap Protocol (RSP): RSP achieves the same purpose as HNP (i.e., role swapping) by extending standard mechanisms provided by the USB 3.0 specification. Products following the USB OTG and Embedded Host Supplement to the USB 3.0 specification are also required to follow the USB 2.0 supplement in order to maintain backwards compatibility. SuperSpeed OTG devices (SS-OTG) are required to support RSP. SuperSpeed Peripheral Capable OTG devices (SSPC-OTG) are not required to support RSP since they can only operate at SuperSpeed as a peripheral; they have no SuperSpeed host and so can only role swap using HNP at USB 2.0 data rates.
Device roles[edit]
USB OTG defines two roles for devices: OTG A-device and OTG B-device, specifying which side supplies power to the link, and which initially is the host. The OTG A-device is a power supplier, and an OTG B-device is a power consumer. In the default link configuration, the A-device acts as a USB host with the B-device acting as a USB peripheral. The host and peripheral modes may be exchanged later by using HNP or RSP. Because every OTG controller supports both roles, they are often called «Dual-Role» controllers rather than «OTG controllers».
For integrated circuit (IC) designers, an attractive feature of USB OTG is the ability to achieve more USB capabilities with fewer gates.
A «traditional» approach includes four controllers, resulting in more gates to test and debug:
- USB high speed host controller based on EHCI (a register interface)
- Full/low speed host controller based on OHCI (another register interface)
- USB device controller, supporting both high and full speeds
- Fourth controller to switch the OTG root port between host and device controllers
Also, most gadgets must be either a host or a device. OTG hardware design merges all of the controllers into one dual-role controller that is somewhat more complex than an individual device controller.
Targeted peripheral list (TPL)[edit]
A manufacturer’s targeted peripheral list (TPL) serves the aim of focusing a host device towards particular products or applications, rather than toward its functioning as a general-purpose host, as is the case for typical PCs. The TPL specifies products supported by the «targeting» host, defining what it needs to support, including the output power, transfer speeds, supported protocols, and device classes. It applies to all targeted hosts, including both OTG devices acting as a host and embedded hosts.
≠
Plug[edit]
Standard, mini, and micro USB plugs (not to scale). The white areas in the drawings represent hollow spaces. As the plugs are shown here, the USB logo (with optional letter A or B) is on the top of the overmold in all cases. Pin numbering (looking into receptacles) is mirrored from plugs, such that pin 1 on plug connects to pin 1 on the receptacle.
OTG mini plugs[edit]
The original USB OTG standard introduced a plug receptacle called mini-AB that was replaced by micro-AB in later revisions (Revision 1.4 onwards). It can accept either a mini-A plug or a mini-B plug, while mini-A adapters allows connection to standard-A USB cables coming from peripherals. The standard OTG cable has a mini-A plug on one end and a mini-B plug on the other end (it can not have two plugs of the same type).
The device with a mini-A plug inserted becomes an OTG A-device, and the device with a mini-B plug inserted becomes a B-device (see above). The type of plug inserted is detected by the state of the ID pin (the mini-A plug’s ID pin is grounded, while the mini-B plug’s is floating).
Pure mini-A receptacles also exist, used where a compact host port is needed, but OTG is not supported.
OTG micro plugs[edit]
With the introduction of the USB micro plug, a new plug receptacle called micro-AB was also introduced. It can accept either a micro-A plug or a micro-B plug. Micro-A adapters allow for connection to standard-A plugs, as used on fixed or standard devices. An OTG product must have a single micro-AB receptacle and no other USB receptacles.[5][6]
An OTG cable has a micro-A plug on one end, and a micro-B plug on the other end (it cannot have two plugs of the same type). OTG adds a fifth pin to the standard USB connector, called the ID-pin; the micro-A plug has the ID pin grounded, while the ID in the micro-B plug is floating. A device with a micro-A plug inserted becomes an OTG A-device, and a device with a micro-B plug inserted becomes a B-device. The type of plug inserted is detected by the state of the pin ID.
Three additional ID pin states are defined[5] at the nominal resistance values of 124 kΩ, 68 kΩ, and 36.5 kΩ, with respect to the ground pin. These permit the device to work with USB Accessory Charger Adapters that allows the OTG device to be attached to both a charger and another device simultaneously.[7]
These three states are used in the cases of:
- A charger and either no device or an A-device that is not asserting VBUS (not providing power) are attached. The OTG device is allowed to charge and initiate SRP but not connect.[7]
- A charger and an A-device that is asserting VBUS (is providing power) are attached. The OTG device is allowed to charge and connect but not initiate SRP.[7]
- A charger and a B-device are attached. The OTG device is allowed to charge and enter host mode.[7]
USB 3.0 introduced a backwards compatible SuperSpeed extension of the micro-AB receptacle and micro-A and micro-B plugs. They contain all pins of the non-Superspeed micro connectors and use the ID pin to identify the A-device and B-device roles, also adding the SuperSpeed pins.
OTG micro cables[edit]
USB OTG adapters, hubs and card readers
When an OTG-enabled device is connected to a PC, it uses its own USB-A or USB Type-C cable (typically ending in micro-B, USB-C or Lightning plugs for modern devices). When an OTG-enabled device is attached to a USB slave device, such as a flash drive, the slave device must either end in the appropriate connection for the device, or the user must supply an appropriate adapter ending in USB-A. The adapter enables any standard USB peripheral to be attached to an OTG device. Attaching two OTG-enabled devices together requires either an adapter in conjunction with the slave device’s USB-A cable, or an appropriate dual-sided cable and a software implementation to manage it. This is becoming commonplace with USB Type-C devices.
Smartphone and tablet implementation[edit]
BlackBerry 10.2 implements Host Mode (like in the BlackBerry Z30 handset).[8] Nokia has implemented USB OTG in many of their Symbian cellphones such as Nokia N8, C6-01, C7, Oro, E6, E7, X7, 603, 700, 701 and 808 Pureview. Some high-end Android phones produced by HTC, and Sony under Xperia series also have it.[9] Samsung[10][11] Android version 3.1 or newer supports USB OTG, but not on all devices.[12][13]
- Host-powered: Sony Ericsson Xperia pro
- Needs external USB-power: Motorola Droid 4
Specifications listed on technology web sites (such as GSMArena, PDAdb.net, PhoneScoop, and others) can help determine compatibility. Using GSMArena as an example, one would locate the page for a given device, and examine the verbiage under Specifications → Comms → USB. If «USB Host» is shown, the device should be capable of supporting OTG-type external USB accessories.[14][15]
In many of the above implementations, the host device has only a micro-B receptacle rather than a micro-AB receptacle. Although non-standard, micro-B to micro-A receptacle adapters are widely available and used in place of the mandated micro-AB receptacle on these devices.[16]
Backward compatibility[edit]
USB OTG devices are backward-compatible with USB 2.0 (USB 3.0 for SuperSpeed OTG devices) and will behave as standard USB hosts or devices when connected to standard (non-OTG) USB devices. The main exception is that OTG hosts are only required to provide enough power for the products listed on the TPL, which may or may not be enough to connect to a peripheral that is not listed. A powered USB hub may sidestep the issue, if supported, since it will then provide its own power according to either the USB 2.0 or USB 3.0 specifications.
Some incompatibilities in both HNP and SRP were introduced between the 1.3 and 2.0 versions of the OTG supplement, which can lead to interoperability issues when using those protocol versions.
Charger compatibility[edit]
Some devices can use their USB ports to charge built-in batteries, while other devices can detect a dedicated charger and draw more than 500 mA (0.5 A), allowing them to charge more rapidly. OTG devices are allowed to use either option.[7]
See also[edit]
- Android Open Accessory Development Kit
- Mobile High-Definition Link, which repurposes the USB on-the-go ID pin
- Mobile phone accessories
- USB human interface device class
References[edit]
- ^ a b
Koeman, Kosta (22 November 2001). «Understanding USB On-The-Go». edn.com. EDN. Retrieved 20 June 2017. - ^ «On-The-Go and Embedded Host Supplement to the USB 2.0 Specification, Revision 2.0 plus ECN and errata». USB.org. 14 July 2011. Archived from the original on 5 May 2012. Retrieved 18 July 2005.
- ^ Heise, Heinz. «USB-On-the-Go-Specification Settled». Heise.de.[dead link]
- ^ «On-The-Go and Embedded Host Supplement to the USB Revision 3.0 Specification, Revision 1.1». USB.org. May 10, 2012.
- ^ a b «Universal Serial Bus Revision 2.0 specification». On-The-Go and Embedded Host Supplement to the USB Revision 2.0 Specification, Revision 2.0 version 1.1a. USB Implementers Forum, Inc. 27 July 2012. Retrieved 26 June 2017.[permanent dead link]
- ^ «Universal Serial Bus Revision 2.0 specification». Universal Serial Bus Micro-USB Cables and Connectors Specification, Revision 1.01. USB Implementers Forum, Inc. 4 April 2007. Retrieved 26 June 2017.[permanent dead link]
- ^ a b c d e «Battery Charging Specification». USB Implementers Forum, Inc. 15 April 2009. Archived from the original on 4 March 2016. Retrieved 23 September 2009.
- ^ «KB34983-Support for USB Embedded Host mode on BlackBerry 10 OS version 10.2». Archived from the original on 9 January 2020. Retrieved 12 November 2013.
- ^ «USB On the Go — HTC Blog». blog.htc.com. Archived from the original on 6 October 2014. Retrieved 30 September 2014.
- ^ «Samsung Galaxy S II Able To Use Standard USB OTG Cable For USB On-The-Go Access — TalkAndroid.com». www.talkandroid.com. Archived from the original on 10 September 2022. Retrieved 11 September 2013.
- ^ «Xperia S USB OTG demonstrated [Video] — Xperia Blog». www.xperiablog.net. 9 March 2012. Archived from the original on 5 September 2013. Retrieved 11 September 2013.
- ^ «Android Issue 738: I hope Android will implement and support the USB host feature». 30 May 2008. Archived from the original on 9 June 2013. Retrieved 30 May 2013.
- ^ «USB Host – Android Developers». developer.android.com. 30 May 2013. Archived from the original on 30 September 2011. Retrieved 30 May 2013.
- ^ http://www.gsmarena.com/ Archived 16 September 2017 at the Wayback Machine GSMArena
- ^ http://pdadb.net Archived 10 August 2006 at the Wayback Machine PDAdb.net
- ^ «Are Micro A USB plugs actually ever used?». Electrical Engineering Stack Exchange. Archived from the original on 10 September 2022. Retrieved 13 August 2020.
External links[edit]
- Official website
- «USB OTG Flash Drives». Kingston.
- Broida, Rick (5 February 2014). «How to tell if your Android phone or tablet supports USB On-The-Go». CNet.
Refers to two apps, to verify OTG compatibility, and to overcome (root) and enable OTG
Владельцы мобильных гаджетов часто оказываются в ситуации, когда нужно подсоединить клавиатуру или другие устройства ввода, и даже просто зарядить один смартфон от другого, но сделать это нечем. В таких случаях вам поможет OTG-кабель, который предусмотрительные производители стали класть в базовую комплектацию своих девайсов.
Так что это такое, каким образом он может совмещать в себе mini usb otg, otg usb flash, otg usb hub, otg кабель для ipad, host, checker и т.п. Об этом и многом другом мы и поговорим далее.

Зарядка другого смартфона

Всё просто: подключите OTG‑переходник к тому гаджету, от которого хотите зарядиться, а к нему подсоедините ваш смартфон через обычный USB‑кабель. Устройство с OTG будет служить источником питания, а подключённое через провод перейдёт в режим зарядки.
Критерии выбора такого переходника следующие:
- Качество крепления micro USB-разъема
. Из-за своих маленьких размеров он часто выходит из строя, поэтому эксплуатировать его нужно аккуратно. - Материал проводов
. OTG-кабель с внешним питанием может иметь жилы, изготовленные из самых разных материалов. Лучшим считается медь, обладающая большой пропускной способностью. - Вид штекера
. Длительный срок службы демонстрирует переходник не обычного, прямого вида, а повернутый под углом 90°. - Качественное покрытие. Более надежной и долговечной в этом отношении считают резину.
OTG-кабель с дополнительным питанием
Найти в продаже так называемый активный USB ON-THE-GO, то есть OTG-кабель c питанием не так-то просто, а ведь некоторые модели телефонов, например, Motorola, поддерживающие Lapdock, требуют для стыковки с периферийным устройством конкретно такой переходник. К тому же есть особо «прожорливые» виды – например, жесткий диск, которые очень быстро разряжают аккумулятор. OTG Y кабель с дополнительным питанием решает эту проблему, но из-за сложностей с покупкой многие пытаются изготовить его своими руками.

Подключение музыкальных инструментов

TouchDAW Demo
npx
Цена: Бесплатно
Загрузить
Цена: Бесплатно
Мышь
Удивительно, но если подключить к смартфону мышку через данный кабель, то на экране появится курсор, и он будет реагировать на все движения мышки. Как и на компьютере, все программы и пиктограммы будут открываться двойным щелчком. Конечно, практической пользы от использования мышки на смартфоне нет никакой, но просто ради эксперимента попробовать стоит. Кто-то еще сомневается, что USB OTG — это круто?

Работа с мышью и клавиатурой
Печатать на сенсорных экранах легко, когда речь идёт о коротких сообщениях. Но работа с длинными текстами превращается в муку. Подключите к устройству USB‑клавиатуру через OTG, загрузите мобильный офисный пакет, и будете печатать куда быстрее.
Аналогично к смартфону можно подключить и мышь. Пригодится, если вам тяжело выделять текст или выбирать мелкие объекты на страничке в браузере. Или если ваш экран не работает и нужно перенести данные с повреждённого смартфона.
К сожалению, вряд ли через OTG будут функционировать USB‑концентраторы. Так что если на смартфоне или планшете нужно использовать мышь с клавиатурой одновременно, купите устройство два в одном вроде такого.
Где и за сколько можно купить?
Главный вопрос, который интересует обычного пользователя из СНГ – где и за сколько его возможно купить? В большинстве случаев выбор падает на иностранные площадки, типа Aliexpress (из минусов – долгая доставка), также можете проверить любой ближайший магазин техники, там подобные кабели – не редкость. А если не хотите тратить свои деньги и у вас есть все необходимые детали для создания этого аксессуара, то никто не мешает вам самостоятельно спаять ОТГ, и даже модернизировать его по своему желанию. Подобный самодельный переходник подойдёт к любым устройствам, в том числе и iPhone.
Подключение к LAN

Как сделать OTG-кабель?
Многие умельцы решаются на эксперимент, изготавливая такой переходник своими руками. Вот этапы работы:
- Взять маленький штекер от дата-кабеля, а большой – от USB-удлинителя.
- В штекере microUSB замкнуть контакт 4 с контактом 5.
- Как правило, предназначенные под пайку концы контактов маленького штекера разведены в шахматном порядке.
- Можно увидеть расположенные с одной стороны черный, зеленый и красный проводки.
- Подплавить изоляцию у черного провода и припаять один конец перемычки к контакту GND.
- Заглянуть на противоположную сторону. Подплавить изоляцию у незадействованного контакта, припаяв к нему второй конец перемычки.
- Чтобы окончательно сделать OTG-кабель своими руками, осталось припаять USB маму от удлинителя к полученному штекеру цвет в цвет.
- При наличии экранированных кабелей соединить их в экраны.

Подключение внешней камеры
@Jorrit Jongma / YouTube
Какими бы продвинутыми ни становились камеры мобильных устройств, с качественными зеркалками им пока что не сравниться. Но это не значит, что смартфон бесполезен для заядлых фотографов.
Подключите камеру к гаджету через OTG, и сможете перебрасывать с неё снимки прямо в память устройства, а также на месте редактировать их с помощью какого‑нибудь мобильного приложения.
Кроме того, программа DSLR Controller позволит вам управлять камерой с подключённого к ней смартфона и использовать экран в качестве видоискателя.
DSLR Controller
Chainfire
Цена: 499,00 ₽
Загрузить
Цена: 499,00 ₽
USB-хаб
Подключив USB-хаб, из телефона можно создать рабочую станцию с мышкой и клавиатурой. В дополнение можно подключить динамики. Правда, здесь нет гарантий, что полноценно будут работать все подключенные устройства, хотя попытаться стоит.

Большинство современных колонок подключаются к USB-порту компьютера для питания и в разъем jack 3.5 мм. При этом мощности колонкам от мобильного USB-порта достаточно. Также и многие крутые наушники подключаются не через «миниджек», а непосредственно через USB. Обидно, когда классные «уши» не получается использовать совместно со смартфоном. Но с OTG-кабелем это становится возможным.
Подключение принтера — вот действительно полезная штука, ради которой стоит иметь такой кабель. Очень удобно распечатывать на принтере документы, которые хранятся на смартфоне. Но еще более удобно распечатывать фотографии. Конечно, лучше, чтобы принтер был подключен к Wi-Fi сети, но если такого функционала у него нет, то можно вполне обойтись кабелем OTG. Что это такое, вы теперь знаете.
Еще один вариант, который подойдет для планшетов без 3G/4G модемов. Речь идет о подключении модема, который обеспечит доступ к сети 3G/4G. Не во всех планшетах есть поддержка данных стандартов, а если и есть, то такие модели стоят дороже. Можно немного сэкономить денег, если купить модификацию гаджета без поддержки беспроводной сети третьего или четвертого поколения и использовать USB-модем, который случайно завалялся у вас дома. С OTG-кабелем это стало возможным, и планшет прекрасно его распознает. Но есть нюанс: подключить модем можно только с правами суперпользователя и с помощью определенных программ. В большинстве случаев помогает приложение PPP Widget 2.
Можно продолжать экспериментировать долго, но главное, что вы поняли, что собой представляет данный кабель.
Просмотр файлов с внешних носителей

Что поддерживает эту технологию?
Как несложно догадаться, такой “папа” переходников подходит ко всему, что способно воспринимать разъем USB. То есть внешние жёсткие диски, управление несколькими экранами с планшета, и вообще что угодно имеющее в своём распоряжении хоть намёки на собственную ОС. Так, часто его используют на планшетах с поддержкой устройств, дополнительным средством подзарядки или снятия части нагрузки через специальный пульт. Поддерживает ли планшет подобное – узнать можно точно так же, как и со смартфоном.
По сути такое устройство может иметь любой из доступных на рынке разъёмов, в том числе позволяя подключать современную технику к уже устаревшей. В Play Market существуют программы, позволяющие скачивать всё необходимое вспомогательное ПО под почти любой девайс из тех, что вы в теории могли бы подключить.
Монтирование флешки с помощью StickMount
Есть специальная программа, которая позволяет быстро смонтировать накопитель, и вы тут же получите доступ к файлам. Скачивайте из магазина приложений приложение StickMount. Стоит заметить важную вещь – на смартфоне должен быть root доступ.
Предоставляете программе Root доступ выбираете по умолчанию USB флешку. Теперь с любого файлового менеджера можно зайти по пути sdcard / usbStorage на флешку.

Еще раз предупрежу. Флешка должна иметь файловую систему FAT32, или ext2, ext3 и ext4.
Для получения доступа к данным на флешке можно использовать платные решения:
- Nexus Photo Viewer – просмотр фотографий на флешке;
- Nexus USB OTG FileManager
- Nexus Media Importer
- OTG Disk Explorer
Перед извлечением флешки рекомендуется демонтировать её из настроек памяти.
Недостатки OTG хранения
Представьте, вы взяли небольшой проводок и флешку, подключили её и вроде бы всё нормально работает, но на постоянной основе такого быть не может и рано или поздно отсоединить устройство придется. Не будет же флешка вечно болтаться рядом со смартфоном.
Перед отключением флешки обязательно демонтируйте её из настроек системы, иначе файлы на ней могут повредиться.
Достоинства этой технологии, конечно, в увеличении памяти телефона, хоть и кратковременно. Но это не то, на что стоит обращать внимание. Так вы сможете работать с файлами при отсутствии компьютера.

Выводы
- OTG хранение позволяет подключить любую флешку к смартфону на базе Android;
- Мы расширяем память смартфона и можем работать с данными (текст, фото, просмотр видео);
- Подключение осуществляется к смартфону, как с microUSB, так и с USB Type C;
- Цена кабеля очень маленькая, от 150 рублей на Aliexpress можно найти стоящие варианты.
- Возможность подключения клавиатуры, мыши и прочих устройств.
Теперь вы знаете, как подключить флешку к телефону с помощью OTG кабеля. Если есть вопросы, задавайте их в комментарии.
( 2 оценки, среднее 5 из 5 )