С помощью приложения Google Authenticator вы можете получать коды для входа в аккаунт без подключения к Интернету или мобильной сети. Для этого нужно настроить двухэтапную аутентификацию.
Что вам понадобится
Чтобы использовать приложение Google Authenticator на устройстве Android, необходимо следующее:
- Android 4.4 или более поздняя версия ОС;
- включенная двухэтапная аутентификация.
Как скачать Google Authenticator
УСТАНОВИТЬ GOOGLE AUTHENTICATOR
Как настроить Google Authenticator
- На своем устройстве откройте страницу аккаунта Google.
- На панели навигации вверху нажмите Безопасность.
- В разделе «Вход в аккаунт Google» выберите Двухэтапная аутентификация. При необходимости выполните вход.
- В разделе «Добавьте дополнительные варианты для второго этапа аутентификации» найдите пункт «Приложение Authenticator» и нажмите Создать.
- Следуйте инструкциям на экране.
Как получать коды на новый телефон
Как перенести коды Google Authenticator на новый телефон
Вот что вам потребуется:
- прежний телефон Android с кодами Google Authenticator;
- установленная на нем последняя версия приложения Google Authenticator;
- новый телефон.
Как указать, на какой телефон должны отправляться коды Google Authenticator
- На своем устройстве откройте страницу аккаунта Google.
- На панели навигации вверху нажмите Безопасность.
- В разделе «Вход в аккаунт Google» выберите Двухэтапная аутентификация. При необходимости выполните вход.
- В разделе «Доступные варианты второго этапа аутентификации» найдите пункт «Приложение Authenticator» и нажмите Изменить номер.
- Следуйте инструкциям на экране.
Как устранить распространенные проблемы
Как устранить неполадки с кодом
Если код оказался некорректным, убедитесь, что:
- Вы указали код до того, как срок его действия истек.
- Время на устройстве соответствует вашему часовому поясу.
Если устранить проблему не удалось, синхронизируйте свое устройство Android. Для этого выполните следующие действия:
- Откройте приложение Google Authenticator
на устройстве Android.
- В правом верхнем углу экрана нажмите на значок «Ещё»
Коррекция времени для кодов
Синхронизация.
- На следующем экране появится сообщение о том, что время синхронизировано. Теперь вы можете использовать коды подтверждения для входа.
- Синхронизация влияет только на время в приложении Google Authenticator. Настройки даты и времени на устройстве не изменятся.
Как использовать Google Authenticator с несколькими устройствами и аккаунтами
Как включить двухэтапную аутентификацию для нескольких аккаунтов
Приложение Google Authenticator, установленное на одном устройстве, может генерировать коды сразу для нескольких аккаунтов Google. Каждому аккаунту должен соответствовать отдельный секретный ключ.
Чтобы настроить дополнительные аккаунты, выполните следующие действия:
- Включите двухэтапную аутентификацию для каждого из аккаунтов.
- Используйте то же приложение Google Authenticator.
Как настроить Google Authenticator на нескольких устройствах
Чтобы коды подтверждения генерировались сразу на нескольких устройствах, выполните следующие действия:
- Проверьте, установлено ли приложение Google Authenticator на всех нужных устройствах.
- В аккаунте Google перейдите в раздел Двухэтапная аутентификация.
- Если вы уже настроили Google Authenticator, удалите аккаунт из приложения.
- Перед этим убедитесь, что у вас есть резервные коды для входа.
- Настройте двухэтапную аутентификацию через Google Authenticator, следуя инструкциям на экране. Используйте один и тот же QR-код или секретный ключ на всех устройствах.
- Убедитесь, что на все устройства приходят одинаковые коды подтверждения.
Эта информация оказалась полезной?
Как можно улучшить эту статью?
В инструкции описан процесс установки приложения Google Authenticator на различные мобильные операционные системы (Android, iOS, Windows Phone) и в качестве расширения веб-браузера, а также его использование при подключении к панели управления.
Что это такое?
Google Authenticator обеспечивает двухфакторную аутентификацию (2FA). 2FA — дополнительный уровень безопасности, используемый для подтверждения пользователей, пытающихся получить доступ к онлайн-учетной записи. Сначала, пользователь вводит свои логин и пароль. Затем, вместо того, чтобы немедленно получить доступ, он должен будет предоставить другую информацию, например:
- дополнительные сведения (персональный идентификационный номер (ПИН), пароль, ответы на «секретные вопросы» или конкретная последовательность нажатия клавиш);
- подтверждение владения (как правило, пользователь имеет что-то в своем распоряжении, например, кредитную карту, смартфон или небольшой аппаратный токен);
- биометрические данные (эта категория немного более продвинута и может включать биометрический рисунок отпечатка пальца, сканирование диафрагмы или голосовую печать).
Таким образом, даже если у вас украден пароль или потерян телефон, вероятность того, что кто-то другой получит доступ к вашей информации маловероятен.
Установка Google Authenticator на Android
Для установки приложения на операционную систему Android достаточно просто скачать его в магазине GooglePlay:

После установки на первой странице нажмите Начать:

При желании вы можете настроить 2FA в своем аккаунте Google, если в этом нет необходимости, то нажмите Пропустить:

Теперь можно перейти к добавлению аккаунта. Доступно два способа: сканировать штрихкод и ввести ключ. Наиболее удобным является сканирование — перед вами откроется камера, где в выделенный квадрат необходимо поместить QR-код, который будет распознан автоматически, а аккаунт сразу добавлен:

Установка Google Authenticator на iOS
Для установки приложения на операционную систему iOS также достаточно скачать его в AppStore:

После установки откройте приложение и нажмите Приступить к настройке:

Можно перейти к добавлению аккаунта. Доступно два способа: сканировать штрихкод и ввести ключ. Наиболее удобным является сканирование — перед вами откроется камера, где в выделенный квадрат необходимо поместить QR-код, который будет распознан автоматически, а аккаунт сразу добавлен:

Установка Google Authenticator на Windows Phone
Использование аутентификатора на Windows Phone возможно только благодаря Google-совместимых приложений, например Authenticator+. Также у Microsoft есть собственное приложение Microsoft Authenticator.
Рассмотрим установку приложения Authenticator+, для установки этого достаточно скачать его в магазине приложений Microsoft:

После установки можно открыть приложение и перейти к добавлению аккаунта. Доступно два способа: сканировать штрихкод и ввести ключ. Наиболее удобным является сканирование — перед вами откроется камера, где в выделенный квадрат необходимо поместить QR-код, который будет распознан автоматически, а аккаунт сразу добавлен:

Установка Google Authenticator в Google Chrome

После этого вы будете перенаправлены на страницу разработчика на Github. Расширение появится в вашем браузере в правом верхнем углу. Для добавления аккаунта нажмите на Карандаш, а затем на Плюс:

Здесь также доступно два способа: сканировать штрихкод и ввести ключ. В первом случае необходимо сделать скриншот части экрана с QR-кодом. Во втором — нужно ввести секретный ключ вручную:

Использование приложения Google Authenticator для подключения к панели управления
После установки приложения на вашу систему откройте в панели управления раздел Настройка профиля -> Безопасность. На открывшейся странице выберите Двухфакторную аутентификацию через приложение:

Перед вами откроется QR-код. Далее в приложении Google Authenticator выберете сканирование штрихкода. После того как откроется камера, поместите штриход в выделенный квадрат на экране приложения, который будет распознан автоматически. В приложении создастся шестизначный код, который необходимо указать:

После ввода кода вы увидите, что двухфакторная аутентификация подключена через приложение.
Теперь для входа в панель управления необходимо указать код из приложения:

Отключение двухуровневой аутентификации для входа в панель управления
Для отключения опции Двухфакторная аутентификация в панели управления перейдите в раздел Настройка профиля -> Безопасность. Чтобы ее отключить нажмите Отключить:

Подтвердите свои действия:

Теперь 2FA отключена.
191028
Санкт-Петербург
Литейный пр., д. 26, Лит. А
+7 (812) 403-06-99

700
300
ООО «ИТГЛОБАЛКОМ ЛАБС»
191028
Санкт-Петербург
Литейный пр., д. 26, Лит. А
+7 (812) 403-06-99

700
300
ООО «ИТГЛОБАЛКОМ ЛАБС»
Доброго времени суток, дорогие друзья, знакомые, читатели, почитатели и прочие личности. Сегодня поговорим про Google Authenticator.
Наверняка многие из Вас слышали о такой штуке как двухфакторная (двухэтапная) аутентификация и даже пользуются ей, благо она позволяет существенно повысить безопасность Ваших аккаунтов и усложняет для злоумышленников путь к Вашим данным.

В настоящий момент двуфакторка (2FA) реализована, в большинстве случаев, методом подтверждения совершаемого действия (вход, оплата и пр) с помощью кода, который отправляется в виде смс сообщения (после ввода пароля).
К сожалению, этот метод, не смотря на всю его мощь, всё чаще признаётся безопасниками не самым.. безопасным (т.к смс можно перехватить и всё такое прочее-разное), поэтому мы поговорим с Вами о несколько альтернативном способе, основанном на использованнии приложения 2FA (в данном случае речь пойдет про Google Authenticator).
Давайте приступим.
-
Установка Google Authenticator и включение двухфакторной аутенфикации
-
Дальнейшая настройка Google Authenticator и верификация
-
Пробуем использовать Google Authenticator для входа
-
Послесловие
Установка Google Authenticator и включение двухфакторной аутенфикации
Сразу хочется сказать, что GA подойдет не только для аккаунтов Google, но и некоторых других (например, подобным образом можно входить в аккаунт социальной сети ВКонтакте), что поддерживают двухэтапный вход с помощью мобильного приложения.
Впрочем, мы рассмотрим пример использования Google Authenticator как раз на примере гугловских аккаунтов. Собственно, для всего этого нам потребуется мобильный телефон, сам аккаунт и приложение, которое, скажем, для Android можно взять по этой ссылке. Само собой, что оно есть в App Store и не только.
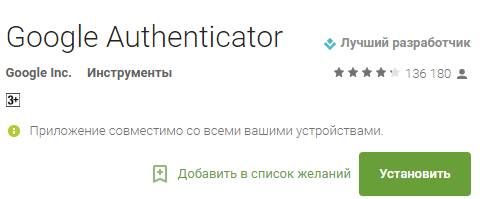
Установка, само собой, если уж не знакома каждому пользователю, то во всяком случае предельно проста и не требует каких-то спец знаний, кроме умения кликать мышкой 
Установку можно сделать не только из браузера, но и непосредственно с мобильного телефона, используя тот же Google Play Market (или App Store), либо просто скачав файл .apk (для Android) со стороннего источника (чего, правда, делать не рекомендуется).
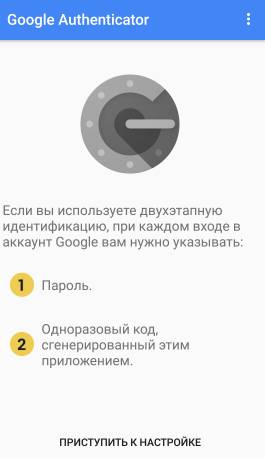
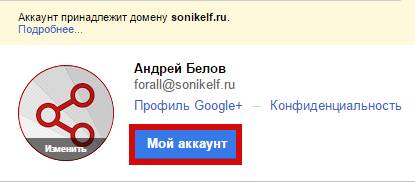
После установки необходимо будет запустить приложение на телефоне, что показано на скриншоте выше и заодно, скажем, в браузере, нажать в кнопки «Мой аккаунт» и «Вход в аккаунт Google«, что можно увидеть на скриншотах ниже:
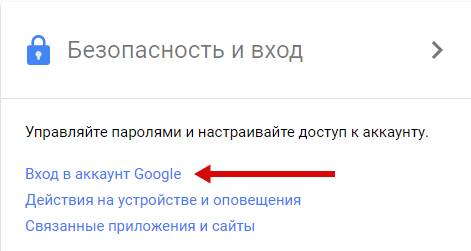
После чего необходимо включить двухфакторную аутентификацию как таковую, т.е основываясь на привязке к телефону и sms:
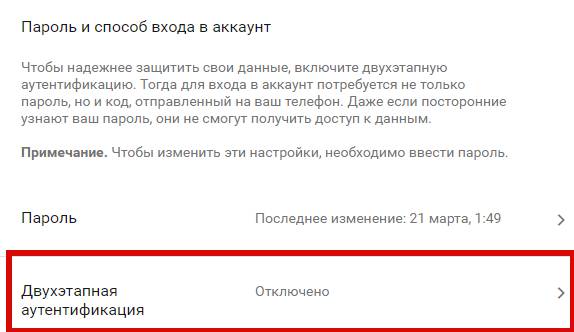
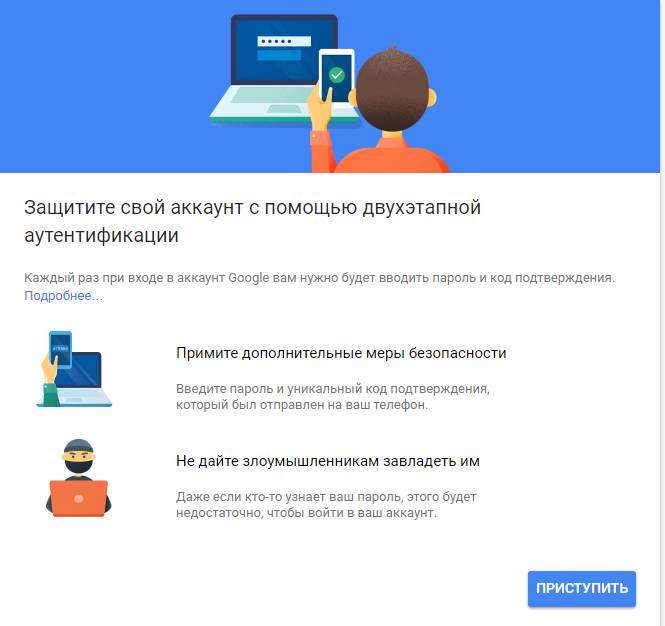
Я думаю, что ничего сложного в этом нет и Вы прекрасно справитесь с сим процессом, благо для сего достаточно указать свой телефон, получить код и ввести его в окно браузера.
к содержанию ↑
Дальнейшая настройка Google Authenticator и верификация
После этого первичная двуфакторка будет осуществлена и Вы получите больше возможностей для её настройки:
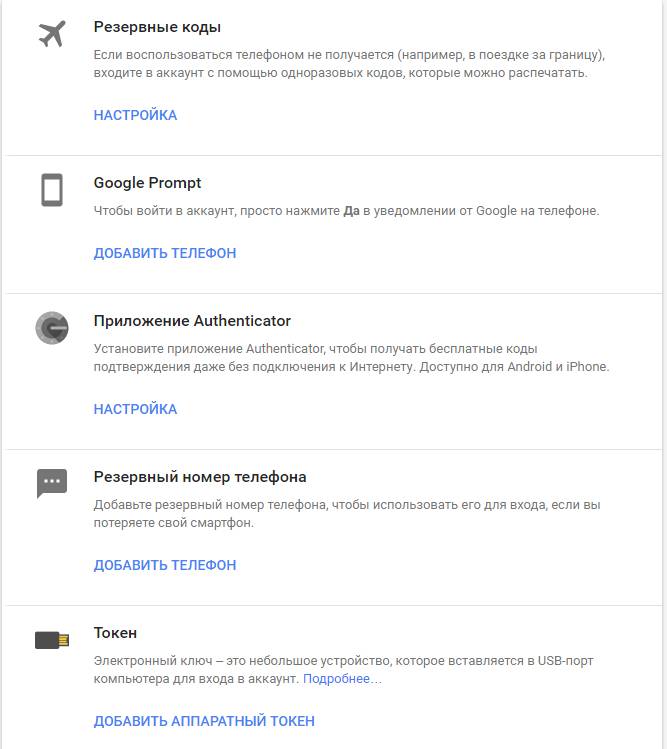
Как Вы понимаете, здесь нас интересует третий пункт, который зовется не иначе как «Приложение Authenticator«, в связи с чем мы жмём в кнопку «Настройка» в соответствующей строке, после чего нам будет предложено выбрать тип мобильного телефона:
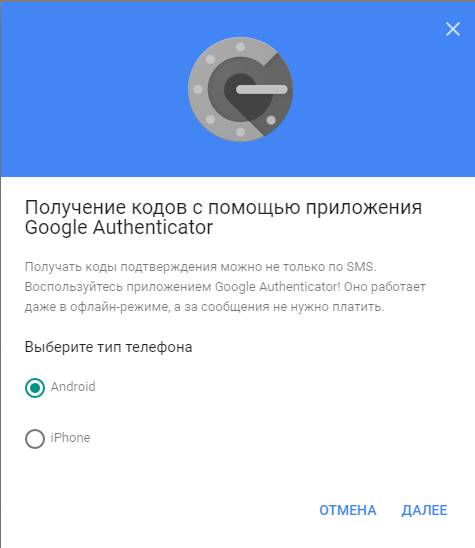
А так же предложен способ настройки, методом сканирования QR с экрана телефона или непосредственно вводом текстового кода вручную:
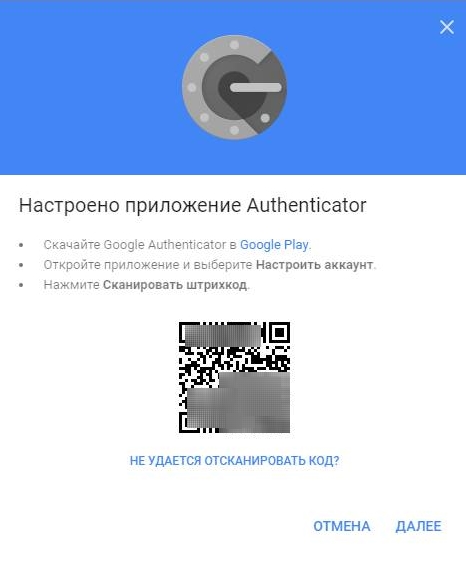
На этом этапе нам надо взять в руки телефон и нажать в пункт «Приступить к настройке» в установленном (и запущенном) ранее приложении Google Authenticator.

Здесь как раз мы увидим аналогичные пункты для добавления аккаунта и, в зависимости от того, что Вам проще и удобнее, необходимо выбрать тот путь, что Вы выбрали в браузере компьютера.
В нашем случае мы пошли по пути ввода ключа (пункт «Введите ключ» в приложении) методом его получения по кнопке «Не удается отсканировать код» (пункт в браузере). Надеемся, что Вы не запутались, благо на практике всё куда проще, чем это выглядит в текстовом виде 
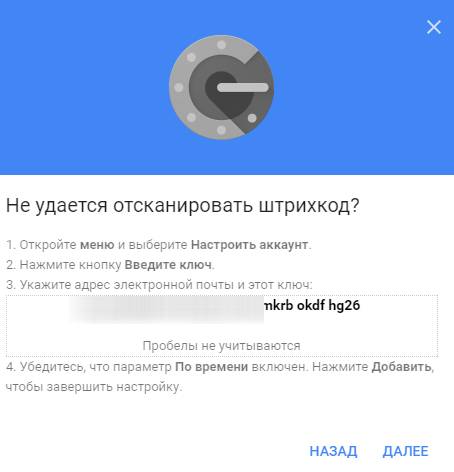
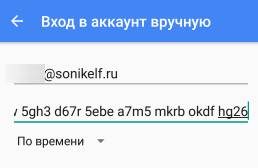
Соответственно, браузер нам покажет код, который мы вводим в приложение. В случае со сканированием QR через камеру телефона всё немного проще, но мы решили показать Вам более мудрёный путь (так сказать, на всякий случай).
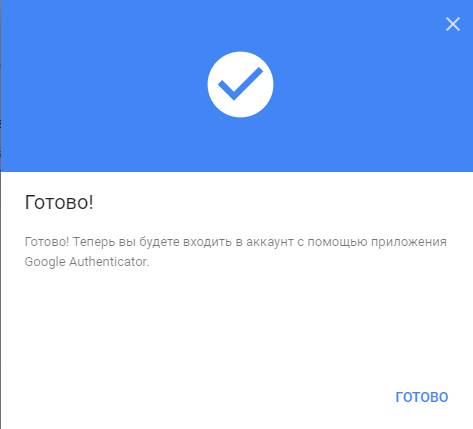
к содержанию ↑
Пробуем использовать Google Authenticator для входа
На этом процесс будет закончен и двуфакторка будет реализована с использованием упомянутого тут неоднократно приложения, т.е процесс входа теперь происходит следующим образом:
- Вводим пароль от аккаунта Google (ну или куда Вы там входите);
- Вводим код приложения из Google Authenticator;
- Готово.
Как это примерно выглядит можно посмотреть на скриншотах ниже:

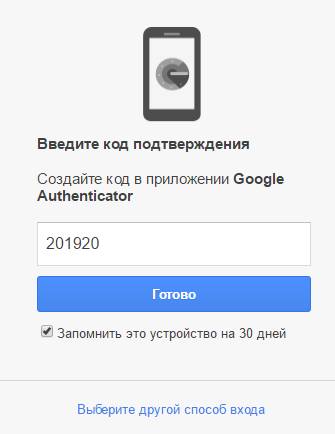
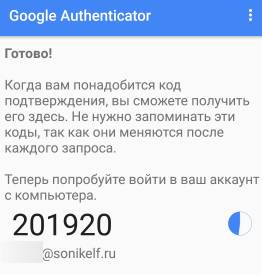
Пожалуй, на этом процесс можно считать законченным и Вы можете добавить любое количество аккаунтов в это приложение, получая код для каждого отдельно.
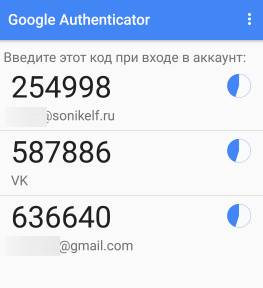
Как уже говорилось выше, использовать GA-приложение можно для разных аккаунтов и процесс первичной привязки примерно аналогичен, равно как и процесс дальнейшего входа. Вот, как пример, привязка социальной сети ВКонтакте:
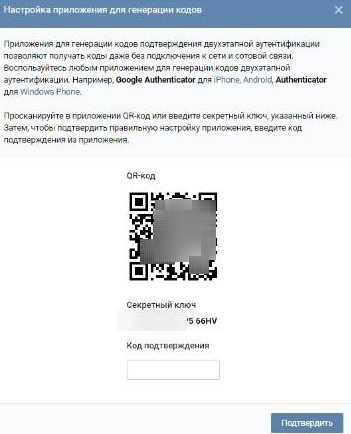
Коды меняются с течением времени, их достаточно сложно перехватить в момент логина (в отличии от sms) и всё такое прочее.
На сим, пожалуй, всё.
Давайте перейдем к послесловию.
к содержанию ↑
Послесловие
С одной стороны, первое время необходимость постоянно использовать телефон для входа в аккаунты (особенно, если их много) может раздражать. С другой.. Что для Вас важнее, — безопасность или комфорт?
К слову, не обязательно использовать именно Google Authenticator, благо 2FA приложений существует приличное количество, а некоторые компании (вроде Blizzard) выпускают собственные.
В общем, наше дело порекомендовать, а уж пользоваться или нет, — дело Ваше 
Download Article
Download Article
Google Authenticator is a free app from Google that helps you sign into websites and services securely. If your email account, workplace, bank, or other service has asked you to install the Google Authenticator so you can use two-factor verification or two-step authentication, you’ll just need to install the app on your Android, iPhone, or iPad, and then set it up with the service you want to use. This wikiHow teaches you how to install and set up Google Authenticator on your smartphone or tablet.
-

1
Open the Play Store on your Android

. It’s the multicolored triangle icon labeled «Play Store» in your app list.
-

2
Type google authenticator into the Search bar. It’s at the top of the Play Store.
Advertisement
-

3
Tap Google Authenticator in the search results. It’s the app with a round gray vault icon.
-

4
Tap the green Install button. Depending on your settings, you may have to verify your PIN or approve the download. When the download is complete, the «Install» button will change to «Open,» and Authenticator’s vault icon will be added to your app list.
-

5
Enable two-factor verification (2FA) or two-step authentication for the site or service you want to sign in to. You can use Google Authenticator to sign into many different sites and services, including Google (of course), Facebook, Coinbase, Discord, Amazon, and Twitch.[1]
If your workplace or school supports 2FA, you can usually use Google Authenticator for that as well.- To get started, locate the area of the site or service that allows you to set up two-factor authentication or two-step authentication, and then select the option to use an authentication app. You may be prompted to re-enter your password to confirm the change. The steps vary by service, so if you’re not sure how to set up 2FA, check with the site administrator or help area.
- When setting up two-factor authentication or two-step authentication, you’ll usually see a QR code that you’ll be prompted to scan. Because of this, you’ll want to use a computer, or a different phone or tablet, to enable this feature on your account. That’ll allow you to scan the QR code with your Android. If you only have one device available, choose the option to display a setup key instead of a QR code.
-

6
Open Authenticator. If you’re still in the Play Store, tap Open. Otherwise, tap the new vault icon in your app list.
-

7
Tap Get Started. This takes you to the «Setup your first account» screen.
-

8
Select a setup method. This part depends on the site or service you’re setting up.
- The Scan a QR code option is the most common—choose this option if setting up 2FA on the site or service resulted in displaying a QR code.
- If you see a string of text called a «setup key,» select Enter a setup key instead.
-

9
Scan the QR code or enter the setup key. Once verified, Authenticator will be ready to use.
- If you selected the option to scan a QR code, tap ALLOW when prompted to give Authenticator permission to access your camera, and then align the QR code in the viewfinder.
- If you’re entering a setup key, type a name for the account, enter the key, and choose a key type from the menu (the option you will choose varies by the service you’re setting up; just make sure you select the option required by your service provider) and tap Add.
Advertisement
-

1
Open the App Store on your iPhone or iPad

. It’s the blue icon with a white «A» in your app list.
-

2
Tap Search. It’s the magnifying glass icon at the bottom-right corner.
-

3
Type google authenticator into the Search bar and tap search. This displays a list of matching search results.
-

4
Tap Google Authenticator in the search results. It’s the app with a round gray vault icon.
-

5
Tap GET. Depending on your settings, you may have to verify your PIN or approve the download. When the download is complete, the «GET» button will change to «Open,» and Authenticator’s vault icon will be added to your app list.
-

6
Enable two-factor verification or two-step authentication for the site or service you want to sign in to. You can use Google Authenticator to sign into many different sites and services, including Google (of course), Facebook, Coinbase, Discord, Amazon, and Twitch. If your workplace or school supports 2FA, you can usually use Google Authenticator for that as well.
- To get started, locate the area of the site or service that allows you to set up two-factor authentication or two-step authentication, and then select the option to use an authentication app. You may be prompted to re-enter your password to confirm the change. The steps vary by service, so if you’re not sure how to set up 2FA, check with the site administrator or help area.
- When setting up two-factor authentication or two-step authentication, you’ll usually see a QR code that you’ll be prompted to scan. Because of this, you’ll want to use a computer, or a different phone or tablet, to enable this feature on your account. That’ll allow you to scan the QR code with your iPhone or iPad. If you only have one device available, choose the option to display a setup key instead of a QR code.
-

7
Open Authenticator. If you’re still in the App Store, tap Open. Otherwise, tap the new vault icon on your home screen.
-

8
Tap Get Started. This takes you to the «Setup your first account» screen.
-

9
Tap a setup method. This part depends on the site or service you’re setting up.
- The Scan a QR code option is the most common—select it if setting up 2FA resulted in displaying a QR code.
- If you see a string of text called a «setup key,» select Enter a setup key instead.
-

10
Scan the QR code or enter the setup key. Once verified, Authenticator will be ready to use.
- If you selected the option to scan a QR code, tap ALLOW when prompted to give Authenticator permission to access your camera, and then align the QR code in the viewfinder.
- If you’re entering a setup key, type a name for the account, enter the key, and choose a key type from the menu (usually Time based, but the service you’re setting up may require a different option; either way, the option will be clear in your service provider’s instructions) and tap Add.
Advertisement
-

1
Log in to the site or service. When you’re ready to sign in to the site or service you’ve added to Google Authenticator, open its login screen and enter your typical username and password to sign in. Once approved, you’ll be prompted to enter a verification code.[2]
-

2
Open Google Authenticator on your phone or tablet. It’s the gray vault icon on your home screen or in your app list.
-

3
Enter the code. As soon as you open Google Authenticator, you will see a 6-digit numeric code for the account(s) you’ve associated with the app. Codes refresh automatically every 30 seconds. This code is what you’ll need to enter into the site or service to complete the login process. Once the code is verified, you’ll be signed in.
- This code actually changes every 30 seconds, so you’ll only have 30 seconds to enter the code. If you are still typing the code when it refreshes, erase what you’ve typed and enter the new code instead.
- If you’re entering the code on the same phone or tablet, simply tap it to copy it to your clipboard, and then paste it into the verification screen by tapping-and-holding the verification blank and selecting Paste.
Advertisement
Ask a Question
200 characters left
Include your email address to get a message when this question is answered.
Submit
Advertisement
-
You can add multiple accounts to Authenticator. To do so, set up 2FA on another site, open Authenticator, tap the + at the bottom-right, and then choose to Scan a QR code or Enter a setup key for a new service.
Thanks for submitting a tip for review!
Advertisement
References
About This Article
Article SummaryX
1. Install Google Authenticator from the Play Store or App Store.
2. Enable two-factor authentication on the desired site or service.
3. Open Google Authenticator and tap Get Started.
4. Select a setup method.
5. Scan the QR code or enter the setup key.
Did this summary help you?
Thanks to all authors for creating a page that has been read 30,453 times.
Is this article up to date?
Download Article
Download Article
Google Authenticator is a free app from Google that helps you sign into websites and services securely. If your email account, workplace, bank, or other service has asked you to install the Google Authenticator so you can use two-factor verification or two-step authentication, you’ll just need to install the app on your Android, iPhone, or iPad, and then set it up with the service you want to use. This wikiHow teaches you how to install and set up Google Authenticator on your smartphone or tablet.
-

1
Open the Play Store on your Android

. It’s the multicolored triangle icon labeled «Play Store» in your app list.
-

2
Type google authenticator into the Search bar. It’s at the top of the Play Store.
Advertisement
-

3
Tap Google Authenticator in the search results. It’s the app with a round gray vault icon.
-

4
Tap the green Install button. Depending on your settings, you may have to verify your PIN or approve the download. When the download is complete, the «Install» button will change to «Open,» and Authenticator’s vault icon will be added to your app list.
-

5
Enable two-factor verification (2FA) or two-step authentication for the site or service you want to sign in to. You can use Google Authenticator to sign into many different sites and services, including Google (of course), Facebook, Coinbase, Discord, Amazon, and Twitch.[1]
If your workplace or school supports 2FA, you can usually use Google Authenticator for that as well.- To get started, locate the area of the site or service that allows you to set up two-factor authentication or two-step authentication, and then select the option to use an authentication app. You may be prompted to re-enter your password to confirm the change. The steps vary by service, so if you’re not sure how to set up 2FA, check with the site administrator or help area.
- When setting up two-factor authentication or two-step authentication, you’ll usually see a QR code that you’ll be prompted to scan. Because of this, you’ll want to use a computer, or a different phone or tablet, to enable this feature on your account. That’ll allow you to scan the QR code with your Android. If you only have one device available, choose the option to display a setup key instead of a QR code.
-

6
Open Authenticator. If you’re still in the Play Store, tap Open. Otherwise, tap the new vault icon in your app list.
-

7
Tap Get Started. This takes you to the «Setup your first account» screen.
-

8
Select a setup method. This part depends on the site or service you’re setting up.
- The Scan a QR code option is the most common—choose this option if setting up 2FA on the site or service resulted in displaying a QR code.
- If you see a string of text called a «setup key,» select Enter a setup key instead.
-

9
Scan the QR code or enter the setup key. Once verified, Authenticator will be ready to use.
- If you selected the option to scan a QR code, tap ALLOW when prompted to give Authenticator permission to access your camera, and then align the QR code in the viewfinder.
- If you’re entering a setup key, type a name for the account, enter the key, and choose a key type from the menu (the option you will choose varies by the service you’re setting up; just make sure you select the option required by your service provider) and tap Add.
Advertisement
-

1
Open the App Store on your iPhone or iPad

. It’s the blue icon with a white «A» in your app list.
-

2
Tap Search. It’s the magnifying glass icon at the bottom-right corner.
-

3
Type google authenticator into the Search bar and tap search. This displays a list of matching search results.
-

4
Tap Google Authenticator in the search results. It’s the app with a round gray vault icon.
-

5
Tap GET. Depending on your settings, you may have to verify your PIN or approve the download. When the download is complete, the «GET» button will change to «Open,» and Authenticator’s vault icon will be added to your app list.
-

6
Enable two-factor verification or two-step authentication for the site or service you want to sign in to. You can use Google Authenticator to sign into many different sites and services, including Google (of course), Facebook, Coinbase, Discord, Amazon, and Twitch. If your workplace or school supports 2FA, you can usually use Google Authenticator for that as well.
- To get started, locate the area of the site or service that allows you to set up two-factor authentication or two-step authentication, and then select the option to use an authentication app. You may be prompted to re-enter your password to confirm the change. The steps vary by service, so if you’re not sure how to set up 2FA, check with the site administrator or help area.
- When setting up two-factor authentication or two-step authentication, you’ll usually see a QR code that you’ll be prompted to scan. Because of this, you’ll want to use a computer, or a different phone or tablet, to enable this feature on your account. That’ll allow you to scan the QR code with your iPhone or iPad. If you only have one device available, choose the option to display a setup key instead of a QR code.
-

7
Open Authenticator. If you’re still in the App Store, tap Open. Otherwise, tap the new vault icon on your home screen.
-

8
Tap Get Started. This takes you to the «Setup your first account» screen.
-

9
Tap a setup method. This part depends on the site or service you’re setting up.
- The Scan a QR code option is the most common—select it if setting up 2FA resulted in displaying a QR code.
- If you see a string of text called a «setup key,» select Enter a setup key instead.
-

10
Scan the QR code or enter the setup key. Once verified, Authenticator will be ready to use.
- If you selected the option to scan a QR code, tap ALLOW when prompted to give Authenticator permission to access your camera, and then align the QR code in the viewfinder.
- If you’re entering a setup key, type a name for the account, enter the key, and choose a key type from the menu (usually Time based, but the service you’re setting up may require a different option; either way, the option will be clear in your service provider’s instructions) and tap Add.
Advertisement
-

1
Log in to the site or service. When you’re ready to sign in to the site or service you’ve added to Google Authenticator, open its login screen and enter your typical username and password to sign in. Once approved, you’ll be prompted to enter a verification code.[2]
-

2
Open Google Authenticator on your phone or tablet. It’s the gray vault icon on your home screen or in your app list.
-

3
Enter the code. As soon as you open Google Authenticator, you will see a 6-digit numeric code for the account(s) you’ve associated with the app. Codes refresh automatically every 30 seconds. This code is what you’ll need to enter into the site or service to complete the login process. Once the code is verified, you’ll be signed in.
- This code actually changes every 30 seconds, so you’ll only have 30 seconds to enter the code. If you are still typing the code when it refreshes, erase what you’ve typed and enter the new code instead.
- If you’re entering the code on the same phone or tablet, simply tap it to copy it to your clipboard, and then paste it into the verification screen by tapping-and-holding the verification blank and selecting Paste.
Advertisement
Ask a Question
200 characters left
Include your email address to get a message when this question is answered.
Submit
Advertisement
-
You can add multiple accounts to Authenticator. To do so, set up 2FA on another site, open Authenticator, tap the + at the bottom-right, and then choose to Scan a QR code or Enter a setup key for a new service.
Thanks for submitting a tip for review!
Advertisement
References
About This Article
Article SummaryX
1. Install Google Authenticator from the Play Store or App Store.
2. Enable two-factor authentication on the desired site or service.
3. Open Google Authenticator and tap Get Started.
4. Select a setup method.
5. Scan the QR code or enter the setup key.
Did this summary help you?
Thanks to all authors for creating a page that has been read 30,453 times.
