Содержание
- Разборка смартфона
- Сборка разобранного смартфона
- Вопросы и ответы
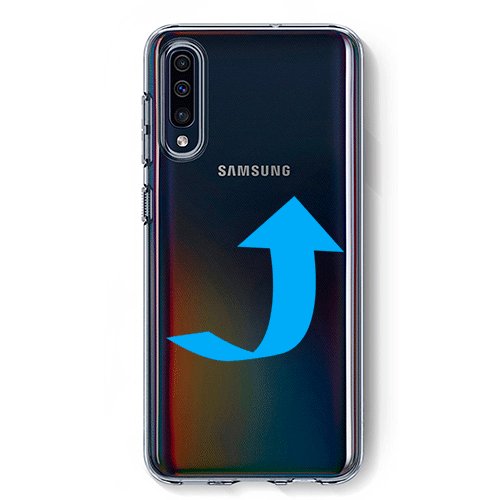
Разборка смартфона
Смартфон Samsung A50 является монолитной моделью в отличие от многих предыдущих устройств производителя, поэтому для открытия корпуса потребуются дополнительные инструменты и время. Перед началом процедуры подготовьте необходимый набор инструментов:
- тонкий пластиковый предмет (можно использовать банковскую карту, подложку от защитного стекла или гитарный медиатор);
- фен или мешок с нагретой солью;
- отвертка;
- акриловый скотч 3M;
- клей E-8000/T-8000 (не обязательно, но рекомендуется для качественной последующей сборки).
Разбирать смартфон рекомендуется тогда, когда аккумулятор полностью разряжен.
Выключите смартфон и приступайте к разборке:
- Нагрейте заднюю крышку примерно до 50 градусов. Сделать это можно с помощью специального фена. Также подойдет мешочек с солью, поскольку он равномерно распределяет тепло по поверхности. Между рамкой телефона и крышкой просуньте пластиковый разъемник. Аккуратно проводите им по всему периметру устройства, отделяя части Самсунга, промазанные клеем. Движения лучше делать поступательные, как лезвием, тщательно счищая клеевую основу.
- После того, как крышка снята, необходимо убрать следующую часть корпуса. Открутите отверткой винтики, которые расположены по периметру и на нижней части грани. Действуйте аккуратно, поскольку под панелью есть шлейф антенны, соединенный с платой, — важно его не повредить.
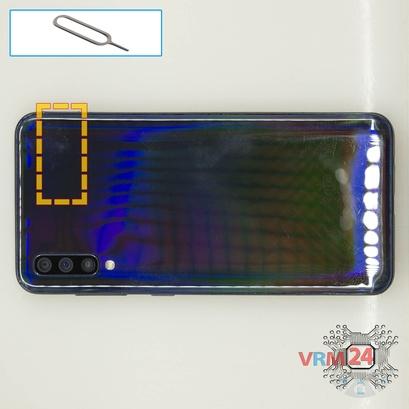
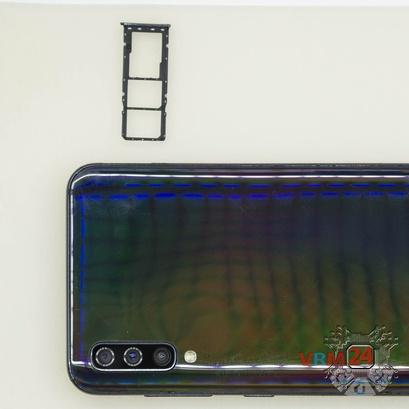
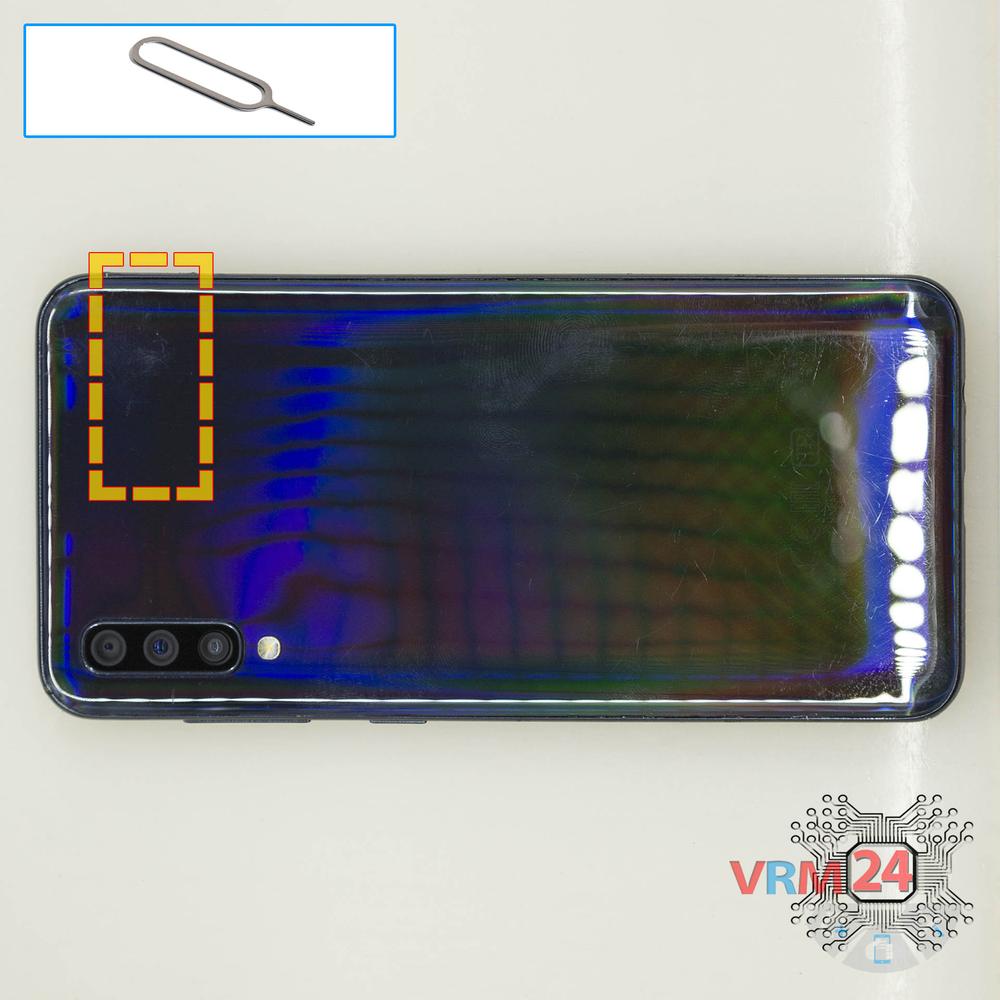
- Извлеките лоток для сим-карт и карты памяти, расположенный сбоку. Для этого нужно использовать специальную скрепку или другой тонкий продолговатый предмет, например щипцы.
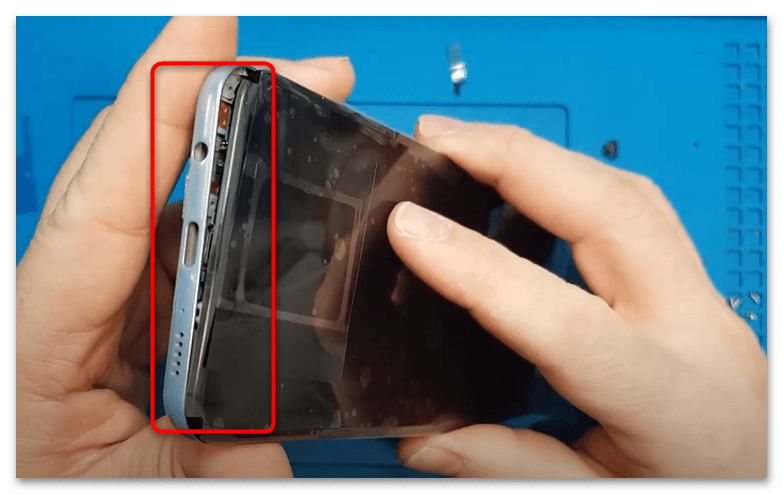
- Подденьте пластиковым разъемником край средней части корпуса и проведите им по периметру. Должны прозвучать характерные щелчки.
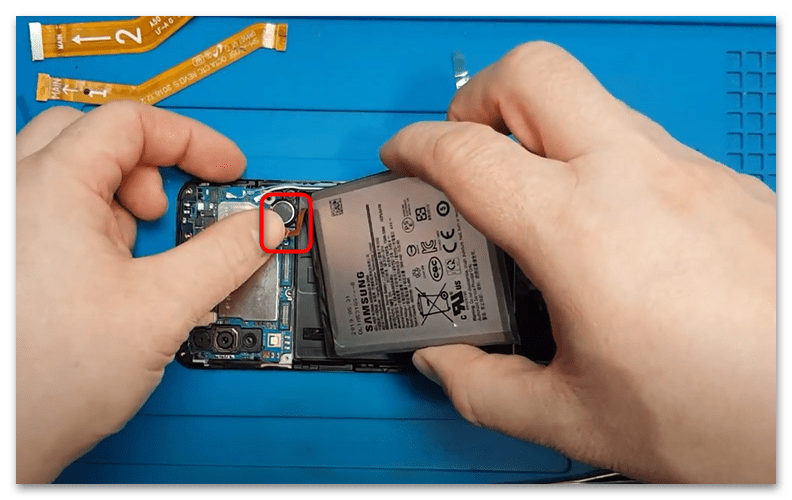
- Отстегните аккумуляторную батарею, которая соединена с платой вверху.
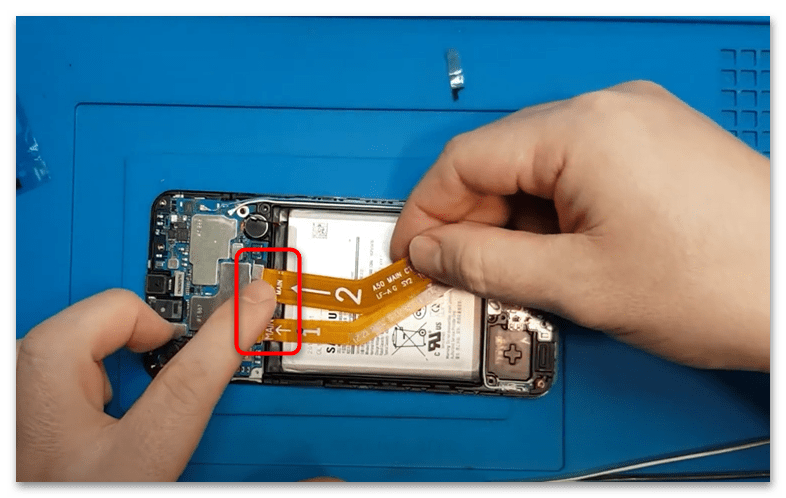
- Снимите шлейфы снизу и сверху, чтобы они не мешали при извлечении аккумуляторной батареи.
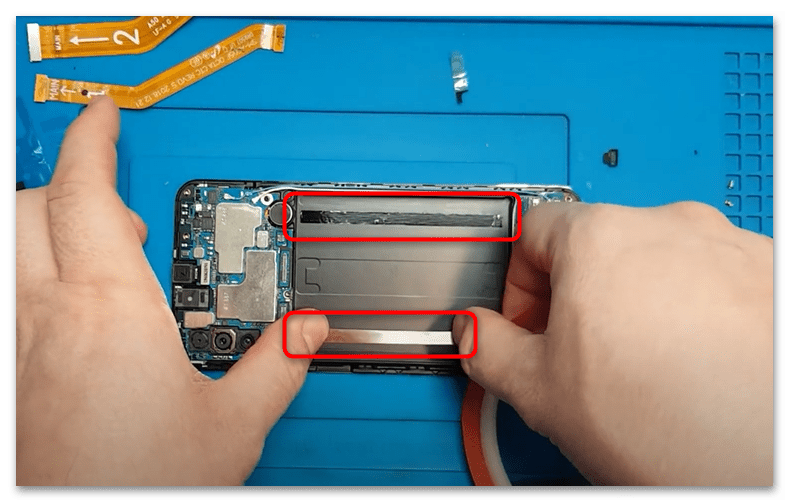
- Батарея прикреплена к средней части скотчем, поэтому для изъятия необходимо поддеть ее снизу с помощью пластикового разъемника.
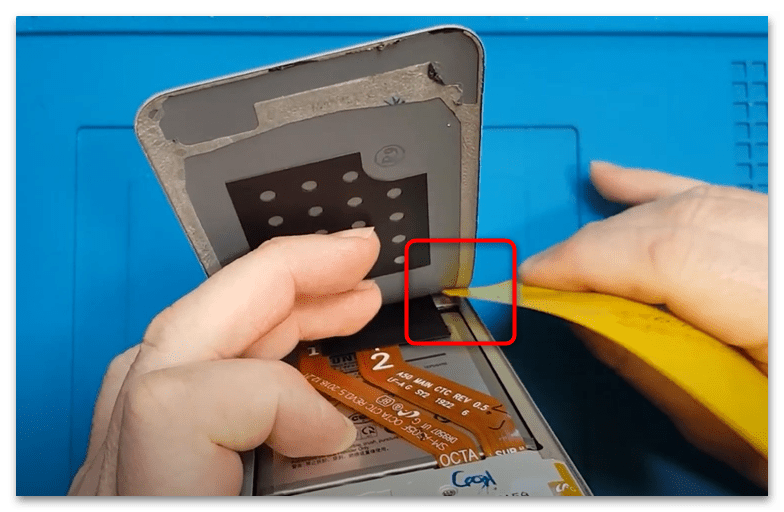
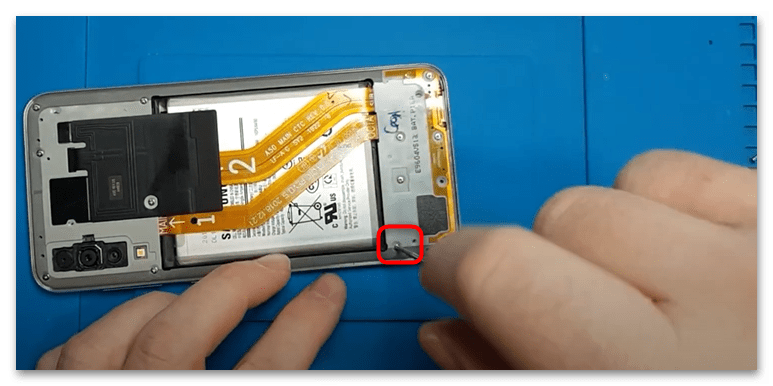
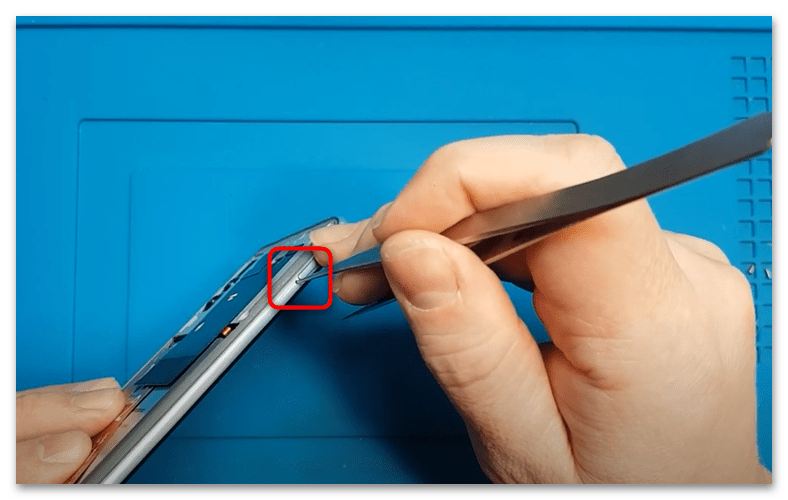
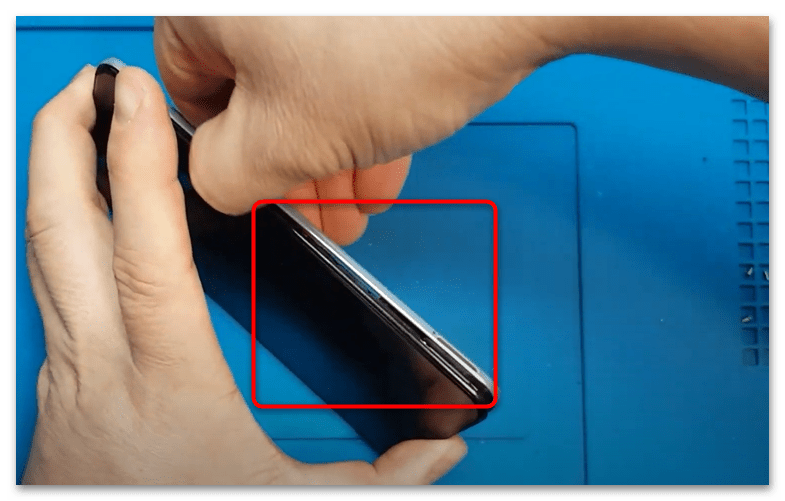
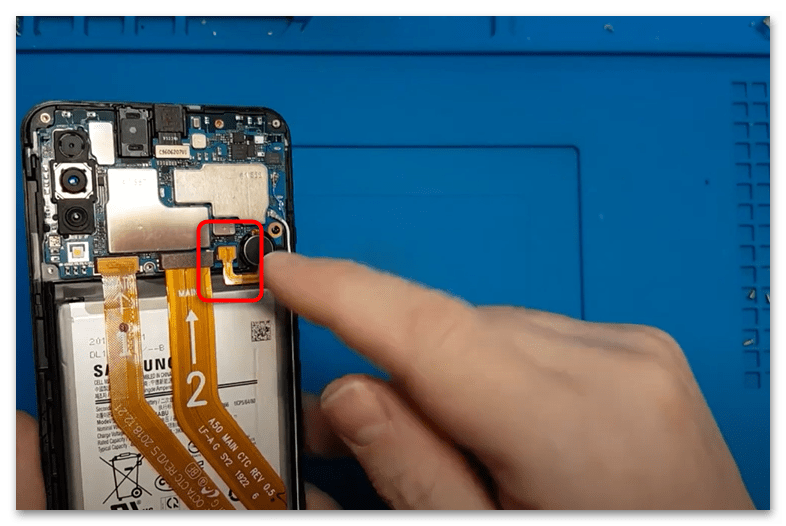
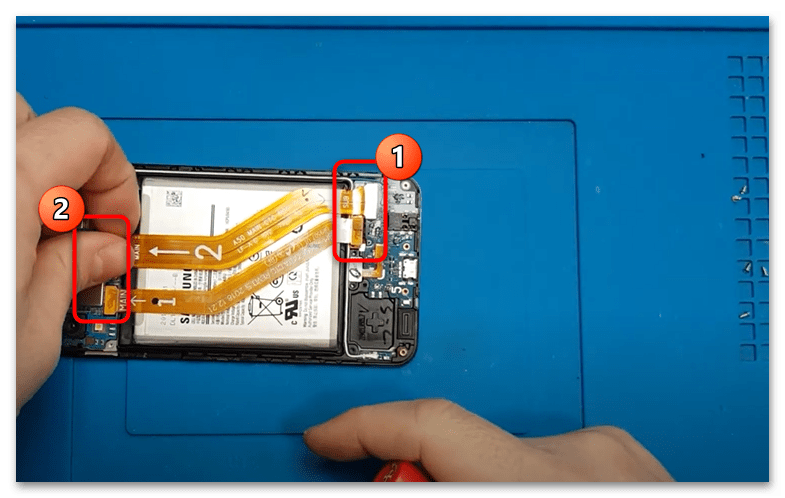
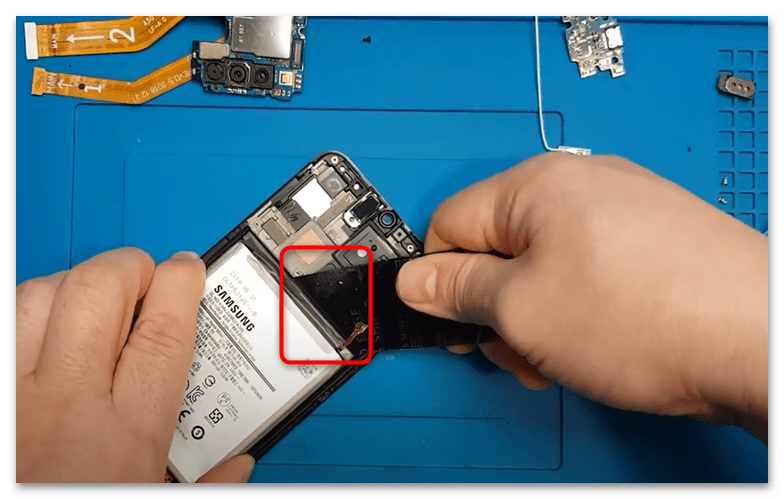
При снятии аккумулятора необходимо действовать осторожно, используя только мягкий пластиковый разъемник: батарея способна самовоспламениться или выйти из строя.
Для того чтобы клейкая масса лучше отходила, можно использовать шприц, наполненный спиртом. Но такой вариант чреват тем, что можно залить внутреннюю часть телефона. Рекомендуется прибегать к нему только если вы уже умеете разбирать мобильные девайсы.
Сборка разобранного смартфона
Собрать смартфон Samsung A50 несложно, но для закрепления аккумулятора и крышки потребуется тонкий акриловый скотч и специальный клей:
- Нанесите на нижнюю часть, которая была под батареей, две полоски скотча.
- Сначала подсоедините аккумулятор к материнской плате с помощью коннектора, затем аккуратно приклейте элемент. Это нужно для того, чтобы быть уверенным, что все закреплено надежно, а длины провода хватает.
- Прикрепите назад шлейфы.
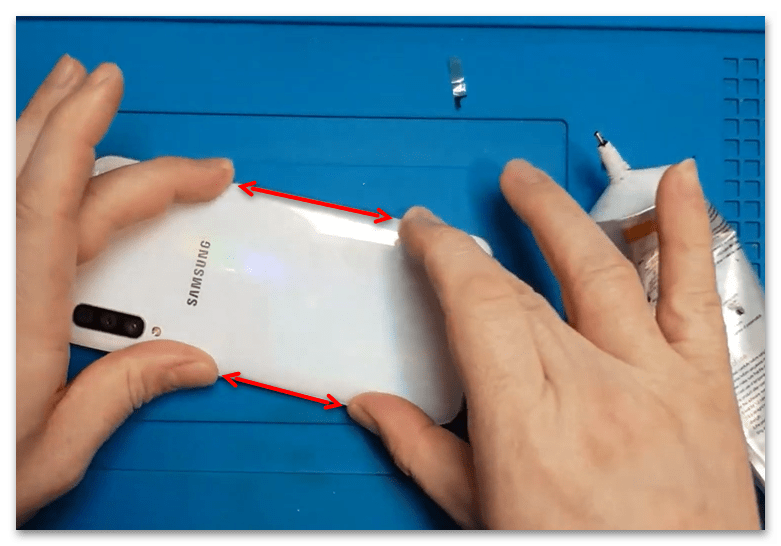
- Подсоедините среднюю часть корпуса, зажимая грани по периметру до тех пор, пока не услышите щелчки.
- Закрутите винтики средней панели, затем приклейте крышку смартфона, используя клей E-8000/T-8000. Если его нет, пользуйтесь клеевой основой, которая изначально была по краям крышки, однако учтите, что крышка может приклеиться обратно недостаточно хорошо и начнет отпадать.
- Клей необходимо аккуратно наносить тонким слоем на грани крышки и в тех местах, где уже была клеевая основа, включая периметр разъема для фотомодуля. После этого зафиксируйте нижнюю панель и оставьте устройство на время.


Еще статьи по данной теме:
Сложность разборки:
Средняя
Рекомендованные инструменты

Фен

Крестовая отвертка 1,5 мм

Инструмент для открывания

Пинцет
Специалист по созданию контента.

Шаг 1. Вынимаем Лоток карт
Используя инструмент Ключ или Скрепку и открываем лоток Сим карты и Карты памяти и вынимаем его.
⚠️ Обратите внимание! Вставлять инструмент нужно в специальное отверстие на ребре корпуса телефона. Не нажимайте слишком сильно, это может привести к поломке механизма выталкивания лотка.
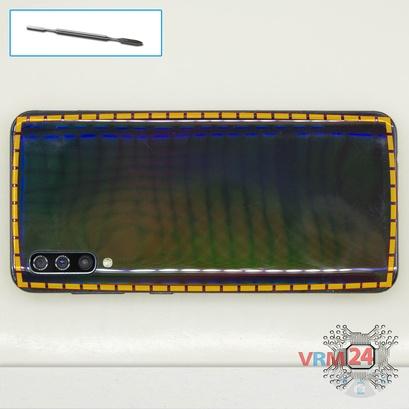
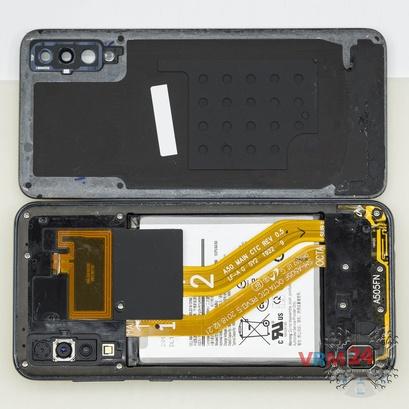
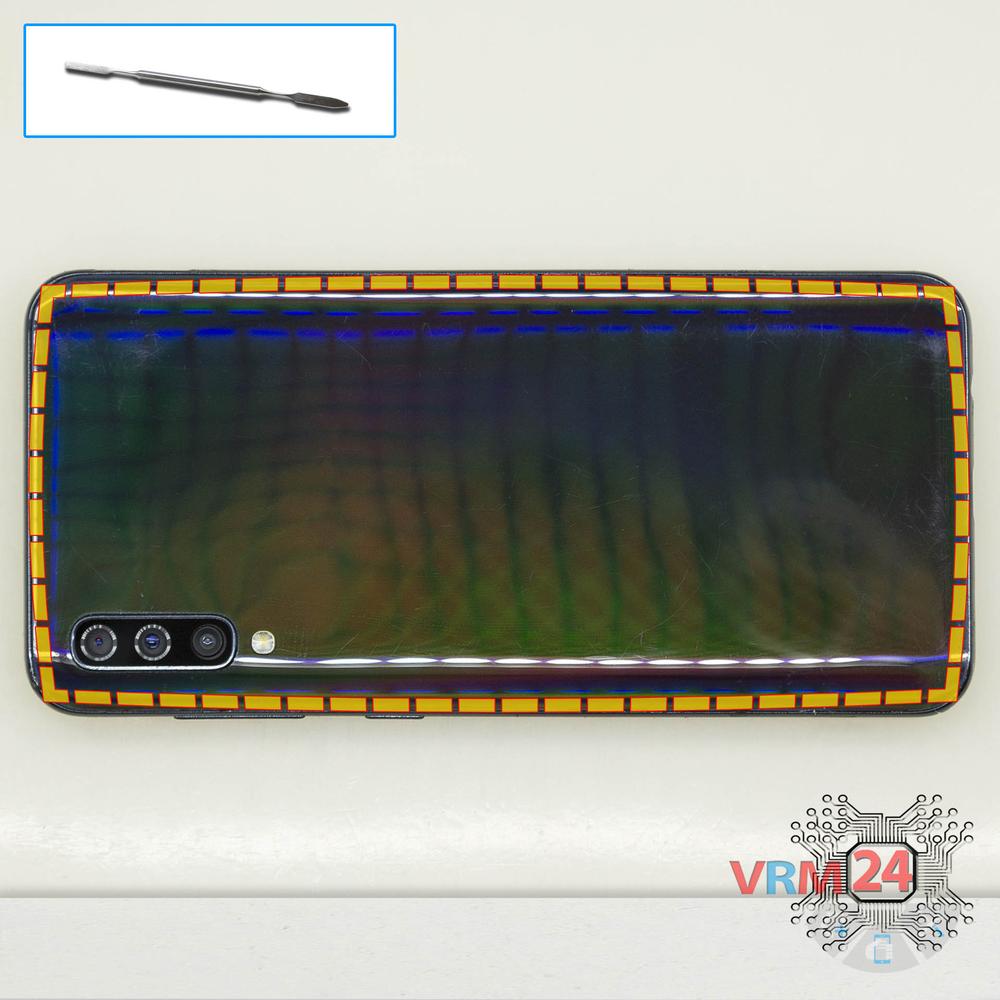
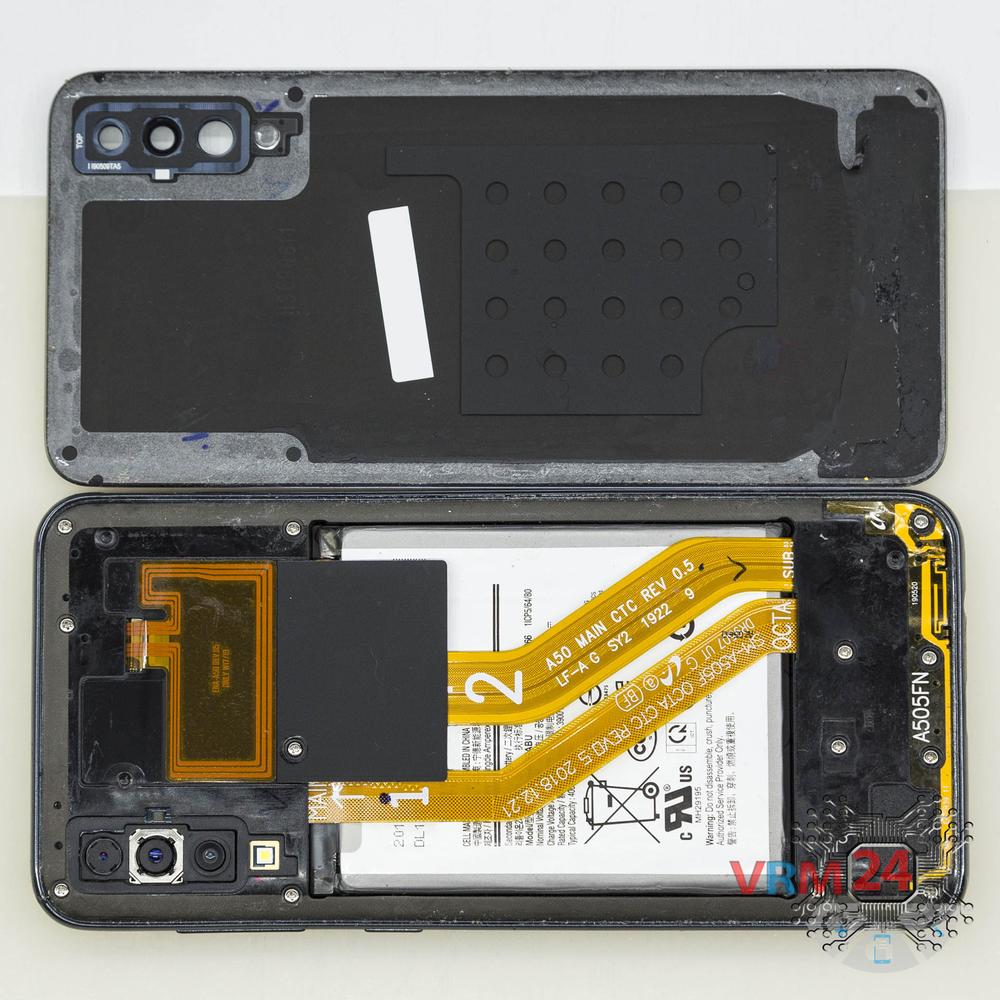
Шаг 2. Открываем заднюю крышку
Для аккуратного разделения, рекомендуем использовать такие специальные нагревательные устройства, как сепаратор, паяльный фен или нагревательный коврик. Можно использовать домашний фен, но придется сделать сопло вручную или иметь подходящее в комплекте, для аккуратного нагрева и концентрации теплового потока в нужном месте.
ℹ️️ Поверхность крышки необходимо нагреть для размягчения клеевой основы под ней. Приблизительная температура нагрева 50° С.
Используйте тонкую пластиковую пленку или очень тонкий медиатор для расклейки. Для облегчения процесса, можно применить изопропиловый спирт, но очень аккуратно и смочить только саму пленку. Зачастую самое сложно пропустить инструмент между разделяемыми частями, обычно для этого выбирается дальний край от шлейфов или кнопок.
Не допускается при разделении использовать рычаг или любое усилие способное повредить внутренние элементы.
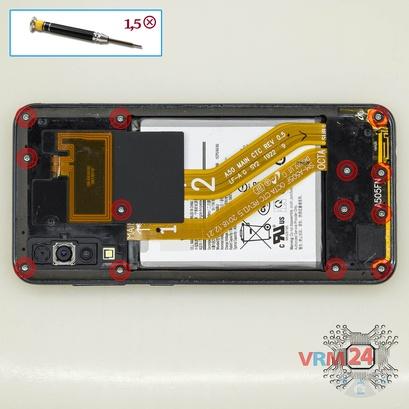
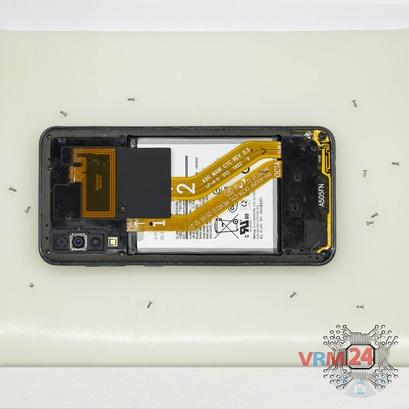


Шаг 3. Откручиваем винты
С помощью отвертки (Phillips 1,5 мм PH000) открутите 13 винтов.
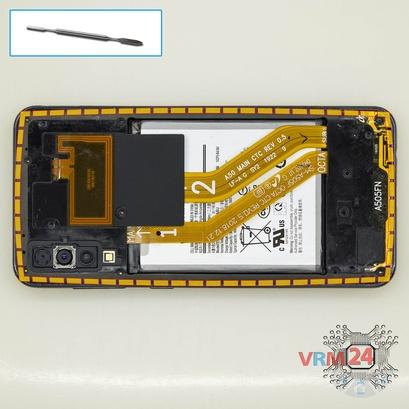
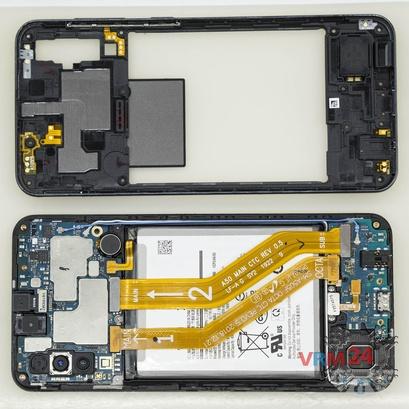
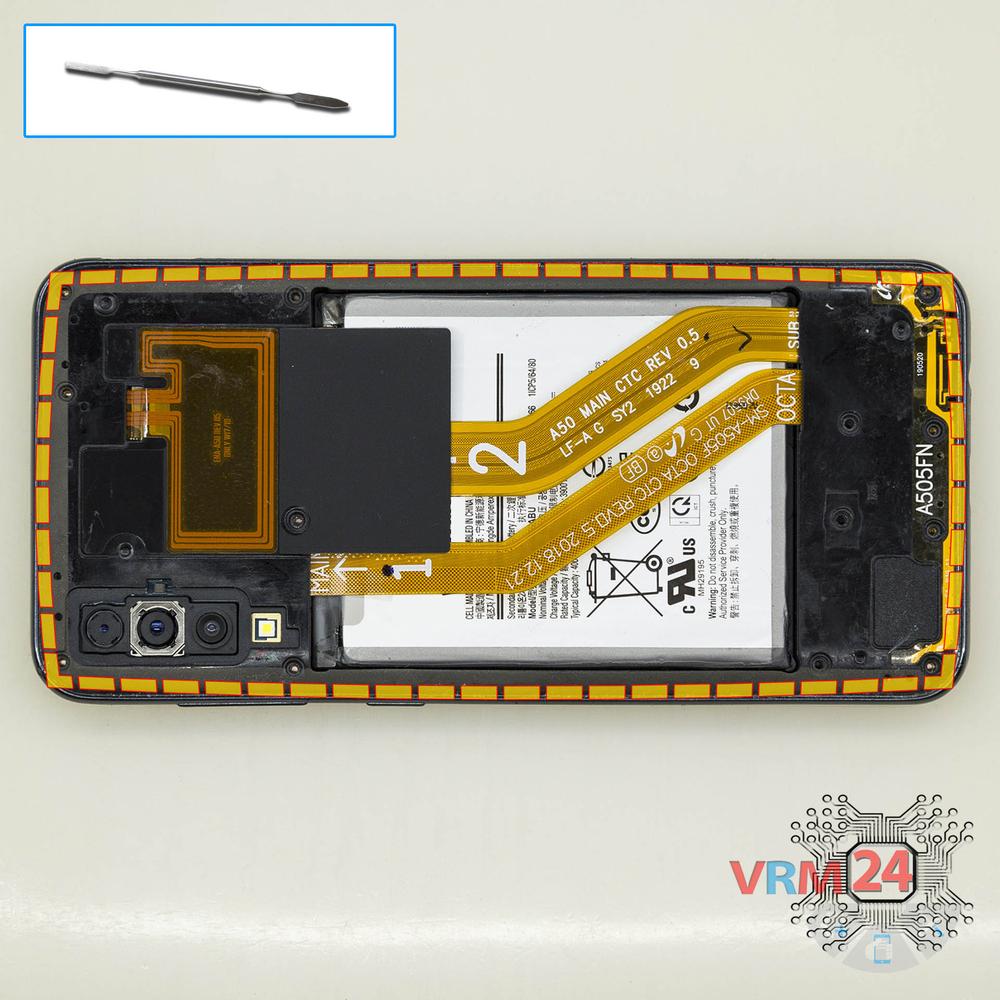

Шаг 4. Открываем среднюю крышку
Снять крышку с динамиком, светодиодным фонариком, боковыми кнопками, контактными площадками антенн. Крышка защищает печатные платы (PCB). Старайтесь поднимать крышку за края и ничего не просовывать между ними, чтобы случайно не задеть и не закоротить что-либо на платах.
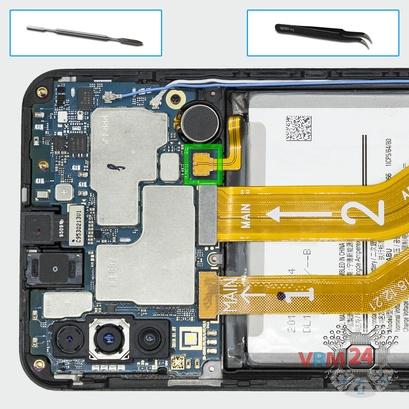
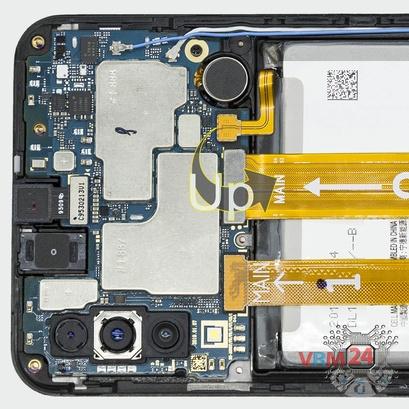
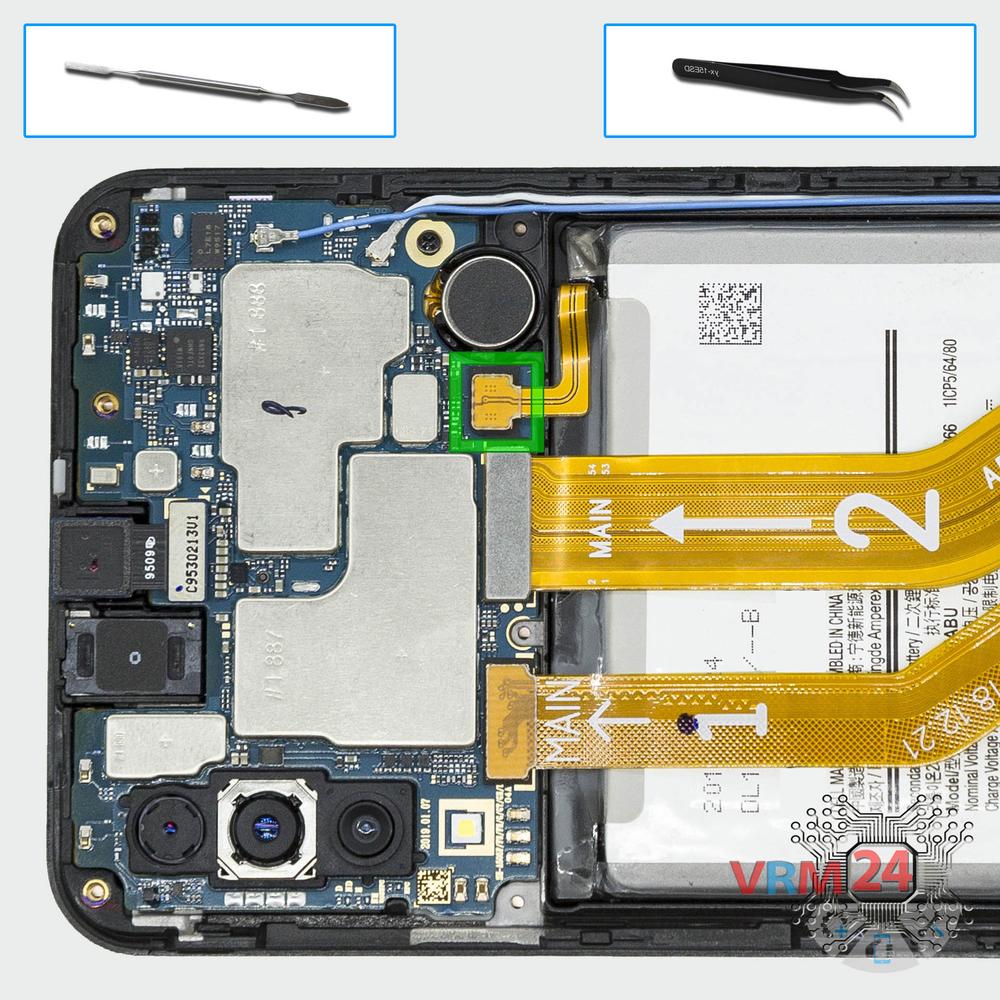
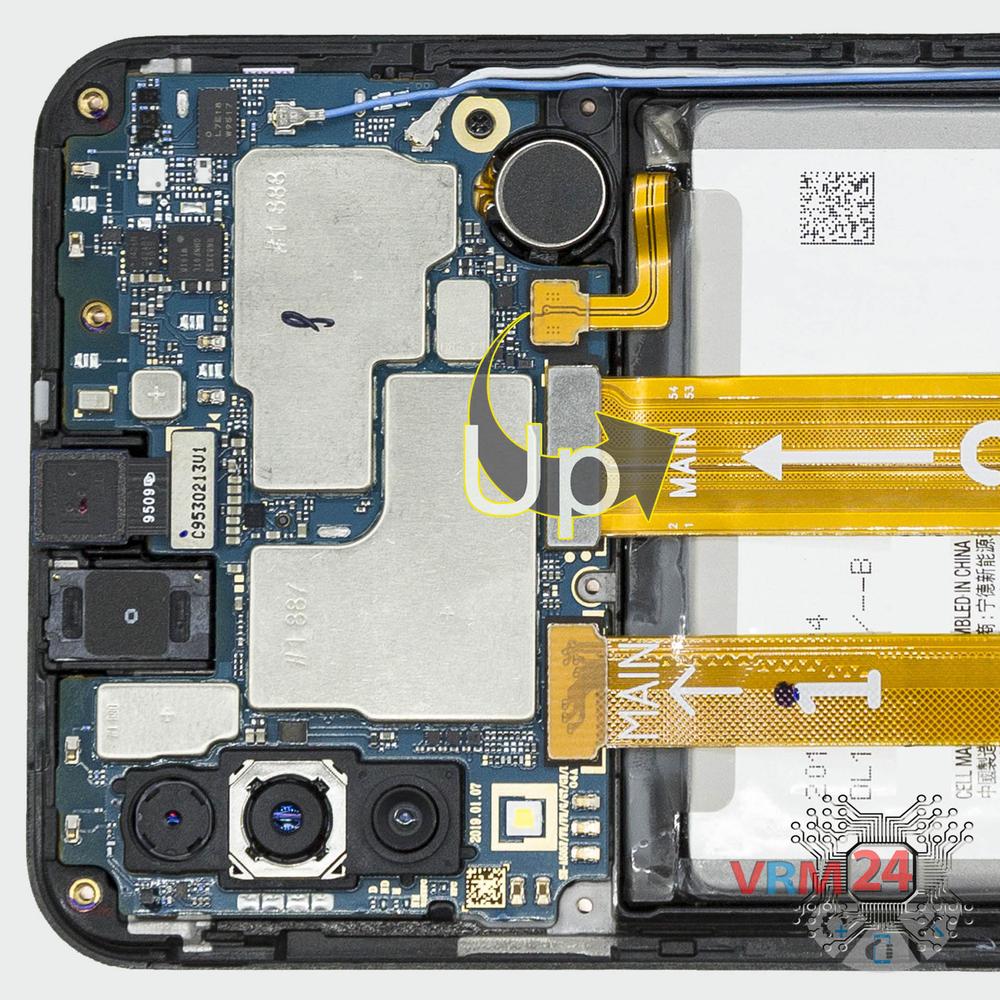
Шаг 5. Отсоединяем коннектор аккумуляторной батареи
Как можно скорее отсоедините разъем аккумулятора.
ℹ️️ В модели Samsung Galaxy A50 SM-A505 установлен аккумулятор EB-BA505ABU емкостью 4000 мАч (он же аккумулятор).
⚠️️ Настоятельно рекомендуется отсоединить разъем во избежание возможного короткого замыкания при разборке.
Кроме того, старайтесь не использовать металлический инструмент для отсоединения разъема аккумуляторной батареи или делайте это осторожно.
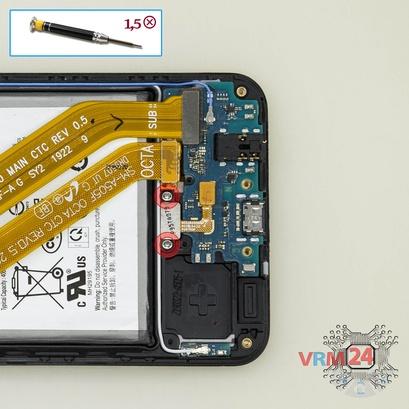
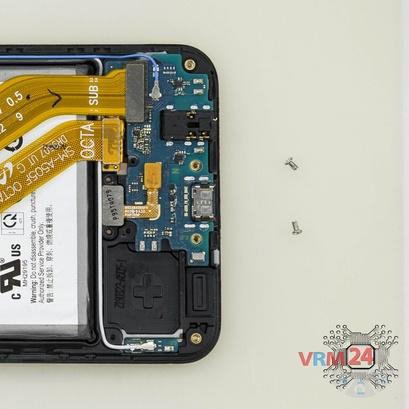
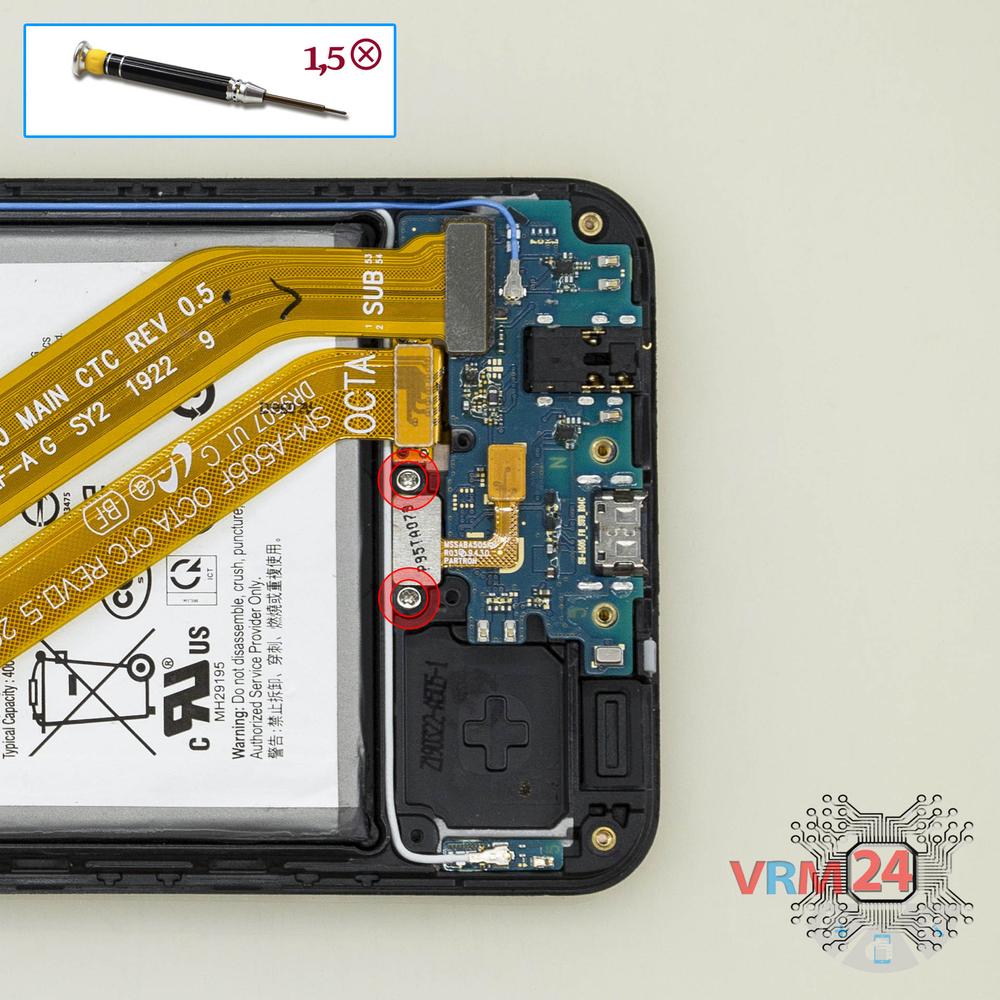
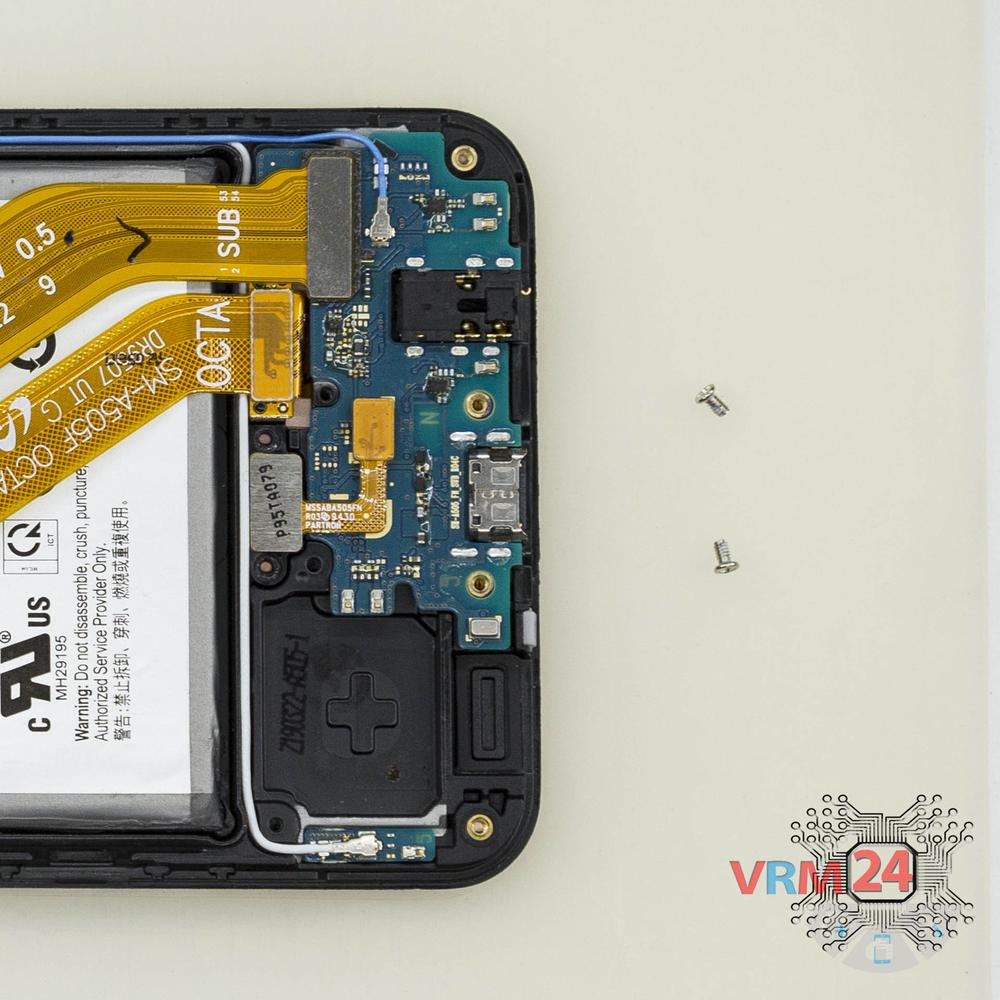
Шаг 6. Откручиваем винты
С помощью отвертки (Phillips 1,5 мм PH000) открутите два винта, крепящих датчик отпечатков пальцев.
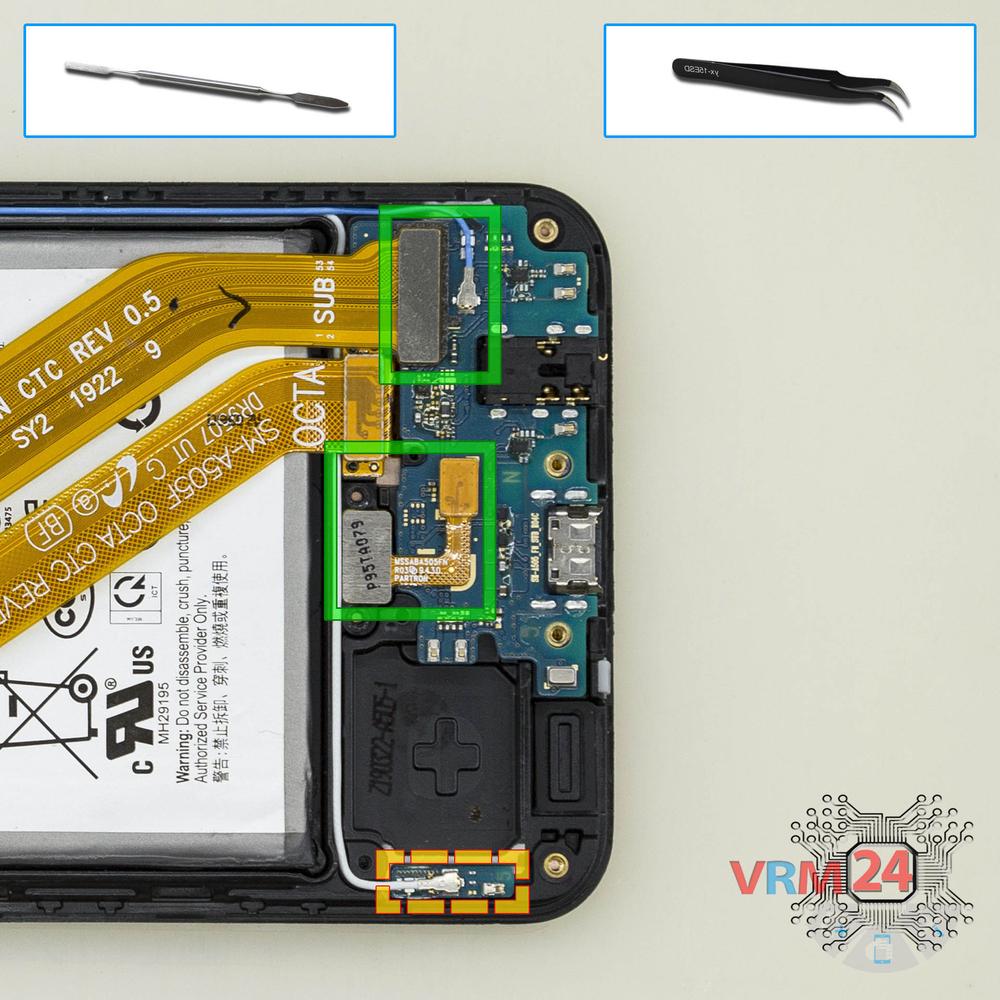

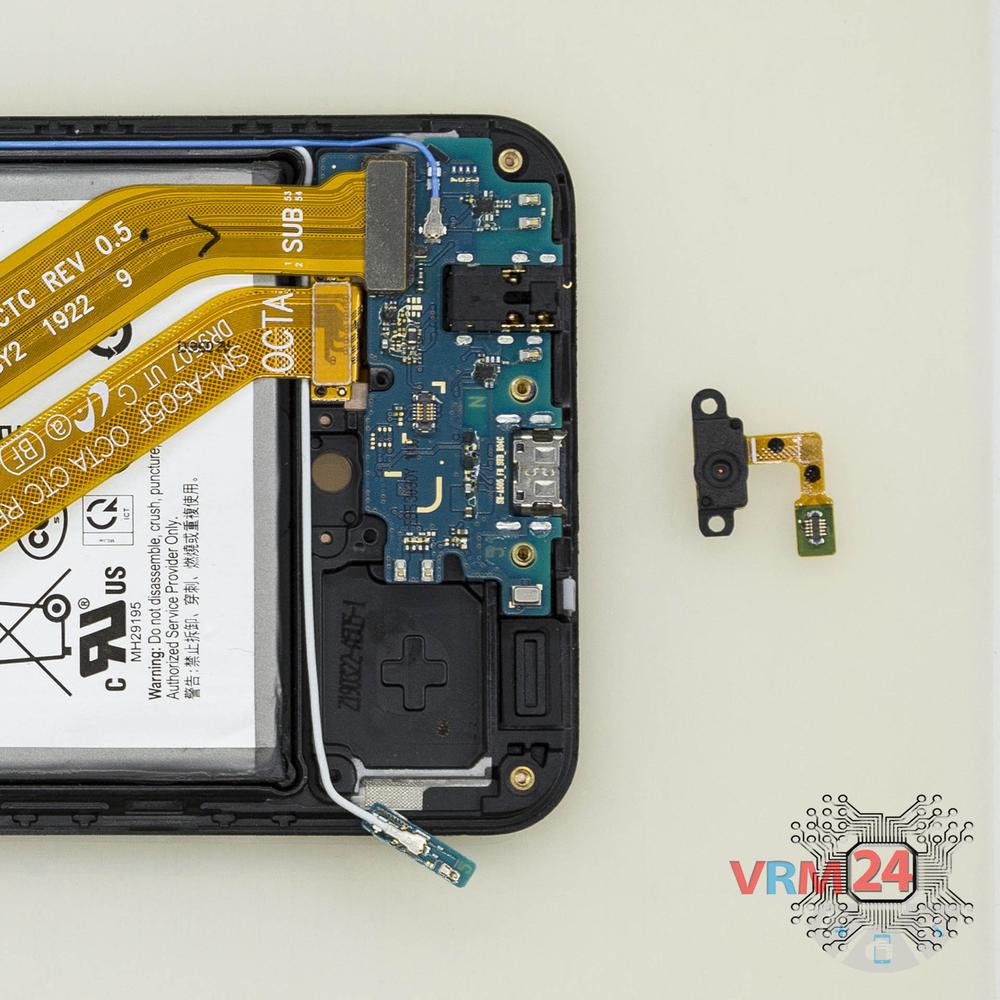
Шаг 7. Отсоединяем датчик отпечатка пальцев
Отсоедините разъем коаксиального кабеля, межплатного шлейфа, шлейфа датчика отпечатков пальцев на дочерней плате.
Кроме того, снимите датчик отпечатков пальцев и отсоедините небольшую плату с антенными.
⚠️️ Не тяните за кабель и не поддевайте его острым предметом. Разъемы довольно слабые и легко ломаются, или кабель выпадает из конца (наконечника).
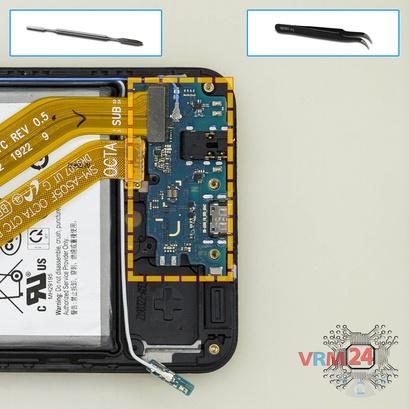
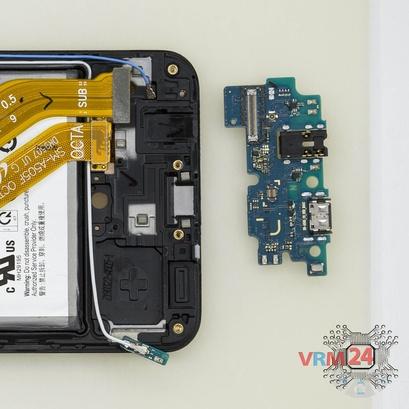

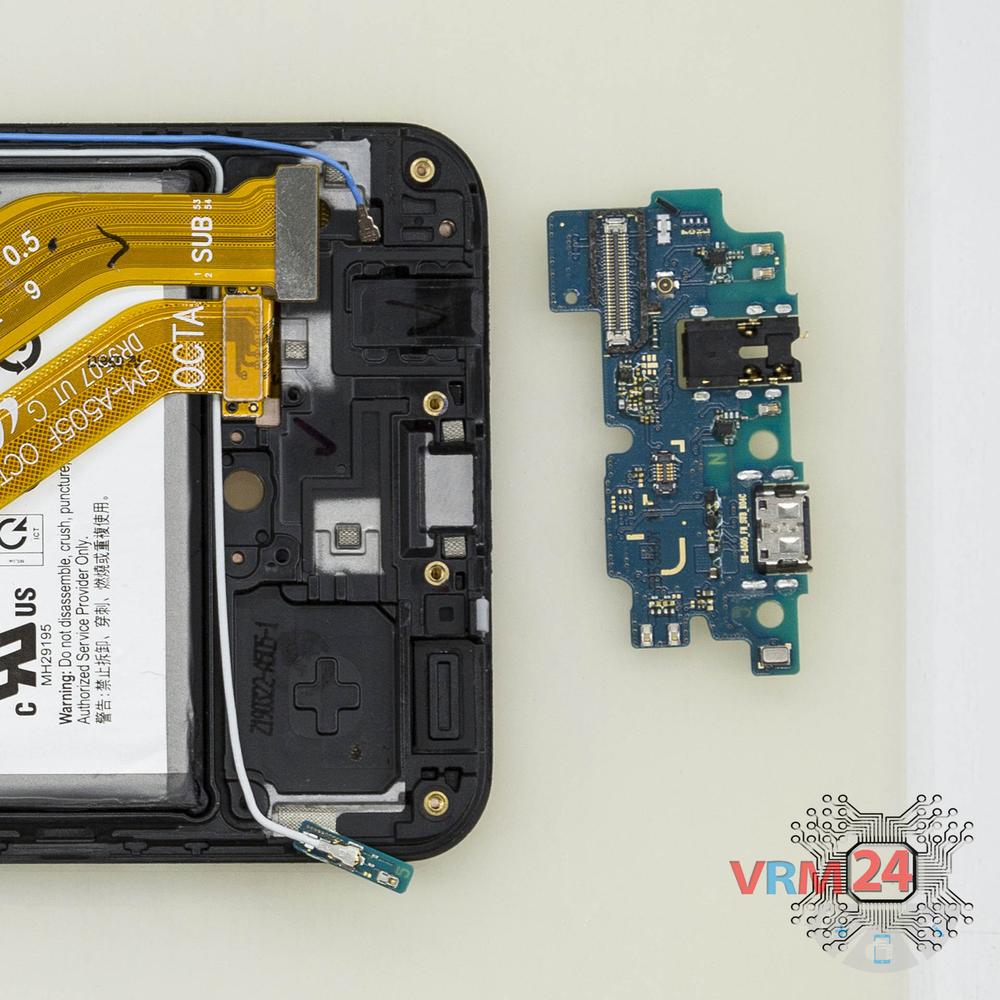
Шаг 8. Отсоединяем субплату
Снимаем нижнюю субплату. Т.к. она приклеена металлизированным скотчем к станине, для облегчения процесса плату можно немного нагреть.
ℹ️️ Дополнительная плата содержит порт зарядки (Micro-USB), микрофон, разъем для наушников, пружинные контакты на динамик и антенный блок.
⚠️ При демонтаже нижней платы, не нужно вставлять инструмент под плату. Можно повредить компоненты с внутренней стороны.
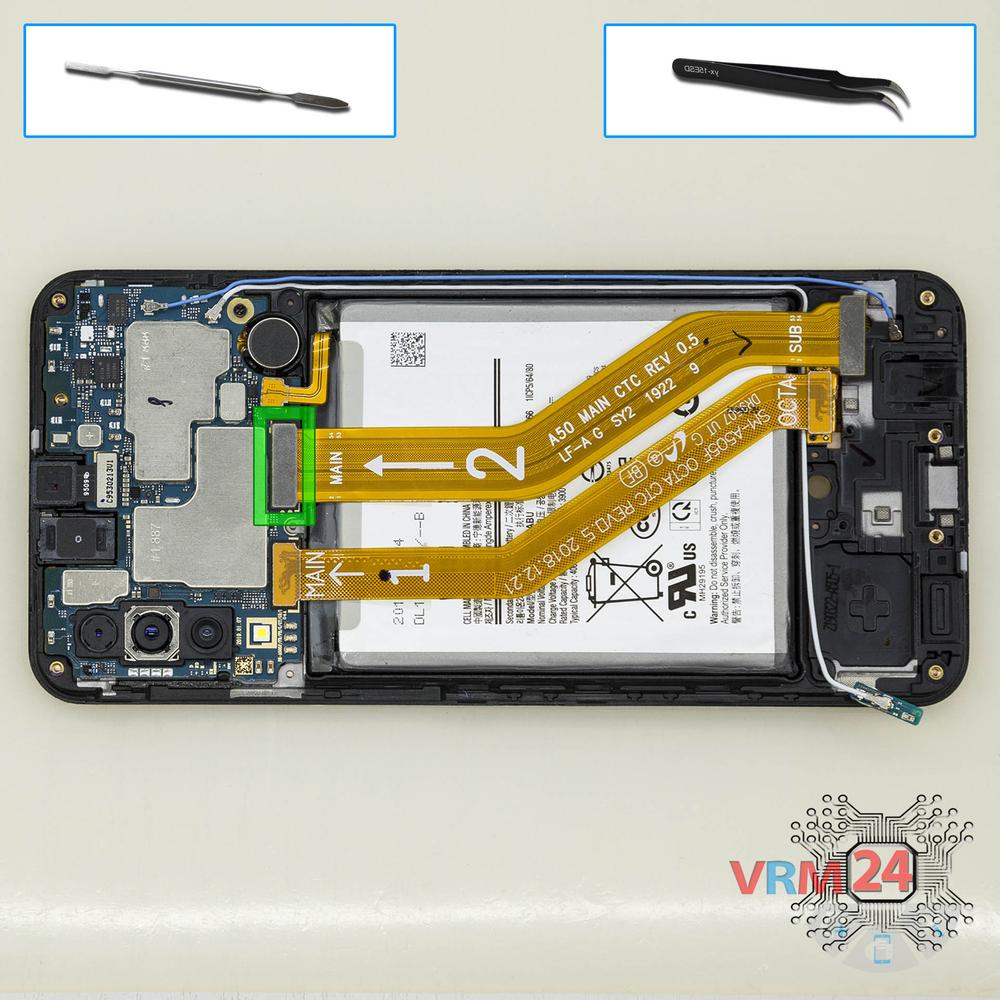
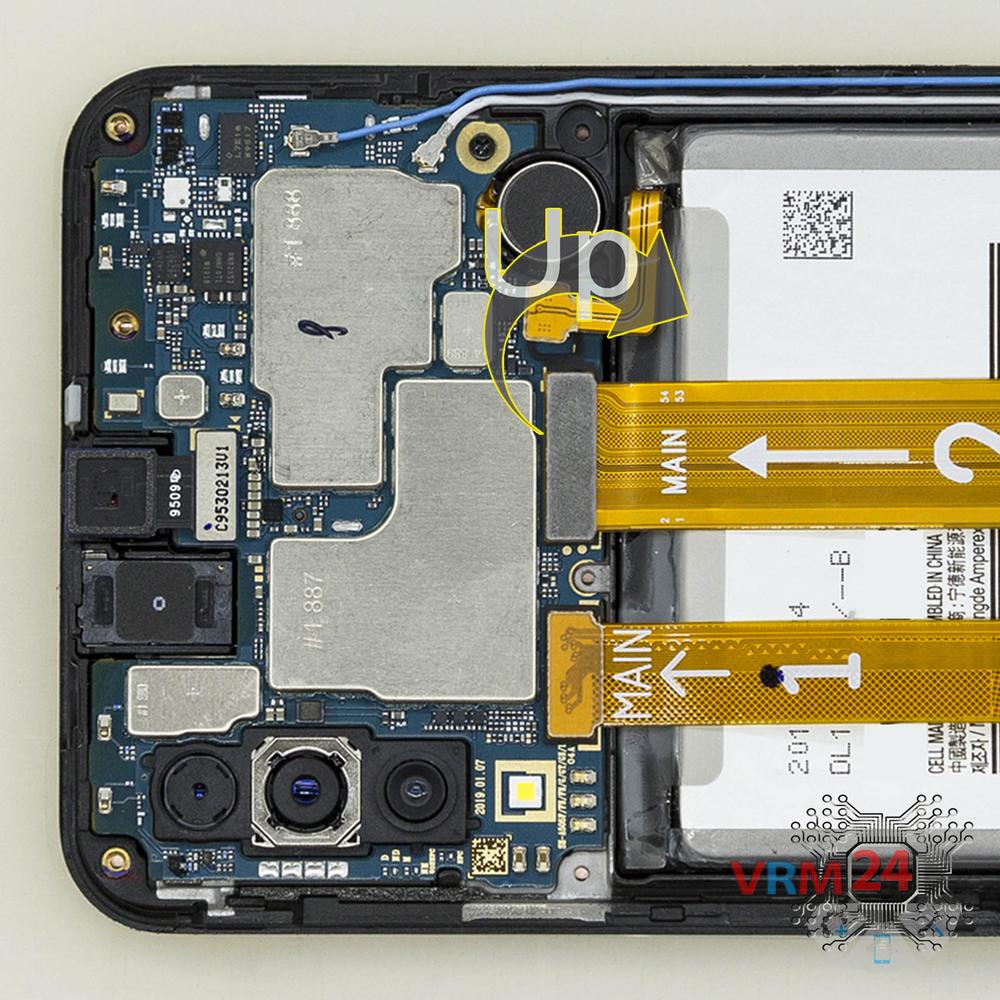
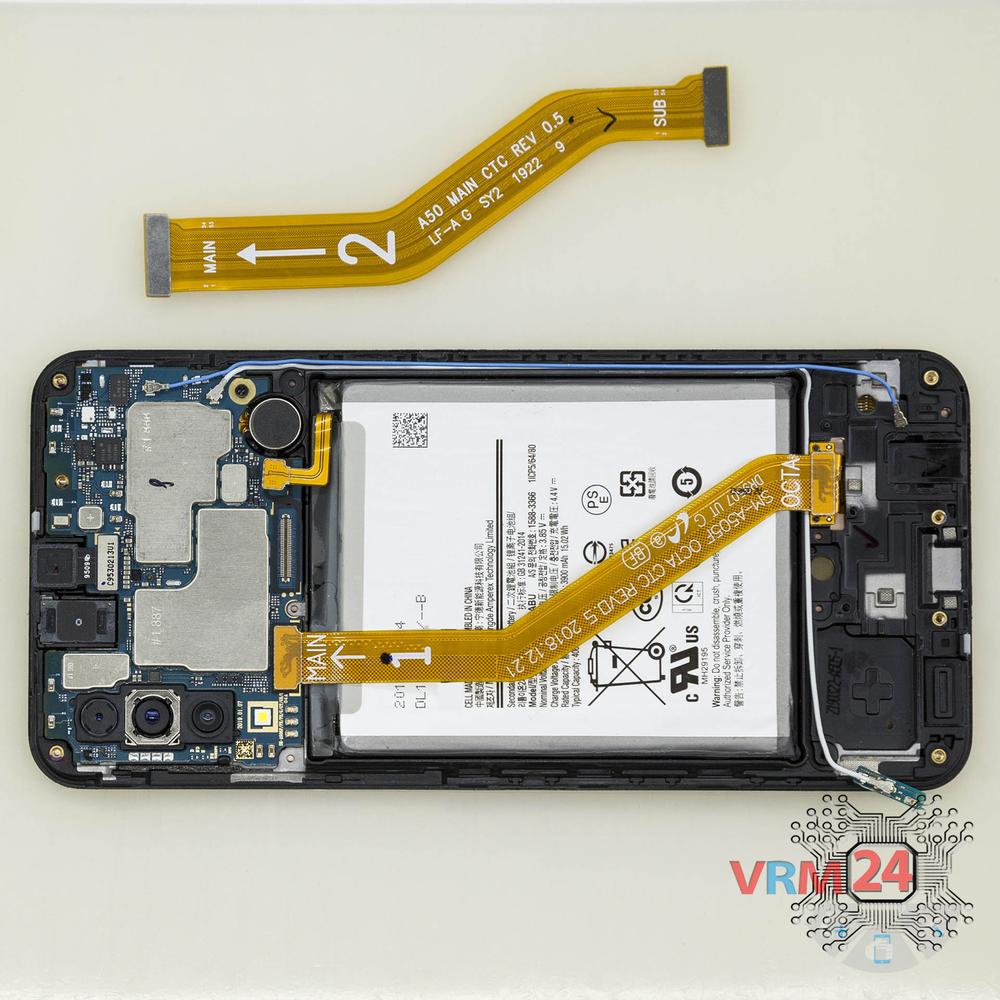
Шаг 9. Отсоединяем межплатный шлейф
Аккуратно, лучше всего с края, отсоединяем коннектор и снимаем межплатный шлейф, соединяющий основную плату с дополнительной печатной платой (также известной как субплата).
⚠️ Будьте осторожны при извлечении шлейфов из коннекторов, шлейфы очень тонкие и их достаточно легко порвать, или повредить контактные дорожки внутри.
ℹ️️ Стрелочка на шлейфе указывает его правильное положение.

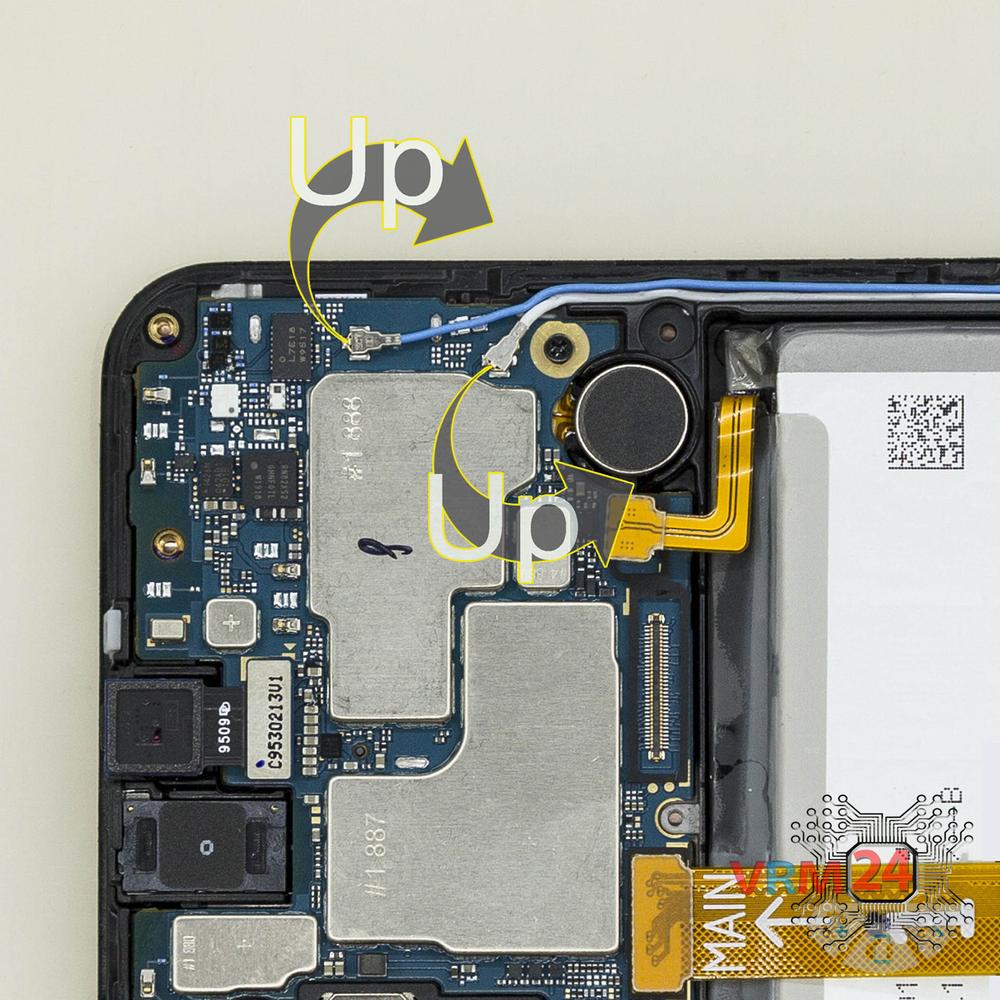
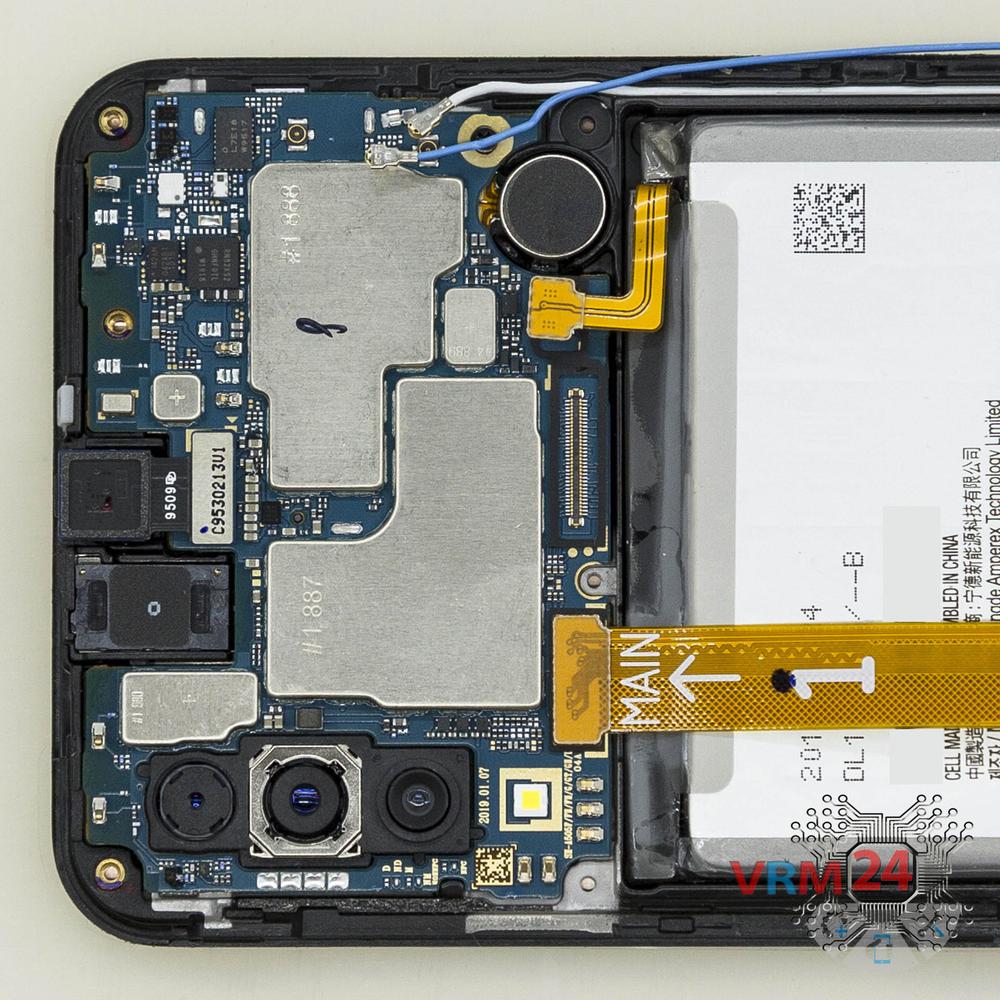
Шаг 10. Отсоединяем коннекторы
Отсоедините два разъема коаксиального кабеля.


Шаг 11. Отсоединяем межплатный шлейф
Осторожно, желательно с края, отсоедините разъемы и снимите шлейф, соединяющий материнскую плату с модулем дисплея.
⚠️️ Будьте осторожны при извлечении кабелей из разъемов. Кабели довольно тонкие, и их достаточно легко сломать или повредить контактные дорожки внутри.
ℹ️️ Стрелка на кабеле FFC (гибкий плоский шлейф) указывает на его правильное положение.
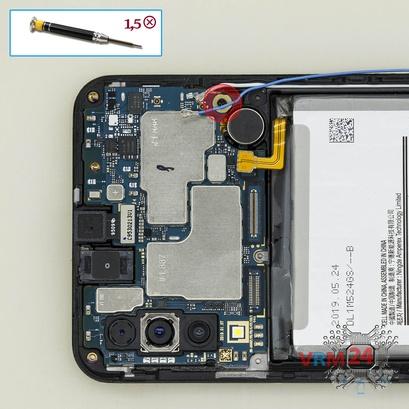
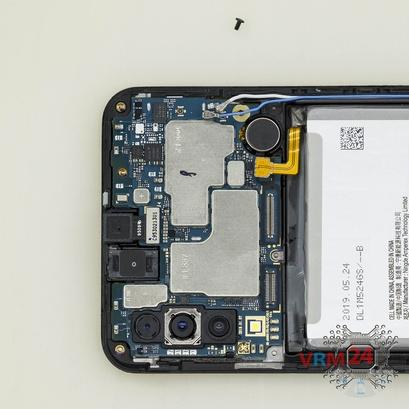

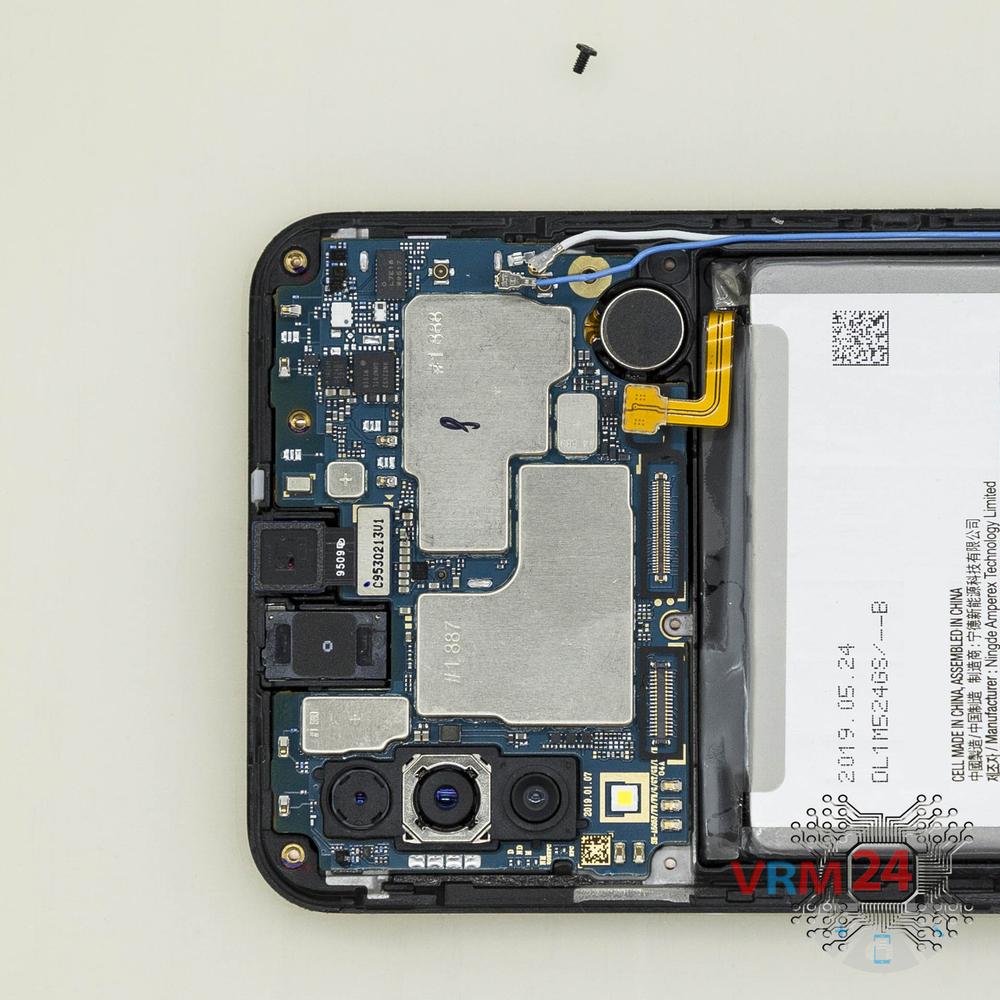
Шаг 12. Откручиваем винт
С помощью отвертки (Philips 1,5 мм PH000) открутите один винт, крепящий материнскую плату.
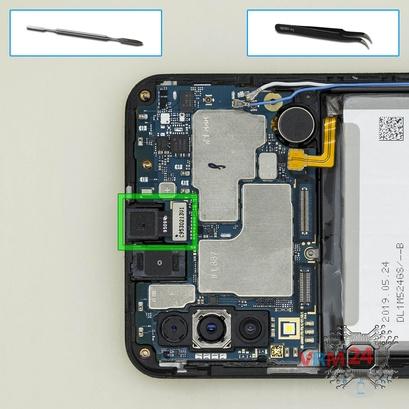
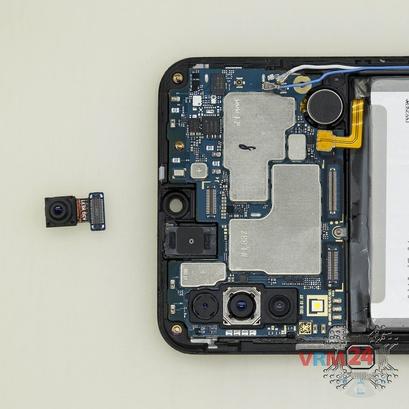
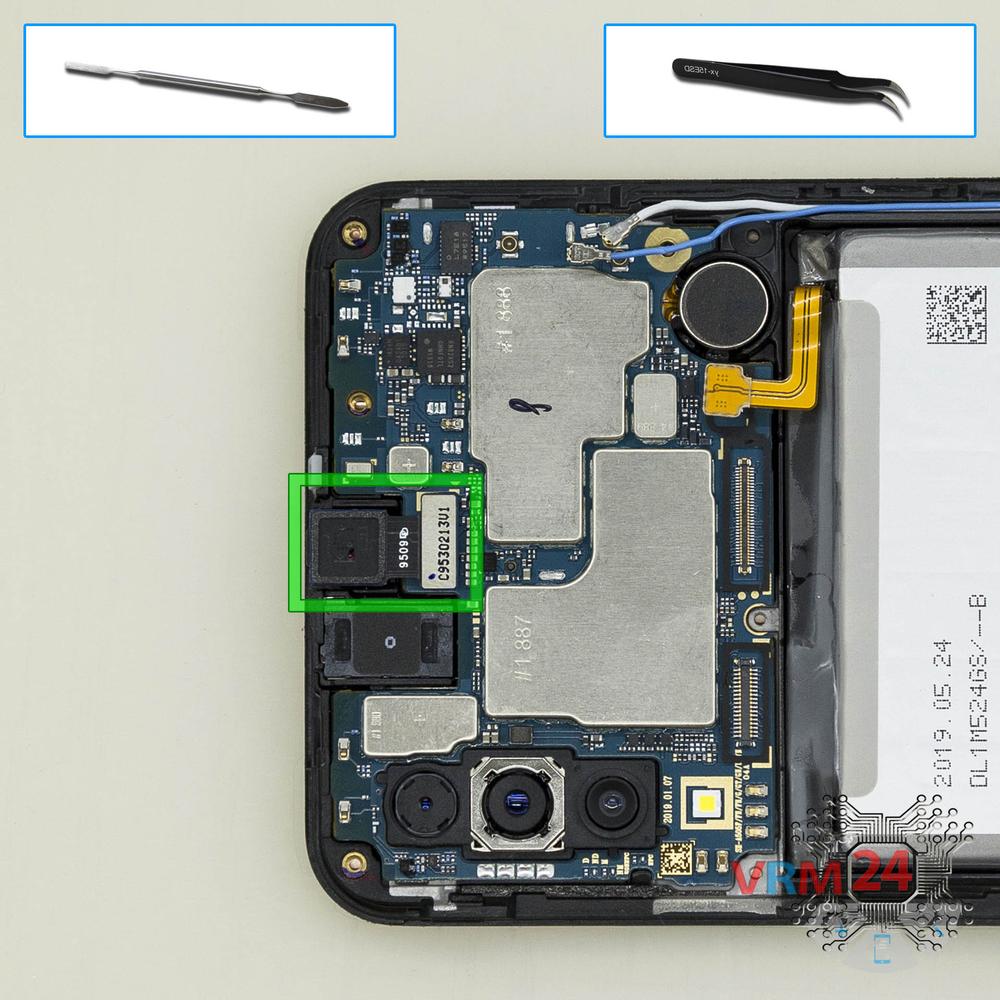

Шаг 13. Отсоединяем фронтальную камеру
Подденьте разъем на материнской плате и снимите переднюю (селфи) камеру.
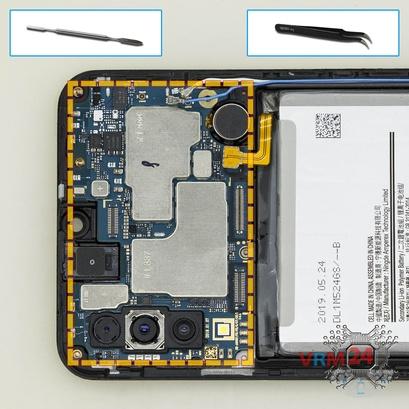
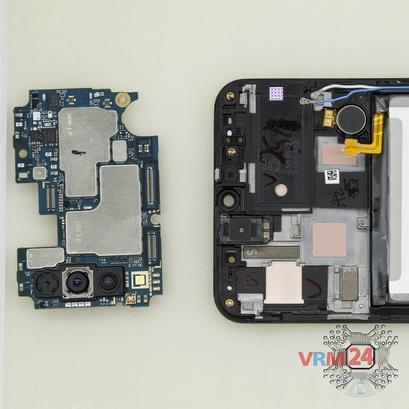

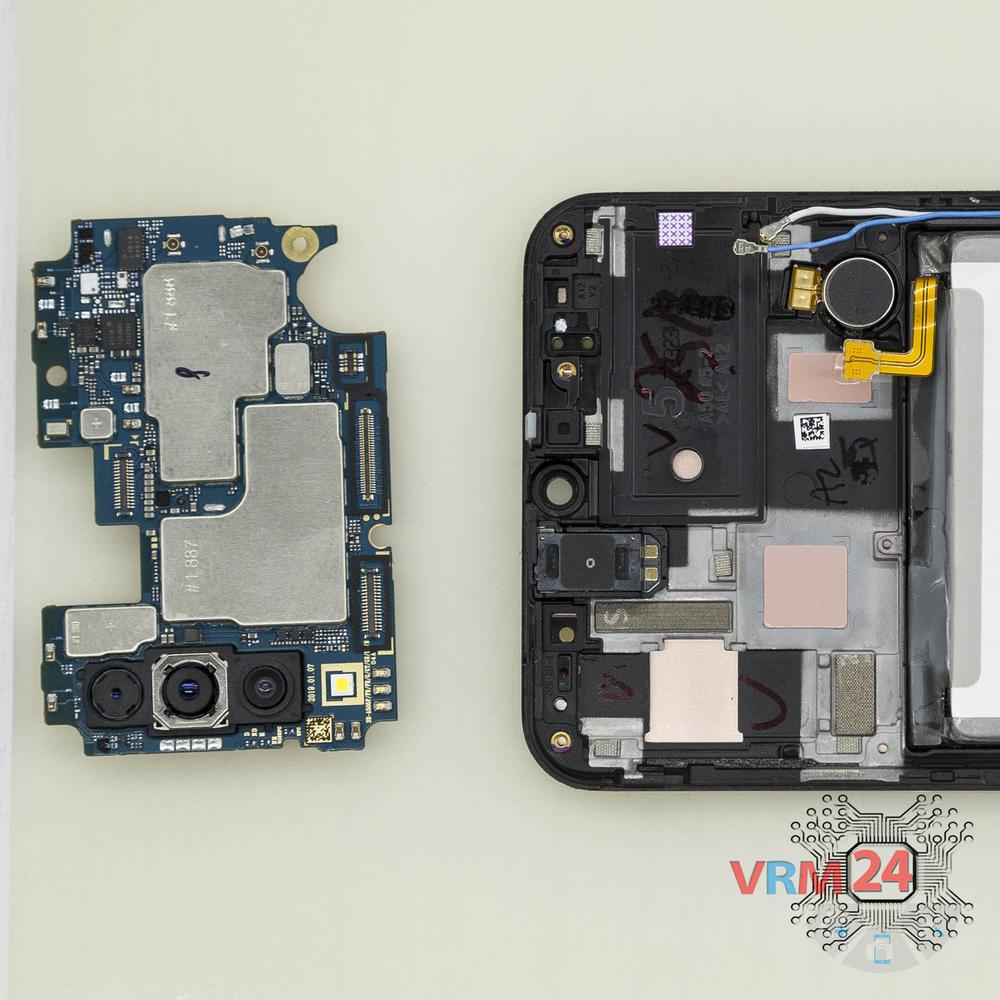
Шаг 14. Отсоединяем печатную плату
Аккуратно снимаем печатную плату. Не нужно использовать рычаг или стараться достать плату силой, убедитесь, что ничто не мешает и не держит плату.
⚠️ Не изгибайте печатную плату при демонтаже и не просовывайте инструменты под нее. Незаметно для себя, вы можете повредить компоненты или шлейфы с внутренней стороны.
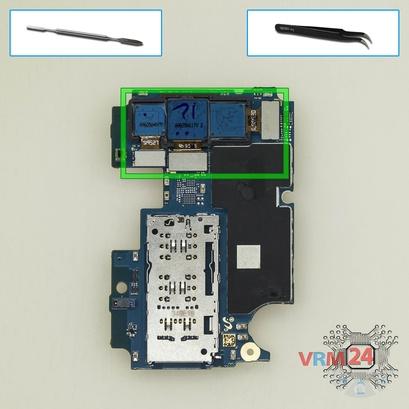
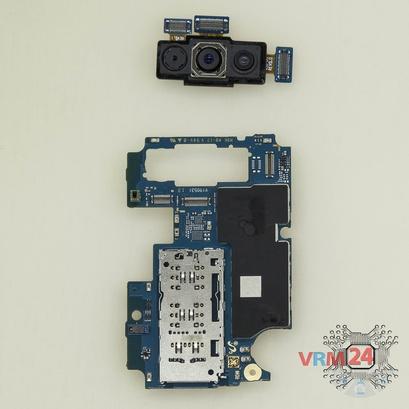
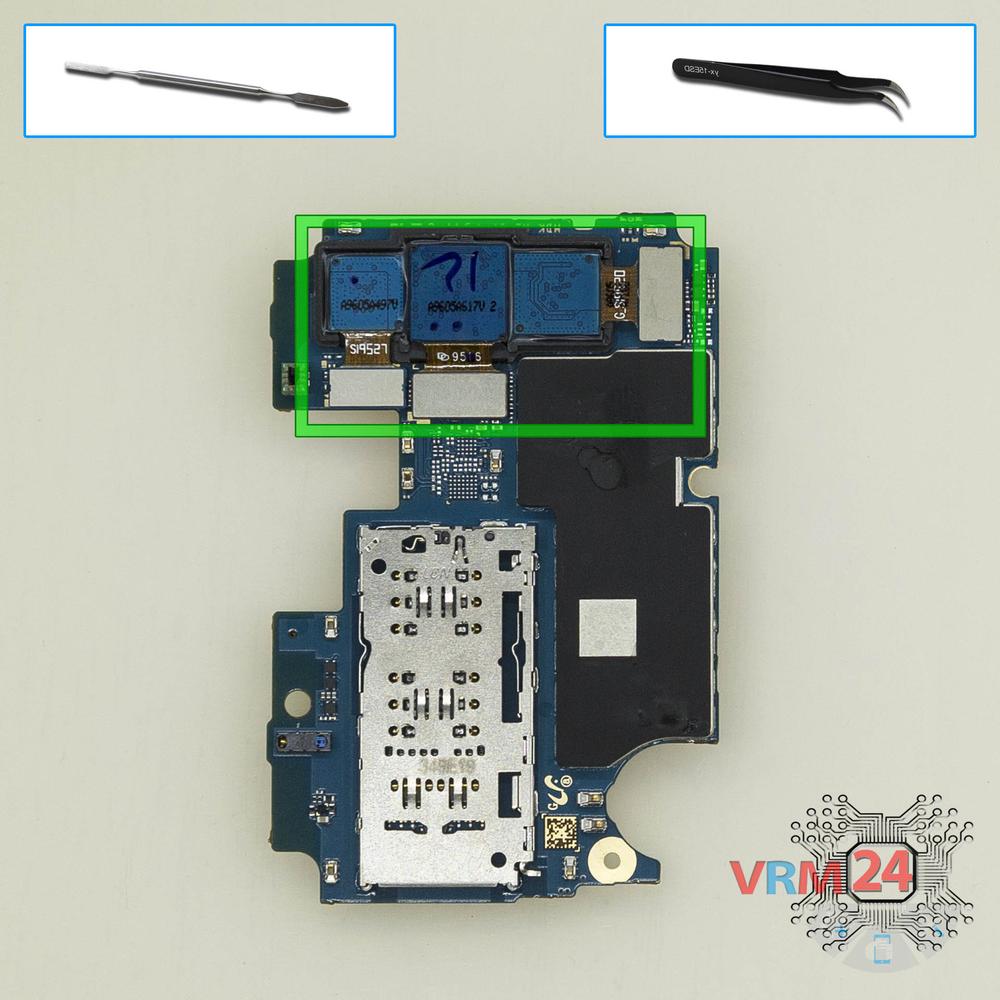
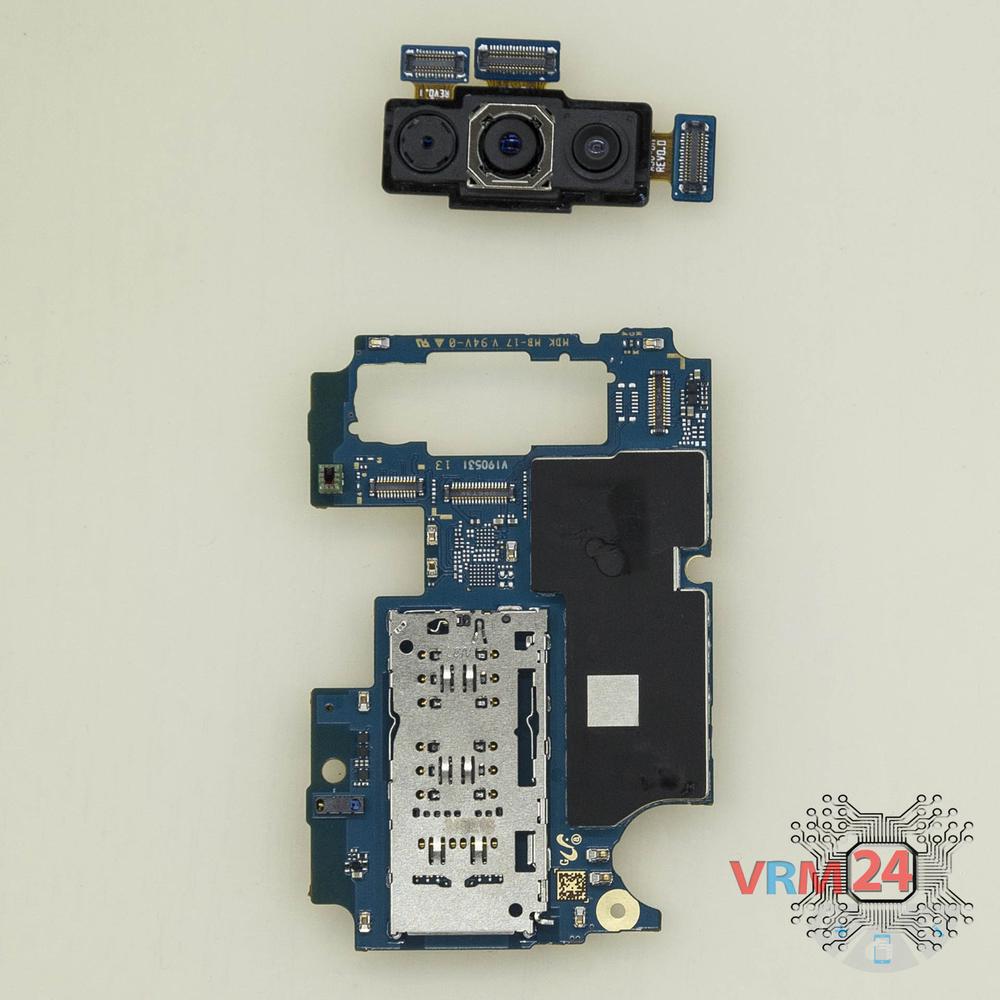
Шаг 15. Отсоединяем камеры
Подденьте разъемы и снимите три тыльные камеры в сборе.
Подробные видео инструкции по разборке и ремонту Samsung Galaxy A50 SM-A505 от нашего сервисного центра:
Если у Вас есть вопрос, задайте его нам и мы постараемся ответить максимально подробно. Если статья оказалась полезной — оцените ее, пожалуйста.

Evgenii Kuzmin
Специалист сервисного центра
РазборкаРемонт имеет среднюю сложность и по времени занимает примерно 12 минут.
Наше руководство подходит для всех моделей Samsung Galaxy A50 SM-A505 — Samsung SM-A505F/DS, SM-A505FN/DS (Global); SM-A505GN/DS, SM-A505FM/DS, SM-A505YN, выпущенных для рынков разных стран.
Возврат к списку
Привет!
Мы обнаружили, что язык контента отличается от того, который используется в вашем регионе.
Вы можете изменить язык в правом верхнем углу или оставить текущий..
Рейтинг телефона:
(3.83 — 112 голосов)
Владельцы Samsung Galaxy A50 редко жалуются на свой смартфон, однако в процессе эксплуатации пользователь может столкнуться с различными проблемами. Для их решения порой требуется полная разборка Samsung Galaxy A50. В подобной ситуации настоятельно рекомендуется обращаться за помощью в сервисный центр, но, если такой возможности нет, можно разобрать Samsung Galaxy A50 самостоятельно.
Что для этого понадобится

Samsung Galaxy A50, как и любой другой смартфон на базе операционной системы Андроид, не получится разобрать без специальных инструментов. Нередко они продаются целым комплектом, однако его можно собрать из подручных средств:
- пластиковая карта (медиатор);
- присоска;
- маленькая отвертка крестового типа;
- изопропиловый спирт;
- салфетки.
Только при наличии всех рекомендованных компонентов можно приступать к разборке. И, поскольку Samsung Galaxy A50 обладает несъемным аккумулятором, этот процесс будет довольно сложным и требующим тщательного изучения.
Процесс разборки Samsung Galaxy A50
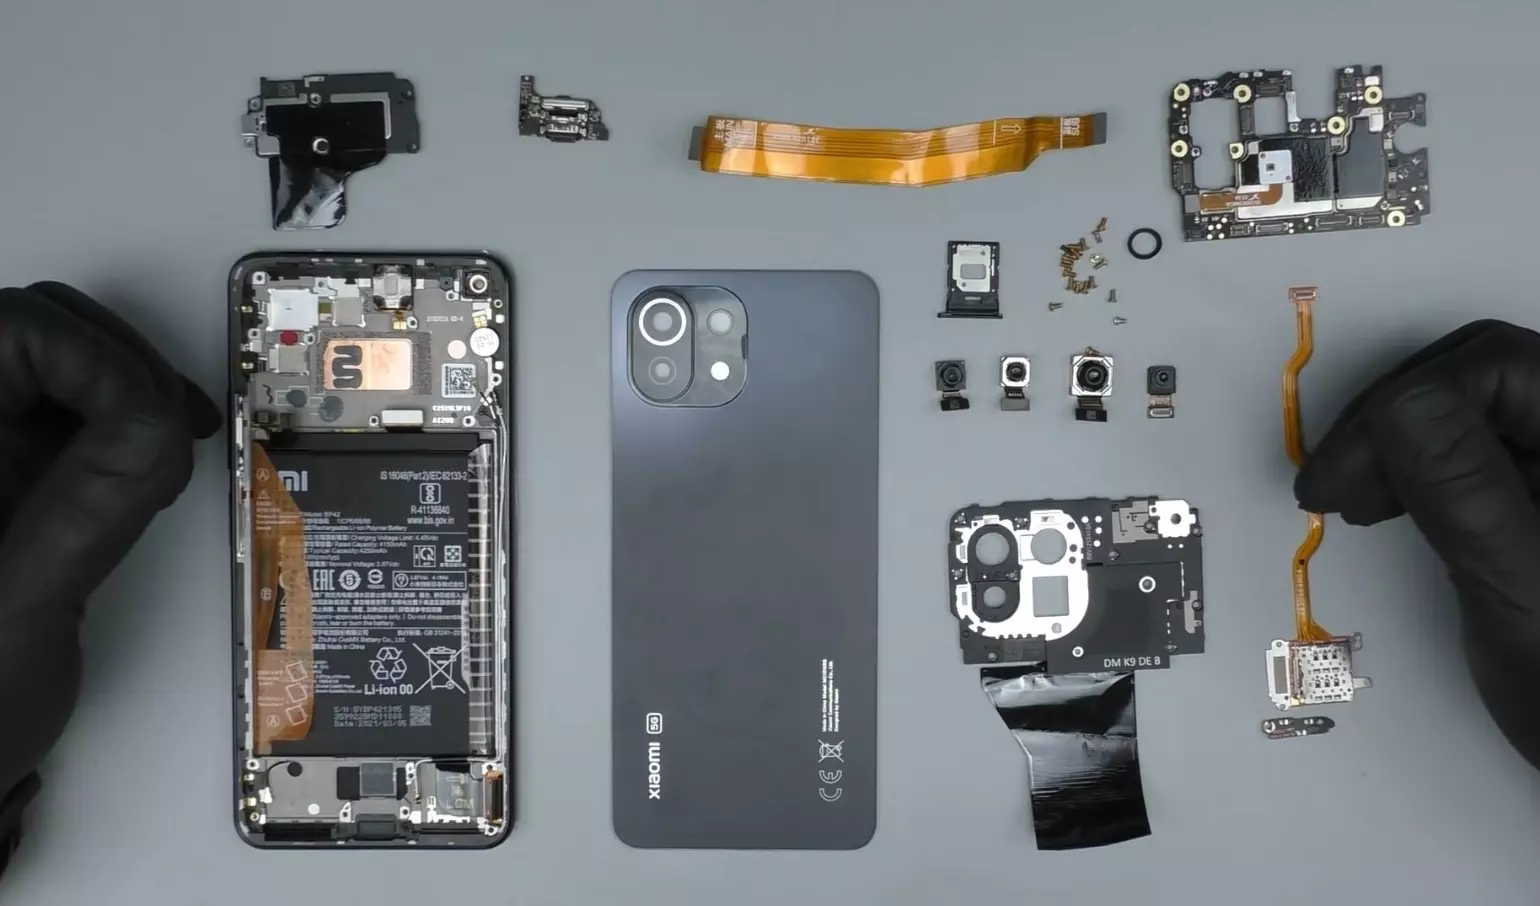
Чтобы выполнить разборку смартфона с минимальным количеством последствий, за основу возьмем процесс выполнения операции в сервисном центре. Это поможет вам сориентироваться и действовать ровно так, как это делают профессионалы:
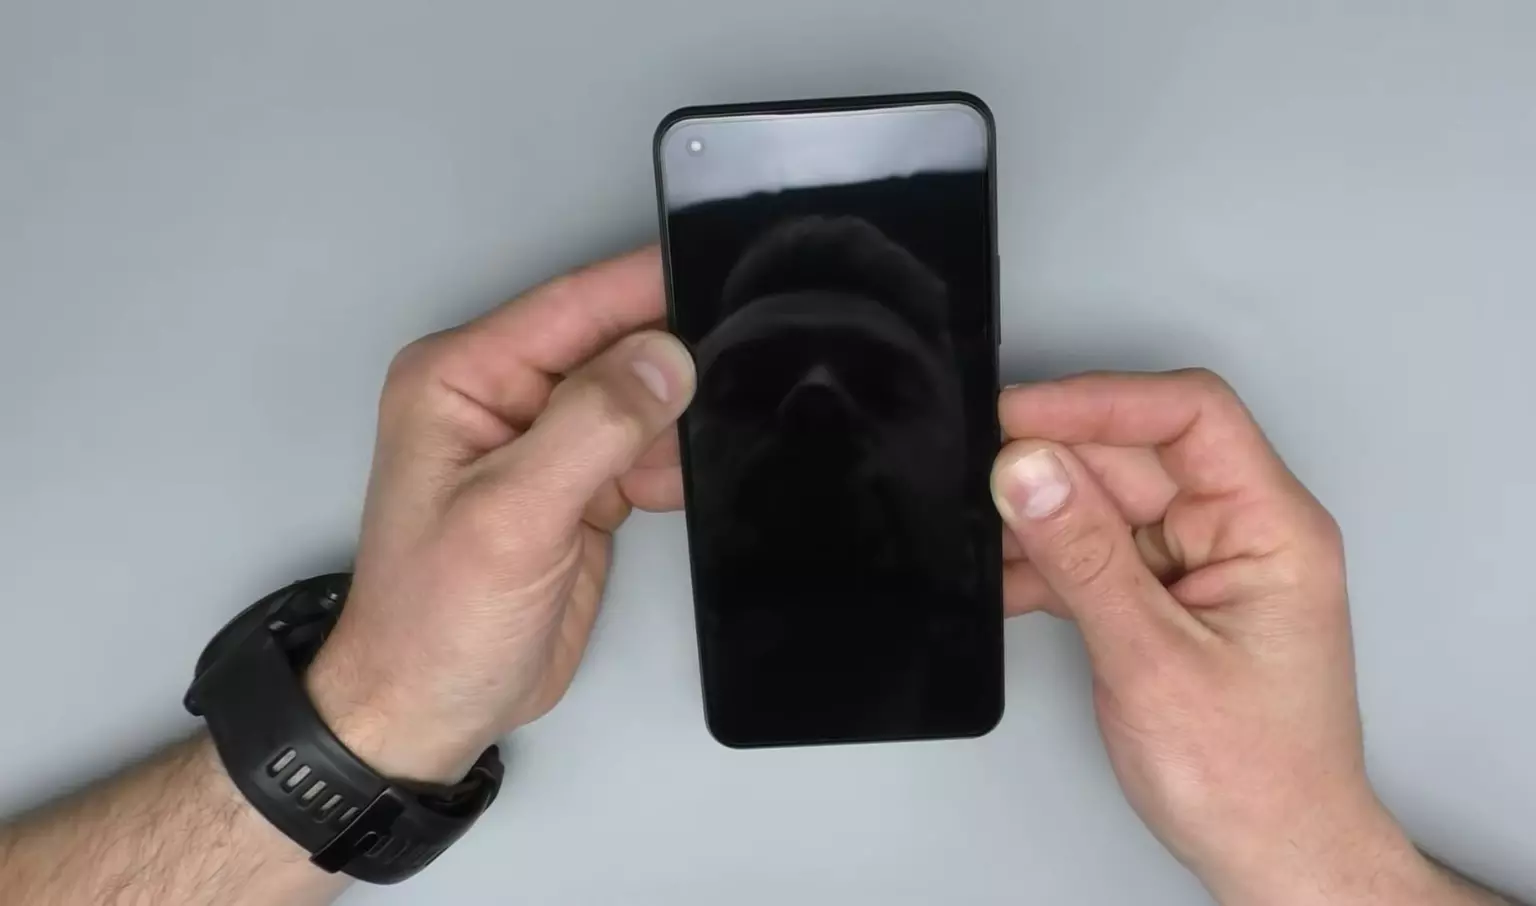
- Выключите смартфон.
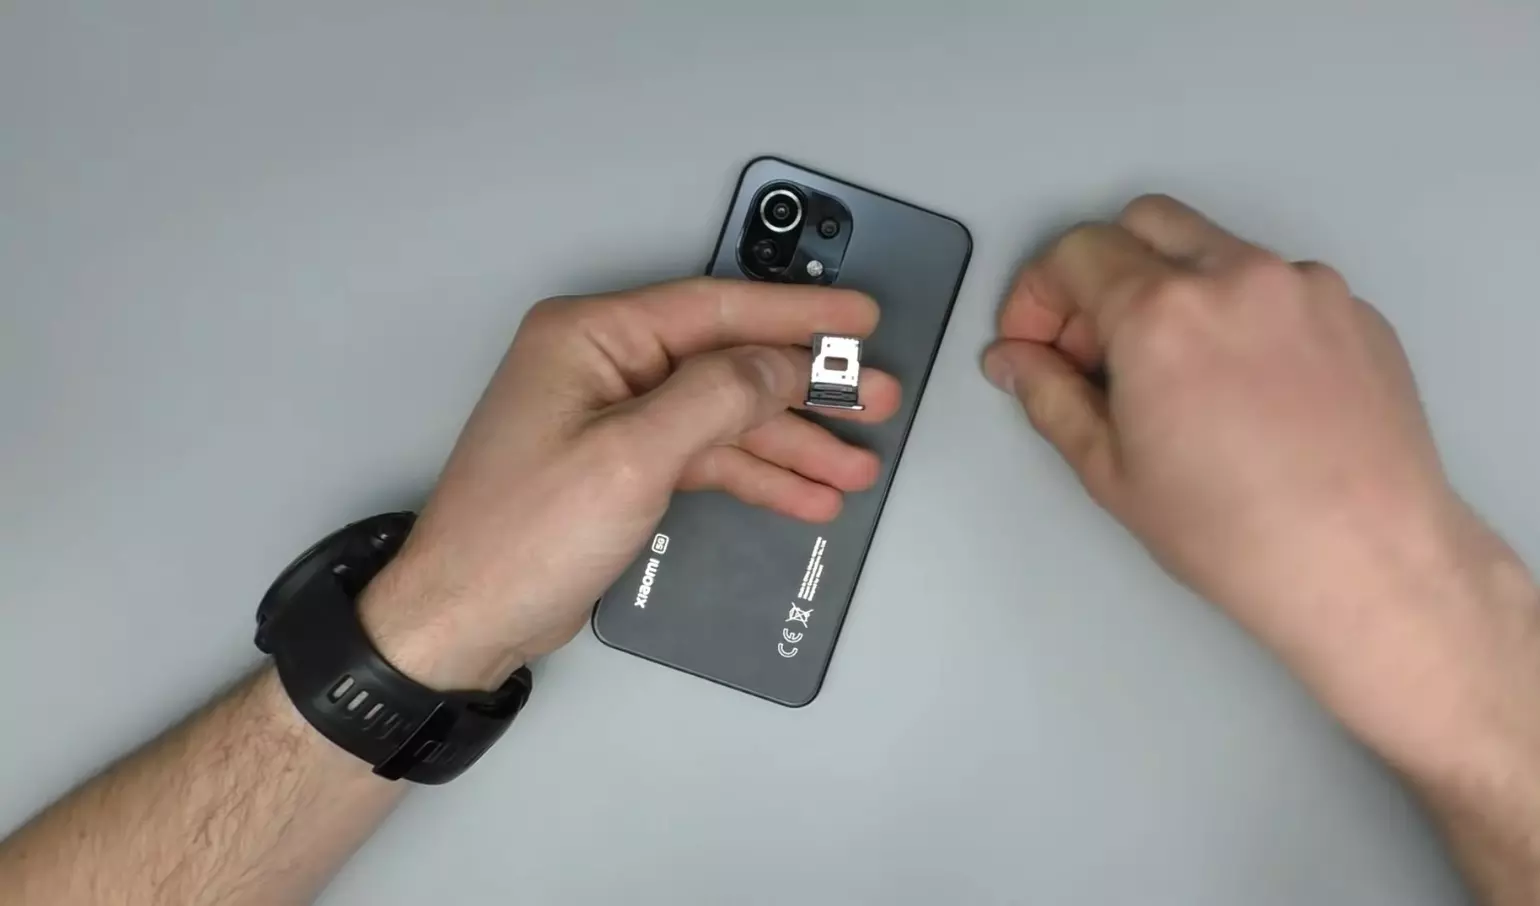
- Извлеките лоток для SIM-карт и карт памяти.
- Положите мобильное устройство экраном вниз. В идеале нужно нагреть телефон на сепараторе для упрощения разборки.
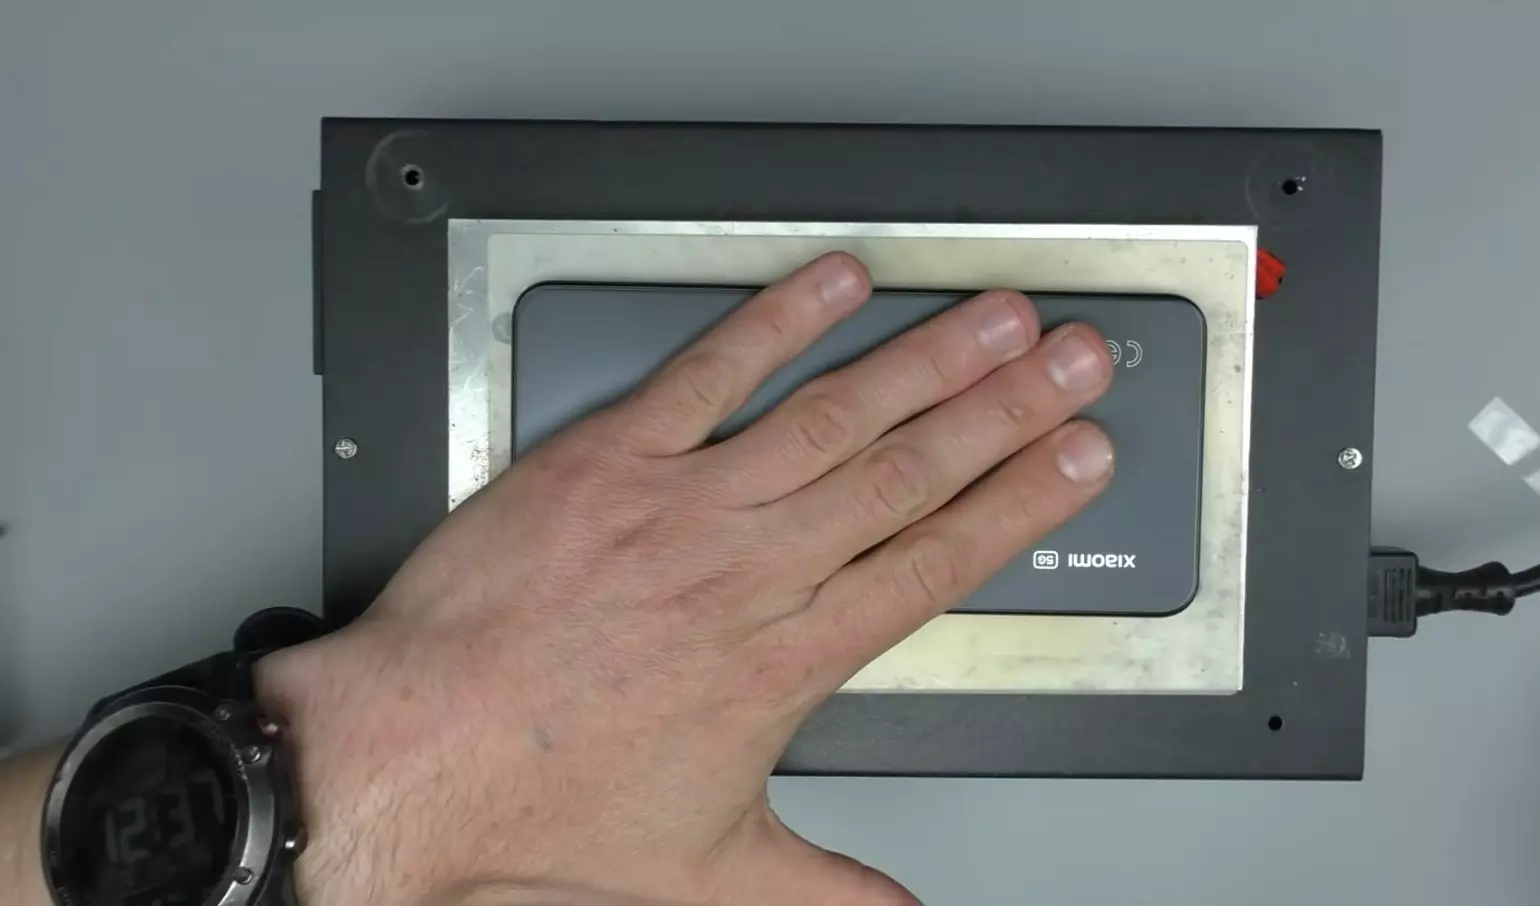
- Установите присоску.
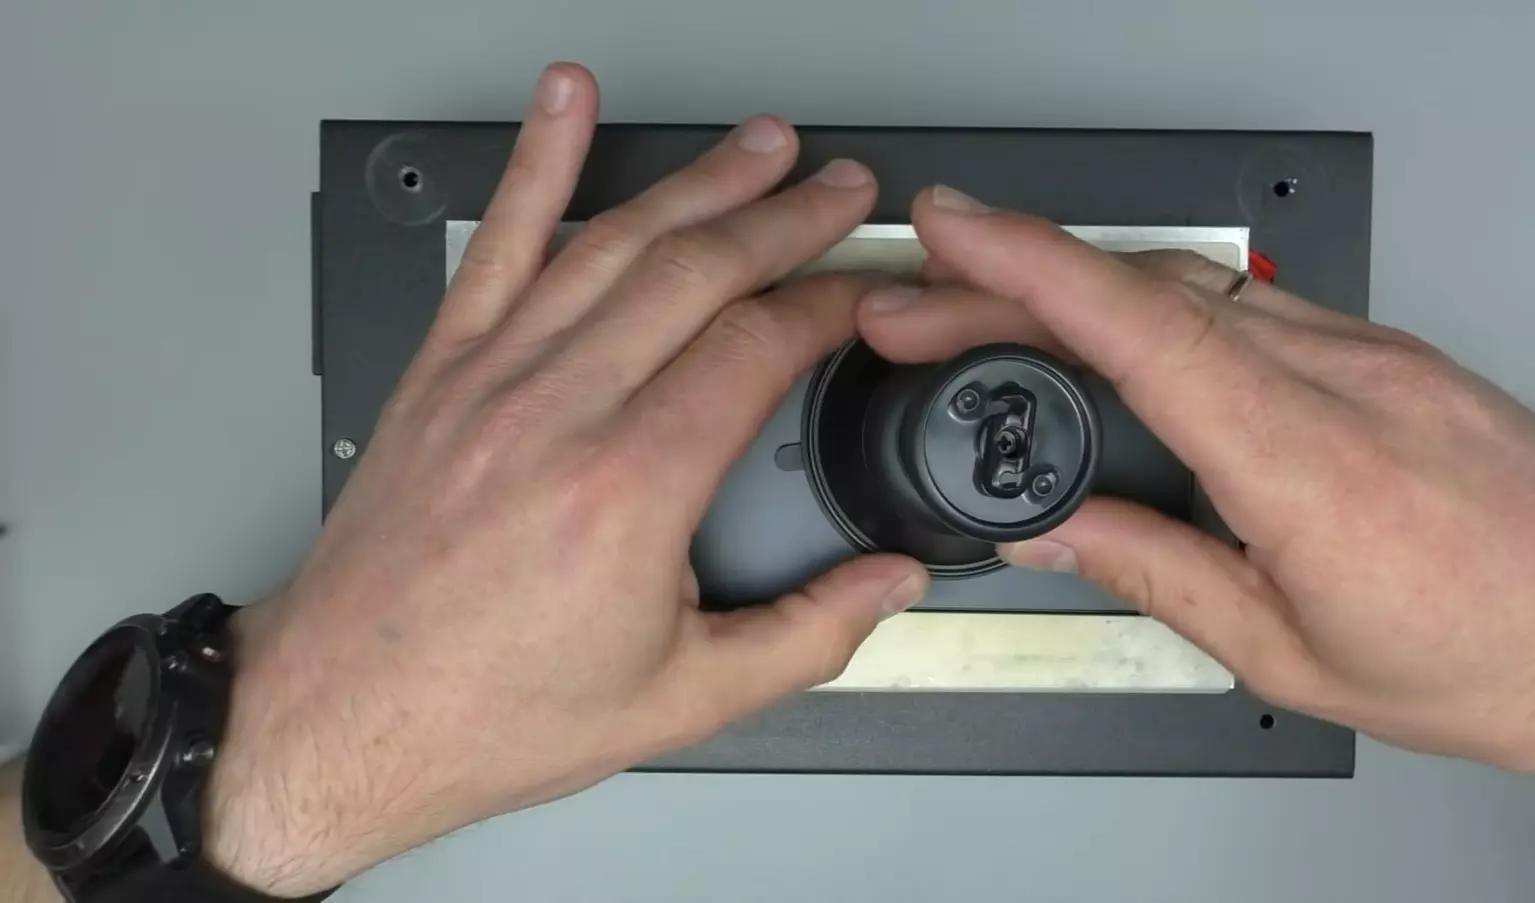
- Одной рукой оттягивая присоску и прижимая корпус, постарайтесь вставить под крышку уголок пластиковой карты или медиатор. Чем тоньше она будет, тем лучше.

- Если крышка будет тяжело отходить, воспользуйтесь изопропиловым спиртом.
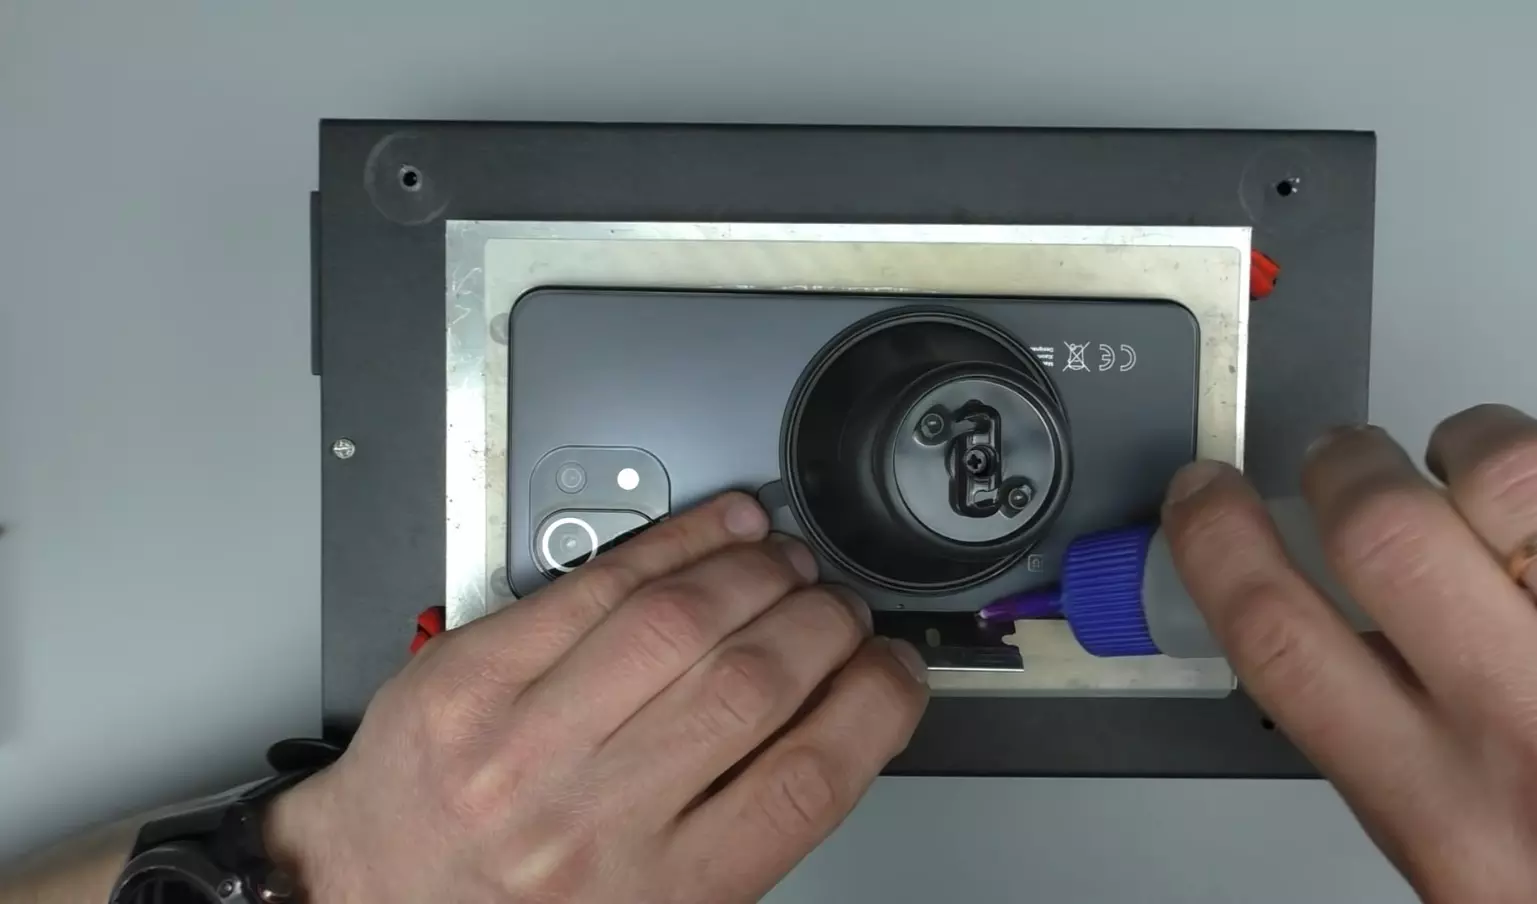
- В конечном итоге вы должны пройтись пластиковой картой по корпусу всего смартфона, чтобы крышка полностью отклеилась.
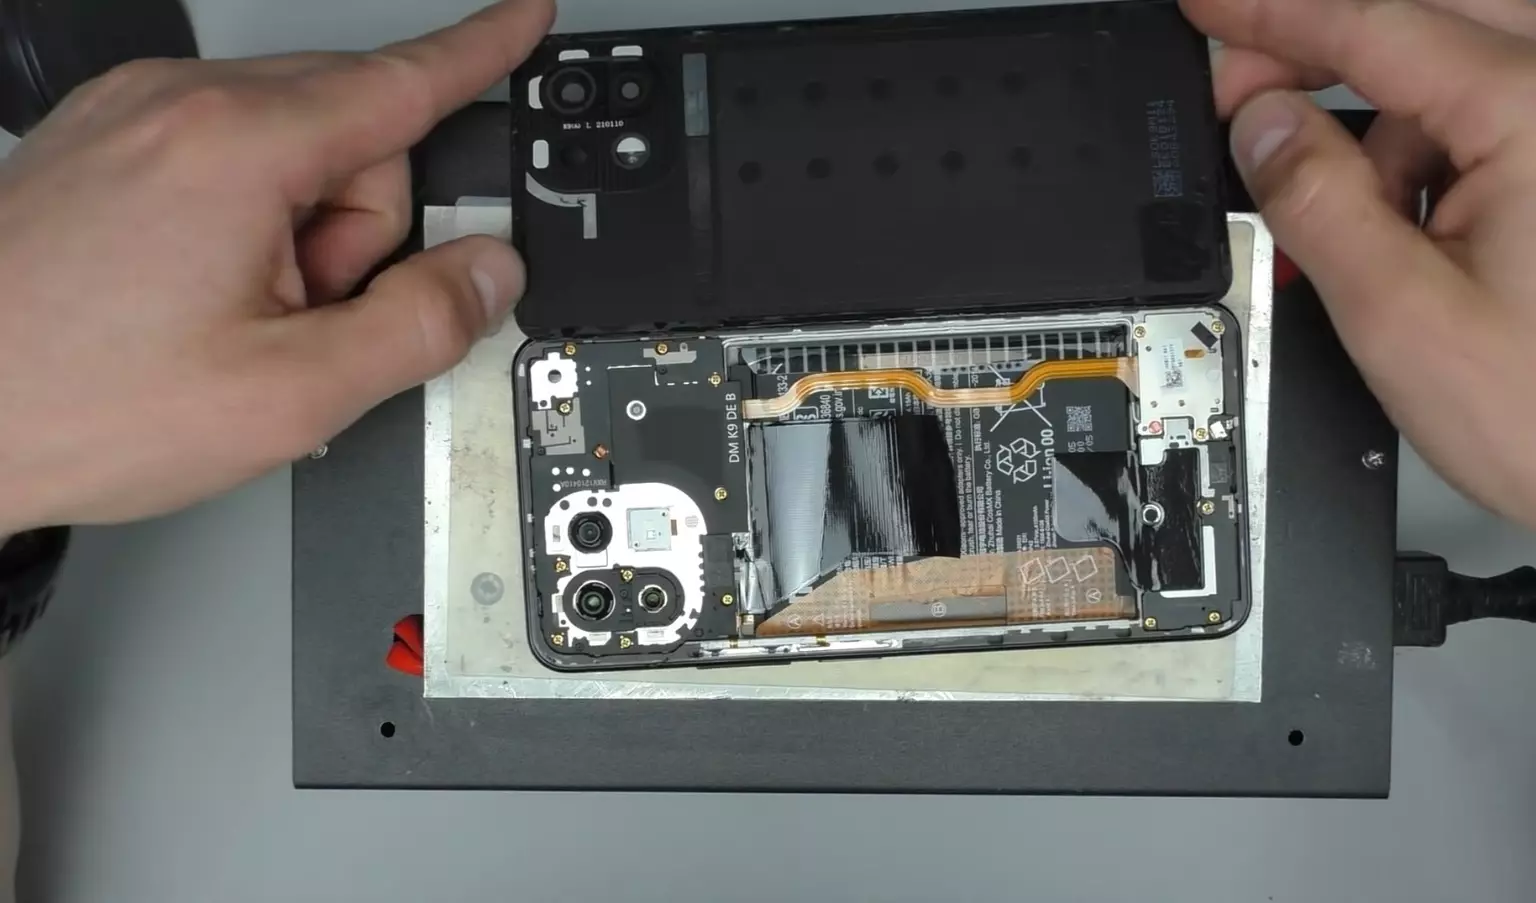
- Снимите пломбы, защищающие винты.
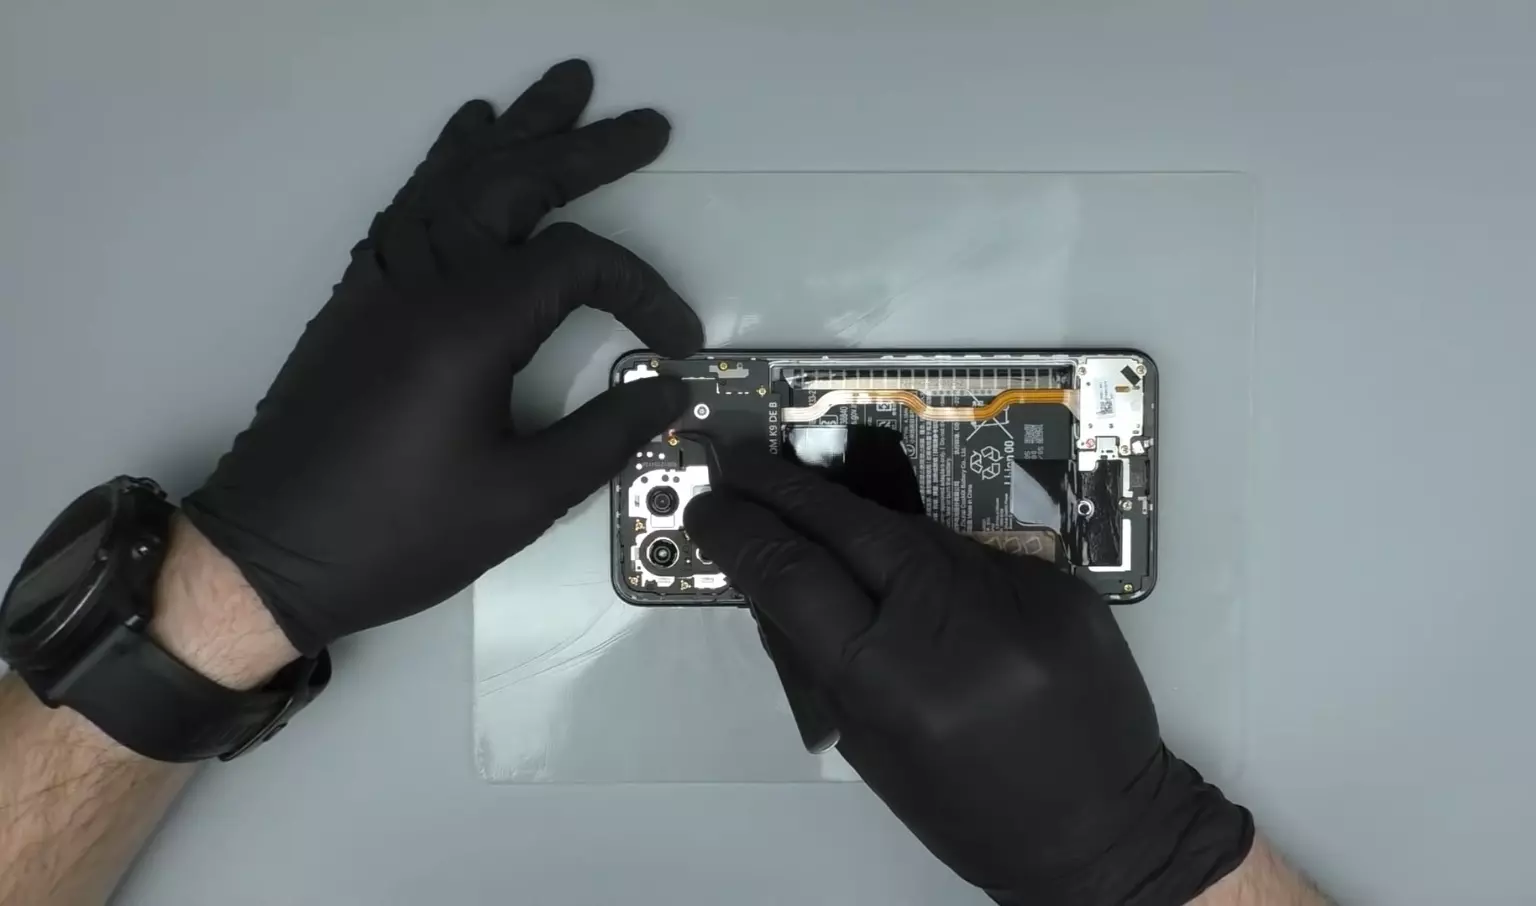
- Поочередно выкрутите все винты, которые удерживают системную плату. Но будьте внимательны, так как винтики могут быть разных размеров. Вам нужно запомнить, где и какой из них был установлен, чтобы в процессе обратной сборки не столкнуться со сложностями.
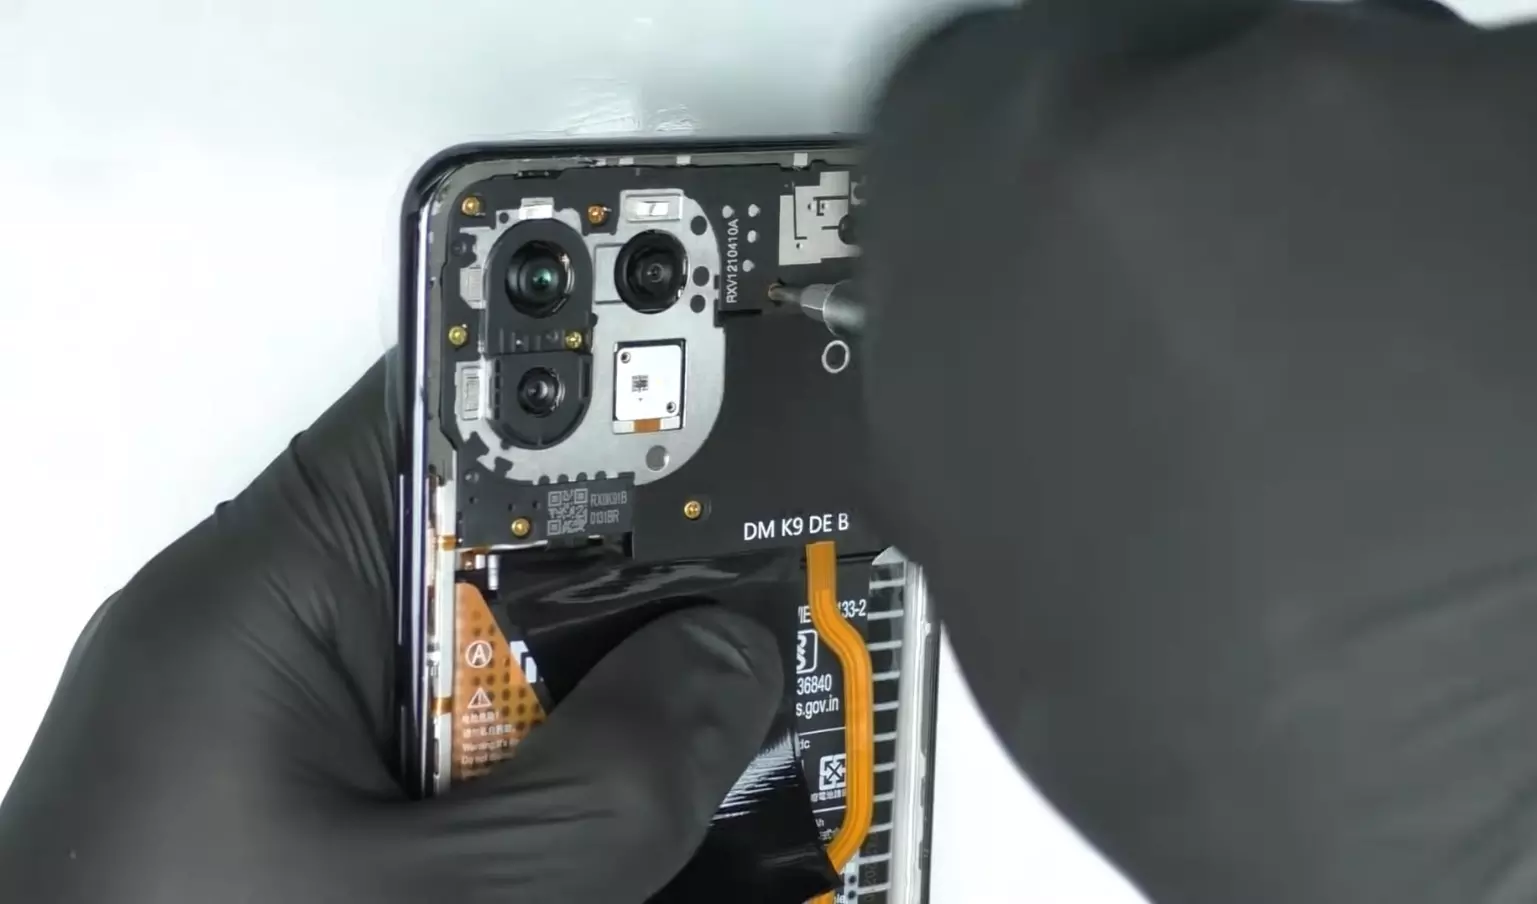
- Снимите кожух.
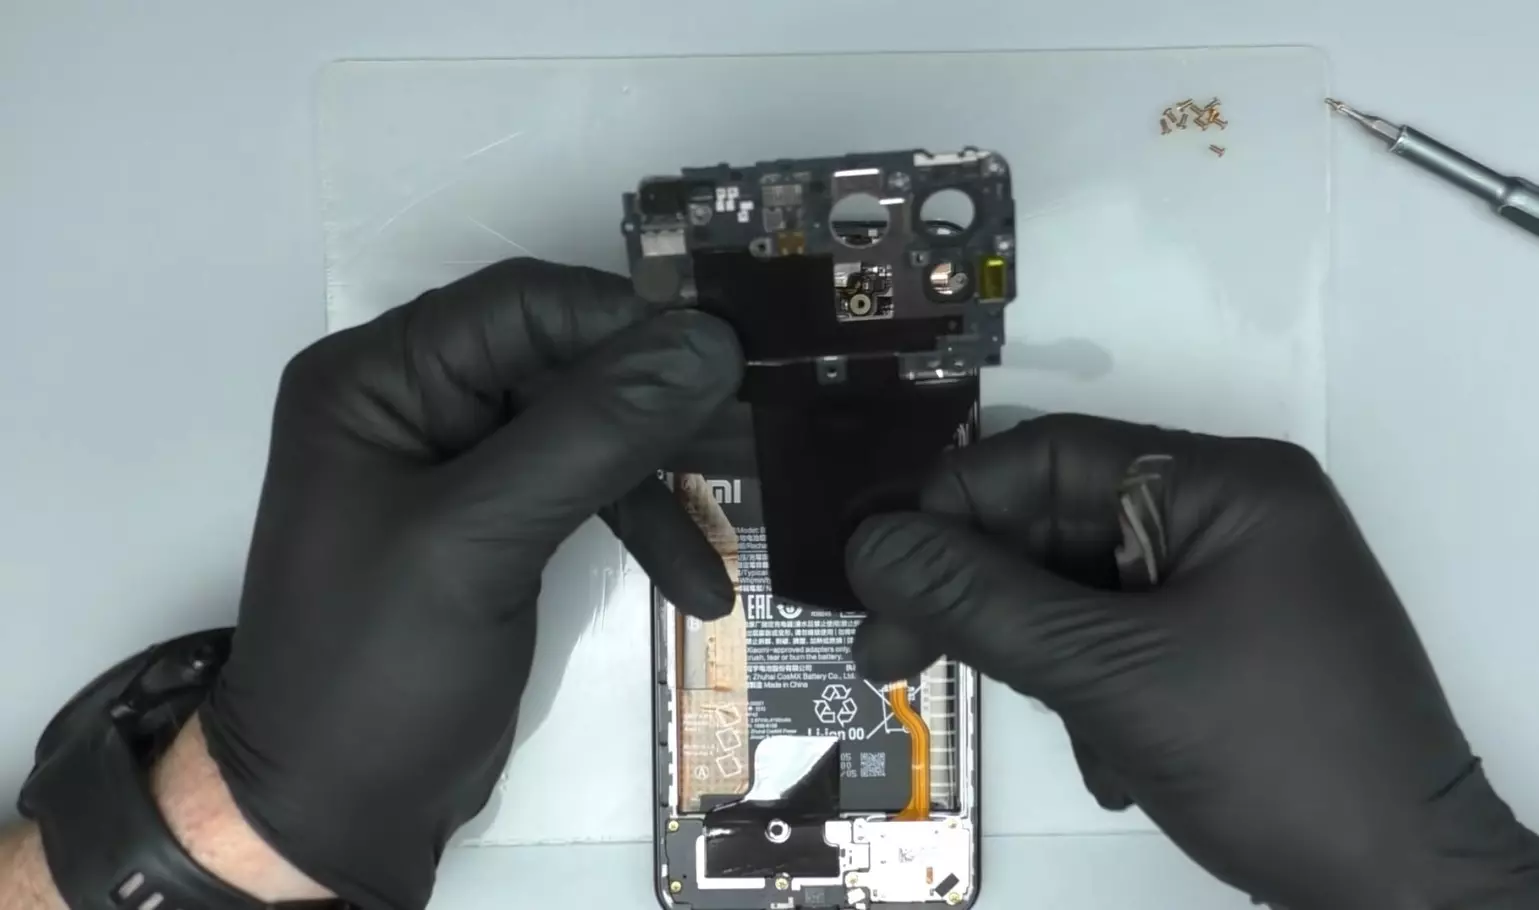
- Отщелкните шлейф аккумуляторной батареи, чтобы обесточить смартфон. Делайте это неметаллическим прибором.
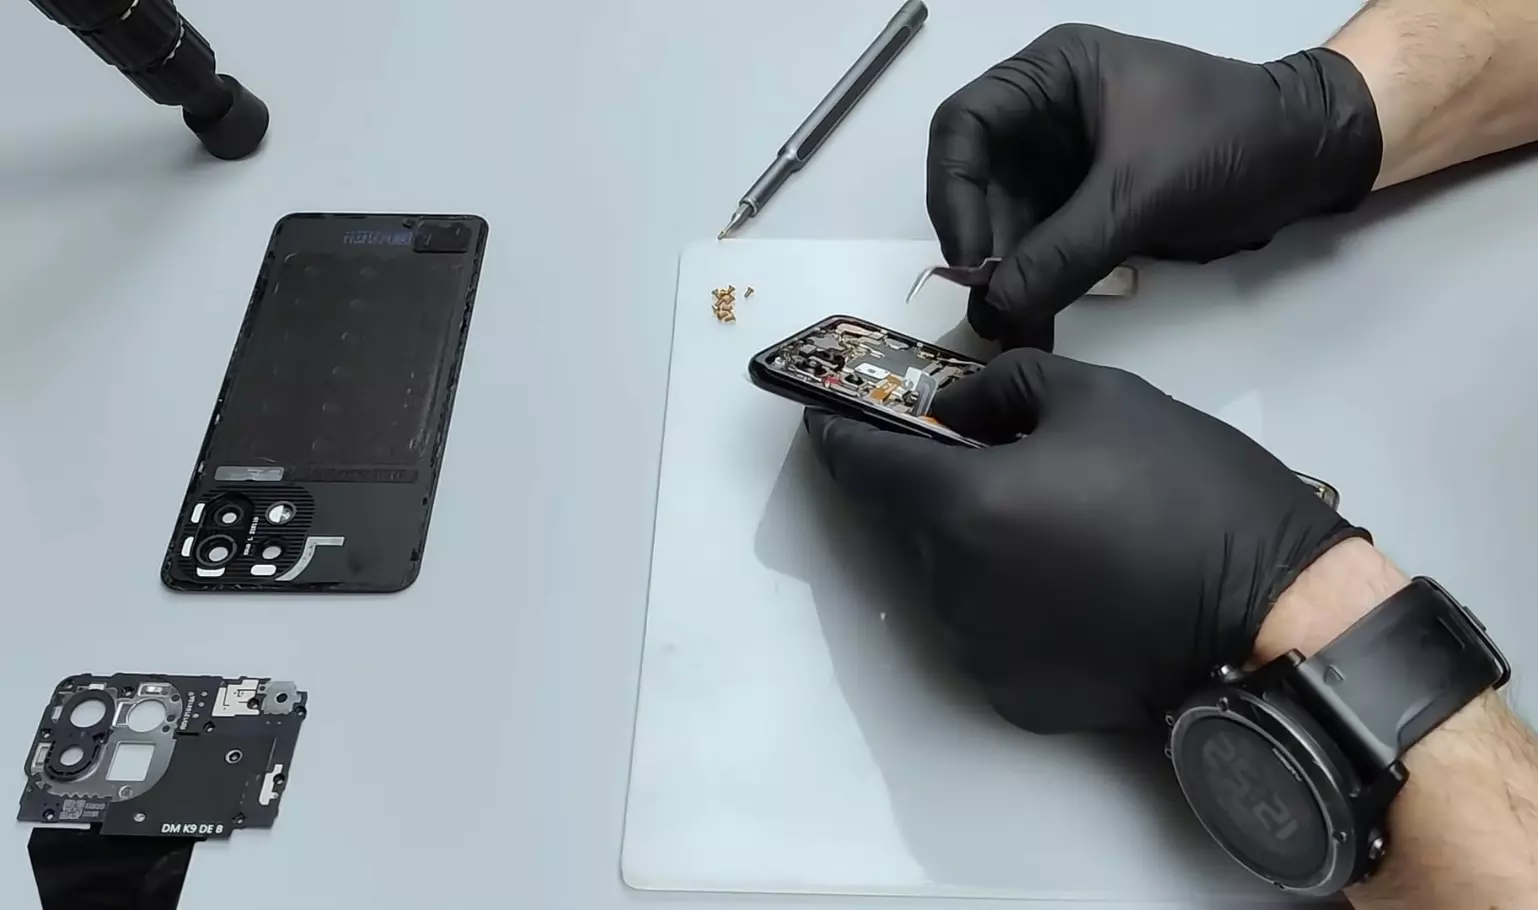
- Извлеките блок полифонического динамика, открутив винты, расположенные в нижней части корпуса.
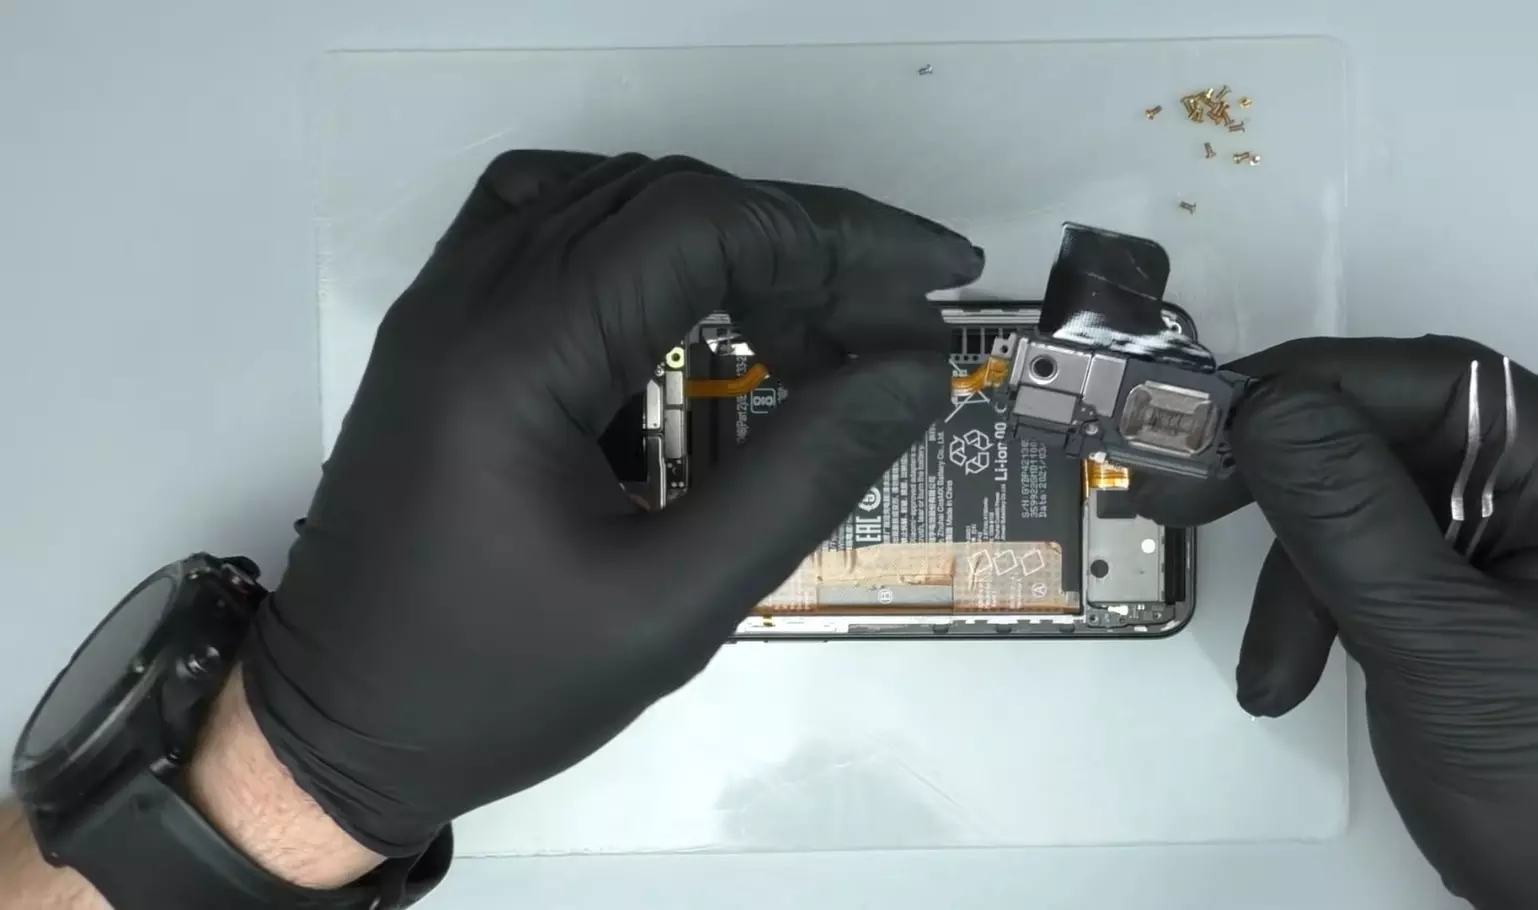
- Снимите каретку SIM-карты.
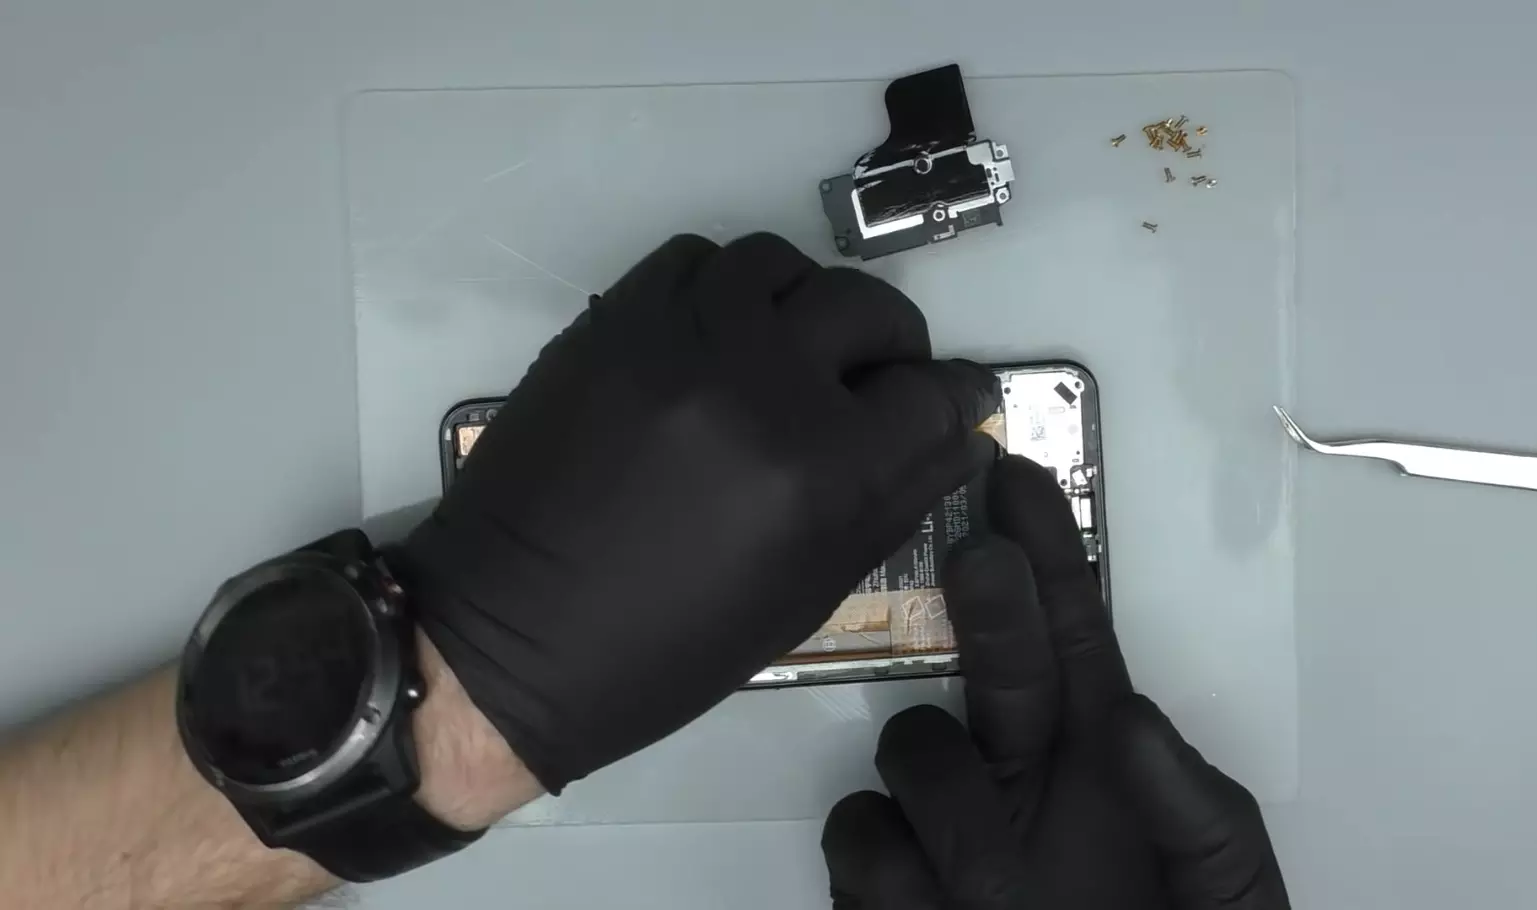
- Отщелкните дисплейный шлейф.
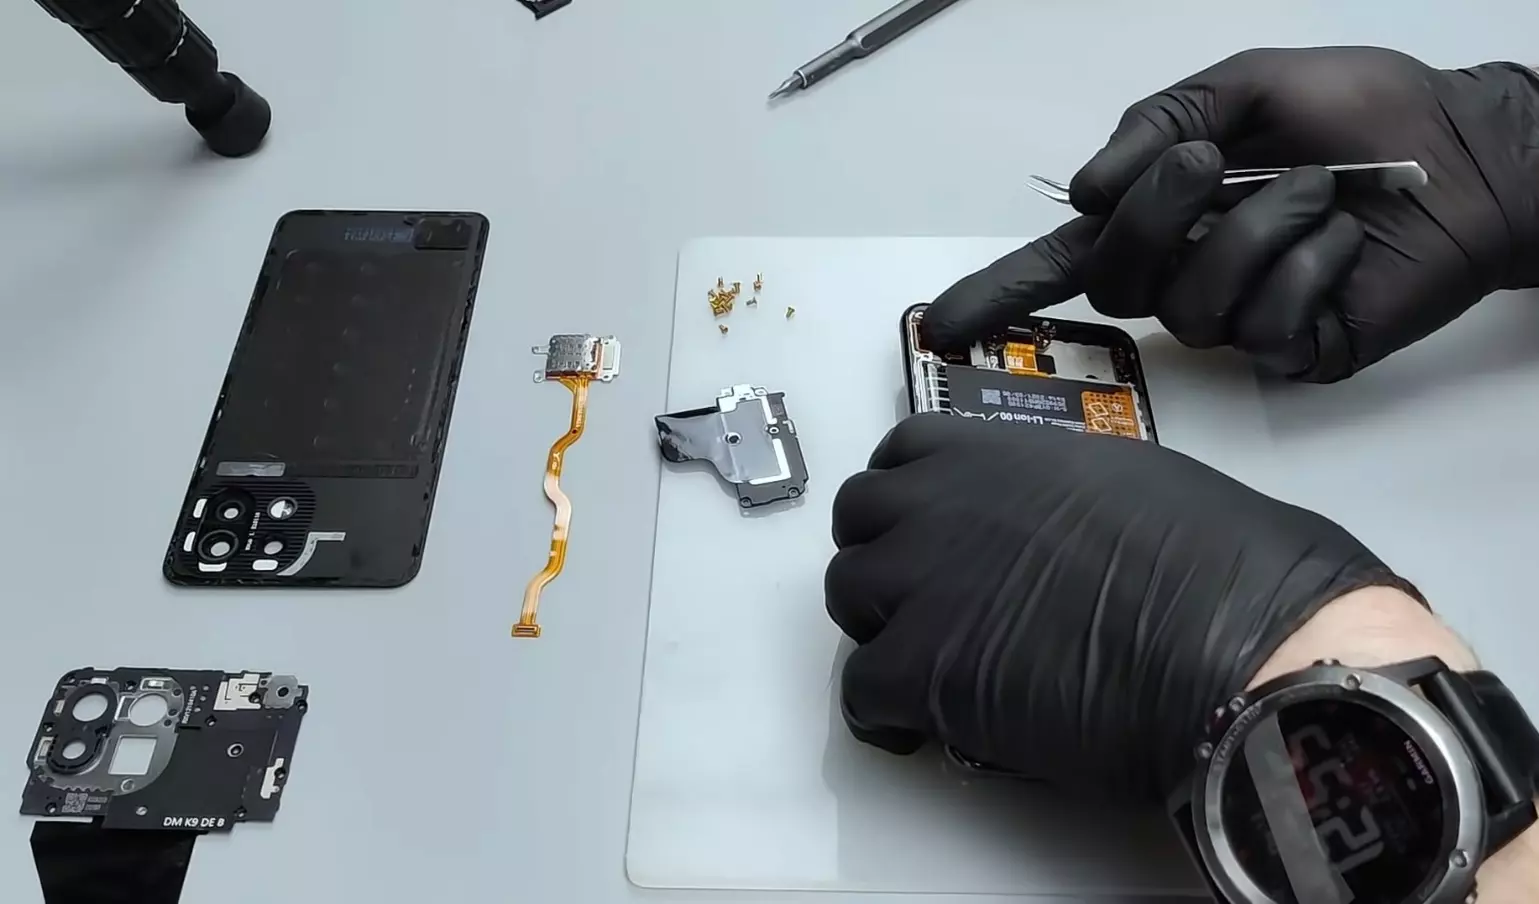
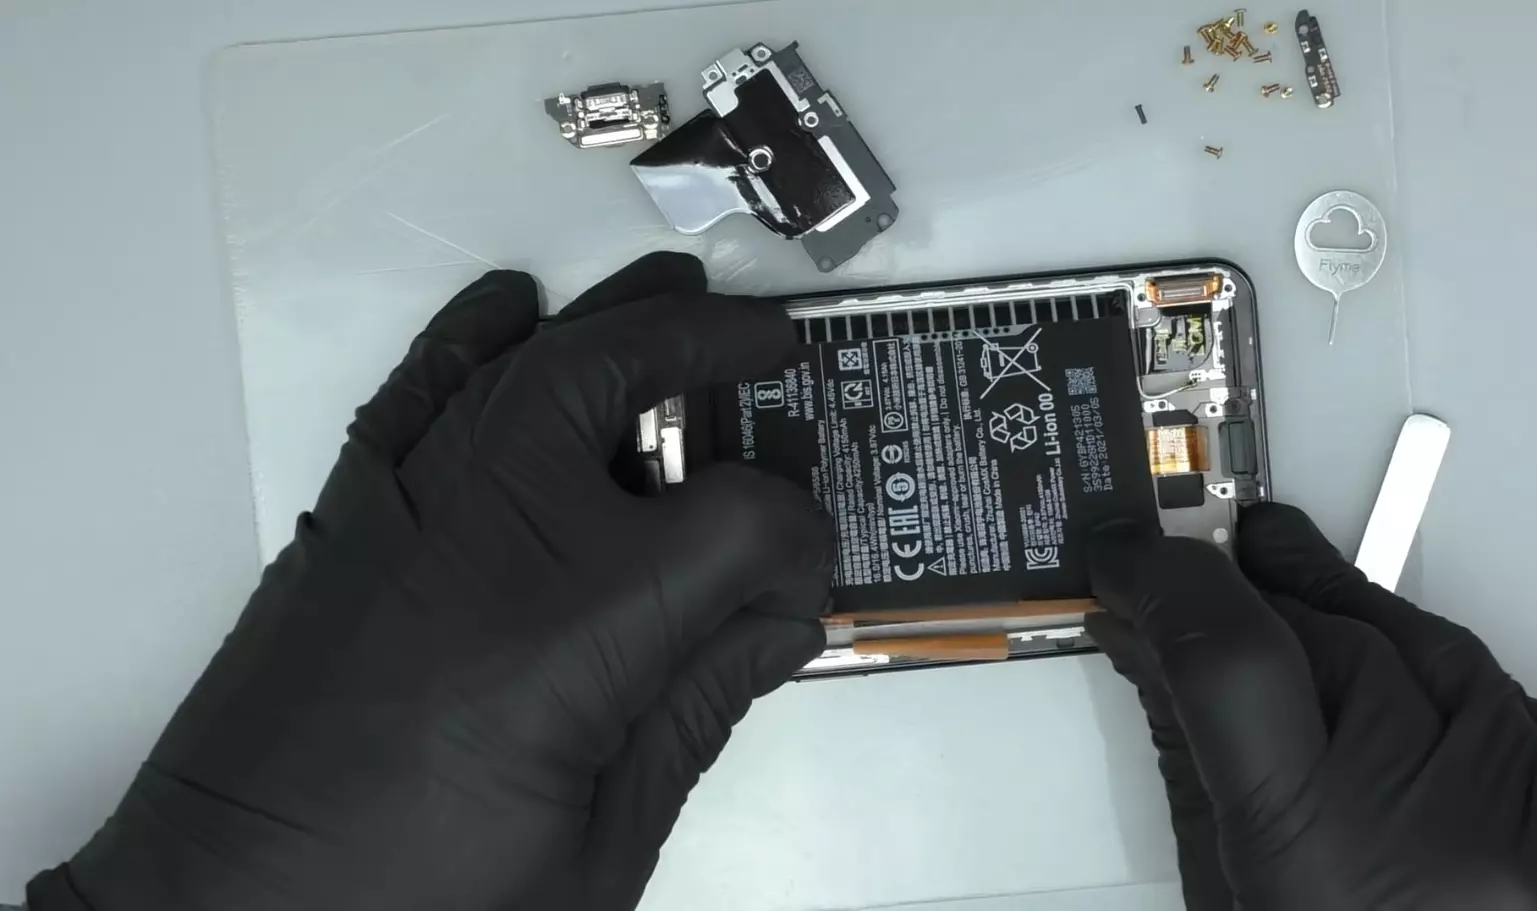
- Отклейте хлястик батареи.
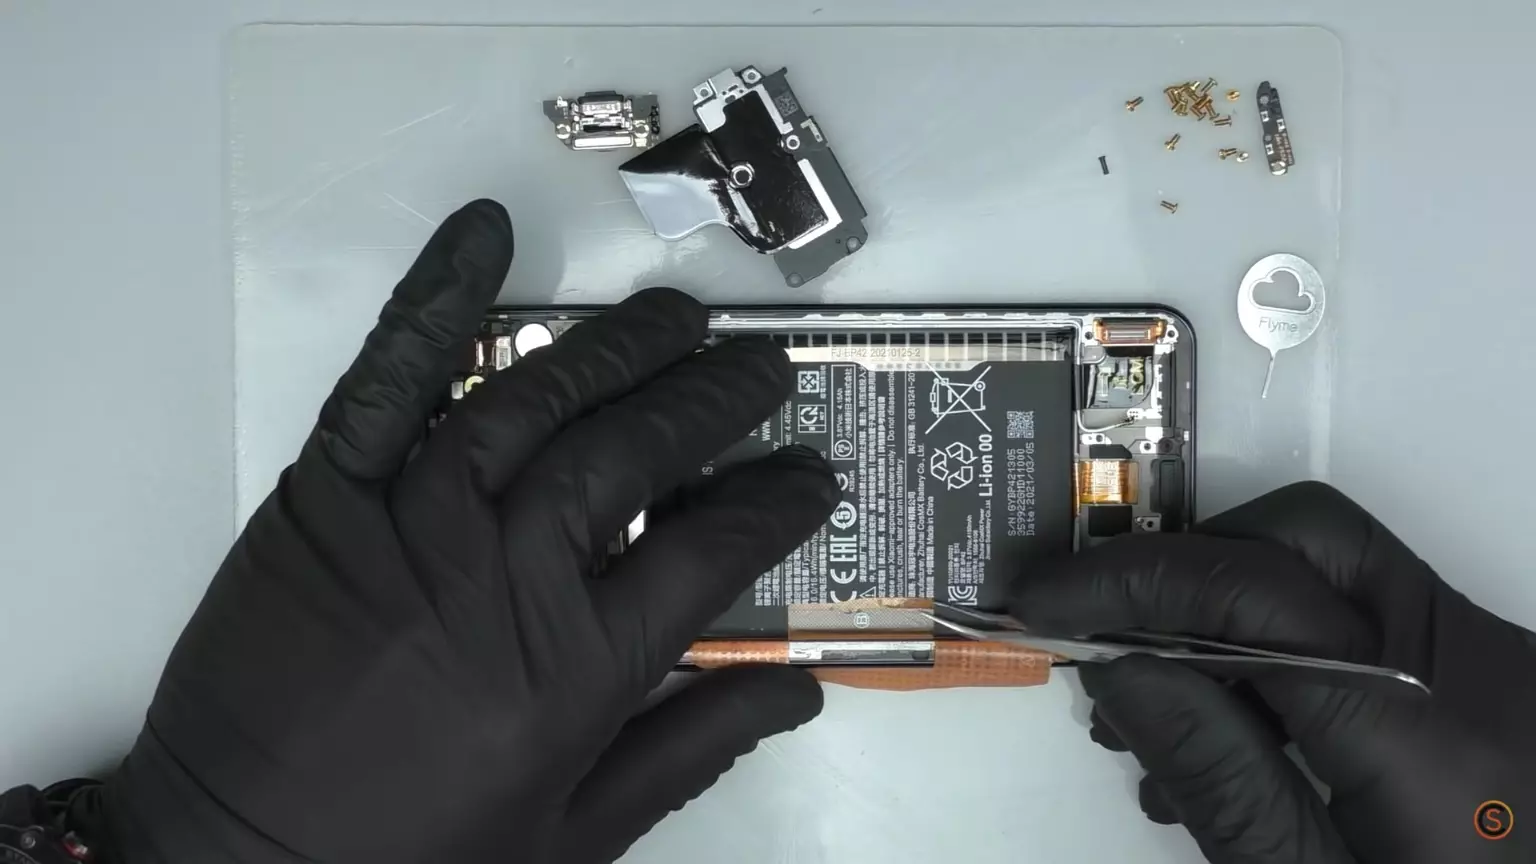
- Потянув за него, извлеките аккумулятор.
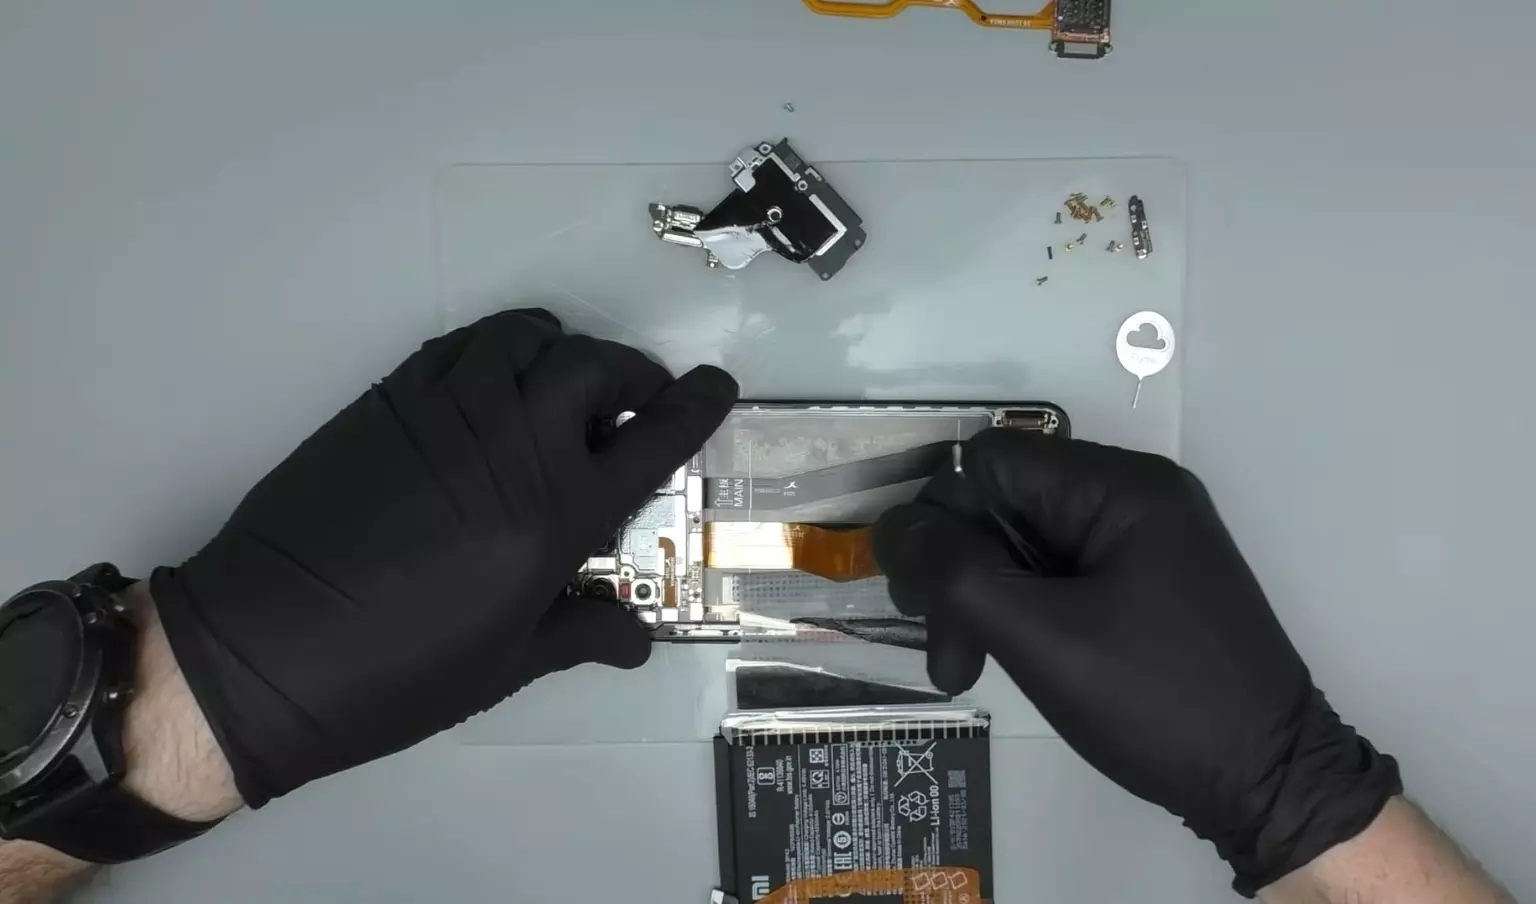
- Открепите межплатный шлейф, который располагается под батарейкой.
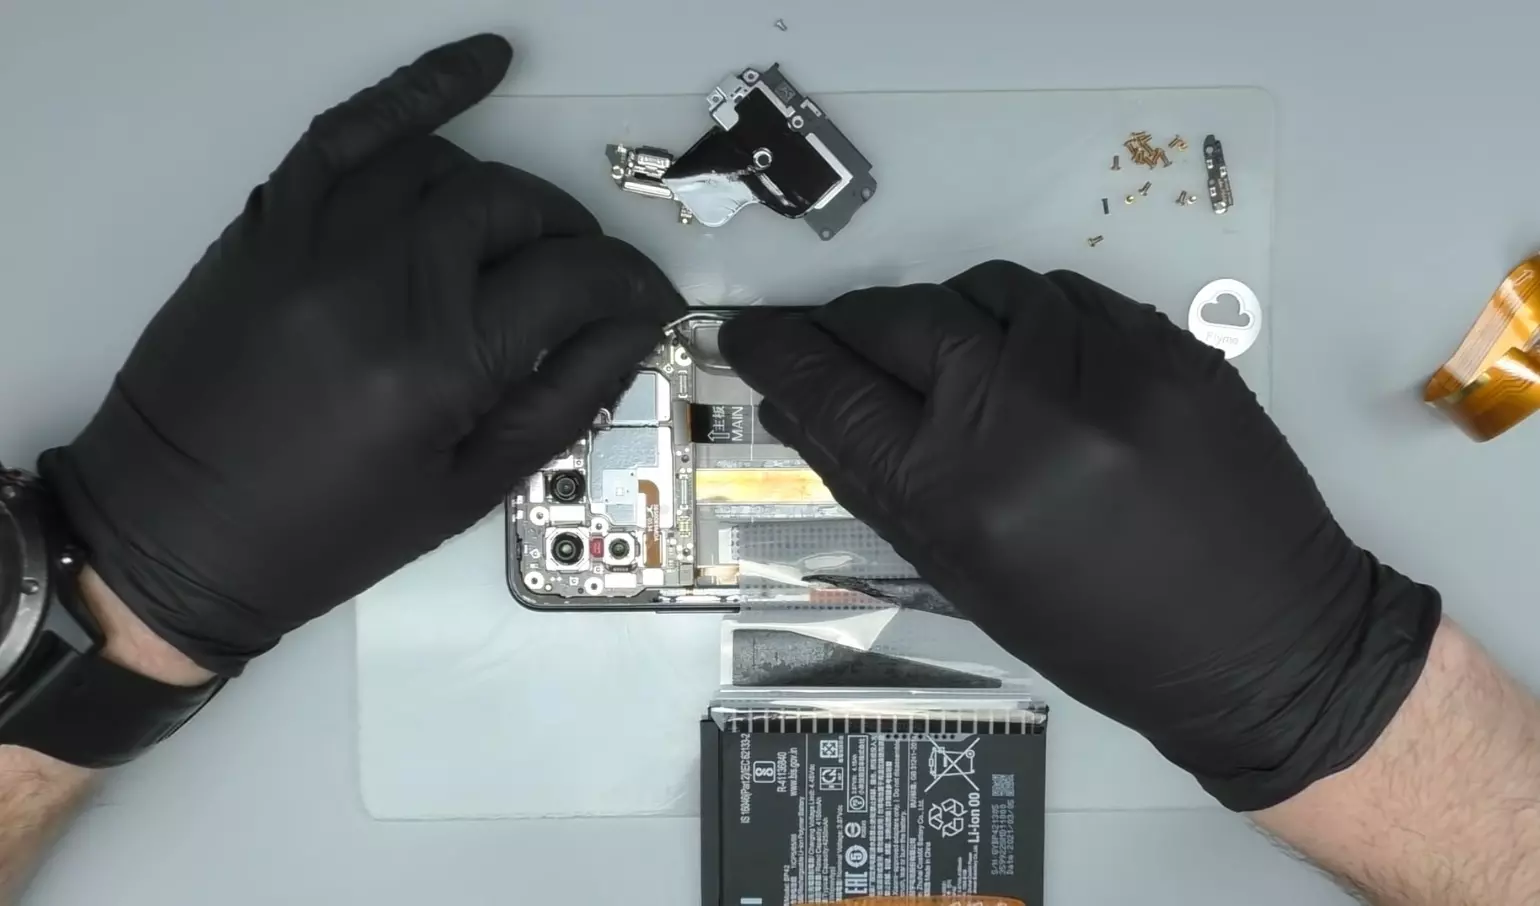
- Отщелкните коаксиальный кабель и шлейф сканера отпечатков.
- Извлеките материнскую плату.
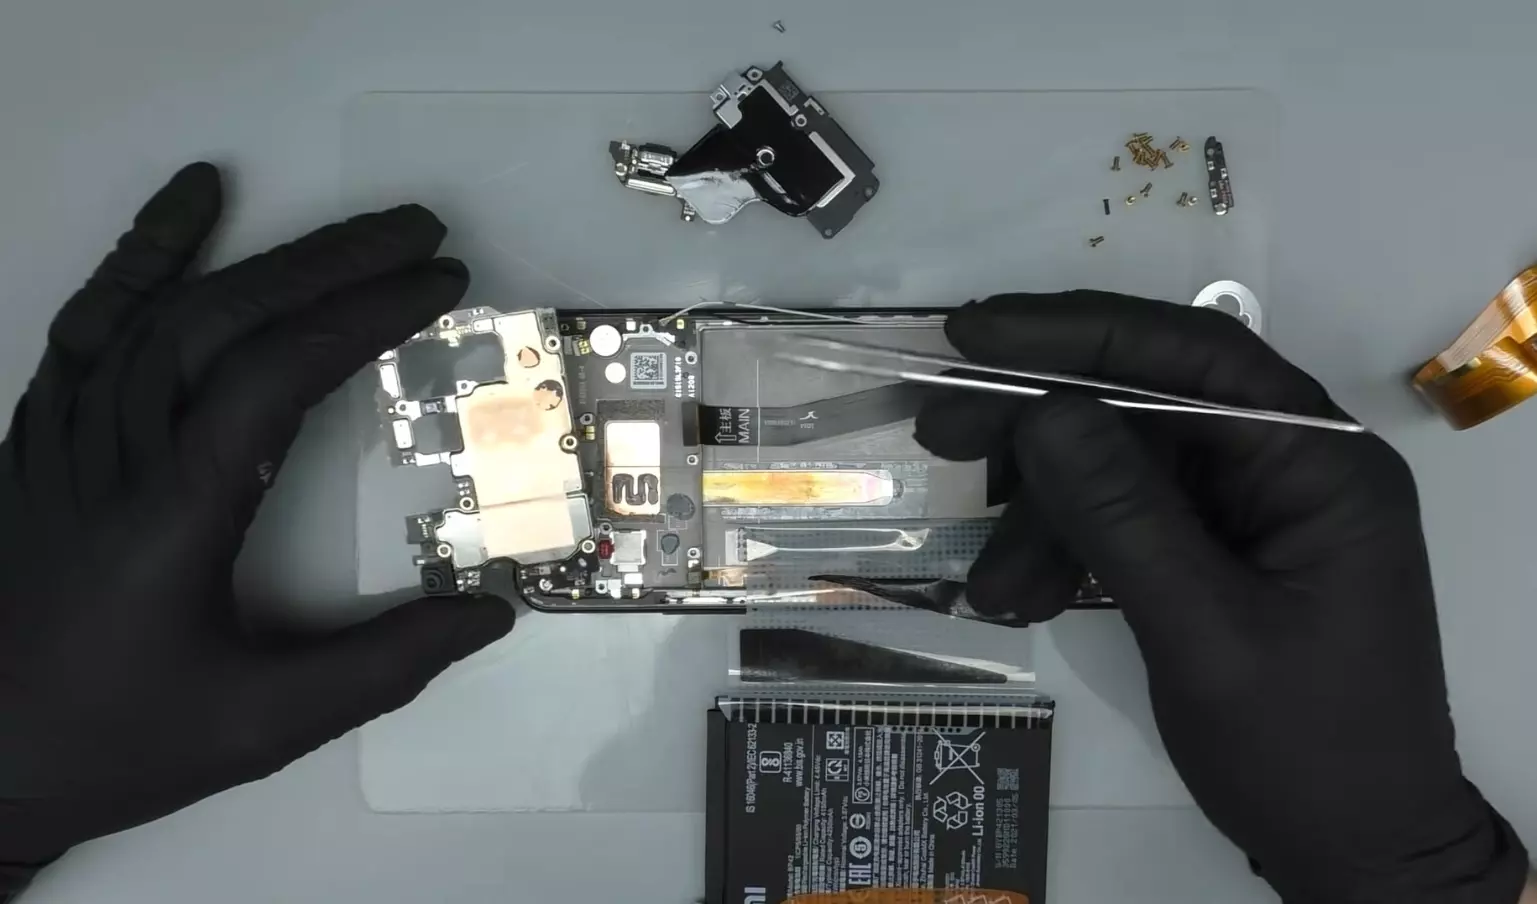
Дальнейший план действий зависит от того, для каких целей осуществляется разборка. Безусловно, некоторые пункты инструкции можно пропустить, однако подробная иллюстрация всех шагов помогает понять, из каких компонентов состоит Samsung Galaxy A50.
Поделитесь страницей с друзьями:
Если все вышеперечисленные советы не помогли, то читайте также:
Как прошить Samsung Galaxy A50
Как получить root-права для Samsung Galaxy A50
Как сделать сброс до заводских настроек (hard reset) для Samsung Galaxy A50
Как разблокировать Samsung Galaxy A50
Как перезагрузить Samsung Galaxy A50
Что делать, если Samsung Galaxy A50 не включается
Что делать, если Samsung Galaxy A50 не заряжается
Что делать, если компьютер не видит Samsung Galaxy A50 через USB
Как сделать скриншот на Samsung Galaxy A50
Как сделать сброс FRP на Samsung Galaxy A50
Как обновить Samsung Galaxy A50
Как записать разговор на Samsung Galaxy A50
Как подключить Samsung Galaxy A50 к телевизору
Как почистить кэш на Samsung Galaxy A50
Как сделать резервную копию Samsung Galaxy A50
Как отключить рекламу на Samsung Galaxy A50
Как очистить память на Samsung Galaxy A50
Как увеличить шрифт на Samsung Galaxy A50
Как раздать интернет с телефона Samsung Galaxy A50
Как перенести данные на Samsung Galaxy A50
Как разблокировать загрузчик на Samsung Galaxy A50
Как восстановить фото на Samsung Galaxy A50
Как сделать запись экрана на Samsung Galaxy A50
Где находится черный список в телефоне Samsung Galaxy A50
Как настроить отпечаток пальца на Samsung Galaxy A50
Как заблокировать номер на Samsung Galaxy A50
Как включить автоповорот экрана на Samsung Galaxy A50
Как поставить будильник на Samsung Galaxy A50
Как изменить мелодию звонка на Samsung Galaxy A50
Как включить процент заряда батареи на Samsung Galaxy A50
Как отключить уведомления на Samsung Galaxy A50
Как отключить Гугл ассистент на Samsung Galaxy A50
Как отключить блокировку экрана на Samsung Galaxy A50
Как удалить приложение на Samsung Galaxy A50
Как восстановить контакты на Samsung Galaxy A50
Где находится корзина в Samsung Galaxy A50
Как установить WhatsApp на Samsung Galaxy A50
Как установить фото на контакт в Samsung Galaxy A50
Как сканировать QR-код на Samsung Galaxy A50
Как подключить Samsung Galaxy A50 к компьютеру
Как установить SD-карту на Samsung Galaxy A50
Как обновить Плей Маркет на Samsung Galaxy A50
Как установить Google Camera на Samsung Galaxy A50
Как включить отладку по USB на Samsung Galaxy A50
Как выключить Samsung Galaxy A50
Как правильно заряжать Samsung Galaxy A50
Как настроить камеру на Samsung Galaxy A50
Как найти потерянный Samsung Galaxy A50
Как поставить пароль на Samsung Galaxy A50
Как включить 5G на Samsung Galaxy A50
Как включить VPN на Samsung Galaxy A50
Как установить приложение на Samsung Galaxy A50
Как вставить СИМ-карту в Samsung Galaxy A50
Как включить и настроить NFC на Samsung Galaxy A50
Как установить время на Samsung Galaxy A50
Как подключить наушники к Samsung Galaxy A50
Как очистить историю браузера на Samsung Galaxy A50
Как скрыть приложение на Samsung Galaxy A50
Как скачать видео c YouTube на Samsung Galaxy A50
Как разблокировать контакт на Samsung Galaxy A50
Как включить вспышку (фонарик) на Samsung Galaxy A50
Как разделить экран на Samsung Galaxy A50 на 2 части
Как выключить звук камеры на Samsung Galaxy A50
Как обрезать видео на Samsung Galaxy A50
Как проверить сколько оперативной памяти в Samsung Galaxy A50
Как обойти Гугл-аккаунт на Samsung Galaxy A50
Как исправить черный экран на Samsung Galaxy A50
Как разобрать на другие телефоны Андроид


Смартфон Samsung Galaxy A50 — инструкция на русском
Установка SIM-карты в смартфон Samsung Galaxy A50
Можно установить две SIM- или USIM-карты, чтобы использовать два номера телефона или поставщика услуг на одном устройстве. В некоторых местах скорость передачи данных может быть ниже в случае, если установлены две SIM-карты в устройство вместо одной.
• Используйте только карту формата nano-SIM.
• Не теряйте и не позволяйте другим использовать вашу SIM- или USIM-карту. Компания Samsung не несет ответственности за повреждения или неудобства, вызванные утерей или кражей карты.
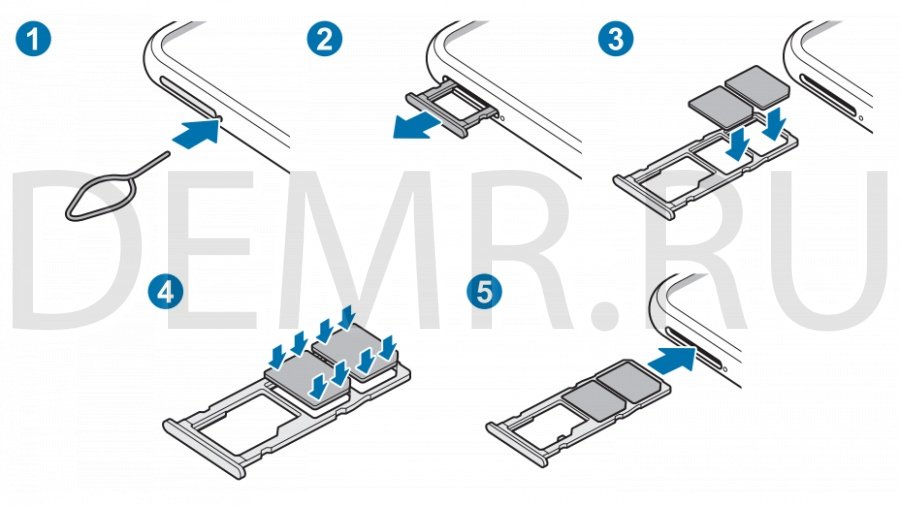
1. Вставьте штифт для извлечения в отверстие слота, чтобы выдвинуть его. Убедитесь, что штифт для извлечения расположен перпендикулярно отверстию. В противном случае можно повредить устройство.
2. Осторожно вытащите слот из соответствующего разъема.
3. Поместите SIM- или USIM-карту в лоток золотистыми контактами вниз.
4. Аккуратно нажмите на SIM- или USIM-карту, чтобы зафиксировать ее в слоте. Если SIM-карта не зафиксирована надлежащим образом, она может выпасть из слота.
5. Вставьте слот обратно в соответствующее гнездо.
• Если в устройство вставлен влажный слот, это может привести к повреждению устройства. Убедитесь, что слот сухой.
• Полностью вставьте слот в разъем во избежание попадания жидкости в устройство.
Активация карты SIM или USIM
Откройте приложение Настройки и выберите пункт Подключения → Диспетчер SIM-карт. Выберите SIM- или USIM-карту и коснитесь переключателя для ее активации.
Настройка SIM- и USIM-карт
Откройте приложение Настройки, выберите пункт Подключения → Диспетчер SIM-карт, а затем выберите SIM- или USIM-карту для доступа к следующим параметрам:
• Значок: изменение значка SIM- или USIM-карты.
• Имя: изменение имени отображения SIM- или USIM-карты.
• Режим сети: выбор типа сети для использования SIM- или USIM-карты.
Настройка предпочтительной SIM- или USIM-карты
В случае, когда активированы две карты, можно назначить голосовые вызовы, обмен сообщениями и службы передачи данных конкретным картам.
Откройте приложение Настройки, выберите пункт Подключения → Диспетчер SIM-карт, а затем задайте предпочтительные функции для карт в меню Приоритетная SIM-карта.
Установка карты памяти в смартфон Samsung Galaxy A50
При установке карты памяти в устройство список файлов, хранящихся на карте, отображается в Мои файлы → Карта памяти.
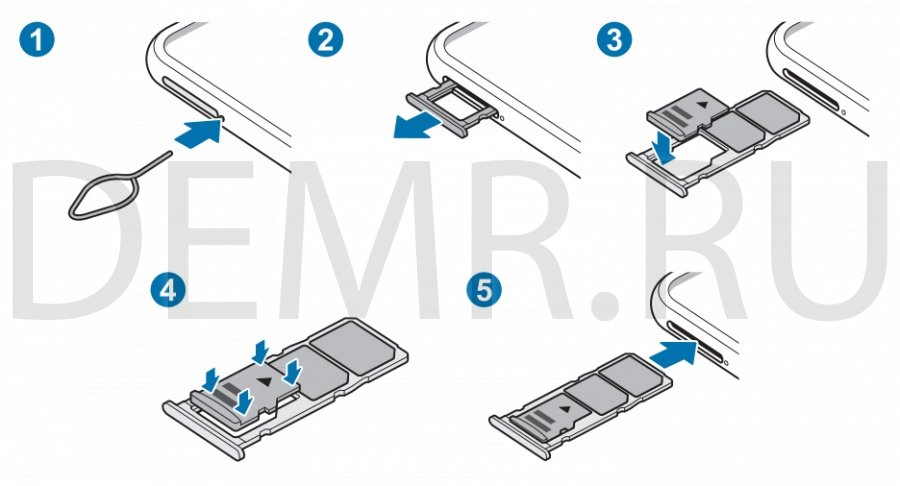
1 Вставьте штифт для извлечения в отверстие слота, чтобы выдвинуть его. Убедитесь, что штифт для извлечения расположен перпендикулярно отверстию. В противном случае можно повредить устройство.
2 Осторожно вытащите слот из соответствующего разъема. При извлечении слота из устройства мобильная передача данных будет отключена.
3 Поместите карту памяти в слот золотистыми контактами вниз.
4 Аккуратно нажмите на карту памяти, чтобы зафиксировать ее в слоте. Если карта памяти не зафиксирована надлежащим образом, она может выпасть из слота.
5 Вставьте слот обратно в соответствующее гнездо.
• Если в устройство вставлен влажный слот, это может привести к повреждению устройства. Убедитесь, что слот сухой.
• Полностью вставьте слот в разъем во избежание попадания жидкости в устройство.
Извлечение карты памяти
Во избежание потери данных отключите карту памяти перед ее извлечением.
Откройте приложение Настройки и выберите пункт Обслуживание устройства → Память → Дополнительно → Карта памяти → Отключить.
Форматирование карты памяти
После форматирования на ПК карты памяти могут неправильно работать при установке в устройство. Форматируйте карты памяти только с помощью устройства.
Откройте приложение Настройки и выберите пункт Обслуживание устройства → Память → Дополнительно → Карта памяти → Форматировать.
Включение и выключение смартфона Samsung Galaxy A50
Включение устройства
Чтобы включить устройство, нажмите и удерживайте боковую клавишу в течение нескольких секунд.
При первом включении устройства, а также после сброса настроек, следуйте инструкциям на экране для настройки устройства.
Выключение устройства
1 Чтобы выключить устройство, нажмите одновременно боковую клавишу и клавишу уменьшения громкости и удерживайте их. Можно также открыть панель уведомлений и нажать кнопку  .
.
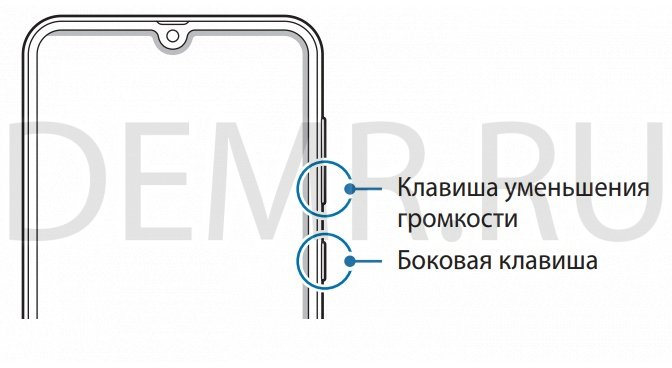

2 Выберите пункт Выключение. Чтобы перезапустить устройство, выберите пункт Перезагрузить.
На устройстве можно настроить отключение при нажатии и удерживании боковой клавиши. Запустите приложение Настройки, выберите пункт Дополнительные функции → Боковая клавиша, после чего выберите вариант Меню выключения для действия Нажмите и удерживайте.
Как сбросить настройки на смартфоне Samsung Galaxy A50
Откройте приложение Настройки, выберите пункт Общие настройки → Сброс → Сброс данных → Сбросить → Удалить все. Перед сбросом настроек устройства рекомендуется создать резервную копию всех важных данных, хранящихся в памяти устройства.
Принудительная перезагрузка смартфона Samsung Galaxy A50
Если смартфон Samsung Galaxy A50 «зависает» и не реагирует на действия, для его перезагрузки одновременно нажмите и удерживайте боковую клавишу и клавишу уменьшения громкости в течение более чем 7 секунд.
Как раздать интернет — мобильная точка доступа
Используйте устройство в качестве мобильной точки доступа, чтобы предоставить другим устройствам доступ к мобильному подключению вашего устройства.
1 На экране настроек выберите пункт Подключения → Мобильная точка доступа и модем → Мобильная точка доступа.
2 Коснитесь переключателя, чтобы включить соответствующую функцию.
Значок  появится в строке состояния. Название вашего устройства будет отображаться на других устройствах в списке сетей Wi-Fi.
Чтобы установить пароль для подключения к мобильной точке доступа, коснитесь значка  → Настройка точки доступа и выберите необходимый уровень безопасности. После чего введите пароль и выберите пункт Соxранить.
3 Найдите и выберите ваше устройство в списке сетей Wi-Fi на другом устройстве. Для подключения без ввода пароля нажмите  и отсканируйте QR-код с помощью другого устройства.
Если мобильная точка доступа не найдена, на своем устройстве нажмите кнопку  → Настройка точки доступа, а затем снимите флажок Скрыть устройство.
4 Для доступа к Интернету на подключенном устройстве используйте мобильную передачу данных.
Автоматический режим точки доступа
Вы можете предоставить доступ к мобильному подключению вашего устройства другим устройствам, на которых выполнен вход в вашу учетную запись Samsung, не вводя пароль.
Коснитесь переключателя Автоматический режим точки доступа, чтобы включить функцию.
Обновление ПО смартфона Samsung Galaxy A50
Обновите ПО устройства с помощью службы FOTA (беспроводная загрузка встроенного ПО). Можно также запланировать обновления программного обеспечения.
На экране настроек выберите пункт Обновление ПО.
При выходе срочных обновлений программного обеспечения для функций безопасности и устранения новых типов угроз они будут устанавливаться на устройстве без согласия пользователя.
• Загрузка и установка: проверка и установка обновлений вручную.
• Автозагрузка по Wi-Fi: установка устройства для автоматической загрузки обновлений при подключении к сети Wi-Fi.
• Последнее обновление: просмотр информации о последнем обновлении программного обеспечения.
Как сделать снимок экрана (скриншот) на смартфоне Samsung Galaxy A50
Во время использования устройства можно создать снимок экрана, а затем сделать на нем надпись, рисунок, обрезать его или поделиться им. Можно создать снимок текущего экрана и прокручиваемой области.
Ниже перечислены способы создания снимка экрана. Сделанные снимки экрана сохраняются в приложении Галерея.
• Снимок клавишами: одновременно нажмите боковую клавишу и клавишу увеличения громкости.
• Снимок проведением: проведите рукой по экрану влево или вправо.
• При использовании некоторых приложений и функций создание снимков экрана невозможно.
• Если функция создания снимка экрана проведением не активирована, откройте приложение Настройки, выберите пункт Дополнительные функции → Движения и жесты, а затем коснитесь переключателя Снимок экрана ладонью, чтобы включить соответствующую функцию.
После создания снимка экрана воспользуйтесь следующими параметрами на панели инструментов внизу экрана:

 : создание снимка отображаемого и скрытого содержимого на длинной странице, например, веб-странице. При выборе параметра
  экран будет автоматически прокручен вниз для съемки дополнительного содержимого.
 : письмо или рисование на снимке экрана или обрезание части снимка экрана. Обрезанный фрагмент сохраняется в приложении Галерея.
 : отправка снимка экрана другим пользователям.
Если параметры на сделанном снимке экрана не отображаются, откройте приложение Настройки, выберите пункт Дополнительные функции → Снимки и запись экрана, коснитесь переключателя Панель инструментов для снимков, чтобы включить соответствующую функцию.
Экран блокировки смартфона Samsung Galaxy A50
Чтобы выключить и заблокировать экран, нажмите боковую клавишу. Кроме того, экран автоматически выключается и блокируется, если устройство не используется в течение определенного периода времени.
Чтобы разблокировать экран, проведите в любом направлении по включенному экрану.
При выключенном экране следует нажать боковую клавишу, чтобы включить экран. Можно также дважды коснуться экрана.
Изменение способа блокировки экрана
Чтобы изменить способ блокировки экрана, запустите приложение Настройки, выберите пункт Экран блокировки → Тип блокировки экрана, а затем выберите способ блокировки.
В случае установки рисунка, PIN-кода, пароля или своих биометрических данных для метода блокировки экрана, вы сможете защитить личные данные, чтобы посторонние не смогли получить к ним доступ. После установки метода блокировки экрана для разблокировки устройства потребуется код разблокировки.
• Провести по экрану: проведение по экрану в любом направлении для разблокировки.
• Рисунок: создание рисунка, как минимум, из четырех точек для разблокировки экрана.
• PIN-код: ввод PIN-кода, состоящего, как минимум, из четырех цифр, для разблокировки экрана.
• Пароль: ввод пароля, состоящего, как минимум, из четырех цифр или символов, для разблокировки экрана.
• Нет: без установки метода блокировки экрана.
• Лицо: регистрация лица для разблокировки экрана.
• Отпечатки пальцев: регистрация отпечатков пальцев для разблокировки экрана.
При введении неправильного кода разблокировки несколько раз подряд и достижении ограничения количества попыток, устройство выполнит возврат к заводским настройкам. Откройте приложение Настройки, выберите пункт Экран блокировки → Параметры защитной блокировки, разблокируйте экран с помощью выбранного метода блокировки экрана, а затем коснитесь переключателя Автосброс, чтобы включить соответствующую функцию.
Распознавание лица
Устройство позволяет разблокировать экран с помощью функции распознавания лица.
• Если в качестве метода блокировки экрана используется лицо, то после включения устройства разблокировать экран по лицу нельзя. Чтобы воспользоваться устройством, для разблокирования экрана необходимо использовать рисунок, PIN-код или пароль, установленный во время регистрации изображения лица. Старайтесь не забывать рисунок, PIN-код или пароль.
• В случае изменения способа блокировки экрана на небезопасные методы Провести по экрану или Нет, все биометрические данные удаляются. Чтобы использовать биометрические данные в приложениях или в работе функций, необходимо зарегистрировать биометрические данные повторно.
Соблюдайте следующие меры предосторожности перед распознаванием лица для разблокировки устройства.
• Существует вероятность, что устройство может разблокироваться по изображению, сходному с изображением его пользователя.
• Функция распознавания лица обеспечивает меньший уровень безопасности в сравнении с использованием рисунка, PIN-кода или пароля.
Советы по улучшению распознавания по лицу
При распознавании лица обращайте внимание на следующее:
• Условия регистрации, например, наличие очков, шляпы, маски, бороды или яркого макияжа.
• Перед регистрацией проверьте наличие достаточного освещения и отсутствие загрязнений на объективе камеры.
• Для более точных результатов распознавания убедитесь, что изображение не размыто.
Регистрация лица
Лучше проводить регистрацию лица в помещении, чтобы на лицо не падали прямые солнечные лучи.
1 На экране настроек выберите пункт Биометрия и безопасность → Распознавание лица.
2 Ознакомьтесь с инструкциями на экране и выберите пункт Продолжить.
3 Задайте способ блокировки экрана.
4 Выберите, носители вы очки или нет, а затем выберите пункт Продолжить.
5 Поверните устройство экраном к себе и смотрите прямо на экран.

6 Расположите лицо внутри рамки на экране.
Камера выполнит сканирование лица.
• Если разблокировка экрана с помощью распознания лица не работает, выберите пункт Удалить данные лица, чтобы удалить зарегистрированные данные и попробовать снова.
• Для улучшения качества распознавания лица выберите пункт Альтернативный вид и добавьте альтернативный внешний вид.
Удаление данных зарегистрированного лица
Данные зарегистрированного лица можно удалить.
1 На экране настроек выберите пункт Биометрия и безопасность → Распознавание лица.
2 Разблокируйте экран с помощью выбранного метода блокировки экрана.
3 Выберите пункт Удалить данные лица → Удалить.
После удаления данных зарегистрированного лица все связанные функции также отключаются.
Разблокировка экрана по лицу
Можно разблокировать экран с помощью лица вместо использования рисунка, PIN-кода или пароля.
1 На экране настроек выберите пункт Биометрия и безопасность → Распознавание лица.
2 Разблокируйте экран с помощью выбранного метода блокировки экрана
3 Коснитесь переключателя Разблокировка с помощью распознавания лица, чтобы включить соответствующую функцию.
• Чтобы настроить устройство на разблокировку экрана без проведения по заблокированному экрану после распознавания лица, коснитесь переключения Оставаться на экране блокировки, чтобы отключить соответствующую функцию.
• Если нужно снизить вероятность распознавания лиц на фотографиях или видео, коснитесь переключателя Ускоренное распознавание, чтобы включить соответствующую функцию. Скорость распознавания лиц может сократиться.
• Чтобы повысить скорость распознавания в условиях низкой освещенности, коснитесь переключателя Повышение яркости экрана, чтобы включить соответствующую функцию.
4 Посмотрите на заблокированный экран, чтобы его разблокировать.
Когда лицо будет распознано, экран разблокируется без каких-либо дополнительных процедур. Если лицо не распознано, воспользуйтесь предварительно настроенным способом разблокировки экрана.
Регистрация отпечатков пальцев
1 На экране настроек выберите пункт Биометрия и безопасность → Отпечатки пальцев.
2 Ознакомьтесь с инструкциями на экране и выберите пункт Продолжить.
3 Задайте способ блокировки экрана.
4 Прочитайте инструкции к чехлу и защитной пленке экрана, а затем нажмите OK.
5 Поместите палец на датчик распознавания отпечатков пальцев внизу экрана. После распознавания пальца устройством уберите его с датчика распознавания отпечатков пальцев и снова приложите к нему.
Повторяйте это действие, пока отпечаток пальца не будет зарегистрирован.
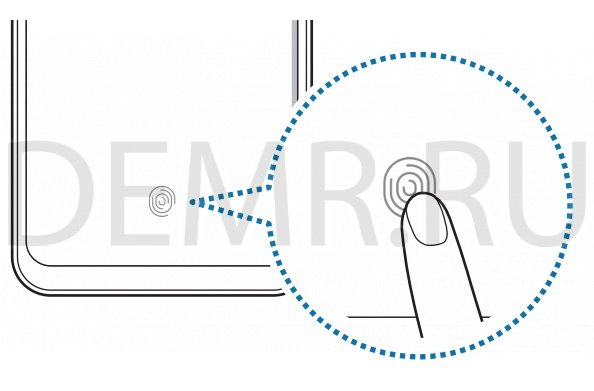
6 По окончании регистрации отпечатков пальцев выберите пункт Готово.
Проверка зарегистрированных отпечатков пальцев
Можно проверить, зарегистрирован ли отпечаток пальца приложением пальца к датчику распознавания отпечатков пальцев.
1 На экране настроек выберите пункт Биометрия и безопасность → Отпечатки пальцев.
2 Разблокируйте экран с помощью выбранного метода блокировки экрана.
3 Выберите пункт Проверка добавленных отпечатков.
4 Поместите палец на датчик распознавания отпечатков пальцев. Будет показан результат распознавания.
Удаление зарегистрированных отпечатков пальцев
Зарегистрированные отпечатки пальцев можно удалить.
1 На экране настроек выберите пункт Биометрия и безопасность → Отпечатки пальцев.
2 Разблокируйте экран с помощью выбранного метода блокировки экрана.
3 Выберите отпечаток пальца, который нужно удалить, а затем выберите пункт Удалить.
Разблокировка экрана по отпечаткам пальцев
Можно разблокировать экран с помощью отпечатка пальца вместо использования рисунка, PINкода или пароля.
1 На экране настроек выберите пункт Биометрия и безопасность → Отпечатки пальцев.
2 Разблокируйте экран с помощью выбранного метода блокировки экрана.
3 Коснитесь переключателя Разблокировка отпечатками, чтобы включить соответствующую функцию.
4 На заблокированном экране поместите палец на датчик распознавания отпечатков пальцев и отсканируйте отпечаток пальца.
Устранение неполадок
При включении устройства или во время его использования появляется запрос на ввод одного из следующих кодов:
• Пароль: если включена функция блокировки, необходимо ввести пароль устройства.
• PIN: при первом включении устройства или при включенном запросе PIN-кода следует ввести PIN-код, поставляемый с SIM- или USIM-картой. Эту функцию можно отключить в меню блокировки SIM-карты.
• PUK-код: как правило, SIM- или USIM-карта блокируется после нескольких попыток ввода неправильного PIN-кода. В этом случае следует ввести PUK-код, предоставленный поставщиком услуг.
• PIN2-код: при доступе к меню, для которого требуется PIN2-код, введите PIN2-код, который предоставляется вместе с SIM- или USIM-картой. За дополнительной информацией обратитесь к поставщику услуг.
На дисплее устройства отображаются сообщения с ошибками сети или сервиса
• В некоторых местах сигнал сети настолько слабый, что использование сетевых функций устройства становится невозможным. Перейдите в место, где сигнал более стабилен. Во время перемещения могут появляться сообщения об ошибке.
• Для использования некоторых функций требуется активировать их. За дополнительной информацией обратитесь к поставщику услуг.
Устройство не включается
Устройство не включится, если аккумулятор полностью разряжен. Перед включением устройства полностью зарядите аккумулятор.
Сенсорный экран медленно или неправильно реагирует на касания
• При установке защитной пленки или дополнительных аксессуаров на сенсорный экран он может работать некорректно.
• Сенсорный экран может работать неправильно в следующих ситуациях: на вас надеты перчатки, вы касаетесь экрана грязными руками, острыми предметами или кончиками пальцев.
• Повышенная влажность и попадание жидкости могут стать причиной неправильной работы сенсорного экрана.
• Выключите и снова включите устройство, чтобы устранить временные неисправности ПО.
• Убедитесь, что на устройстве установлена последняя версия ПО.
• Если сенсорный экран поцарапан или поврежден, обратитесь в сервисный центр Samsung.
Устройство «зависает», или возникла критическая ошибка
Попробуйте выполнить действия, указанные ниже. Если неполадка не устранена, обратитесь в сервисный центр Samsung.
Перезагрузка устройства
Если устройство «зависает», необходимо закрыть все приложения или выключить устройство и снова включить его.
Принудительная перезагрузка
Если устройство «зависает» и не реагирует на действия, для его перезагрузки одновременно нажмите и удерживайте боковую клавишу и клавишу уменьшения громкости в течение более чем 7 секунд.
Сброс устройства
Если способы выше не помогли устранить проблему, выполните сброс настроек устройства. Откройте приложение Настройки, выберите пункт Общие настройки → Сброс → Сброс данных → Сбросить → Удалить все. Перед сбросом настроек устройства рекомендуется создать резервную копию всех важных данных, хранящихся в памяти устройства.
Невозможно выполнить или принять вызов
• Убедитесь, что используется надлежащая сотовая сеть.
• Проверьте, не включена ли функция запрета вызова для набираемого номера телефона.
• Проверьте, не включена ли функция запрета вызова для входящего номера телефона.
Собеседники не слышат меня во время разговора
• Проверьте, не закрыты ли отверстия встроенного микрофона какими-либо посторонними предметами.
• Поднесите микрофон ближе ко рту.
• Если вы используете наушники, проверьте правильность их подключения к устройству.
Во время вызова звучит эхо
Отрегулируйте громкость устройства с помощью клавиши громкости или перейдите в другое место.
Часто пропадает сигнал сети или подключение к Интернету, либо качество звука становится низким
• Убедитесь, что область встроенной антенны устройства не закрыта посторонними объектами.
• В некоторых местах сигнал сети настолько слабый, что использование сетевых функций устройства становится невозможным. Проблемы с подключением могут возникать из-за базовой станции поставщика услуг. Перейдите в место, где сигнал более стабилен.
• При использовании устройства во время движения, службы беспроводной сети могут отключаться из-за проблем в сети поставщика услуг.
Аккумулятор не заряжается (при использовании одобренных зарядных устройств Samsung)
• Убедитесь, что зарядное устройство подключено правильно.
• Обратитесь в сервисный центр Samsung для замены аккумулятора.
Аккумулятор разряжается быстрее, чем обычно
• Эффективный заряд аккумулятора устройства может снижаться при слишком низкой или высокой температуре окружающей среды.
• Расход заряда аккумулятора увеличивается при использовании определенных функций или приложений, например GPS, игр или Интернета.
• Аккумулятор является расходным материалом, и его эффективный заряд будет со временем снижаться.
При включении камеры появляются сообщения об ошибке
Для использования камеры в памяти устройства должно быть достаточно свободного места, а аккумулятор должен быть полностью заряжен. Если при включении камеры появляются сообщения об ошибке, выполните следующие действия:
• Зарядите аккумулятор.
• Освободите место в памяти устройства, скопировав файлы на компьютер или удалив их.
• Перезагрузите устройство. Если это не поможет устранить проблему с приложением камеры, обратитесь в сервисный центр Samsung.
Качество снимка ниже, чем при предварительном просмотре
• Качество снимков может различаться в зависимости от окружающих условий и способов съемки.
• При фотосъемке в темных местах, ночью или в помещении изображение может быть размыто или на нем могут появляться шумы.
При попытке открыть мультимедийный файл появляются сообщения об ошибке Если вы получаете сообщения об ошибке или на вашем устройстве не воспроизводятся мультимедийные файлы, попробуйте выполнить следующие действия:
• Освободите место в памяти устройства, скопировав файлы на компьютер или удалив их.
• Убедитесь, что музыкальный файл не находится под защитой DRM (Digital Rights Management — управление цифровым доступом). Если файл под защитой DRM, прослушать его можно только в том случае, если у вас есть соответствующий ключ или лицензия на воспроизведение.
• Убедитесь, что форматы файлов поддерживаются устройством. Если такие форматы файлов, как DivX или AC3, не поддерживаются, установите специальное приложение с их поддержкой. Для проверки совместимых с вашим устройством форматов файлов перейдите на веб-сайт www.samsung.com.
• Устройство способно воспроизводить все снимки и видеозаписи, сделанные с его помощью. Снимки и видеозаписи, сделанные с помощью других устройств, могут не воспроизводиться.
• Устройство поддерживает мультимедийные файлы, одобренные поставщиком услуг сети или поставщиком дополнительных услуг. Некоторое содержимое из Интернета, например мелодии вызова, видеозаписи или обои, может воспроизводиться некорректно.
Не удается подключить устройство к компьютеру
• Убедитесь, что используемый кабель USB совместим с устройством.
• Убедитесь, что на компьютере установлен необходимый драйвер и его обновления.
Устройство не может определить мое текущее местонахождение
В некоторых местах, например в помещении, на пути сигнала GPS могут возникать помехи. В таких ситуациях для определения вашего местонахождения используйте сеть Wi-Fi или мобильную сеть.
Вокруг внешней части корпуса устройства есть небольшой люфт
• Этот люфт неизбежно появляется при производстве корпуса и может приводить к небольшой вибрации или движению частей устройства.
• Со временем из-за трения между частями люфт может увеличиться.
Не отображается кнопка возврата на главный экран
При использовании определенных приложений или функций навигационная панель с кнопкой возврата на главный экран, может не отображаться. Для отображения панели навигации проведите от нижнего края экрана вверх.
На панели уведомлений не отображается ползунок регулировки яркости экрана
Откройте панель уведомлений, перетащив панель состояния вниз, а затем перетащите панель уведомлений вверх. Коснитесь значка  → Панель быстрого доступа и коснитесь перключателя Показ ползунка яркости вверху, чтобы включить соответствующую функцию.

- Manuals
- Brands
- Samsung Manuals
- Cell Phone
- Galaxy A50
- User manual
-
Contents
-
Table of Contents
-
Troubleshooting
-
Bookmarks
Quick Links
Related Manuals for Samsung Galaxy A50
- Cell Phone Samsung SM-A505W User Manual
(228 pages)
- Cell Phone Samsung SM-A505FM/DS User Manual
(219 pages)
- Cell Phone Samsung SM-A505FN/DS User Manual
(217 pages)
- Cell Phone Samsung SM-A505GN User Manual
(203 pages)
- Cell Phone Samsung SM-A707F/DS User Manual
(146 pages)
- Cell Phone Samsung Galaxy A5 Duos User Manual
(115 pages)
- Cell Phone Samsung Galaxy A50 Enterprise User Manual
(217 pages)
- Cell Phone Samsung Galaxy Ace Setup Manual
(8 pages)
- Cell Phone Samsung Galaxy Ace Setup Manual
(8 pages)
- Cell Phone Samsung Galaxy Ace User Manual
(127 pages)
- Cell Phone Samsung Galaxy Ace Plus User Manual
(157 pages)
- Cell Phone Samsung Galaxy Appeal User Manual
(161 pages)
- Cell Phone Samsung Galaxy Ace Style User Manual
(375 pages)
- Cell Phone Samsung Galaxy Ace II e User Manual
Portable quad-band mobile phone (279 pages)
- Cell Phone Samsung Galaxy Alpha User Manual
Android smart phone (115 pages)
- Cell Phone Samsung Galaxy Alpha User Manual
(126 pages)
Summary of Contents for Samsung Galaxy A50
- Page 1
User manual… -
Page 2: Table Of Contents
Table of contents Features Meet Bixby Camera Security Expandable storage Night mode Getting started Front view Back view Assemble your device Charge the battery Accessories Start using your device Use the Setup Wizard Transfer data from an old device Lock or unlock your device Accounts Set up voicemail SPT_A505U_EN_UM_TN_SEJ_053119_FINAL…
- Page 3
Customize your home screen Bixby Digital wellbeing Always On Display Flexible security Multi window Enter text Emergency mode Apps Using apps Uninstall or disable apps Search for apps Sort apps Create and use folders Samsung apps Galaxy Essentials Galaxy Store… - Page 4
Table of contents Galaxy Wearable Samsung Health Samsung Members Samsung Notes Samsung Pay SmartThings Bixby Calculator Calendar Camera Contacts Clock Email Gallery Internet Messages My Files Phone Google apps… - Page 5
Table of contents Chrome Drive Gmail Google Maps Photos Play Movies & TV Play Music Play Store YouTube Settings Access Settings Search for Settings Connections Wi-Fi Bluetooth Phone visibility NFC and payment… - Page 6
Table of contents Airplane mode Voice networks Mobile networks Data usage Mobile hotspot Tethering Call and message continuity Nearby device scanning Connect to a printer MirrorLink Virtual Private Networks Private DNS Ethernet Sounds and vibration Sound mode Vibrations Volume Ringtone Notification sounds… - Page 7
Table of contents System sounds and vibration Dolby Atmos Equalizer Headset audio options Adapt sound Separate app sound Notifications Manage notifications Customize app notifications Smart pop-up view Smart alert Display Screen brightness Blue light filter Night mode Screen mode Font size and style Screen zoom Full screen apps… - Page 8
Table of contents Screen timeout Accidental touch protection Touch sensitivity Screen saver Reduce animations Lift to wake Double tap to wake Smart stay One-handed mode Device maintenance Quick optimization Battery Storage and memory card Memory Language and input Date and time Troubleshooting Lock screen and security Screen lock types… - Page 9
Table of contents Clock and information Google Play Protect Find My Mobile Security update Samsung Pass Install unknown apps Secure Folder Encrypt SD card View passwords Security update service Device administration Credential storage Strong Protection Advanced security settings Location App permissions… - Page 10
Table of contents Add an account Account settings Synchronize accounts Remove an account Backup and restore Google settings Accessibility Screen Reader Visibility enhancements Hearing enhancements Interaction and dexterity Advanced settings Installed services Other settings Help Manage game features Dual Messenger About phone… - Page 11
Learn more Videos Smart Simulator Tips Samsung Care Talk to an agent Legal information Intellectual property Open source software Disclaimer of warranties; exclusion of liability Modification of software Samsung Knox Restricting children’s access to your mobile device Samsung Electronics America, Inc. -
Page 12: Features
Features Meet Bixby Bixby learns what you like to do and works with your favorite apps and services to help you get more done. See Bixby on page 25. Camera The camera on your device has several unique features. See Camera on page 49.
-
Page 13: Getting Started
Getting started Front view Back view Assemble your device Start using your device…
-
Page 14: Front View
Getting started Front view Front camera SIM/microSD card tray Volume keys Power key Fingerprint scanner USB charger/ Accessory port Devices and software are constantly evolving — the illustrations you see here are for reference only.
-
Page 15: Back View
Getting started Back view Microphone Rear cameras Flash Speaker Headset jack Microphone…
-
Page 16: Assemble Your Device
Getting started Assemble your device Your device uses a nano-SIM card. A SIM card may be preinstalled, or you may be able to use your previous SIM card. Contact your carrier for more details. Install SIM/microSD card Place the SIM card and optional microSD card (sold separately) into the tray with the gold…
-
Page 17: Charge The Battery
NOTE Use only charging devices and batteries (if applicable) that are approved by Samsung. Samsung charging devices and batteries are designed for your device to maximize battery life. Using other charging devices and batteries may void your warranty and may cause damage.
-
Page 18: Start Using Your Device
Smart Switch can transfer your data via USB cable, Wi-Fi, or computer. Visit samsung.com/us/support/owners/app/smart-switch to learn more. 1. From Settings, tap Accounts and backup > Smart Switch.
-
Page 19: Lock Or Unlock Your Device
Getting started Lock or unlock your device Use your device’s screen lock features to secure your device. By default, the device locks automatically when the screen times out. For more information about screen locks, see Lock screen and security on page 119. Power key Press to lock.
-
Page 20: Accounts
FRP requires your Google Account information when resetting to factory settings. For more information, see Factory reset protection on page 118. Add a Samsung account Sign in to your Samsung account to access exclusive Samsung content and make full use of Samsung apps. 1. From Settings, tap Accounts and backup >…
-
Page 21: Set Up Voicemail
Getting started Set up voicemail You can set up your voicemail service when you access it for the first time. You can access voicemail through the Phone app. 1. From Phone, touch and hold the 1 key. 2. Follow the tutorial to create a password, record a greeting, and record your name.
-
Page 22: Navigation
Getting started Navigation A touch screen responds best to a light touch from the pad of your finger or a capacitive stylus. Using excessive force or a metallic object on the touch screen may damage the tempered glass surface and void the warranty. Lightly touch items to select or launch them.
- Page 23
Getting started Swipe Lightly drag your finger across the screen. Swipe the screen to unlock the device. Swipe the screen to scroll through the Home screens or menu options. Devices and software are constantly evolving — the illustrations you see here are for reference only. - Page 24
Getting started Drag and drop Touch and hold an item, and then move it to a new location. Drag an app shortcut to add it to a Home screen. Drag a widget to place it in a new location. Devices and software are constantly evolving — the illustrations you see here are for reference only. - Page 25
Getting started Zoom in and out Bring your thumb and forefinger together or apart to zoom in and out. Bring your thumb and forefinger together on the screen to zoom out. Move your thumb and forefinger apart on the screen to zoom in. Devices and software are constantly evolving —… - Page 26
Getting started Touch and hold Touch and hold items to activate them. Touch and hold a field to display a pop-up menu of options. Touch and hold a Home screen to customize the Home screen. Devices and software are constantly evolving — the illustrations you see here are for reference only. -
Page 27: Navigation Bar
Getting started Navigation bar The Navigation bar, at the bottom of the screen, displays the navigation keys. Back Recent apps Home Devices and software are constantly evolving — the illustrations you see here are for reference only.
- Page 28
Getting started Navigation gestures To make more space on the screen, you can hide the navigation keys, and instead use gestures to navigate the device. Simply swipe up on the screen where the navigation buttons used to display to navigate the device. ◌… -
Page 29: Customize Your Home Screen
Getting started Customize your home screen The Home screen is the starting point for navigating your device. You can place your favorite apps and widgets here. You can set up additional Home screens, remove screens, change the order of screens, and choose a main Home screen. App icons You can use app icons to launch an app from any Home screen.
- Page 30
Getting started Themes Set a theme to be applied to your Home and Lock screens, wallpapers, and app icons. 1. From a Home screen, touch and hold the screen. 2. Tap Themes to customize. 3. Tap View all to see downloaded themes. 4. - Page 31
Getting started Home screen settings Customize your Home and Apps screens. 1. From a Home screen, touch and hold the screen. 2. Tap Home screen settings to customize: • Home screen layout: Set your device to have separate Home and Apps screens, or only a Home screen where all apps are located. - Page 32
Getting started Easy mode The Easy mode layout has larger text and icons, making for a more straightforward visual experience. Switch between the default screen layout and a simpler layout. Apps list 1. From Settings, tap Display > Easy mode. 2. - Page 33
Getting started Status bar The Status bar provides device information on the right side and notification alerts on the left. Status icons Battery full Battery low Charging Mute Vibrate Airplane mode Bluetooth active Wi-Fi active Location active Alarm Notification icons Missed calls Call in progress Call on hold… - Page 34
Getting started Notification panel For quick access to notifications, settings, and more, simply open the Notification panel. D e v i c e s e tt i n g s Q u i c k s e tt i n g s V i e w a l l N o t i f i c a t i o n c a r d s Devices and software are constantly evolving —… - Page 35
Getting started View the Notification panel You can access the Notification panel from any screen. 1. Drag the Status bar down to display the Notification panel. 2. Swipe down the list to see notification details. • To open an item, tap it. •… -
Page 36: Bixby
Bixby is a virtual assistant that learns, evolves, and adapts to you. It learns your routines, helps you set up reminders based on time and location, and is built in to your favorite apps. Visit samsung.com/us/support/owners/app/Bixby for more information. The Bixby Home page displays customized content based on your interactions. Bixby learns from your usage patterns and will suggest content you may like.
-
Page 37: Digital Wellbeing
Getting started Digital wellbeing You can monitor and manage your digital habits by getting a daily view of how frequently you use apps, how many notifications you receive, and how often you check your device. You can also set your device to help you wind down before going to bed. ◌…
-
Page 38: Flexible Security
Getting started AOD themes Apply custom themes for Always On Display. 1. From a Home screen, touch and hold the screen, and tap Wallpapers > AODs. • Tap an AOD to preview and download it to My Always On Displays. 2.
- Page 39
• Brighten screen: Increase the screen brightness temporarily so that your face can be recognized in dark conditions. • Samsung Pass: Access your online accounts using face recognition. Fingerprint scanner Use fingerprint recognition as an alternative to entering passwords in certain apps. - Page 40
• Fingerprint unlock: Use your fingerprint for identification when unlocking your device. • Show icon when screen is off: Show the fingerprint icon when the screen is off. • Samsung Pass: Use your fingerprint for identification when using supported apps. Biometrics Preferences Configure your preferences for biometric security options. -
Page 41: Multi Window
Getting started Multi window ™ Multitask by using multiple apps at the same time. Apps that support Multi window can be displayed together on a split screen. You can switch between the apps and adjust the size of their windows. Split screen control 1.
-
Page 42: Enter Text
Enter text Text can be entered using a keyboard or your voice. Expand toolbar ◌ Tap a field to display the Samsung keyboard. • Tap Show predictive text to view suggested words while you type. • Tap Show toolbar functions to view all keyboard options.
- Page 43
• Keyboard layout and feedback: Customize the appearance and function of the keyboard. • Reset to default settings: Return keyboard to original settings and clear personalized data. • About Samsung keyboard: View version and legal information for the Samsung keyboard. - Page 44
Getting started Use Samsung voice input Instead of typing, enter text by speaking. Return to keyboard 1. From the Samsung keyboard, tap Voice input. 2. Tap the screen and speak your text. -
Page 45: Emergency Mode
• Keyboard language: Choose the language for the keyboard. • Voice input language: Select the language for Samsung voice input. • Hide offensive words: Hide potentially offensive words with asterisks. • About Samsung voice input: View version and legal information for Samsung voice input. Emergency mode Use Emergency mode to access helpful emergency features and conserve your device’s power during an emergency situation.
- Page 46
Getting started Share my location: Send your location information to your emergency contacts. Phone: Launch the call screen. Internet: Launch the web browser. – Email: Launch the Email app. – ™ Maps: Launch Google Maps Battery charge: Displays estimated battery charge percentage. Estimated battery life: Displays estimated remaining battery charge time based on current battery charge and usage. -
Page 47: Apps
Apps Using apps Samsung apps Google apps…
-
Page 48: Using Apps
Apps Using apps The Apps list displays all preloaded and downloaded apps. Apps can be downloaded ™ from Galaxy Store and the Google Play store. ◌ From a Home screen, swipe the screen upward to access the Apps list. Uninstall or disable apps Installed apps can be removed from your device.
-
Page 49: Create And Use Folders
Apps Create and use folders You can make folders to organize App shortcuts on the Apps list. 1. From Apps, touch and hold an app shortcut, and then drag it on top of another app shortcut until it is highlighted. 2.
-
Page 50: Samsung Apps
Samsung apps. You can access and download a collection of premium content. ◌ From Apps, tap More options > Galaxy Essentials. Galaxy Store Find and download premium apps that are exclusive to Galaxy devices. A Samsung account is required to download from Galaxy Store. ◌ From Apps, tap Galaxy Store.
-
Page 51: Samsung Health
Before you start exercising Although the Samsung Health application is a great companion to your exercise routine, it is always best to make sure you consult with your physician before beginning any exercise regimen. While moderate physical activity, such as brisk…
-
Page 52: Samsung Members
Get more and do more from your Galaxy device. Enjoy DIY support tools and exclusive experiences and content — for Samsung members only. Samsung Members may be preloaded on your device, or you can download and install it from Galaxy Store or the Google Play store.
-
Page 53: Samsung Notes
Apps Samsung Notes Use Samsung Notes to create notes containing text, images with footnotes, voice recordings, and music. You can share your notes easily using social networking services. Visit samsung.com/us/support/owners/app/samsung-notes to learn more. ◌ From Apps, tap Samsung Notes >…
-
Page 54: Samsung Pay
Samsung Pay ™ Samsung Pay lets you make payments with your device. It is accepted almost anywhere you can swipe or tap your credit card. A Samsung account is required. For support, visit samsung.com/us/support/owners/app/samsung-pay. ◌ From Apps, tap Samsung folder >…
- Page 55
NOTE For added security, your credit and debit card information is not stored on a cloud service. If you are using the Samsung Pay app on multiple devices, you must sign in to the app and confirm all payment cards on each device. Some card issuers may limit the number of devices. -
Page 56: Smartthings
Secure your information Samsung Pay is designed with the latest security technology and works on most recent Samsung Galaxy devices. Payments are authorized with your fingerprint or PIN, and each transaction uses a unique token each time, so your device only allows payments with your consent.
-
Page 57: Calculator
Apps Calculator The Calculator app features both basic and scientific math functions, as well as a unit converter. ◌ From Apps, tap Calculator. C o n v e r t e r Convert between S c i e n t i f i c c a l c u l a t o r measurements.
-
Page 58: Calendar
Apps Calendar The Calendar app can be connected to your various online accounts to consolidate all your calendars in one place. ◌ From Apps, tap Calendar. Change to other Go to today’s date calendar views Double-tap to edit event Create new event Devices and software are constantly evolving —…
- Page 59
Apps Add calendars Add your accounts to the Calendar app. 1. From Calendar, tap Menu. 2. Tap Settings > Add new account and select an account type. 3. Enter your account information and follow the prompts. TIP Accounts may also support email, contacts, and other features. Create an event Use your Calendar to create events. -
Page 60: Camera
Apps Camera You can capture high-quality pictures and videos using the Camera app. ◌ From Apps, tap Camera. TIP If Quick launch is enabled, quickly press the Power key twice. Settings Scene optimizer Zoom Shooting modes Switch cameras Gallery Capture Devices and software are constantly evolving —…
- Page 61
Apps Navigate the camera screen Take stunning pictures with your device’s front and rear cameras. 1. From Camera, set up your shot with the following features: • Tap the screen where you want the camera to focus. – When you tap the screen, a brightness scale appears. Drag the light bulb to adjust the brightness. - Page 62
Apps Record videos Record high-quality videos using your device. 1. From Camera, swipe right or left to change the shooting mode to Video. 2. Tap Capture to begin recording a video. • To take a picture while recording, tap Capture. •… - Page 63
Apps • Slow motion: Record videos at a high frame rate for viewing in slow motion. • Hyperlapse: Create a time lapse video by recording at various frame rates. The frame rate is adjusted depending on the scene being recorded and the movement of the device. - Page 64
Apps • Shooting methods: – Press Volume key to: Use the Volume key to take pictures, record video, zoom, or control system volume. – Voice control: Take pictures speaking key words. – Floating shutter button: Add an extra shutter button that you can move anywhere on the screen. -
Page 65: Contacts
Apps Contacts Store and manage your contacts. You can synchronize with personal accounts added to your device. Accounts may also support email, calendars, and other features. ◌ From Apps, tap Contacts > Create contact. Add profile picture Add, delete, and expand fields Devices and software are constantly evolving —…
- Page 66
Apps Edit a contact When editing a contact, you can tap a field and change or delete information, or you can add more fields to the contact’s list of information. 1. From Contacts, tap a contact. 2. Tap Edit. 3. Tap any of the fields to add, change, or delete information. 4. - Page 67
Apps 3. Tap either vCard file (VCF) or Text. 4. Choose a sharing method and follow the prompts. Groups You can use groups to organize your contacts. Create a group Create your own contact groups. 1. From Contacts, tap Menu > Groups. 2. - Page 68
Apps Send an email to a group Send an email to members of a group. 1. From Contacts, tap Menu > Groups, and then tap a group. 2. Tap More options > Send email. 3. Tap contacts to select them, or tap the All checkbox at the top of the screen to select all, and then tap Done. - Page 69
Apps Export contacts Export contacts from your phone as vCard files (VCF). 1. From Contacts tap Menu > Manage contacts. 2. Tap Import/export contacts. 3. Tap Export and follow the prompts. Link contacts Consolidate contact information from multiple sources into one contact by linking entries into a single contact. -
Page 70: Clock
Apps Clock The Clock app offers features for keeping track of time and setting alarms. ◌ From Apps, tap Clock, and tap a tab to use a feature. Create new alarm Turn alarm on or off Devices and software are constantly evolving — the illustrations you see here are for reference only.
- Page 71
Apps Alarm Use the Alarm tab to set one-time or recurring alarms and choose options for how to be notified. 1. From Clock, tap Add alarm. 2. Tap the following items to configure an alarm: • Time: Set a time for the alarm. •… - Page 72
Apps World clock The World clock lets you keep track of the current time in multiple cities around the globe. Location Search Center the globe on Find a particular city. your current location. City View the current Globe time and add to your Drag to spin and list of cities. - Page 73
Apps Time zone converter Set a time in a city on your World clock list to see what the local times would be in the other listed cities. 1. From Clock, tap World clock. 2. Tap More options > Time zone converter. 3. -
Page 74: Email
Apps Email View and manage multiple email accounts in one app. To add an email account, see Add an email account on page 9. ◌ From Apps, tap Email. Add attachment Send message Devices and software are constantly evolving — the illustrations you see here are for reference only.
- Page 75
Apps Create and send an email Compose and send email messages from your device. 1. From Email, tap Compose new email. • Different email account may have additional steps and options. 2. Tap the To field to add an email address or tap Add from Contacts to select a recipient from your contacts. - Page 76
Apps View multiple email accounts You can view email you receive for multiple accounts, or you can view email accounts individually. ◌ From Email, tap for the following options: • [Account name]: View email for only one email account. • All accounts: View all email in a combined inbox. TIP Accounts may also support calendars, contacts, and other features. -
Page 77: Gallery
Apps Gallery Go to the Gallery to look at the all the visual media stored on your device. You can view, edit, and manage pictures and videos. ◌ From Apps, tap Gallery. Sort images into Customize collections custom albums of pictures and videos View pictures Share pictures and videos…
- Page 78
Apps View pictures Pictures stored on your device are viewable in the Gallery app. 1. From Gallery, tap Pictures. 2. Tap a picture to view it. Swipe left or right to view other pictures or videos. • To mark the picture as a favorite, tap Favorite. - Page 79
Apps Play video View the videos stored on your device. You can save videos as favorites, and view video details. 1. From Gallery, tap Pictures. 2. Tap a video to view it. Swipe left or right to view other pictures or videos. •… - Page 80
Apps Delete pictures and videos Delete pictures and videos stored on your device. 1. From Gallery, tap More options > Edit. 2. Tap pictures and videos to select them, or tap the All checkbox at the top of the screen to select all pictures and videos. 3. -
Page 81: Internet
Apps Internet Samsung Internet is a simple, fast, and reliable web browser for your device. Experience more secure Web browsing features with Secret Mode, Biometric Web Login, and Contents Blocker. ◌ From Apps, tap Internet. Add to Reload webpage Bookmarks…
- Page 82
Apps Browser tabs Use tabs to view multiple web pages at the same time. ◌ From Internet, tap Tabs > New tab. • To close a tab, tap Close tab . Tabs > Bookmarks The Bookmarks page stores Bookmarks, Saved pages, and your browsing History. Open a Bookmark Quickly launch a web page from the Bookmarks page. - Page 83
Apps Secret mode Pages viewed in Secret mode are not listed in your browser history or search history, and leave no traces (such as cookies) on your device. Secret tabs are a darker shade than the normal tab windows. Any downloaded files remain on your device after you close the secret tab. 1. -
Page 84: Messages
Apps Messages Keep in touch with your contacts by using the Messages app to share photos, send emojis, or just say a quick hello. ◌ From Apps, tap Messages > Compose. Add attachment Send message Message search To quickly locate a message, use the search feature. 1.
- Page 85
Apps Delete conversations You can remove your conversion history by deleting conversations. 1. From Messages, tap More options > Edit. 2. Tap each conversation you want to delete. 3. Tap Delete, and confirm when prompted. Emergency alerts Emergency alerts notify you of imminent threats and other situations. There is no charge for receiving an Emergency alert message. -
Page 86: My Files
My Files View and manage files stored on your device, including images, videos, music, and sound clips. ◌ From Apps, tap Samsung folder > My Files. Search Storage locations Devices and software are constantly evolving — the illustrations you see here are for reference only.
- Page 87
Apps File groups Files stored in the device are organized into the following groups: Recent files: View recently accessed files. • – This option displays if one or more files have been accessed recently. Categories: View your files based on the file type. •… -
Page 88: Phone
Apps Phone The Phone app does more than just make telephone calls. Explore the advanced calling features. See your carrier for more information. ◌ From a Home screen, tap Phone. Access voicemail Access Messages Make a call Devices and software are constantly evolving — the illustrations you see here are for reference only.
- Page 89
Apps Calls The Phone app allows you to make and answer calls from the Home screen, Recents tab, Contacts and more. Make a call Use your phone to make and answer calls from a Home screen. ◌ From Phone, enter a number on the keypad and tap Call. - Page 90
Apps Decline a call You can choose to decline an incoming call. If you are using an app, a pop-up screen is displayed for the incoming call. ◌ On the incoming call screen, drag Decline to the left to reject the call and send it to your voicemail. - Page 91
Apps Multitask If you exit the call screen to use another app, your active call is indicated in the Status bar. To return to the call screen: ◌ Drag the Status bar down to display the Notification panel and tap the call. To end a call while multitasking: ◌… - Page 92
Apps Delete call records To delete Call log entries: 1. From Phone, tap Recents. 2. Touch and hold the call you want to delete from the Call log. 3. Tap Delete. Block a number By adding a caller to your Block list, future calls from this number are sent directly to your voicemail, and messages are not received. - Page 93
Apps Make a call with Speed dial You can make a call using Speed dial. ◌ From Phone, touch and hold the Speed dial number. • If the Speed dial number is more than one digit long, enter the first digits, and then hold the last digit. - Page 94
Apps Make an emergency call from a locked screen The emergency telephone number can be dialed even if the phone is locked, allowing anyone to use your phone to call for help in an emergency. When accessed from a locked screen, only the emergency calling feature is accessible to the caller. The rest of the phone remains secured. - Page 95
Apps TTY mode A teletypewriter (TTY) is a telecommunications device that allows people who are deaf, hard of hearing, or who have speech or language disabilities to communicate by telephone. 1. From Phone, tap More options > Settings. 2. Tap Other call settings > TTY mode. 3. -
Page 96: Google Apps
Apps Google apps Enjoy these apps from Google. Chrome ™ Browse the Internet with Chrome and bring your open tabs, bookmarks, and address bar data from your computer to your mobile device. Visit support.google.com/chrome to learn more. Drive ™ Open, view, rename, and share files saved to your Google Drive cloud account.
-
Page 97: Maps
Apps Maps Get directions and other location-based information. You must enable location services to use Google Maps. For more information, see Location on page 125. Visit support.google.com/maps to learn more. Photos Store and back up your photos and videos automatically to your Google Account ™…
-
Page 98: Settings
Settings Access Settings Connections Sounds and vibration Notifications Display Device maintenance Lock screen and security Accounts Accessibility Other settings…
-
Page 99: Access Settings
Settings Access Settings There are a couple of ways to access your device settings. Drag down the Status bar, and then tap Settings. — From Apps, tap Settings. — Search for Settings If you are not sure exactly where to find a certain setting, you can search for it. 1.
- Page 100
Settings 3. Enter information about the Wi-Fi network: • Network name: Type the exact name of the network. • Security: Select a security option from the list, and enter the password if required. • Auto reconnect: Choose this option if you want to automatically reconnect to this network whenever you are in range. -
Page 101: Bluetooth
Settings Wi-Fi Direct Wi-Fi Direct uses Wi-Fi to share data between devices. 1. From Settings, tap Connections > Wi-Fi, and then tap to turn on Wi-Fi. 2. Tap Wi-Fi Direct. 3. Tap a device, and then follow the prompts to connect. TIP When sharing a file, tap Wi-Fi Direct to use this feature.
-
Page 102: Phone Visibility
Settings Unpair from a Bluetooth device When you unpair from a Bluetooth device, the two devices no longer recognize each other. 1. From Settings, tap Connections > Bluetooth, and then tap to turn on Bluetooth. 2. Tap Settings next to the device, and then tap Unpair. TIP You will need to pair with the device again in order to connect to it.
-
Page 103: Nfc And Payment
• To set another payment app as the default, tap Others, and then tap the app you prefer. TIP NFC technology is used with Samsung Pay. Turn on this feature to see how easy and secure it is to use your device to make payments.
-
Page 104: Airplane Mode
Settings Airplane mode Airplane mode disconnects your device from all networks and turns off connectivity features. 1. From Settings, tap Connections > Airplane mode. 2. Tap to enable this feature. Voice networks Select the networks you want to use for calls. ◌…
- Page 105
Settings Turn on Data saver Use Data saver to reduce your data consumption by preventing selected apps from sending or receiving data in the background. 1. From Settings, tap Connections > Data usage > Data saver. 2. Tap to turn on Data saver. •… -
Page 106: Mobile Hotspot
Settings Mobile hotspot Mobile hotspot uses your data plan to create a Wi-Fi network that can be used by multiple devices. 1. From Settings, tap Connections > Mobile hotspot and tethering > Mobile hotspot. 2. Tap to turn on Mobile hotspot. 3.
- Page 107
Settings Configure mobile hotspot settings You can customize your mobile hotspot’s security and connection settings. 1. From Settings, tap Connections > Mobile hotspot and tethering > Mobile hotspot. 2. Tap More options > Configure mobile hotspot for the following settings: •… -
Page 108: Tethering
Connection occurs automatically. 3. Sign in to your Samsung account on both devices. TIP Move your contacts from your phone to your Samsung account so you can access them on all registered devices. Nearby device scanning Easily set up connections to other available devices by turning on Nearby device scanning.
-
Page 109: Connect To A Printer
Settings Connect to a printer Connect your device to a printer on the same Wi-Fi network to easily print documents and images from your device. 1. From Settings, tap Connections > More connection settings > Printing. 2. Tap Download plugin and follow the prompts to add a print service. 3.
-
Page 110: Private Dns
Settings Manage a VPN Use the VPN settings menu to edit or delete a VPN connection. 1. From Settings, tap Connections > More connection settings > VPN. 2. Tap Settings next to a VPN. 3. Edit the VPN and tap Save, or tap Delete to remove the VPN. Connect to a VPN Once you have set up a VPN, connecting to and disconnecting from a VPN is easy.
-
Page 111: Sounds And Vibration
Settings Sounds and vibration You can control the sounds and vibrations used to indicate notifications, screen touches, and other interactions. Sound mode You can change the sound mode on your device without using the volume keys. ◌ From Settings, tap Sounds and vibration >…
-
Page 112: Vibrations
Settings Vibrations You can control how and when your device vibrates 1. From Settings, tap Sounds and vibration. 2. Tap options to customize: • Vibrate while ringing: Set your device to vibrate in addition to ringing when you receive a call. •…
-
Page 113: Ringtone
• Dialing keypad tone: Play a tone when dialing numbers on the Phone keypad. • Keyboard sound: Play a sound when typing with the Samsung keyboard. • Keyboard vibration: Vibrate when typing with the Samsung keyboard. • Touch vibration: Vibrate when you tap navigation buttons or touch and hold…
-
Page 114: Dolby Atmos
Settings Dolby Atmos Enjoy Dolby Atmos quality when playing content that was specifically mixed for Atmos. This feature may only be available with a headset connected. 1. From Settings, tap Sounds and vibration > Advanced sound settings > Sound quality and effects. 2.
-
Page 115: Separate App Sound
Settings Separate app sound You can play media sound on a speaker or headphones separate from the rest of the sounds on your device. 1. From Settings, tap Sounds and vibration > Advanced sound settings > Separate app sound. 2. Tap to enable Separate app sound, and then set the following options: •…
-
Page 116: Customize App Notifications
Settings Customize app notifications You can change notification settings for each app. 1. From Settings, tap Notifications > See all. 2. Tap an app for the following options: • Show notifications: Receive notifications from this app. • App icon badges: Show a badge on the icon when there are notifications. •…
-
Page 117: Display
Settings Display You can configure the screen brightness, timeout delay, font size, and many other display settings. Screen brightness Adjust the screen brightness according to lighting conditions or personal preference. 1. From Settings, tap Display. 2. Customize options under Brightness: •…
-
Page 118: Night Mode
Settings Night mode Night mode allows you to switch to a darker theme to keep your eyes more comfortable at night. ◌ From Settings, tap Display > Night mode for the following options: • Turn on now: Put your device in Night mode. •…
-
Page 119: Full Screen Apps
Settings Full screen apps You can choose which apps you want to use in the full screen aspect ratio. ◌ From Settings, tap Display > Full screen apps and tap apps to enable this feature. Screen timeout You can set the screen to turn off after a set amount of time. ◌…
-
Page 120: Reduce Animations
Settings Reduce animations Decrease certain motion effects, such as when opening apps. ◌ From Settings, tap Advanced features > Reduce animations, and tap enable the feature. Lift to wake Turn on the screen by lifting the device. ◌ From Settings, tap Advanced features >…
-
Page 121: Device Maintenance
Settings Device maintenance View the status of your device’s battery, storage, and memory. You can also automatically optimize your device’s system resources. Quick optimization The quick optimization feature improves device performance through the following actions: Identifying apps that use excessive battery power and clearing unneeded items •…
-
Page 122: Storage And Memory Card
Settings Storage and memory card View the device memory and usage. You can also mount, unmount, or format an optional memory card (not included). Device storage Quickly optimize your device’s memory, increasing available memory. ◌ From Settings, tap Device care > Storage > Clean now. Memory card Once an optional microSD memory card (not included) has been installed in your device, the card memory is displayed in the Storage setting.
-
Page 123: Memory
Settings Format a memory card When formatting an SD card, you should back up your music and photo files that are stored on the card because formatting the SD card deletes ALL stored files. 1. From Settings, tap Device care > Storage. 2.
- Page 124
Settings Default keyboard You can select a default keyboard for your device’s menus and keyboards. Additional keyboards can be downloaded from the Google Play store. 1. From Settings, tap General management > Language and input. 2. Tap Default keyboard, and select a keyboard. Google Voice typing ™… - Page 125
◌ From Settings, tap General management > Language and input > Text-to-speech for options: • Preferred engine: Choose either the Samsung or Google Text-to-speech engine. Tap Settings for options. • Language: Set the default speech language. • Speech rate: Set the speed at which the text is spoken. -
Page 126: Date And Time
Settings Primary mouse button You can define which mouse button that you favor as primary. 1. From Settings, tap General management > Language and input. 2. Tap Primary mouse button, and choose either Left or Right. Date and time By default, your device receives date and time information from the wireless network. Outside of network coverage, you can set the date and time manually.
- Page 127
Settings • Update Profile: Automatically update your user profile information. • UICC unlock: Enable the SIM slot to use another carrier’s SIM card. Contact your service provider for assistance. Reset Reset device and network settings. You can also reset your device to its factory defaults. - Page 128
Settings Auto restart Optimize your device by restarting it automatically at set times. Any unsaved data will be lost when the device restarts. 1. From Settings, tap General management > Reset > Auto restart. 2. Tap to activate Auto restart, and then set the following parameters: •… - Page 129
You will not be able to access the device after a factory data reset if you do not have your Google Account username and password. CAUTION Before sending your device to Samsung or taking it to a Samsung- authorized service center, remove your Google Account and then perform a factory data reset. -
Page 130: Lock Screen And Security
Settings Lock screen and security You can secure your device and protect your data by setting a screen lock. Screen lock types You can choose from the following screen lock types that offer high, medium, or no security: Swipe, Pattern, PIN, Password, and None. NOTE Biometric locks are also available to protect access to your device and sensitive data on your device.
-
Page 131: Clock And Information
You can protect your device from loss or theft by allowing your device to be locked, tracked online, and for your data to be deleted remotely. For more information, visit samsung.com/us/support/owners/app/find-my-mobile. TIP A Samsung account is required, and Google location service must be turned on in order to use Find My Mobile.
-
Page 132: Security Update
Samsung Pass Use Samsung Pass to access your favorite services with biometric data. You must sign in to your Samsung account to use Samsung Pass. Visit samsung.com/us/support/owners/app/samsung-pass to learn more.
-
Page 133: Install Unknown Apps
Biometrics and security > Secure Folder and follow the prompts to secure content on your device. TIP You must sign in to your Samsung account, and use secured lock on your device to set up and use Secure Folder. Encrypt SD card You can encrypt your optional memory card (not included) to protect its data.
-
Page 134: View Passwords
Settings Decrypt SD card You can decrypt an optional memory card (not included) if it was encrypted by this device. You may want to decrypt the memory card if you plan to use it with another device or before performing a Factory data reset. 1.
-
Page 135: Credential Storage
Settings Credential storage You can manage the trusted security certificates installed on your device, which verify the identity of servers for secure connections. ◌ From Settings, tap Biometrics and security > Other security settings for the following options: • Storage type: Select a storage location for credential contents. •…
-
Page 136: Location
Settings Location Location services use a combination of GPS, mobile network and Wi-Fi to determine the location of your device. 1. From Settings, tap Biometrics and security > Location. 2. Tap to turn on Location services. 3. Tap Improve accuracy to use other connections for determining your location: •…
-
Page 137: App Permissions
Accounts and backup > Samsung Cloud. If a Samsung account has not been added, the screens explain how to create or sign in to your account. 2. Once a Samsung account is configured, you can view and manage items stored in the Samsung Cloud.
-
Page 138: Add An Account
Settings Add an account You can add and sync all your email, social networking, and picture and video sharing accounts. 1. From Settings, tap Accounts and backup > Accounts > Add account. 2. Tap one of the account types. 3. Follow the prompts to enter your credentials and set up the account. Tap Auto sync data to enable automatic updates to your accounts.
-
Page 139: Backup And Restore
◌ From Settings, tap Accounts and backup > Backup and restore for options: • Back up data: Configure your Samsung account to back up your data. • Restore data: Use your Samsung account to restore your backup data. Google Account You can enable backup of your information to your Google Account.
-
Page 140: Accessibility
• High contrast fonts: Adjust the color and outline of fonts to increase the contrast with the background. • High contrast keyboard: Adjust the size of the Samsung keyboard and change its colors to increase the contrast between the keys and the background.
-
Page 141: Hearing Enhancements
Settings • Remove animations: Remove certain screen effects if you are sensitive to motion. • Color inversion: Reverse the display of colors from white text on a black background to black text on a white background. • Color correction: Adjust the color of the screen if you find it difficult to see some colors.
-
Page 142: Interaction And Dexterity
You can watch closed captions when viewing multimedia. ◌ From Settings, tap Accessibility > Hearing enhancements and tap an option: • Samsung subtitles (CC): Use Samsung subtitles with multimedia files when available. • Google subtitles (CC): Use Google subtitles with multimedia files when available.
- Page 143
Settings Interactions You can simplify the motions needed to answer phone calls or respond to notifications and alarms. ◌ From Settings, tap Accessibility > Interaction and dexterity and tap an option: • Answering and ending calls: – Read caller names aloud: Hear callers’ names read aloud when using Bluetooth or headsets (not included). -
Page 144: Advanced Settings
Settings Advanced settings You can customize additional accessibility features and services for your device. TIP Additional accessibility apps may be downloaded from the Google Play store. Direct access ◌ From Settings, tap Accessibility > Advanced settings and tap an option: •…
-
Page 145: Other Settings
◌ From Settings, tap Help. Manage game features Automatically arrange all your games in one place. For more information on Game Launcher, visit samsung.com/us/support/owners/app/game-launcher. ◌ From Settings, tap Advanced features > Game Launcher. Dual Messenger Use two separate accounts for the same app.
-
Page 146: Learn More
Learn more Videos samsung.com/us/support/videos Smart Simulator samsungsimulator.com Tips samsung.com/us/support/tips Samsung Care samsung.com/us/support Talk to an agent Contact us on Facebook Messenger Find us on Facebook Follow us on Twitter…
-
Page 147: Legal Information
1-800-SAMSUNG (726-7864) and providing the applicable information. For complete terms and conditions that bind you and Samsung, refer to the “Arbitration Agreement” section of the Terms & Conditions, included with the Product. Find legal information online The full Arbitration Agreement, Standard Limited Warranty, End User License Agreement (EULA), and Health &…
-
Page 148: Intellectual Property
The full Arbitration Agreement, Standard Limited Warranty, End User License Agreement (EULA) and Health & Safety Information are also available on the device, in the Samsung legal section of Settings. The location depends on the device, and is usually in the “About device” or “About phone” section, for example: Settings >…
-
Page 149: Disclaimer Of Warranties; Exclusion Of Liability
Samsung to service this Product. In addition, Samsung shall not be liable for any damages of any kind resulting from the purchase or use of the Product or arising from the breach of the express warranty, including incidental, special or consequential damages, or loss of anticipated profits or benefits.
-
Page 150: Samsung Knox
OS. Samsung Knox Samsung Knox is Samsung’s security platform and is a mark for a Samsung device tested for security with enterprise use in mind. Additional licensing fee may be required. For more information about Knox, please refer to: samsung.com/us/knox.
- Page 151
Legal information Manufactured under license from Dolby Laboratories. Dolby, Dolby Atmos, and the double-D symbol are trademarks of Dolby Laboratories. Some multimedia (audio/video) files contain Digital Rights Management (DRM) technology to verify you have the right to use the files. Preloaded apps on your device may not be compatible with DRM-protected files.
20.04.2020
Обновлено: 20.04.2020
Как открыть заднюю крышку телефона Samsung, если боишься сломать ненадежный с виду пластик? Необходимость во «вскрытии» Galaxy A50 у пользователей может возникнуть при попадании влаги внутрь телефона, в этом случае срочное просушивание разобранного устройства может спасти его от серьезных поломок.
Монтаж задней крышки смартфона Samsung

Специфика Galaxy A50 заключается в том, что у смартфона нельзя просто так разобрать. Сделано это из-за особенностей крепления аккумулятора: АКБ здесь не съемный, а приклеенный к платам. Чтобы пользователи не занимались самостоятельным ремонтом, корпус сделан условно неразборным.
Разборка смартфона возможна, но только с использованием специальных инструментов. Профессионалы, уже столкнувшиеся со спецификой модели, рекомендуют производить демонтаж части корпуса по следующему алгоритму:
- Для начала готовим необходимые инструменты – фен, присоску, тонкий пластиковый шпатель или карта, отвертки под маленькие винты.
- С помощью фена на маленькой температуре, чтобы не повредить голографические рисунки, начинаем нагревать заднюю стенку корпуса.
- Как только пластик достаточно прогреется, закрепляем на детали присоску.
- Слегка поддеваем шпателем или тонкой пластиковой картой зазор между деталями и тянем присоску.
Деталь снята, но внутрь телефона мы еще не попали. Периметр корпуса зафиксирован винтами, которые необходимо открутить и снять поочередно рамку, защитный экран, шлейфы и затем только – дисплейный модуль.

Если необходима замена АКБ, нужно осторожно, чтобы не повредить шлейфы, снять их, а затем переходить к разъемам материнской платы и сканера отпечатков. После установки нового аккумулятора или просушивания деталей следует приступить к обратной сборке Галакси.
Видео
Если вы новичок, и инструкция, как открыть заднюю крышку телефона Самсунг, не дала вам знаний тонкостей процесса демонтажа, посмотрите следующий видеоролик, в котором подробно и наглядно описан порядок действий:

Оценка статьи:
![]() Загрузка…
Загрузка…
