Персонализация обоев смартфона — это эффективный способ сделать домашний экран уникальным и непохожим на домашние экраны других пользователей. Конечно, есть очень красивые штатные заставки, миллиарды красивых фото в интернете и тысячи фотографий в самом телефоне, но именно видеообои производят ни на что не похожий эффект. Живые обои, которые перемещаются как GIF при нажатии и удерживании, делают работу с Android или iPhone еще более интересной. И да, вы правильно прочитали, что установка таких обоев возможна на любом смартфоне. Что удивительно, на iOS сделать это даже проще. Но я расскажу о процессе создания их на обеих платформах.
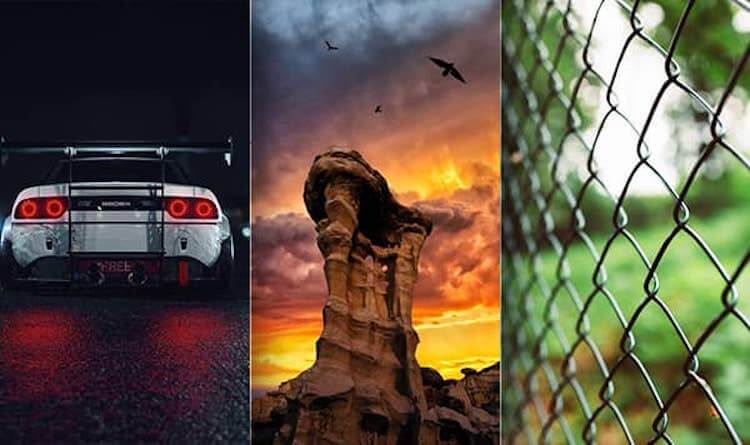
На заставку можно поставить не только статичные, но и анимированные обои.
Живые обои для телефона своими руками
Некоторые смартфоны поставляются со встроенными живыми обоями, но создание собственных живых обоев из любого имеющегося у вас видео занимает всего несколько минут. Подумайте, насколько интересно было бы каждый раз при включении телефона видеть водопад, который вы сняли в поездке, или капли воды, красиво падающие с крыши.
Звучит заманчиво? Тогда сейчас расскажу, как это сделать, и начну с описания процесса на Android. В этом случае надо будет скачать приложение, а на iOS все делается штатными средствами.
Лучшие приложения для дизайна интерьера на Android.
Как сделать живые обои на Android
Android не предлагает встроенных средств для создания живых обоев, но вы можете получить доступ к аналогичным функциям через сторонние приложения, доступные в Google Play. Поиском можно найти огромное количество таких приложений, но к наиболее известным относятся следующие:
- Live Wallpaper
- GIF Live Wallpaper
- Walloop’s Live
- Backgrounds 4k / 3D
Некоторые приложения не просто создают обои, но и автоматизируют процесс их установки, делая все за вас после того, как вы внесете необходимые настройки. Среди интересных приложений можно так же назвать Muzei Live Wallpaper, которое каждый день будет предлагать вам новые живые обои с хорошо известными произведениями искусства. А если вам больше по душе природа, то обратите внимание на Forest Live Wallpaper, предоставляющее вам живые обои на тему леса.
Лучшие приложения для Instagram.
Расскажу, как выглядит процесс автоматического создания живых обоев на примере приложения Video Live Wallpaper.
Для начала скачайте приложение из Google Play и запустите его, затем после нескольких приветственных сообщений с краткой инструкцией откройте галерею, нажав верхнее поле. Теперь выберите видео, которое хотите использовать в качестве живых обоев.
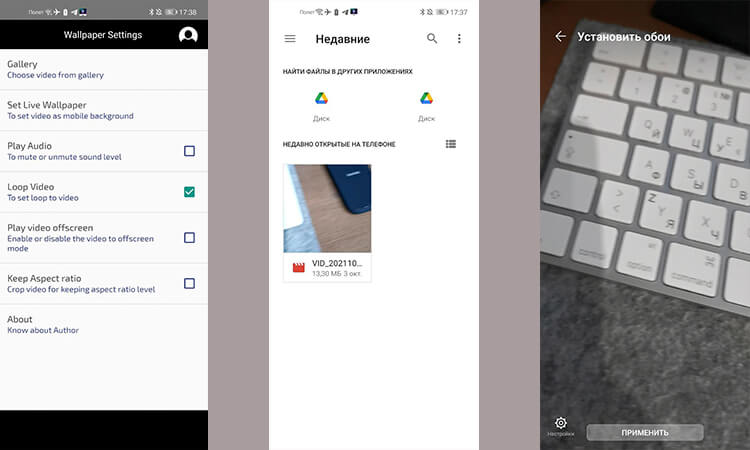
Все просто и понятно.
Желательно, чтобы видео было вертикальным, в противном случае оно может быть сильно обрезано или искажено. Дальше выберите настройки, которые вам нравятся для ваших живых обоев. Можно даже сделать так, чтобы они воспроизводились со звуком. Впрочем, это не самая хорошая идея. Зато вы можете зациклить видео, чтобы оно воспроизводилось без перерыва. И внести несколько других настроек. Все они будут перед вами.
После того, как все будет готово, нажмите кнопку установки обоев. Вот и все. Вы можете выбрать другое приложение, но часто они создаются на одной базе и мало чем будут отличаться друг от друга. Порой они даже имеют одинаковый интерфейс.
Как приложения в Google Play крадут у пользователей деньги.
Как сделать живые обои на iPhone
Если у вас iPhone 6S или новее, то для того, чтобы сделать живые обои, нет необходимости загружать отдельное приложение. Это связано с тем, что iPhone 6S и более поздние модели (за исключением iPhone SE первого поколения) позволяют делать живые фотографии, а также поддерживают 3D или Haptic Touch. Живые фотографии — это очень короткие фрагменты видео, которые записываются до и после вашей фотографии, чтобы сделать ее ”живой”. Однако такие фото могут служить живыми обоями.
Для iOS 13 и новее процесс настройки живых обоев выглядит следующим образом.
Сначала откройте настройки телефона и найдите пункт ”Обои”. Теперь нажмите ”Выбрать новые обои”. И прокрутите вниз до раздела ”Фото Live Photos”. В нем будут те фотографии, которые можно использовать для живых обоев.
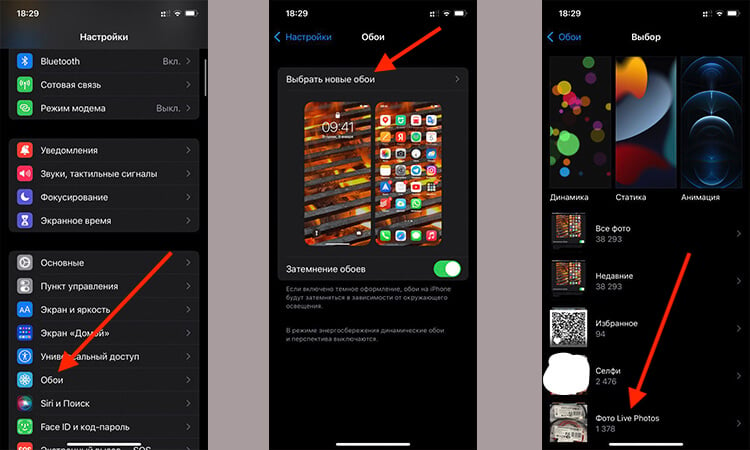
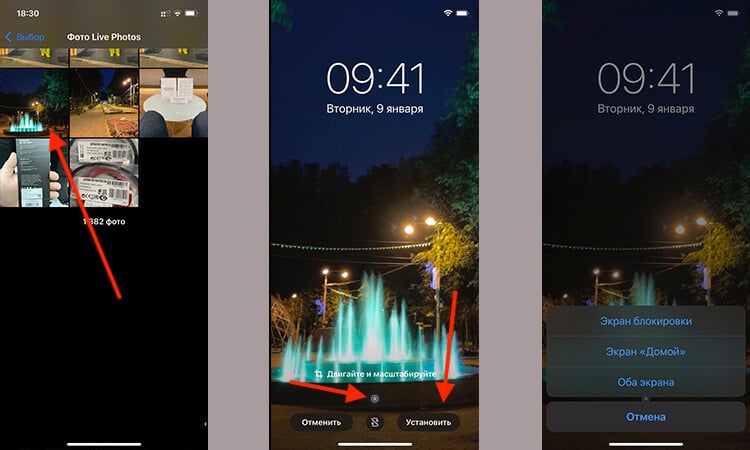
Только прежде, чем выбирать обои, убедитесь, что внизу стоит значок Live Photo. Если он перечеркнут, то фотография будет выбрана как обычная. Если фотография сделана в горизонтальной ориентации, ее можно подвинуть, чтобы на экран попадало то, что нужно.
Теперь останется только выбрать то место, где будут отображаться живые обои — экран блокировки или оба экрана. Как только вы это сделаете, у вас появятся живые обои, которые будут прокручиваться на экране блокировки, когда вы касаетесь экрана и удерживаете палец на нем.
Есть и другие способы установки живых фото. К ним относятся приложения, скачиваемые их AppStore. Они позволят вам сохранить GIF-анимацию, которую вы будете использовать в качестве живых обоев. Например, IntoLive — популярное приложение для iOS, которое может конвертировать ваши видео в Live Photos, как и Giphy.
Какой бы крутой ни была картинка-заставка на вашем смартфоне, она мало чем отличается от миллиарда (без преувеличения) других. Вернее, внешне она разнится, но это всё та же статичная «обоина», которая установлена у каждого первого — просто на ней другой рисунок. А вот видеозаставка на рабочем столе телефона — это довольно необычное (хоть и не новое) решение, которое сделает главный экран вашего устройства действительно выделяющимся. В этой статье я расскажу, как установить живые обои на заставку рабочего стола или экрана блокировки телефона — сделать это довольно просто.
Как установить видеообои на любом Android 5.0+
К сожалению, далеко не все смартфоны на Android поддерживают установку видео в качестве обоев без сторонних утилит. Но благодаря независимым разработчикам, эта проблема была решена. Я выбрал Video Live Wallpapers — это бесплатное приложение с открытым исходным кодом, которое совместимо практически со всеми современными устройствами (на Android 5.0 Lollipop и новее). Если эта не подходит, можно воспользоваться альтернативами, например Video Live Wallpaper. Эта утилита подойдёт обладателям устройств на более старых версиях Android, вплоть до 4.1.
- Запустите программу Video Live Wallpapers и кликните по самой верхней кнопке с надписью «Choose Video File».
- Выберите необходимое видео, предварительно сохранённое на устройстве. Оно должно быть доступно в галерее (а не находиться в какой-либо скрытой папке) — в ином случае, приложение может не найти его в памяти смартфона. Также, не стоит устанавливать видео в очень высоком разрешении, это приведёт к высокому энергопотреблению и медленной работе смартфона.
- Если видео вас устраивает, нажмите на кнопку «Установить обои» в левом верхнем углу, после чего выберите место установки: только на главный экран или на рабочий стол и экран блокировки.
- Закройте приложение. Если вы всё сделали правильно, видеозапись должна установиться вместо старых обоев.
Как установить видеозаставку на Samsung и Xiaomi
Некоторые производители внедряют в оболочки своих смартфонов и планшетов стандартное средство для установки видео вместо «обоины» экрана блокировки. Расположение этой функции практически одно и то же во всех пользовательских интерфейсах — в галерее или настройках. В качестве примера, я покажу процесс установки видео на экран блокировки смартфона Samsung с оболочкой One UI. Также эта инструкция актуальна и для устройств от Xiaomi.
- Откройте галерею и отыщите нужную видеозапись, после чего кликните по значку с тремя точками и выберите «Установить как обои».
- Если ролик длиннее 15 секунд, обрежьте его в меню «Изменить». Если же он подходит, нажмите на кнопку «Установить как обои экрана блокировки».
Как установить живое фото в качестве обоев на iPhone
Из-за ограничений мобильной операционной системы от Apple, установить стандартное видео вместо обоев нельзя. Но есть лазейка: короткий ролик можно переконвертировать в живое фото (Live Photo) — изображение, которое начнёт двигаться при длительном нажатии на дисплей. Для конвертации видео в живое фото воспользуемся бесплатной программой intoLive (вместо неё можно выбрать любое аналогичное приложение).
- Запустите программу intoLive и выберите видео.
- Если необходимо, укажите нужный промежуток ролика с помощью красных ползунков на временной шкале. Если есть желание, можете применить фильтр, добавить фон, изменить скорость воспроизведения или отредактировать видео иными способами с помощью соответствующих кнопок.
- Нажмите на кнопку «Сделать» в правом верхнем углу и выберите нужное число повторений. В бесплатной версии intoLive можно указать только 0 повторений — этого достаточно в большинстве случаев.
- Дождитесь завершения конвертации и нажмите на кнопку «Сохранить живые фото».
- Откройте настройки операционной системы и перейдите в раздел «Обои», после чего выберите живое фото из альбома «Фото Live Photos».
- Нажмите на кнопку «Установить».
Независимо от того, какие обои вы задумали сделать, существуют 2 различных подхода к реализации ваших задумок: SGL (в дальнейшем Canvas) и OpenGL. Когда я создавал свои первые обои у меня ушло несколько дней, чтобы попробовать различные средства и методы, поэтому эта статья сэкономит вам немного времени и быстро введет вас в курс дел.
Canvas
Если работает для вас — даже и не думайте об OpenGL
Что же такое Canvas? Это главный способ рисования GUI в андроид. Все формы, кнопочки и переключатели отрисовываются с помощью данной технологии. Нам дается Bitmap определенного размера (1024х600 например), на котором мы должны рисовать. Рисовать мы можем с использованием класса Canvas, который имеет богатое высокоуровневое АПИ для рисования. Скажем, нарисовать окружность заданной толщины определенного цвета с включенным сглаживанием не составляет никакой сложности. Есть даже поддержка шейдеров.
Но зачем тогда спрашивается OpenGL?
Недостатки Canvas:
- низкая скорость. Вся работа с графикой производится без аппаратного ускорения (есть исключение). То есть ваш Bitmap вы будите заполнять усилиями центрального процессора, с чем он отлично справляется, если Bitmap умеренного размера. Скорость рисования пропорциональна площади и сильно замедляется при ее увеличении.
- никакого 3d и наворотов. Канва не поддерживает 3d, свойства материалов, расстановку и настройку источников света и др. Если вам нужно, что-то из этого списка, то придется эмулировать это самим, что еще больше замедлит и без того низкую скорость отрисовки.
Преимужества Canvas:
- простота интеграции в приложение. Рисование с помощью Canvas доступно вам сразу. Не надо создавать специальных поверхностей на которую будет выводится изображение созданное с помощью OpenGL. Не надо создавать поток, в котором работает OpenGL и синхронизировать его с вашим сервисом обоев (очень нетривиальная задача).
- простое высокоуровневое АПИ. У канвы есть готовая функция рисования почти на все случаи жизни. Требуется 5 минут, чтобы прочитать документацию на класс и начать успешно использовать его.
К канве мы еще вернемся, теперь поговорим об альтернативном подходе.
OpenGL
Если Canvas не справляется, то больше ничего не остается.
OpenGL, DirectX — все мы слышали эти «крутые» слова. На Андроид у нас доступен OpenGL, но не простой (не такой как на десктопе), а урезанный. Причем у нас даже есть выбор: OpenGL ES 1.0/1.1 (работает везде) или OpenGL ES 2.0 (Android 2.2+). Что такое ES в названии? ES говорит нам о том, что это урезанная версия OpenGL, из которой убрали все лишнее, чтобы сделать АПИ как можно более компактнее и не тащить за собой на мобильные устройства вещи, которые легко эмулировать на центральном процессоре. То есть не все примеры из книжек по обычному OpenGL у вас заработают, но в принципе осталось все также.
Как было замечено версий у нас две: 1.0/1.1 и 2.0. Почитать об их отличиях можно в википедии (выбрать английский язык). Причем не все устройства одинаково поддерживают все расширения OpenGL ES, перед тем как использовать некоторые, нужно убедится, что это поддреживается (почитать можно тут).
Недостатки OpenGL:
- тяжело интегрировать в приложение. Чтобы выводить графику на экран устройства с помощью OpenGL необходимо создать специальную поверхность и специальный поток, который будет на этой поверхности рисовать. Необходимо также позаботиться о синхронизации системы и потока.
- сложное низкоуровневое АПИ. У нас нет функции нарисовать квадрат, нет функции вывести картинку. Зато есть куча флагов и режимов рисования. Если механизмы задания вершин полигонов, матриц преобразования координат, функции загрузки текстур и средства управления наложением… В общем все очень запутано, если вы раньше никогда не имели дело с OpenGL. На освоение уйдет несколько дней.
Преимущества OpenGL:
- высокая скорость работы. Никогда ваше приложение с использованием Canvas не будет работать быстрее и плавнее чем с использованием OpenGL (при наличии прямых рук конечно же).
- поддержка 3d и наворотов. Трехмерные гонки или стрелялки? Все это возможно с использованием OpenGL. Создавайте источники света, управляйте камерой, создайте реалистичный эффект водной поверхности, используйте материалы и др.
И что же делать?
OpenGL. Делаем проще.
Когда тяжело в одиночку — просим помощи.
Понятно, что мы далеко не первые, кто решил использовать OpenGL и все мы уже играли в красивые игрушки, перерезали веревки и спасали сворованные яйца. Редко когда игра пишется абсолютно с нуля, обычно используются движки, которые берут на себя все скучные занятия и предлагают нам более простое АПИ для реализации наших фантазий. И оказываться, применительно к живым обоям, вариантов сделать проще у нас 2…
GLSurfaceView adapted for 3D Live Wallpapers
Так называется статья Роберта Грина, где он рассказывает о созданных им классах (основной из которых GLWallpaperService), которые выполняют всю работу по настройке за нас. Нам же остается писать код, который рисует. Скачав с github файлы проекта (проект живой и недавно обновлялся), вы получите готовые обои, которые правда ничего не делают красивого (просто заливают весь фон цветом), но они уже работают. Вам остается только написать требуемый код для рисования. Об интерфейсе взаимодействия с системой и базовой настройке OpenGL уже позаботились. У Роберта используется OpenGL 1.0/1.1, но перейти на 2.0 не представляет никакой сложности. Стоит так же заметить, что никаких дополнительных средств для рисования не предоставляется, рисовать придется все тем же OpenGL ES АПИ.
AndEngine
AndEngine это настоящий 2d движок для создания игр. Движок поддерживает несколько расширений, среди которых и physicsbox2d для создания физики. Сам движок довольно популярный с открытым кодом (Java). Все средства движка можно использовать для создания обоев. Есть много примеров, которые являются единственной «документацией» движка. Если надо что-то сделать — вспоминаем в каком примере мы это видели и смотрим как это там реализовано. Так же есть форум, где можно попросить помощи (форум активный, быстро помогают).
Теперь о плохом.
Версии у движка 2. Первая (GLES1) использует OpenGL ES 1.0/1.1, вторая (GLES2) — ES 2.0. АПИ в GLES2 намного продвинулось вперед, поэтому лучше использовать GLES2, но мы тогда теряем пользователей Андроида версии 2.1 (GLES2 на нем не работает, a живые обои замечательно работают). Мне удалось запустить обои используя обе версии AndEngine. Но в GLES1 сразу же столкнулся с невозможностью изменить настройки камеры при изменении ориентации экрана (приходится изменять масштаб сцены по одной из осей, в GLES2 АПИ это позволяет).
Движок создан для 2d игр, поэтому никакого АПИ для поддержки 3d не предоставляется (никто не запрещает использовать OpenGL напрямую). Так же отсутствуют казалось бы такие нужные функции как рисование окружности и даже треугольника. Движок больше ориентирован на спрайты. Добавить функцию рисования той же окружности, так чтобы она вписывалась в систему классов движка довольно тяжело — никакой документации нет. Поэтому придется перелопатить много кода и разбираться что к чему.
Заключение.
Начнем делать выводы с того, что я приведу пример: один кадр созданных мной обоев с помощью Canvas рисуется за 17мс на Kindle Fire (6 из которых «лочится» и «анлочится» канва). Это много, для заполнения фона текстурой 16х16px, вывода изображения 350х180px и отрисовки 4х окружностей различной толщины и радиуса. При использовании OpenGL это делается на порядок быстрее. О хорошем: код отрисовки я написал за час с небольшим, 17мс немного — анимация плавная.
В остатке.
Используйте канву, если вам не важно 3d, если ваша анимация не очень сложна и не требует больших вычислительных ресурсов.
Используйте AndEngine, если вы делаете 2d обои. Изучив примеры и почитав форум, вы быстро приступите к созданию вашей анимации, а дополнительные расширения движка позволят вам с легкостью внедрить в вашу анимацию эффектные решения (физика, система частиц и др.)
Используйте GLWallpaperService Роберта Грина. Если вы хорошо владеете OpenGL и делаете 3d обои, он позволит вам, не отвлекаясь на рутину, быстро приступись к кодированию вашей анимации.
Вы также можете адаптировать многие ваши любимые графические OpenGL движки для создания живых обоев. Используя код GLWallpaperService и/или AndEngine в качестве примера.
Download Article
An easy guide to adding custom animated wallpapers to your Android’s home screen
Download Article
We all like to have beautiful home screen backgrounds on our Android devices. Live wallpapers are fun, since objects are most often moving on the screen, and sometimes, you can even interact with the objects. There are many live wallpapers available in the Play Store, but if you want a more personal touch to it, just create your own live wallpaper! Kustom Live Wallpaper (KLWP) is a powerful app that lets you create your own custom live wallpapers. This wikiHow teaches you the basics of how to create a custom wallpaper using the free version of KLWP.
-

1
Download and Install Kustom Live Wallpaper. KLWP is available from the Google Play Store. It has a red app icon with a «K» in the middle. Use the following steps to download and install Kustom Live Wallpaper:
- Open the Google Play Store.
- Type «KLWP» in the search bar at the top.
- Tap KLWP Live Wallpaper Maker in the search result.
- Tap Install below the KWLP Live Wallpaper Maker banner.
-

2
Open KLWP. Tap the KLWP icon on your home screen or apps drawer to open. You can also tap Open in the Google Play Store once it finished downloading.
Advertisement
-

3
Tap ☰. It’s the icon with three horizontal lines in the upper-left corner. This displays the menu.
-

4
Tap Load Preset. This displays the Presets menu. Here you can load a custom live wallpaper or start a new one.
-

5
Tap the icon that resembles a sheet of paper. It’s in the upper-right corner. This loads a brand new custom wallpaper preset.
- Alternatively, you can load one of the installed pre-installed presets or one of the featured ones. You can edit them and/or reverse engineer them to see how they are made in KLWP.
-

6
Tap the icon that resembles a monitor. It’s in the upper-right corner below the plus (+) sign. This allows you to add new screens to your custom wallpaper.
-

7
Swipe up or down below «X» and «Y» to add more screen. This adds more horizontal and vertical screens. The X-axis adds horizontal (side-to-side) screens. The Y-axis adds vertical (up and down) screens.
Advertisement
-

1
Tap Background. It’s the second tab at the bottom of the screen. This displays background options.
-

2
Tap Type to select an image type. This displays the two types of background types you can select
-

3
Tap Image. This allows you to pick an image to use as a background.
- Alternatively, you can tap Solid to use a solid color as a background. If you select a solid color background, tap Color to select a color. Use the color array to the right to select the color hue. Then tap the color you want. You can also select the opacity (see-through) at the bottom. Tap the checkmark icon in the upper-right corner to select a color.
-

4
Pick an image to use. To pick an image to use as a background, tap Pick Image Then tap an image you want to use as a background.
-

5
Select how the image scrolls. Tap Scroll to select how the image scrolls. None disables image scrolling. Normal scrolls the image when you swipe from one screen to the next. Invert scrolls the image in the opposite direction when you swipe from one image to the left.
-

6
Tap Items It’s the first tab at the bottom of the screen. This takes you back to the main screen that allows you to add items.
Advertisement
-

1
Tap +. It’s in the upper-right corner. This displays a menu that allows you to add objects to your custom wallpaper.
-

2
Tap an object you want to add. There are a variety of objects you can add to your custom wallpaper. When you tap an item, it will get added to the «Items» menu. Some of the objects are as follows:
- Komponents: This contains a variety of pre-made components you can add to your custom wallpaper. These include digital and analog clocks, weather widgets, news feeds, and more.
- Text: This allows you to add text to your wallpaper. Once the text is added, you can use formulas to create a variable text (i.g. time and date, battery life, Wi-Fi signal, etc), as well as change the text size, font, color, and more. You can also add animations and touch responses to text objects.
- Shape: This allows you to add solid shapes to your custom wallpaper. This can include , squares, rectangles, circles, ovals, triangles, arcs, a hexagon, and other shapes. To can change the size and color of these objects, as well as add animations and touch responses to them.
- Image: This creates an object that holds a static image.
- Fonticon: This allows you to add different icons to your wallpaper. This can include stars, arrows, music notes, film strips, weather icons, and more. These are useful for creating buttons on your live wallpaper.
- Progress: This creates a progress bar that you can add to your wallpaper. The progress bar can be set to represent battery life, hours, minutes, music volume, or playtime.
- Morphing Text: This is similar to regular text, but it has a few more options, like being able to make arcing text, text that flips, and more. This is designed for single lines of text.
- Stack Group: This allows you to create a group of objects that are stacked horizontally or vertically.
- Overlap Group: This allows you to create a group of objects that can be transformed.
- Animated Image: This allows you to create an object that contains a GIF animated object.
-

3
Tap the object you want to edit. When you add an object to your wallpaper, it will be listed under the «Items» tab on the root screen. Tap the object you want to edit to see how it can be edited.
-

4
Tap the different menu tabs to access the different menus. There’s a variety of menus you can use to adjust an object. The tabs are as follows:
- Object tab: This tab has the same name as the object (i.e. Text, Shape, Fonticon, etc»). This contains menu options that are specific to that object type. For example, Text contains the ability to change the text, font, and size. The Shape menu allows you to pick what shape you want and adjust the size. Fonticon allows you to pick an icon to use as a button.
- Paint: This allows you to change the color of the object. To change the color of the object, tap Color in the Paint menu and then use the array bar to the right to pick a color hue. Then tap the color you want to use. You can also adjust the opacity of the color. Tap the checkmark icon in the upper-right corner to select the color.
-

5
FX: This allows you to add visual effects to an icon. You can add a color gradient, image background, or even mask the object against another object.
- Position: This allows you to adjust the screen position. “X Offset” changes the horizontal position of an object. “Y Offset” changes the vertical position of an object.
- ’’’Animation:’’’ This allows you to animate an object.
- ’’’Touch:’’’ This allows you to make an object interactive by adding a response when the object is tapped.
-

6
Use the menus to adjust the object. Use the menus under each tab to adjust the object. Some menus may have functions that are specific to the object type.
-

7
Return to the root folder to exit the object menus. To return to the root folder, tap the icon that resembles a folder in the upper-left corner. This returns to the root folder, where you can select and edit the different objects in the wallpaper.
-

8
Change the name of an object. Creating unique names for each object will help keep them more organized. To change the name of an object, tap the checkbox next to an object in the «Items» menu. Then tap the pencil icon in the upper-right corner to change the name of it. Type the new name and tap Ok.
-

9
Delete an unwanted object. To delete an unwanted object, tap the checkbox next to the object in the «Items» menu. Then tap the icon that resembles a trashcan in the upper-right corner.
-

10
Duplicate an item. If you want to create two of the same items, tap the checkbox next to the item in the «Items» menu. Then tap the icon that resembles a stack of papers in the upper-right corner.
Advertisement
-

1
Tap +. It’s in the upper-right corner. This displays a menu that allows you to add objects to your custom wallpaper.
-

2
Tap Text or Morphing Text. «Text» allows you to add text items to the wallpaper. «Morphing Text» allows you to add single-line text objects that have more options curving, flipping, and rotating.
-

3
Tap the Text tab. It’s the first tab at the bottom of the screen. This displays the text options.
-

4
Edit the text. To edit the text tap Text. Then use the text in the «Formula Editor» box to edit the text. To create variable text, tap one of the examples at the bottom to add formulas to the text. Formulas include things like the Date and Time, Battery usage, Wi-Fi and cellular signal, and more.
-

5
Select the font. To select a font, tap Font and then tap the font you want to use for the text. Each font gives a preview of how it looks.
-

6
Change the text size. To change the size of the text, tap the plus (+) or minus (-) signs next to «Size» to adjust the size by single increments. Tap the double-arrows pointing left and right to adjust the size in increments of 5. You can also tap the size number in the middle and input your own size.
-

7
Add a filter to text. Filters include options like Uppercase, Lowercase, Numbers to Words, Numbers to Roman Numerals, and more. To add filters, tap Filters and then checkbox next to the options you want to use.
-

8
Adjust the angle of the text. Text Morphing allows you to adjust the angle to the text. This makes the text wrap around in a circle or ark. Use the plus and minus buttons or double-arrow buttons next to «Angle» to adjust the curve of the text.
-

9
Adjust the text spacing. Spacing adjusts how wide the text is. Use the plus, minus, or double-arrow buttons next to «Spacing» to adjust the width of the text.
-

10
Select the rotation of the text. Text Morphing allows you to rotate the text. To rotate the text, tap Rotation and then tap the option for how you want to rotate the text. You can flip the text, rotate it 90, 180, or 270 degrees. You can even make the text point in the direction of the hour and minute hand of a clock.
-

11
Skew the text. Skewing the text makes the letters lean to the left of right. Use the plus, minus, or double arrow buttons next to «Skew» to adjust the skew angle of the text.
-

12
Tap Paint. It’s the second tab at the top of the page. This lets you pick the color of the text.
-

13
Select the text style. The two text styles available are solid or stroke. Solid text just uses solid color letters. Stroke creates a thin outline around the letters of the text.
- Try this. Duplicate the text object and then stack them on top of each other. Give the bottom one a solid color and the top one a different stroke color.
-

14
Tap the colored square. It’s to the right of “Color.” This allows you to pick a color for the text. Use the color array to the right to select the color hue. Then tap the color you want to use. You can even use the opacity bar below to adjust the opacity of a color. Tap the checkmark icon in the upper-right corner to select a color.
-

15
Tap FX. This allows you to add stylish effects to texts and objects.
-

16
Tap Mask. If the text is placed on another object, such as a shape, it will mask the background image below it. This reveals the background below the object in the shape of the text. You can select the background or blurred background as the mask mode.
-

17
Select a texture. To select a texture, tap ‘’’Texture’’’ and then tap one of the options. There are a variety of color gradient styles you can use as a texture. You can also tap ‘’’Bitmap’’’ to select an image to use as the texture.
-

18
Tap Position. This allows you to adjust the position of an object on the screen.
-

19
Adjust the position. To adjust the position, tap the plus, minus, or double-arrow icons to adjust the X Offset or Y Offset of the text or object. The Y Offset adjusts the vertical position of the text or object. The X Offset adjusts the horizontal position of the object.
Advertisement
-

1
Tap an object in the «Items» menu. This opens the editing options for that object.
-

2
Tap Animation. It’s the second to last tab in the object editing menu.
-

3
Tap +. This adds a new disabled animation to the list of animations.
-

4
Tap Disabled twice. The first time you tap it, it will turn form Disabled to «ReactOn» Then tap Disabled again to display a list of things the animation will react on.
-

5
Tap an action for the animation to react on. Options include Bg Scroll (background scroll), Gyroscope (phone rotation), Music Visualizer, Global Switch, Unlock, Lock, and Formula.
-

6
Select an action. This is the animation that will occur. Actions include, scroll, scale in, scale out, rotate, fade in, fade out, color filter in, color filter out, and more.
-

7
Adjust the animation. Use the other menu items to adjust the animation. Each animated action will have different menu items. Some common adjustments include the following:
- Rule: This helps you align the object along the center of the screen, or off to the side of the center line.
- Center: This allows you to pick which screen the object is centered on.
- Speed: This allows you to adjust how fast the animation happens. You can also use this to adjust how much an object moves when you scroll through different screens. The more screens your wallpaper has, the faster it will need to move to completely leave the screen.
- Amount: This adjusts how much an object fades in or out.
- Limit: This limits how much an object moves during an action.
- Angle: This adjust the angle at which an object moves.
-

8
Tap the Touch tab. This allows you to add a touch response to an object.
-

9
Tap +. This displays a new blank touch response.
-

10
Tap None. It’s next to the mouse icon at the bottom. This displays a list of touch responses.
-

11
Touch an action. Touch actions include Launch App, Launch Shortcut, Launch Activity, Music Controls, Toggle Global Switch, Open Link, Change Volume, and Kustom Action.
-

12
Select the action information. This will vary depending on the action. If you want it to open a link, you will need to tap URL and provide a link. If you want it to open an app, you will need to tap App and then select which app you want it to open. If you want to act as a music control button, you will need to select which music control (i.e. Play/Pause, Next, Back, etc).
Advertisement
-

1
Tap ☰. It’s the icon with three horizontal lines in the upper-left corner. This displays the menu.
-

2
Tap Export Preset. This allows you to export the wallpaper as a custom wallpaper.
-

3
Enter the information about your wallpaper. You will need to give it a name. Optionally, you can also add a description and add your name as the author.
-

4
Tap Export. It’s in the upper-right corner. This exports and saves the custom wallpaper.
-

5
Tap the icon that resembles disk. It’s the icon with a notched corner and a circle in the middle. It’s in the upper-right corner. This sets your wallpaper.
- If you see an alert that says «Missing Requirements» tap fix to set Kustom as your live wallpaper.
- If your phone is not able to apply your custom wallpaper, download an app called Nova Launcher. It acts as an alternate home screen that can run KLWP presets.
-
6
Tap Set Wallpaper. This sets your wallpaper.
Advertisement

Ask a Question
200 characters left
Include your email address to get a message when this question is answered.
Submit
Advertisement
Thanks for submitting a tip for review!
About This Article
Article SummaryX
1. Download and Open Kustom Live Wallpaper (KLWP).
2. Tap the Background tab at the bottom.
3. Tap Pick Image to select a background image.
4. Tap the plus (+) sign in the upper-right corner to select an object.
5. Tap an object to add to the live wallpaper.
6. Use the menu items at the bottom to adjust the object.
7 Tap the floppy disk icon at the top to apply the live wallpaper.
8. Tap Set Wallpaper.
Did this summary help you?
Thanks to all authors for creating a page that has been read 93,012 times.
Is this article up to date?
Download Article
An easy guide to adding custom animated wallpapers to your Android’s home screen
Download Article
We all like to have beautiful home screen backgrounds on our Android devices. Live wallpapers are fun, since objects are most often moving on the screen, and sometimes, you can even interact with the objects. There are many live wallpapers available in the Play Store, but if you want a more personal touch to it, just create your own live wallpaper! Kustom Live Wallpaper (KLWP) is a powerful app that lets you create your own custom live wallpapers. This wikiHow teaches you the basics of how to create a custom wallpaper using the free version of KLWP.
-

1
Download and Install Kustom Live Wallpaper. KLWP is available from the Google Play Store. It has a red app icon with a «K» in the middle. Use the following steps to download and install Kustom Live Wallpaper:
- Open the Google Play Store.
- Type «KLWP» in the search bar at the top.
- Tap KLWP Live Wallpaper Maker in the search result.
- Tap Install below the KWLP Live Wallpaper Maker banner.
-

2
Open KLWP. Tap the KLWP icon on your home screen or apps drawer to open. You can also tap Open in the Google Play Store once it finished downloading.
Advertisement
-

3
Tap ☰. It’s the icon with three horizontal lines in the upper-left corner. This displays the menu.
-

4
Tap Load Preset. This displays the Presets menu. Here you can load a custom live wallpaper or start a new one.
-

5
Tap the icon that resembles a sheet of paper. It’s in the upper-right corner. This loads a brand new custom wallpaper preset.
- Alternatively, you can load one of the installed pre-installed presets or one of the featured ones. You can edit them and/or reverse engineer them to see how they are made in KLWP.
-

6
Tap the icon that resembles a monitor. It’s in the upper-right corner below the plus (+) sign. This allows you to add new screens to your custom wallpaper.
-

7
Swipe up or down below «X» and «Y» to add more screen. This adds more horizontal and vertical screens. The X-axis adds horizontal (side-to-side) screens. The Y-axis adds vertical (up and down) screens.
Advertisement
-

1
Tap Background. It’s the second tab at the bottom of the screen. This displays background options.
-

2
Tap Type to select an image type. This displays the two types of background types you can select
-

3
Tap Image. This allows you to pick an image to use as a background.
- Alternatively, you can tap Solid to use a solid color as a background. If you select a solid color background, tap Color to select a color. Use the color array to the right to select the color hue. Then tap the color you want. You can also select the opacity (see-through) at the bottom. Tap the checkmark icon in the upper-right corner to select a color.
-

4
Pick an image to use. To pick an image to use as a background, tap Pick Image Then tap an image you want to use as a background.
-

5
Select how the image scrolls. Tap Scroll to select how the image scrolls. None disables image scrolling. Normal scrolls the image when you swipe from one screen to the next. Invert scrolls the image in the opposite direction when you swipe from one image to the left.
-

6
Tap Items It’s the first tab at the bottom of the screen. This takes you back to the main screen that allows you to add items.
Advertisement
-

1
Tap +. It’s in the upper-right corner. This displays a menu that allows you to add objects to your custom wallpaper.
-

2
Tap an object you want to add. There are a variety of objects you can add to your custom wallpaper. When you tap an item, it will get added to the «Items» menu. Some of the objects are as follows:
- Komponents: This contains a variety of pre-made components you can add to your custom wallpaper. These include digital and analog clocks, weather widgets, news feeds, and more.
- Text: This allows you to add text to your wallpaper. Once the text is added, you can use formulas to create a variable text (i.g. time and date, battery life, Wi-Fi signal, etc), as well as change the text size, font, color, and more. You can also add animations and touch responses to text objects.
- Shape: This allows you to add solid shapes to your custom wallpaper. This can include , squares, rectangles, circles, ovals, triangles, arcs, a hexagon, and other shapes. To can change the size and color of these objects, as well as add animations and touch responses to them.
- Image: This creates an object that holds a static image.
- Fonticon: This allows you to add different icons to your wallpaper. This can include stars, arrows, music notes, film strips, weather icons, and more. These are useful for creating buttons on your live wallpaper.
- Progress: This creates a progress bar that you can add to your wallpaper. The progress bar can be set to represent battery life, hours, minutes, music volume, or playtime.
- Morphing Text: This is similar to regular text, but it has a few more options, like being able to make arcing text, text that flips, and more. This is designed for single lines of text.
- Stack Group: This allows you to create a group of objects that are stacked horizontally or vertically.
- Overlap Group: This allows you to create a group of objects that can be transformed.
- Animated Image: This allows you to create an object that contains a GIF animated object.
-

3
Tap the object you want to edit. When you add an object to your wallpaper, it will be listed under the «Items» tab on the root screen. Tap the object you want to edit to see how it can be edited.
-

4
Tap the different menu tabs to access the different menus. There’s a variety of menus you can use to adjust an object. The tabs are as follows:
- Object tab: This tab has the same name as the object (i.e. Text, Shape, Fonticon, etc»). This contains menu options that are specific to that object type. For example, Text contains the ability to change the text, font, and size. The Shape menu allows you to pick what shape you want and adjust the size. Fonticon allows you to pick an icon to use as a button.
- Paint: This allows you to change the color of the object. To change the color of the object, tap Color in the Paint menu and then use the array bar to the right to pick a color hue. Then tap the color you want to use. You can also adjust the opacity of the color. Tap the checkmark icon in the upper-right corner to select the color.
-

5
FX: This allows you to add visual effects to an icon. You can add a color gradient, image background, or even mask the object against another object.
- Position: This allows you to adjust the screen position. “X Offset” changes the horizontal position of an object. “Y Offset” changes the vertical position of an object.
- ’’’Animation:’’’ This allows you to animate an object.
- ’’’Touch:’’’ This allows you to make an object interactive by adding a response when the object is tapped.
-

6
Use the menus to adjust the object. Use the menus under each tab to adjust the object. Some menus may have functions that are specific to the object type.
-

7
Return to the root folder to exit the object menus. To return to the root folder, tap the icon that resembles a folder in the upper-left corner. This returns to the root folder, where you can select and edit the different objects in the wallpaper.
-

8
Change the name of an object. Creating unique names for each object will help keep them more organized. To change the name of an object, tap the checkbox next to an object in the «Items» menu. Then tap the pencil icon in the upper-right corner to change the name of it. Type the new name and tap Ok.
-

9
Delete an unwanted object. To delete an unwanted object, tap the checkbox next to the object in the «Items» menu. Then tap the icon that resembles a trashcan in the upper-right corner.
-

10
Duplicate an item. If you want to create two of the same items, tap the checkbox next to the item in the «Items» menu. Then tap the icon that resembles a stack of papers in the upper-right corner.
Advertisement
-

1
Tap +. It’s in the upper-right corner. This displays a menu that allows you to add objects to your custom wallpaper.
-

2
Tap Text or Morphing Text. «Text» allows you to add text items to the wallpaper. «Morphing Text» allows you to add single-line text objects that have more options curving, flipping, and rotating.
-

3
Tap the Text tab. It’s the first tab at the bottom of the screen. This displays the text options.
-

4
Edit the text. To edit the text tap Text. Then use the text in the «Formula Editor» box to edit the text. To create variable text, tap one of the examples at the bottom to add formulas to the text. Formulas include things like the Date and Time, Battery usage, Wi-Fi and cellular signal, and more.
-

5
Select the font. To select a font, tap Font and then tap the font you want to use for the text. Each font gives a preview of how it looks.
-

6
Change the text size. To change the size of the text, tap the plus (+) or minus (-) signs next to «Size» to adjust the size by single increments. Tap the double-arrows pointing left and right to adjust the size in increments of 5. You can also tap the size number in the middle and input your own size.
-

7
Add a filter to text. Filters include options like Uppercase, Lowercase, Numbers to Words, Numbers to Roman Numerals, and more. To add filters, tap Filters and then checkbox next to the options you want to use.
-

8
Adjust the angle of the text. Text Morphing allows you to adjust the angle to the text. This makes the text wrap around in a circle or ark. Use the plus and minus buttons or double-arrow buttons next to «Angle» to adjust the curve of the text.
-

9
Adjust the text spacing. Spacing adjusts how wide the text is. Use the plus, minus, or double-arrow buttons next to «Spacing» to adjust the width of the text.
-

10
Select the rotation of the text. Text Morphing allows you to rotate the text. To rotate the text, tap Rotation and then tap the option for how you want to rotate the text. You can flip the text, rotate it 90, 180, or 270 degrees. You can even make the text point in the direction of the hour and minute hand of a clock.
-

11
Skew the text. Skewing the text makes the letters lean to the left of right. Use the plus, minus, or double arrow buttons next to «Skew» to adjust the skew angle of the text.
-

12
Tap Paint. It’s the second tab at the top of the page. This lets you pick the color of the text.
-

13
Select the text style. The two text styles available are solid or stroke. Solid text just uses solid color letters. Stroke creates a thin outline around the letters of the text.
- Try this. Duplicate the text object and then stack them on top of each other. Give the bottom one a solid color and the top one a different stroke color.
-

14
Tap the colored square. It’s to the right of “Color.” This allows you to pick a color for the text. Use the color array to the right to select the color hue. Then tap the color you want to use. You can even use the opacity bar below to adjust the opacity of a color. Tap the checkmark icon in the upper-right corner to select a color.
-

15
Tap FX. This allows you to add stylish effects to texts and objects.
-

16
Tap Mask. If the text is placed on another object, such as a shape, it will mask the background image below it. This reveals the background below the object in the shape of the text. You can select the background or blurred background as the mask mode.
-

17
Select a texture. To select a texture, tap ‘’’Texture’’’ and then tap one of the options. There are a variety of color gradient styles you can use as a texture. You can also tap ‘’’Bitmap’’’ to select an image to use as the texture.
-

18
Tap Position. This allows you to adjust the position of an object on the screen.
-

19
Adjust the position. To adjust the position, tap the plus, minus, or double-arrow icons to adjust the X Offset or Y Offset of the text or object. The Y Offset adjusts the vertical position of the text or object. The X Offset adjusts the horizontal position of the object.
Advertisement
-

1
Tap an object in the «Items» menu. This opens the editing options for that object.
-

2
Tap Animation. It’s the second to last tab in the object editing menu.
-

3
Tap +. This adds a new disabled animation to the list of animations.
-

4
Tap Disabled twice. The first time you tap it, it will turn form Disabled to «ReactOn» Then tap Disabled again to display a list of things the animation will react on.
-

5
Tap an action for the animation to react on. Options include Bg Scroll (background scroll), Gyroscope (phone rotation), Music Visualizer, Global Switch, Unlock, Lock, and Formula.
-

6
Select an action. This is the animation that will occur. Actions include, scroll, scale in, scale out, rotate, fade in, fade out, color filter in, color filter out, and more.
-

7
Adjust the animation. Use the other menu items to adjust the animation. Each animated action will have different menu items. Some common adjustments include the following:
- Rule: This helps you align the object along the center of the screen, or off to the side of the center line.
- Center: This allows you to pick which screen the object is centered on.
- Speed: This allows you to adjust how fast the animation happens. You can also use this to adjust how much an object moves when you scroll through different screens. The more screens your wallpaper has, the faster it will need to move to completely leave the screen.
- Amount: This adjusts how much an object fades in or out.
- Limit: This limits how much an object moves during an action.
- Angle: This adjust the angle at which an object moves.
-

8
Tap the Touch tab. This allows you to add a touch response to an object.
-

9
Tap +. This displays a new blank touch response.
-

10
Tap None. It’s next to the mouse icon at the bottom. This displays a list of touch responses.
-

11
Touch an action. Touch actions include Launch App, Launch Shortcut, Launch Activity, Music Controls, Toggle Global Switch, Open Link, Change Volume, and Kustom Action.
-

12
Select the action information. This will vary depending on the action. If you want it to open a link, you will need to tap URL and provide a link. If you want it to open an app, you will need to tap App and then select which app you want it to open. If you want to act as a music control button, you will need to select which music control (i.e. Play/Pause, Next, Back, etc).
Advertisement
-

1
Tap ☰. It’s the icon with three horizontal lines in the upper-left corner. This displays the menu.
-

2
Tap Export Preset. This allows you to export the wallpaper as a custom wallpaper.
-

3
Enter the information about your wallpaper. You will need to give it a name. Optionally, you can also add a description and add your name as the author.
-

4
Tap Export. It’s in the upper-right corner. This exports and saves the custom wallpaper.
-

5
Tap the icon that resembles disk. It’s the icon with a notched corner and a circle in the middle. It’s in the upper-right corner. This sets your wallpaper.
- If you see an alert that says «Missing Requirements» tap fix to set Kustom as your live wallpaper.
- If your phone is not able to apply your custom wallpaper, download an app called Nova Launcher. It acts as an alternate home screen that can run KLWP presets.
-
6
Tap Set Wallpaper. This sets your wallpaper.
Advertisement

Ask a Question
200 characters left
Include your email address to get a message when this question is answered.
Submit
Advertisement
Thanks for submitting a tip for review!
About This Article
Article SummaryX
1. Download and Open Kustom Live Wallpaper (KLWP).
2. Tap the Background tab at the bottom.
3. Tap Pick Image to select a background image.
4. Tap the plus (+) sign in the upper-right corner to select an object.
5. Tap an object to add to the live wallpaper.
6. Use the menu items at the bottom to adjust the object.
7 Tap the floppy disk icon at the top to apply the live wallpaper.
8. Tap Set Wallpaper.
Did this summary help you?
Thanks to all authors for creating a page that has been read 93,012 times.
Is this article up to date?
В последнее время очень популярными среди владельцев Андроид устройств стали живые обои. В то же время далеко не все понимают, в чем заключается эта «живость», и чем подобный фон отличается от обычных обоев. Сегодня постараемся разобраться в особенностях анимированных картинок и в том, как эта функция работает на телефоне.
Содержание
- Что такое живые обои
- Как сделать живые обои на телефон из своего видео – лучшие приложения
- Как установить живые обои при помощи встроенных средств
- Как удалить живые обои
Что такое живые обои
«Живыми» обои названы не просто так. Все мы привыкли к тому, что картинка на рабочем столе смартфона и на экране блокировки находится в статике. Это оптимальный вариант, когда человек хочет максимально абстрагироваться от изображения и сосредоточиться на иконках приложений.
Но все-таки иногда появляется желание сделать рабочий стол более ярким и даже интерактивным. Все это позволяют сделать движущиеся обои. Это анимированная картинка, которая практически всегда находится в движении. Так владелец смартфона получает возможность увидеть всю палитру красок и получить эстетическое удовольствие от эксплуатации гаджета.
Живые обои бывают разные. Некоторые из них не просто двигаются, а как бы откликаются на определенные действия пользователя (разблокировка экрана, наклон устройства, нажатие по определенной области и так далее).
Наиболее интересным выглядит движущийся фон на новых смартфонах компании Xiaomi. Китайский производитель подготовил живые картинки, которые переносят пользователя в определенную точку планеты (Земли, Марса или Сатурна) при разблокировке экрана. Выглядит подобный эффект крайне необычно и даже захватывающе. Более подробно о подобной фишке можно узнать из видео.
А теперь вернемся ко всем смартфонам, которые базируются на операционной системе Андроид. Несмотря на то, что движущиеся обои многим людям кажутся скучными, их многообразие в действительности поражает. Разработчики фонов придумали массу разных фишек, включая создание движущейся анимации из обычного видеоролика.
Как сделать живые обои на телефон из своего видео – лучшие приложения
В качестве движущихся обоев может выступать не только заготовленная анимация, но и видеоролик пользователя. Правда, вам вряд ли удастся установить видео на рабочий стол или экран блокировки без стороннего ПО. Это происходит из-за несовместимости форматов видео и анимации. Исправить проблему помогают специальные приложения, которые можно без труда найти на просторах Google Play.
Некоторые модели смартфонов все-таки позволяют преобразовать пользовательское видео в анимацию или сразу же сделать ролик фоном рабочего стола. Чтобы убедиться в этом, рекомендуется внимательно изучить настройки устройства.
Разработчики стороннего софта уже давно делают приложения для преобразования видео в живую картинку. Как только анимация будет готова, ее можно устанавливать на рабочий стол или экран блокировки через встроенные средства смартфона. А для того, чтобы не наткнуться на глючное ПО, предлагаем ознакомиться с тройкой самых стабильных и интересных программ.
| Наименование | Описание | Рейтинг |
| Video Live Wallpaper FREE | Хорошо зарекомендовавшая себя программа индийского производства, которая предлагает не только переформатировать собственные видео, но и скачать заранее подготовленные ролики из интернета. | ★★★★★ |
| VideoWall — Video Wallpaper | Популярное приложение, имеющее высокий рейтинг в Google Play. Не самая стабильная работа интерфейса полностью компенсируется широким функционалом, позволяющим изменить видеоролик по своему усмотрению. | ★★★★ |
| Video Live Wallpaper (C.C.P. [email protected]) | Еще одна программа с главным отличием в лице поддержки старых версий Андроид. Оформление приложения вызывает вопросы, зато поддержка большинства существующих кодеков позволяет адаптировать любое видео. | ★★★ |
Video Live Wallpaper FREE
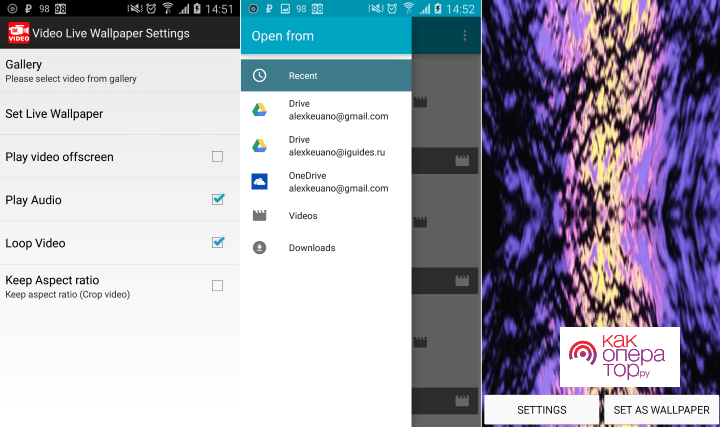
Это приложение не случайно занимает первое место в рейтинге. Виной тому идеальное соотношение стабильности и функциональности. Чтобы превратить свой видеоролик в обои через Video Live Wallpaper FREE, понадобится:
- Запустить программу.
- Нажать кнопку «Gallery» и выбрать интересующий видеоролик.
- Отредактировать видео, если требуется его обрезать, или применить эффект.
- Нажмите «Set as Wallpaper» для создания обоев.
- Примените настройки.
Теперь видеоролик будет не только храниться в «Галерее», но и станет прекрасным оформлением рабочего стола. Также полученные обои можно скачать, чтобы в любой момент установить их встроенными средствами.
VideoWall — Video Wallpaper
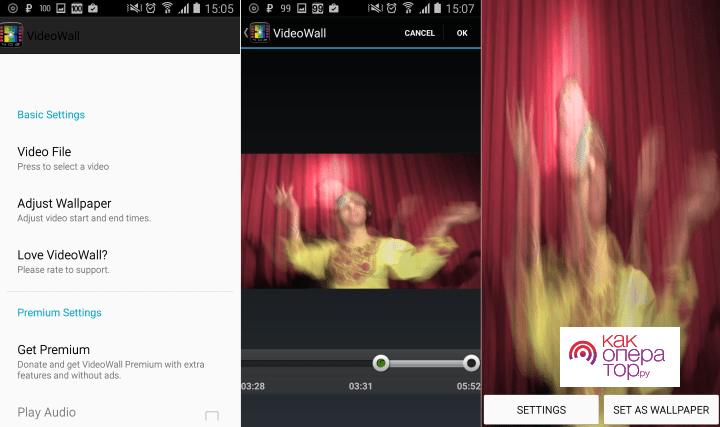
Хорошая программа, не уступающая по функционалу лидеру рейтинга. Здесь для создания обоев потребуется выполнить несколько простых и понятных шагов:
- Запустить приложение.
- Кликнуть по надписи «Video File» для выбора исходного видео.
- Обрезать ролик по своему желанию или применить эффект через раздел «Settings».
- Нажать кнопку «Set as Wallpaper».
Также в VideoWall — Video Wallpaper доступно изменение обоев со стартовой странице. Вы можете использовать тот вариант, который покажется наиболее удобным.
Video Live Wallpaper
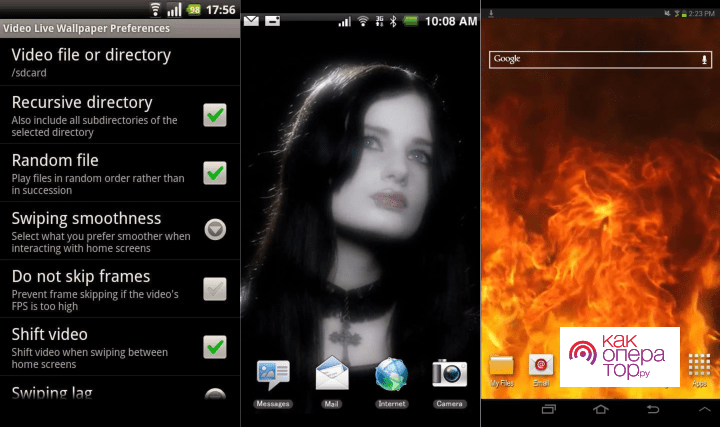
Эта программа уже давно доступна в Google Play, и в последний раз обновлялась в далеком 2016 году. Тем не менее, она до сих пор остается востребованной, благодаря поддержке старых версий Android и понятному интерфейсу.
Для создания живых обоев понадобится:
- Запустить приложение.
- Нажать кнопку «Video file or directory» для выбора видеозаписи.
- Сохранить изменения.
В случае если будет выбрано не одно видео, а целая папка с видео, а также пользователь нажмет кнопку «Random», живые картинки будут меняться в произвольном порядке.
Обои, созданные через Video Live Wallpaper, можно сохранить в любой директории. Обратите внимание, что после удаления программы, фоновые анимации тоже исчезают.
Как установить живые обои при помощи встроенных средств
В случае, когда пользователь уже подготовил живые обои, он может установить их при помощи функционала смартфона. Использование специальных приложений в данном случае является необязательным условием.
Поставить анимированный фон можно напрямую с рабочего стола:
- Задержите палец на пустой области пространства.
- Нажмите кнопку «Обои».
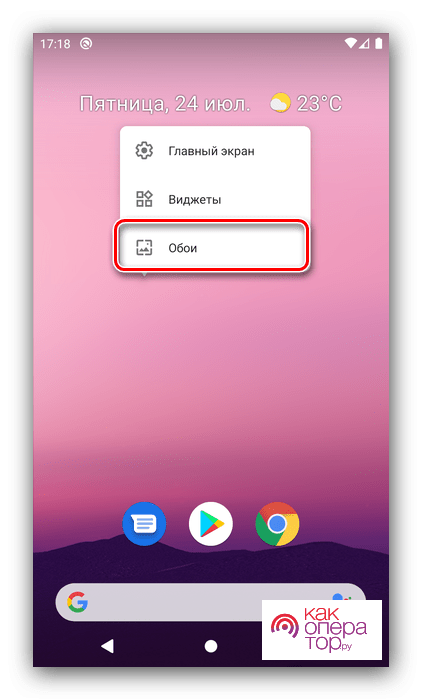
- Откройте раздел «Живые обои».
- Выберете интересующий фон.
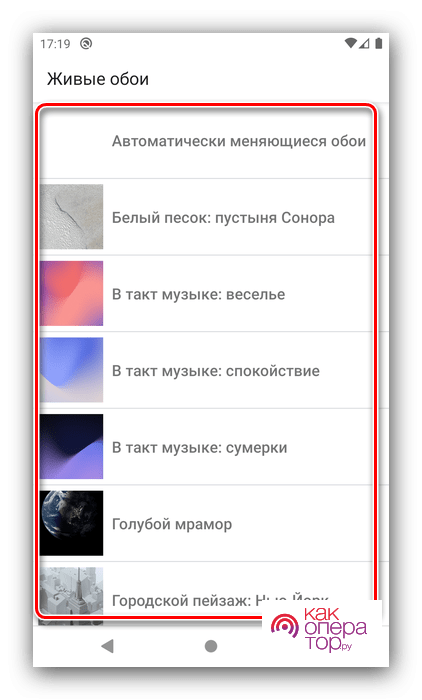
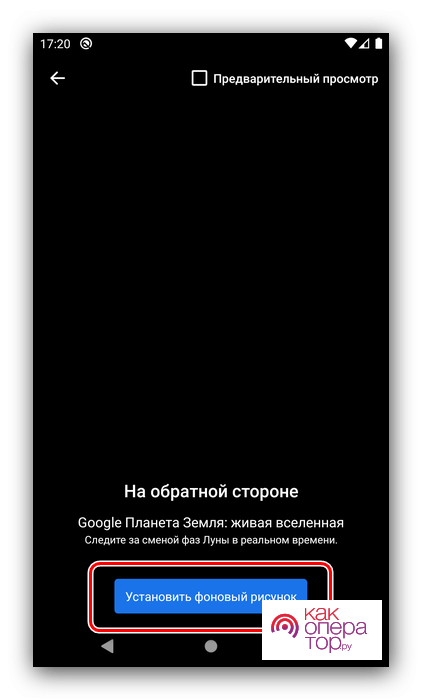
- Посмотрите, как будет выглядеть анимированное изображение. Если все устраивает, нажмите «Установить фоновый рисунок».
- Теперь выберете, где будут размещаться обои (рабочий стол, экран блокировки и все вместе).
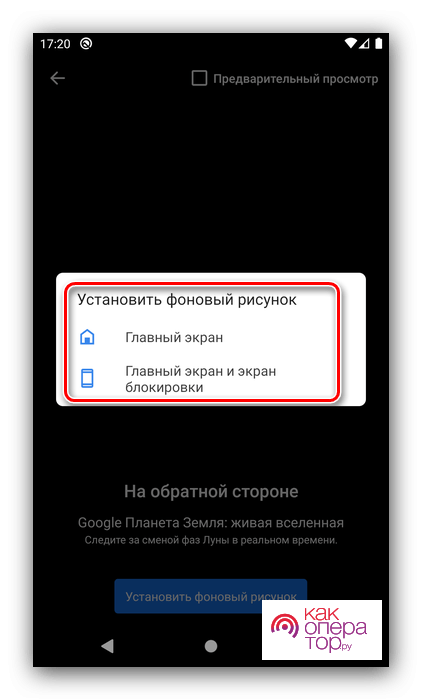
Учтите, что в зависимости от модели устройства и версии прошивки названия пунктов меню могут отличаться. В старых смартфонах возможность установки живых обоев предполагает использование специальных приложений.
Также обои устанавливаются через настройки телефона. Для выполнения операции необходимо перейди в раздел «Экран», после чего выбрать интересующее изображение для фона.
При возникновении сложностей с установкой анимированной картинки на рабочий стол или экран блокировки рекомендуется обратиться к видеоинструкции. В ней подробным образом описан процесс от начала до конца.
Как удалить живые обои
С удалением обоев не должно возникнуть проблем у людей, которые разобрались, как устанавливается анимированный фон. Чтобы избавиться от него, достаточно выбрать любое другое интересующее изображение в качестве фона для рабочего стола или экрана блокировки.
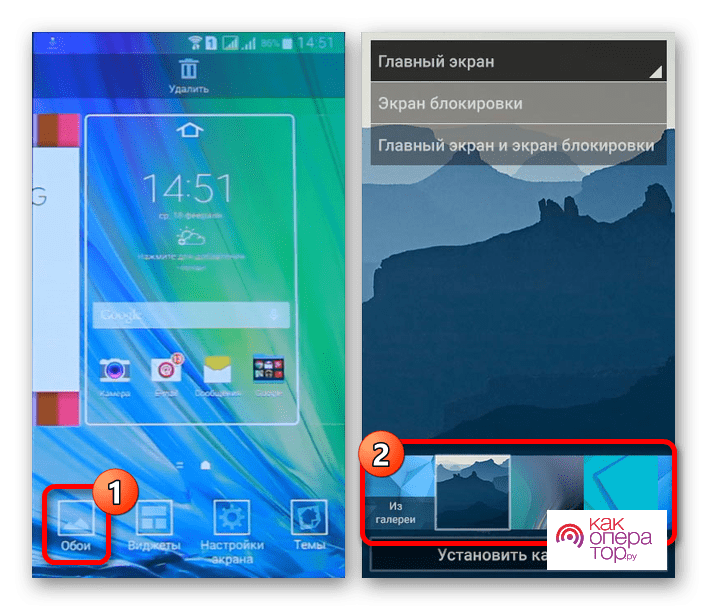
Если же требуется удалить сами обои, необходимо поступать тем же самым образом, что и с любыми другими файлами. То есть владельцу смартфона потребуется найти анимацию и кликнуть по иконке в виде мусорного ведра.
Но в случае, если фон устанавливался не встроенными средствами девайса, а через специальное приложение, операцию необходимо выполнять через используемую программу. Причем для удаления файла обоев понадобится избавиться от софта.

Как связаться со службой поддержки WhatsApp на Android
10 Январь, 2023 — ![]() Sergey
Sergey
WhatsApp постоянно обновляется новым функционалом и проходит регулярную оптимизацию, чтобы исправить возможные проблемы и обеспечить своим пользователям комфортное и стабильное пользование этим мессенджером. Эффективные способы устранения самых распространённых проблем в What…

Как узнать, когда вы подписались на кого-то в Instagram
10 Январь, 2023 — ![]() Sergey
Sergey
Задумались над тем, как давно вы подписаны на тот или иной профиль в Instagram? Причины возникновения такого вопроса могут быть самыми разнообразными, однако для нас главное, что существует ряд способов, позволяющих сделать это и узнать приблизительное время подписки на каждо…

Как отправлять пустые сообщения в WhatsApp
3 Январь, 2023 — ![]() Sergey
Sergey
WhatsApp был и остаётся лучшим мессенджером для коммуникации с друзьями и знакомыми, однако использовать его можно и не по назначению, разряжая свои скучные переписки всевозможными приколами и шутками. Любите разыгрывать своих друзей? В WhatsApp существует такая возможность! …

Как увеличить количество подписчиков в Instagram на Android
3 Январь, 2023 — ![]() Sergey
Sergey
Instargam был и остаётся лучшей социальной сетью, где можно зарабатывать реальные деньги на рекламе, но для этого у вас должно быть много подписчиков. Задаётесь вопросом о том, как их получить? Тогда читайте эту статью, в которой мы освещаем основные приёмы, позволяющие сдела…

Лучшие приложения для стриминга на Android, которые стоит скачать
29 Декабрь, 2022 — ![]() Sergey
Sergey
Стримы прочно занимают популярное место в игровом мире — они служат для развлечения и заработка. Ведь давно прошли те времена, когда игровой стриминг был доступен только для настольных компьютеров. В настоящее время геймеры могут транслировать свои игровые видео со свои…
Как правило, пользователи устанавливают на свои устройства статические изображения: их проще найти и легче использовать. Но живые обои выглядят более впечатляюще. Поэтому стоит рассмотреть вопрос о том, как установить такие обои на аппарат с Android.
Перед установкой вы должны знать, что живые обои существенно уменьшают время автономной работы, поскольку негативно влияют на аккумулятор. Даже специальные режимы энергосбережения не особенно помогают.
Тем не менее, если вы твердо решили поставить такие обои, мы готовы помочь. Только учтите, что на разных смартфонах или версиях Android действия будут различаться в мелочах. Однако общая концепция будет неизменной.
Для использования живых обоев на смартфоне есть несколько путей: использование встроенного в систему контента, установка сторонних обоев и инсталляция приложения с живыми обоями. Мы рассмотрим все возможные варианты. Начнем с самого простого.
Использование встроенных обоев
Практически во всех современных смартфонах имеется некоторое количество живых обоев. Еще в первых версиях Android разработчики поставляли такой контент для пользователей. Но при этом прятали его довольно глубоко.
С тех пор почти ничего не изменилось. Мы найдем живые обои и установим их на рабочий стол. Для примера рассмотрим данный процесс на смартфоне Xiaomi Redmi 8 с установленной оболочкой MIUI и Android 10 на борту.
Шаг 1. Для начала требуется долгий тап по пустому месту на рабочем столе. Внизу появится лента с кнопками. Нужно тапнуть по иконке с надписью «Обои».

Шаг 2. Далее откроется список доступных обоев. Тапаем по категории «Живые обои».

Шаг 3. После этого выбираем требуемую картинку и нажимаем на нее.

Шаг 4. Внизу жмем на кнопку «Применить».

На этом процедура завершена. Теперь нужно выйти из настроек и посмотреть, насколько органично картинка вписывается в общую цветовую гамму. Если полученный результат вас чем-то не устроил, то можно выбрать другую картинку, используя все ту же инструкцию.
Внимание! Если ваш смартфон относительно слабый, установка живых обоев может привести к тормозам и фризам. Для нормального функционирования такой картинке требуется изрядное количество ОЗУ и довольно мощный процессор. Причем, процессор будет работать постоянно. Даже если дисплей будет полностью выключен.
Использование приложения
Найти анимированные картинки на различных сайтах можно. Но далеко не факт, что они будут двигаться после установки на рабочий стол аппарата. Поэтому самый простой ход – скачивание соответствующей программы с нужным контентом.
В Google Play большое количество подобных продуктов. Но мы выберем Live Wallpapers — 4K Wallpapers, как самое адекватное приложение. Сейчас рассмотрим особенности работы с ним. Итак, начнем с самого простого – установки.
Шаг 1. На рабочем столе аппарата тапаем по пункту «Google Play».

Шаг 2. Далее вводим в верхней строке «Live Wallpapers» и жмем кнопку с изображением лупы.

Шаг 3. Тапаем по нужной записи в результатах поиска.

Шаг 4. Нажимаем на кнопку «Установить».

Шаг 5. Дожидаемся окончания процесса инсталляции, возвращаемся на рабочий стол и запускаем программу при помощи иконки.

Шаг 6. Запустится приветственный экран. Здесь жмем «Continue».

Шаг 7. Теперь в категории «Live» (находится в верхней строке) ищем нужную картинку и тапаем по ней.

Шаг 8. Нажимаем на круглую кнопку со стрелкой для загрузки обоев.

Шаг 9. В следующем меню выбираем пункт «Single Mode».

Шаг 10. Нажимаем кнопку «Set Wallpaper».

Шаг 11. В следующем окне выбираем «Home Screen» если требуется установить картинку на рабочий стол, либо же «Home screen and lock screen», если хотите, чтобы картинка отображалась еще и на экране блокировки.

Вот и все. Теперь можно выходить из приложения и проверять, как картинка смотрится на дисплее смартфона. Если она вас чем-то не устроила, то ее всегда можно поменять, используя предыдущую инструкцию (кроме пунктов, посвященных установке из Google Play).
Внимание! В Google Play имеется большое количество программ, предназначенных якобы для установки живых обоев. Но они являются фишинговыми и единственная их задача – сбор сведений о пользователе. Так что бездумно устанавливать приложения оттуда не стоит. Лучше следуйте нашим рекомендациям.
Заключение
На просторах интернета большое количество ресурсов, предлагающих скачать живые обои бесплатно и без регистрации. Как правило, таким сайтам доверять нельзя. Поэтому мы не включили их в нашу инструкцию.
Впрочем, подавляющему большинству пользователей хватит возможностей операционной системы Android или рассмотренного выше приложения. Только выполнять все действия нужно в соответствии с предоставленной инструкцией.
