Как совершать оплату с помощью телефона
Через приложение Google Pay на мобильном устройстве можно оплачивать покупки в магазинах.
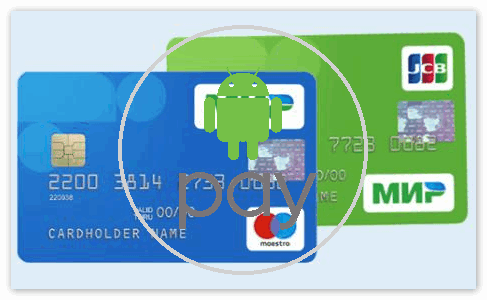
Где можно расплачиваться через Google Pay
Расплачиваться через Google Pay можно через любые устройства для оплаты, на которых есть один из следующих значков:
Список популярных магазинов, где можно расплачиваться через Google Pay, приведен здесь.
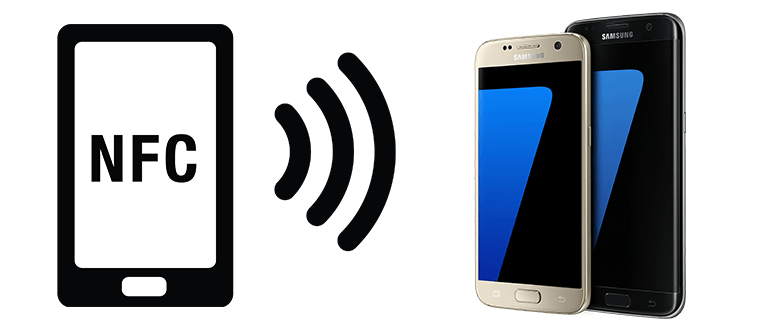
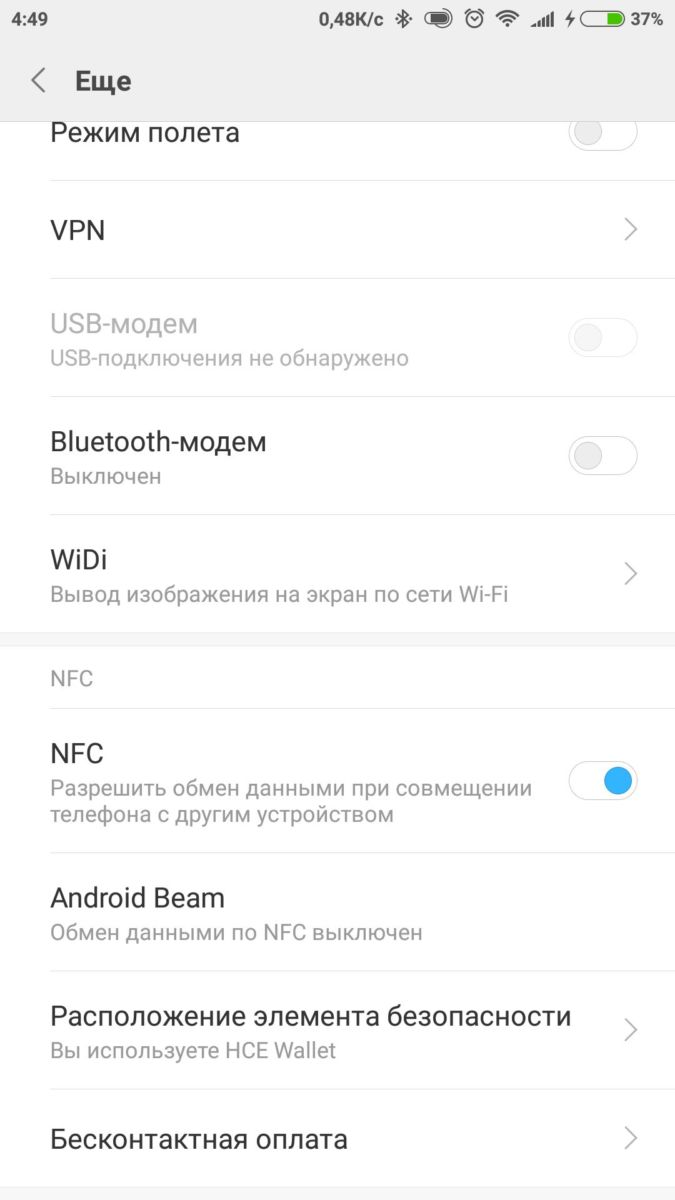
Важно. Чтобы совершать бесконтактные платежи, включите функцию NFC в настройках устройства.
Как настроить способ оплаты для бесконтактных платежей
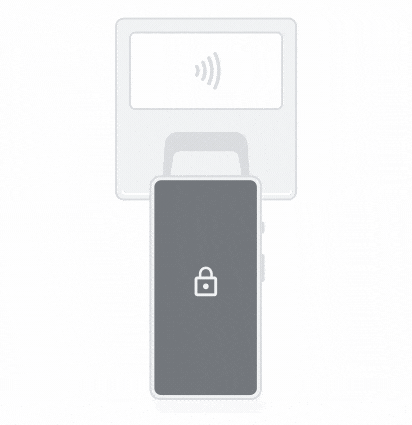
Как оплатить покупку
Шаг 1. Выведите телефон из спящего режима и разблокируйте его.
Открывать приложение Google Pay необязательно.
Совет. В большинстве стран транзакции на определенные суммы можно выполнять на заблокированном устройстве.
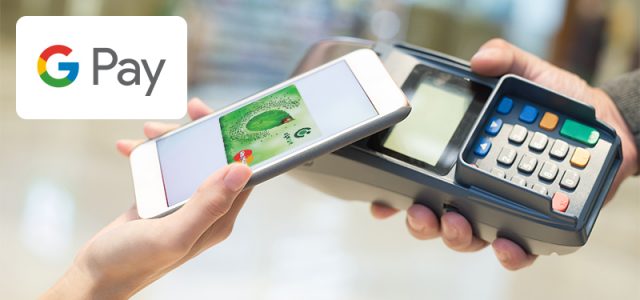
Шаг 2. Поднесите устройство задней панелью к терминалу бесконтактных платежей.
Если оплата совершена, на экране телефона появится синяя галочка.
Если она не появляется:
- Попробуйте поменять положение устройства. NFC-антенна может находиться или в верхней, или в нижней его части.
- Поднесите телефон ближе к терминалу.
- Подержите телефон у терминала дольше обычного.
Если же галочка появилась, но, по словам кассира, покупка не оплачена, выполните следующие действия:
- Убедитесь, что магазин принимает платежи через Google Pay.
- Свяжитесь с банком и узнайте, все ли в порядке с вашим счетом.
Как платить с помощью NFC
Шаг 3. Следуйте инструкциям на экране.
В некоторых магазинах может потребоваться ввести PIN-код или поставить свою подпись. В таком случае следуйте указаниям на экране.
- Если это дебетовая карта, введите ее PIN-код. Он отличается от PIN-кода устройства.
- Если это кредитная карта и сумма покупки достаточно велика, вам нужно будет поставить свою подпись на экране.
Как использовать другой способ оплаты
Статьи по теме
- Устранение неполадок при бесконтактной оплате
- Как узнать, подходит ли телефон для бесконтактной оплаты
- Какие способы оплаты поддерживаются в Google Pay в магазинах
Эта информация оказалась полезной?
Как можно улучшить эту статью?
На чтение 5 мин Просмотров 3.6к.
Обновлено 23.05.2022
В статье подробно рассказываем Как пользоваться Google Pay в 2022 году: как подключить банковскую карту, как ее отключить при необходимости, с какими телефонами будет работать, ка провести оплату нужен ли интернет.
Прогресс в развитии технологий позволил мобильные устройства превратить в кошельки, позволяющие совершать финансовые операции. Сервис достаточно прост и удобен. Самым распространённым среди российских пользователей является Google Pay. Система становится с каждым днем популярной и востребованной услугой среди граждан России.
Гугл Пэй – это платежная платформа, которая представляет собой специальный сервис. Благодаря этому совершаются покупки в онлайн и оффлайн магазинах с телефона. Функции доступны в бесконтактных устройствах. Для совершения покупки стоит поднести к дисплею смартфон, на котором загружена программа.
Содержание
- Какие телефоны поддерживает Google Pay
- Банковские карточки
- Добавление банковской карты в Google Pay: пошаговая инструкция
- Оплата через приложение
- Безопасность платежей в Google Pay
- Удаление банковской карты из системы Google Pay
- Плюсы Google Pay
- Минусы Google Google Pay
Какие телефоны поддерживает Google Pay
На сегодняшний день совместимость мобильного устройства и специальных приложений огромна. Популярные бренды поддерживают функцию Google Pay: Samsung, Lenovo, Xiaomi, LG, Prestigio.
Условием для поддержки и установки программы выдвигается версия андроид 4.4 и выше. Оплата производится только, если в телефоне имеется технология передачи беспроводным способом. Для того, что узнать есть ли возможность использования на смартфоне приложения Гугл Пэй, следует зайти во вкладку «система», затем «о телефоне».
Также при помощи других устройств возможно пользоваться данной программой: компьютер, планшет, мобильные с операционной системой IOS.
В скаченное приложение добавляются не только банковские продукты, но и дисконтные карточки, сертификаты, купоны со скидками, проездные билеты или карты постоянного клиента.
Банковские карточки
Список финансовых компаний, которые предлагают качественный сервис по услуге, большой и количество их увеличивается. Сегодня большинство крупнейших отечественных банков стали партнерами Google Pay. Сервис применим на Украине, Белоруссии, Казахстане, Молдавии и ряде других стран. По разновидностям допускаются дебетовые и кредитные карты.
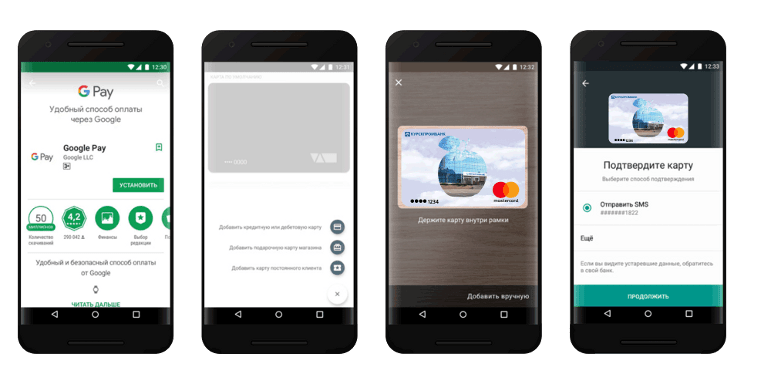
Добавление банковской карты в Google Pay: пошаговая инструкция
Одним из основных востребованных пользовательских желаний отмечается привязка карточки. Действие достаточно простое. Привязать можно несколько пластиков.
Пошаговые действия:
- Установка приложения через play-маркет (бесплатно);
- Требуется зайти в настройки и включить беспроводное считывание;
- Ручная настройка блокировки панели – кодовая pin-комбинация, пароль, отпечаток, графический ключ;
- Запуск программы и далее выполняются действия, которые предлагаются приложением.
Нужно ли интернет-подключение для работы приложения?
Ответ на вопрос – нет. Это преимущество для конкретной платежной системы. Не везде предлагают качественный и стабильный сервис.
Оплата через приложение
Если стоимость покупки менее 1000 рублей, то покупателю не требуется разблокировать телефон, требуется включить подсветку. Если сумма за тысячу, то с экрана снимается блокировка. Далее смартфон приближается к терминалу тыльной стороной. После этого появится пошаговая инструкция. Например, введение карточного пин-кода.
Бывает, что привязано несколько карт и не выбрана основная, поэтому клиенту потребуется вручную совершить выбор и только потом поднести к терминалу. При правильном выполнении всех условий и рекомендаций по пользованию с счета спишется определенная сумма и придет смс, если же что-то не так, то система оповестить о неудачной попытке и предложить повторить.
Если же сумма оплаты небольшая, то достаточно поднести телефон к терминалу. На таком устройстве должны имеется логотипы G PAY или подносимой карточки. Теперь должна появиться синяя галочка, если она отсутствует, следует проверить включена ли функции NFC. Если все в порядке, то нужно попробовать сменить положение смартфона. Бывает, что антенна аппарата находится в другой части. Стоит приблизить мобильник и поддержать его чуть дольше возле устройства для оплаты.
Безопасность платежей в Google Pay
Разработчики уверяют, что сервис безопасен. Информация, которая считывается, отправляется в хранилище. Разработано несколько уровней защиты. Продавец при оплате никаких данных о клиенте не получает, то есть номер и баланс отсутствует. Доступны только виртуальные реквизиты, которые хранятся у каждого пользователя.
Дополнительная защита информации осуществляется при оплате смартфонов, экран которого заблокирован. Если же блокировка отключена человеком, то сервис чистит виртуальные реквизиты.
При утере или краже телефона установленное приложение позволит отследить, где находится смартфон. Это позволит вовремя сделать блокировку и удалить финансовые данные. В приложении разработана специальная опция для отслеживания гаджета.
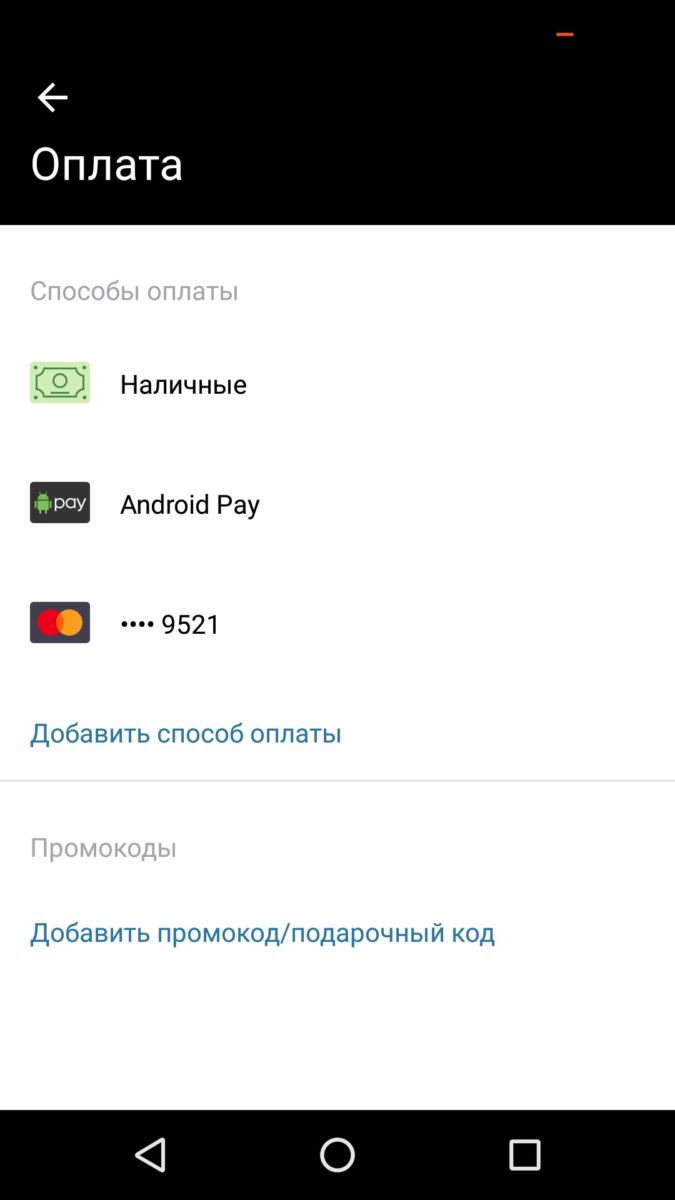
Удаление банковской карты из системы Google Pay
Случается, что пластик становится неактивным, поэтому целесообразно его удалить из приложения. Потребуется:
- Открыть в программе вкладку «Оплата»;
- Щелкнуть на ненужный реквизит;
- Нажать на появившееся «Удалить»;
- Подтвердить действие.
После таких действий информация по карточке исчезнет.
Плюсы Google Pay
Сервис на практике показал объективность и востребованность.
Во-первых, бесконтактная оплата предполагает быстроту, простоту и комфорт. Считывающие терминалы на сегодняшний день имеются практически везде: от маленького супермаркета до больших торговых центров.
Во-вторых, мгновенные операции.
В-третьих, проводятся различные акции, бонусные программы, скидки, отсутствие комиссий. Произвести настройку сможет любой пользователь. Интерфейс прост и понятен, тем более доступно бесплатное скачивание. В-четвертых, защита данных на всех этапах оплаты товаров. Номер пластика заменяется кодовой комбинацией, другими словами – виртуальный счет.
Минусы Google Google Pay
В первую очередь, отрицательной чертой отмечается то, что не все карты возможно привязать к приложению. Такие пластики, как МИР сервис не поддерживает. Также возникнут сложности с корпоративными, неименными, виртуальными счетами; Maestro; Cirrus; Visa Electron; American Express.
Еще одним минусом клиенты выделяют задержки сервиса при обработке платежа за проезд в общественном транспорте.
Некоторые пользователи говорят, что не только функционал подводит, но и работоспособность приложения. Так возможно потерять информацию о сохраненных картах. Другие жалуются, что платежи не проходят с первого раза.
Также не каждое новое мобильное устройство поддерживает бесконтактную оплату. Телефоны имеют недостаток быстро садится или зависать. Но вины разработчиков приложения нет, а такие факторы только мешают использовать сервис.
Бесконтактная оплата с помощью приложения Google Pay является простым и комфортным сервисом для потребителей. Человек не носит с собой солидные деньги и не переживает, что кто-то вытащить кошелек или попросту не потеряет.
Воспользоваться денежными средствами ни у кого не получится, так как блокировка работает безупречно. Единственное, требуется смотреть за тем, чтобы телефон имел зарядку и выбирать магазины, в которых терминалы поддерживают такой формат оплаты.
Платежная система Google Pay помогает оплачивать покупки и услуги в магазинах, интернете, кафе, ресторанах, салонах красоты и др. Сохранность средств гарантирована. Убедиться в удобстве и значимости приложения можно лишь после знакомства со всеми его возможностями, функционалом и положительными сторонами.
Что такое Google Pay

Google Pay — платежная система, позволяющая расплачиваться за услуги и товары при помощи телефона, без использования банковской карточки. Достаточно просто привязать ее к смартфону, а после подносить гаджет к считывающему устройству за несколько сантиметров. Не обязательно носить с собой кошелек, главное иметь с собой заряженный телефон.
Изначально система называлась Android Pay, со временем ее переименовали в Google Pay.
Возможности платежной системы Google Pay
Оплачивать через Google Pay можно:
- товары в магазинах, супермаркетах;
- интернет-покупки;
- билеты;
- проезд в общественном транспорте;
- бензин на заправках;
- различные услуги.
Появилась возможность получать и отправлять переводы, совершать мобильные платежи.
Что потребуется для установки
Чтобы Google Pay работала, нужно убедиться, что у вас подходящий смартфон. Гаджет должен иметь:
- операционную систему андроид (4.4 и более);
- Near Field Communication (NFC) — встроенный модуль.
Если в устройстве присутствует чип NFC, то телефон поддерживает бесконтактную оплату. Если такового нет, то воспользоваться услугой будет невозможно.
Также важно, чтобы банк, в котором открыта карта, поддерживал Гугл Пей. Если это так, то следует уточнить у консультанта финансового учреждения, можно ли подключить конкретную карту к бесконтактной оплате.
Какие банки и карты поддерживают платежную систему Google Pay
С каждым днем к Гугл Пей присоединяется все больше банков. Списки пополняются не только по России, но и по зарубежным странам. Просмотреть детальную информацию можно на официальном https://pay.google.com/intl/uk_ua/about/banks/.
На сайте представлен немаленький список российских банков, среди них:
- Альфа Банк;
- Русский стандарт;
- Промсвязьбанк;
- Сбербанк;
- Россельхозбанк;
- МТС;
- Открытие;
- ВТБ;
- Тинькофф;
- Райфайзен;
- Рокетбанк и др.
Там же есть информация и по картам.
Обычно поддерживаются кредитные, дебетовые, предоплаченные (Visa, MasterCard). Также можно добавить:
- скидочные;
- бизнес-карты;
- подарочные;
- дисконтные;
- корпоративные;
- интернет-карты.
У каждого банка свой список.
Где скачать Гугл Пей?
Чтобы воспользоваться Google Pay, нужно скачать соответствующее приложение. Его несложно найти в Гугл-магазине. Достаточно просто ввести название в поисковике, после чего нужное высветится со значком GPay.
Внимание! Отдавать предпочтение неофициальной версии не стоит. В дальнейшем работа с таким приложением приведет к многочисленным проблемам.
Для успешного скачивания нужно:
- Кликнуть на значок “Google Pay”.
- Нажать на “Установить”.
- Принять все условия.
- Подождать, пока произойдет скачивание.
Если загрузке ничего не помешает, на экране телефона появится значок GPay.
Имейте в виду! Если в телефоне недостаточно памяти, то приложение не загрузится.
Настройка приложения
Если Гугл Пей скачан на смартфон, то можно приступать к настройке:
- В настройках телефона найдите “NFC” — включите его.
- Сделайте блокировку экрана. Это может быть графический ключ, отпечаток пальца или установка пароля.
- Создайте учетную запись в Гугл.
- Войдите в скаченное приложение, используя данные учетной записи.
Если все вышеперечисленное сделано, то можно приступать к добавлению карт. Таковых может быть добавлено несколько, но лишь одна выбирается по умолчанию.
Как добавить карту
Для привязки карточки:
- Зайдите в Google Pay.
- Найдите пункт “добавить карту”. Рядом будет “+” — нажмите на него.
- В открывшемся окошке предложат сделать фото карты, или вписать всю информацию вручную. Сделайте то, что удобно.
- Впишите имя, отчество и фамилию, адрес, номер телефона и другую информацию.
- Сохраните все сведения.
- Прочтите и примите условия.
- На телефон придет пароль, который впишите в окошко и кликните на “отправить”.
- Если все введено верно, карта успешно добавится.
Если у вас есть личный кабинет в Сбербанк-онлайн, а вы желаете добавить сбербанковскую карту, то сделать это можно быстро, используя приложение банка. Для этого:
- Зайдите через телефон в Сбербанк-онлайн.
- Найдите карту, которую хотите добавить в Гугл Пей и кликните на нее.
- В открывшемся окошке выберите “добавление в Google Pay”.
- Кликните на “подключить”.
- Примите или откажитесь от специальных предложений, продолжите.
- Согласитесь с условиями банка-эмитента.
После этого банковская карточка успешно добавиться в систему. В данном случае вводить реквизиты не нужно.
Как поставить отпечаток пальца?
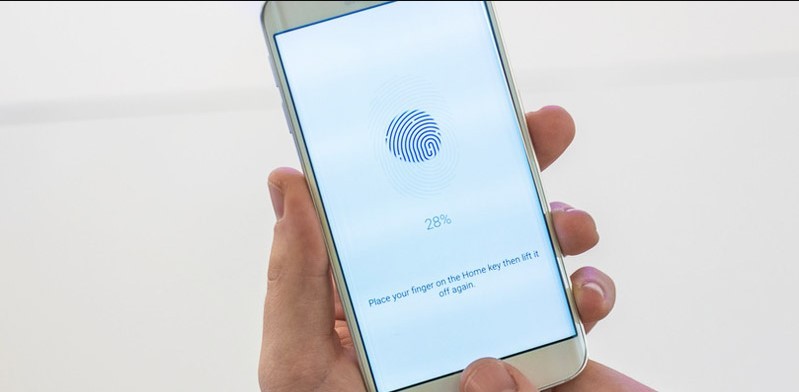
Если вы планируете использовать свой смартфон для бесконтактной оплаты, то обязательно установите на нем блокировку экрана. Это нужно в целях безопасности — тогда никто не сможет оплатить через Гугл Пей без вас.
Лучший способ аутентификации — по папиллярному рисунку пальца.
Для установки нужно:
- Войти в приложение.
- Найти “настройки”.
- Отметить “аутентификацию по отпечатку пальца”.
- Ввести числовой пароль для подтверждения изменений.
Как пользоваться платежной системой
Работать с Гугл Пей можно везде, где поддерживается подобная оплата. Чтобы не произошли сбои, следите за состоянием счета, зарядкой телефона и наличием интернет-соединения.
Как оплачивать
Если продавец принимает бесконтактные платежи, то задача покупателя:
- Разблокировать смартфон.
- Поднести его обратной стороной к терминалу.
- Подождать подключения.
- Ввести ПИН или подтвердить оплату отпечатком пальца (при покупке свыше 1 тыс. рублей).
Если к Google Pay привязано несколько карточек и деньги нужно списать не стой, которая стоит по умолчанию, то предварительно придется войти в приложение и выбрать нужную. Только после этого гаджет подносится к считывающему устройству.
Где принимается оплата Google Pay и сколько это стоит

Оплата принимается везде, где есть PayPass. Также платить через Гугл Пей можно на интернет-сайтах.
Сервис бесконтактной оплаты и банк-эмитент не взимают никакой комиссии.
Как удалить карту из платежной системы
Если карта, загруженная в Google Pay стала неактивной, ее целесообразно удалить. Для этого:
- Зайдите в приложение.
- Перейдите в “оплату”.
- Кликните на карту, которая уже не нужна.
- Нажмите на удаление.
- Подтвердите действие.
После подобных нехитрых действий карточка исчезнет с Гугл Пей.
Все о безопасности
Компания Google твердит, что их бесконтактный платежный сервис абсолютно безопасен, потому что:
- данные находятся на серверах, которые надежно зашифрованы;
- не высвечивается никакая информация по карте во время проплаты;
- приложение не работает, если экран смартфона не блокируется;
- есть возможность установить биометрические данные (отпечаток пальца), что на 100% исключает проникновение в телефон постороннего лица;
- при потере телефона или краже, можно моментально отследить месторасположение гаджета или стереть все данные по счетам.
Воспользовавшись всеми возможными мерами безопасности, можно защититься от злоумышленников на 100%.
Чтобы никаких эксцессов не произошло, стоит быть внимательными и придерживаться некоторых правил:
- не снимайте блокировку с телефона при посторонних (если у вас стоит пин-код или графический ключ);
- поставьте на разблокировку отпечаток пальца, тогда мошенники не смогут получить доступ к приложению;
- заранее включите на смартфоне функцию под названием “найти устройство”, тогда без труда найдете гаджет в любом месте при его потере;
- не производите оплату в одной торговой точке на сумму менее 1 тыс. рублей (в случае кражи телефона, аферисты могут снять деньги с телефона без пароля);
- не добавляйте в Гугл Пей карты, с большим балансом.
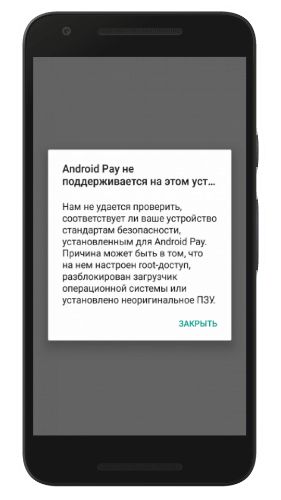
Возможные проблемы
Иногда не получается установить Google Pay или происходят сбои во время работы с программой.
Проблемы при регистрации связаны с:
- настроенными рут-правами (их нужно убрать);
- несоответствующей версией телефона Андроид (проверьте в настройках);
- разблокированным загрузчиком ОС (заблокируйте);
- модифицированной прошивкой (посетите сервисный центр для перепрошивки смартфона);
- нет NFC модуля или вы его не включили (проверьте наличие нужной функции в настройках).
Если трудности возникли во время оплаты, то причина может крыться в:
- разрядке телефона;
- блокировке карты;
- отсутствии интернета;
- сбое времени и даты;
- застарелой версии приложения;
- сбое настроек.
Исправить ситуацию часто помогает перезагрузка, обновление приложения или сброс всех настроек.
Плюсы и минусы системы

Бесконтактная система оплаты Google Pay достаточно востребована. Популярность обрела благодаря ряду положительных сторон. Она:
- безопасна;
- удобна;
- доступна.
Если подробнее, то:
- В приложение можно добавлять несколько карт. Поддерживаются не только дебетовые и кредитные банковские карточки, но и бонусные, корпоративные, виртуальные и др.
- Хорошо то, что установить сервис можно на любую модель телефона, независимо от марки.
- Оплата не занимает много времени — быстрый запуск. Считывание данных происходит тоже за несколько секунд.
- Если сумма оплаты меньше 1000, не нужно вводить пароли.
- Не нужно носить карточки с собой, хватает под рукой смартфона.
- Оплачивать можно не только покупки в обычных магазинах, но и в интернете.
Не обошлось и без недостатков. Минус Гугл Пей в том, что сервис доступен только на:
- андроиде и не ниже версии 4.4;
- хорошо заряженном телефоне;
- гаджетах, имеющих модуль NFC.
Также следует знать, что не все торговые точки поддерживают бесконтактную оплату. И снять наличные через банкомат с Гугл Пей невозможно.
Имейте в виду! Полноценно сервис работает лишь при подключенном интернете.
Отзывы о платежной системе Google Pay

Основная масса отзывов положительная, но встречаются и незначительные отрицательные моменты.
Ирина, 35 лет. Решила просто попробовать бесконтактную технологию в работе, не собиралась пользоваться Гугл Пей постоянно. Но после нескольких проб поняла, насколько удобна бесконтактная оплата. Я забыла, что такое наличность и ношение с собой карт. Теперь я оплачиваю покупки в три раза быстрее и всегда спокойна за сохранность своих финансов.
Александр, 26 лет. Пользоваться Google Pay нравится. Очень быстро происходит оплата в супермаркетах и интернет-магазинах, в кафе, на заправках и т.д. Впечатляет возможность добавления бонусных и подарочных карт. Пользуюсь скидками, акциями и все в одном приложении. Все, чего моя душа желала.
Игорь, 44 года. Приложение хорошее, но не нравится то, что идет зависимость от телефона. Невозможно воспользоваться сервисом при низкой зарядке, а это неудобно. У меня смартфон разряжается быстро, поэтому не удается использовать Гугл Пей регулярно. Никуда не деться от наличных в кошельке.
Заключение
С помощью Google Pay пользователи ограждают себя от ношения наличных в кошельке и банковских карт. Хорошая система защиты не дает возможности мошенникам проникнуть к финансам. С бесконтактной оплатой работает множество банков и торговых точек, что развязывает руки пользователям и убирает все неудобства.
![]()
Download Article
![]()
Download Article
Google Pay is a digital wallet that allows you to quickly send and receive money. In 2018, Google Pay replaced both Google Wallet and Android Pay. Google Pay allows you to add and manage your debit and credit cards, as well as your PayPal account. This information is stored on a secure server. Google Pay uses a virtual account number, instead of your credit or debit card number to make transactions.[1]
You can use Google pay to send and receive money from your contacts, as well as pay at stores that support Google Pay. You can also use Google Pay to add transit passes, loyalty cards, and gift cards to your account. This wikiHow teaches you how to use Google Pay.
-

1
Open Google Pay. It has an icon with a blue, red, green, and yellow «G» with the word «Pay» next to it. Tap the icon to open the Google Pay app.
- If you do not have the Google Pay app installed on your phone, you can download Google Pay for free using the Google Play Store on Android, or the App Store on iPhone.
-

2
Select your email address. If you are using an Android device, you will see a list of all Google accounts you have signed into on your device. Tap the email address you want to use to set up your Google Pay account to continue. On iPhone and iPad, use the drop-down menu at the bottom of the screen to select your email address and tap the blue button at the bottom to continue.
- If you don’ t see the email address you want to use listed, tap Use another account on iPhone and iPad and sign in with the username and password associated with your Google account. On Android, you will need to add another Google account in the Settings menu of your smartphone.
Advertisement
-

3
Tap Get Started. It’s the blue button at the bottom of the screen. This will take you to the Google Pay main menu.
- If you have Locations turned off, you may be asked to turn them on so that you can be notified when you can use Google Pay. You can either tap Turn on or No thanks at the bottom of the screen. Be aware that if you have Locations turned on, Google may use your information for targeted advertising.
Advertisement
-

1
Open Google Pay. It has an icon with a blue, red, green, and yellow «G» with the word «Pay» next to it. Tap the icon to open the Google Pay app.
-

2
Tap Payment or Payment Methods. It’s the second option at the bottom of the screen. It has an icon that resembles a credit card.
-

3
Tap + Add Payment Method. It’s the blue button at the bottom of the screen.
- If you already have a credit or debit card set up with another Google service, such as Google Play, you’ll be given the option to connect that card to your Google Pay account.
-

4
Tap Credit or debit card. It’s the first option at the bottom of the screen when adding a payment method.
-

5
Enter your credit card information. You will need to enter your credit card number, the month and year of your expiration date, and the CVC security code on the back of the card. You may also need to enter your name and billing address if it isn’t automatically populated by your Google account information.
- If you have the right kind of camera, you can line up your card with camera feed in the center of the screen to scan your card number automatically. Alternatively, you can tap Enter manually to skip using your camera.
-

6
Tap Save. It’s the blue button at the bottom of the screen. This saves your credit or debit card information.
-

7
Scroll to the bottom and tap Accept & continue. You must agree to the Issuer terms. To do so, read the text. When you get to the bottom, tap the button that says Accept & continue. Google Pay will contact your bank and verify your card.
-

8
Tap Got it. After your card has been verified, you will see a screen informing you phone security sign-in method will be used for Google Pay. This may be your password, screen-lock code, or pattern.
-

9
Tap Continue to confirm your identity. Most likely, this will open your Bank app and ask you to sign in to your bank account.
-

10
Sign in to your bank app. Your bank app will open automatically. To confirm your identity, sign in with your username and password or PIN. Once your identity is confirmed, you will see a screen informing you that you are ready to use Google Pay.
Advertisement
-

1
Open Google Pay. It has an icon with a blue, red, green, and yellow «G» with the word «Pay» next to it. Tap the icon to open the Google Pay app.
-

2
tap Payment or Payment Methods. It’s the second option at the bottom of the screen. It has an icon that resembles a credit card.
-

3
Tap + Add Payment Method. It’s the blue button at the bottom of the screen.
-

4
Tap PayPal. It’s the second option at the bottom of the screen when you add a payment method.
-

5
Enter the email. Use the first line to enter the email address associated with your PayPal account.
-

6
Tap Allow. It’s the blue button at the bottom of the screen.
-

7
Tap Next. It’s the blue button at the bottom of the screen that explains using PayPal with Google Pay.
-

8
Enter and confirm your PIN. Type a 4-digit number you want to use as your PIN. Then type it again to confirm it.
-

9
Tap Agree & Continue. It’s the blue button at the bottom of the screen.
-

10
Confirm your address and tap Continue. Check to make sure your address at the top is correct. If it is incorrect, tap it and enter your correct address. Tap Continue at the bottom of the screen when you are ready to continue.
Advertisement
-

1
Open Google Pay. It has an icon with a blue, red, green, and yellow «G» with the word «Pay» next to it. Tap the icon to open the Google Pay app.
-

2
Tap Send. It has an icon that resembles a paper airplane. It’s in the lower-right corner of the screen.
-

3
Tap + Send or request. It’s the blue button the blue button at the bottom of the screen.
-

4
Enter a contact you want to send or request money from. Use the search bar at the top to enter a contact’s name, phone number, or email address. Then tap the contact’s name when they appear in your list of search results.
-

5
Enter the amount you want to send or request. Use the on-screen number pad to enter the amount you want to send or request.
-

6
Add a note (optional). If you want to add a note, tap Add note below the amount. Type a brief note and tap Done.
-

7
Tap Send or Request. Both these options are at the bottom of the screen. If you want to send money to a contact, tap Send. If you want to request money, tap Request.
-

8
Tap Confirm & Send or Done. If you are sending money, tap Confirm & Send. If you are requesting money, tap Done to send your request.
- You can also send and request money using Gmail. To do so, open the Gmail app and compose a new email. Tap the paperclip icon to add an attachment. Then tap Send money or Request money. Enter the dollar amount you want to send or request.
Advertisement
-
1
Find a vendor or machine that supports Google Pay. Most merchants that support Google Pay have a sticker that says that they accept Google Pay. Look for this sticker during checkout.
-

2
Go through the checkout process. Place your items on the counter and let the cashier scan them. If you’re using a vending machine, make the order by pressing the correct buttons for the item you want.
-

3
Unlock your phone. To use Google Pay, you must unlock your phone. Use your password, on-screen pattern, or fingerprint scanner to unlock your phone.
-

4
Hold the back of your phone close to the payment scanner. A blue checkmark will appear on the screen.
- Some stores may require you to enter a PIN or signature in the payment reader.[2]
- You can also use Google Pay to withdraw cash at ATMs that support Google Pay. You will still need to enter your PIN on the ATM keypad.
- Some stores may require you to enter a PIN or signature in the payment reader.[2]
Advertisement
-

1
Open Google Pay. It has an icon with a blue, red, green, and yellow «G» with the word «Pay» next to it. Tap the icon to open the Google Pay app.
-

2
Tap Passes. It has an icon that resembles a ticket stub. It’s the third icon at the bottom of the screen. This menu allows you to add public transportation passes, loyalty cards, and gift cards to your Google Pay account.
-

3
Tap + Pass. It’s the blue button at the bottom of the screen.
-

4
Tap Transit, Loyalty program, or Gift card. Tap the type of pass you want to add. Tap Transit to add a public transportation pass. Tap Loyalty program to add a discount or rewards card for a store your frequently shop at. Tap Gift card to add a gift card to your Google Pay account.
- Transit is currently only available in a few select cities.
-

5
Tap the name of a store or business. You can either browse the list of stores and chains nearby, or you can use the search bar at the top of the screen to enter the name of a store or business you have a loyalty, discount, or gift card for.
-

6
Enter the card information. The way you enter the card information is different for each card type. Use one of the following steps to enter your card information:
-

7
«Transit:’ Transit is currently only available in a few select cities. To add a transit pass, you may be asked to buy tickets online, create or scan a transit card, or sign in to Token Transit or your local public transportation company.
-

8
Loyalty card: Hold your phone steady over the barcode on the card until it scans. If you are unable to scan the card, tap Enter manually and use the number pad to enter the card number.
- Gift card: Use the on-screen number pad to enter the card number, PIN or security code, and the balance on the card.
-

9
Tap Save. It’s the blue button at the bottom of the screen. This saves your card to your Google Pay account.
Advertisement
-

1
Go through the checkout process. When you are finished shopping, have the cashier scan your items.
-

2
Open Google Pay. It has an icon with a blue, red, green, and yellow «G» with the word «Pay» next to it. Tap the icon to open the Google Pay app.
-

3
Tap Passes. It has an icon that resembles a ticket stub. It’s the third icon at the bottom of the screen. This menu displays all the gift cards, loyalty cards, and offers you have added to your Google Pay account.
-

4
Tap the card you want to use. This displays a number and barcode for the card on-screen.
-

5
Ask the cashier to scan the barcode. The cashier can use their scanning device to scan the barcode directly from your phone.
- If your screen is dirty or cracked, the cashier may not be able to scan the barcode. If they are unable to scan the barcode, you can ask them to enter the card number manually.[3]
- If your screen is dirty or cracked, the cashier may not be able to scan the barcode. If they are unable to scan the barcode, you can ask them to enter the card number manually.[3]
Advertisement
-

1
Open Google Pay. It has an icon with a blue, red, green, and yellow «G» with the word «Pay» next to it. Tap the icon to open the Google Pay app.
-

2
Tap ☰. It’s the icon with three vertical lines in the upper-right corner. This displays the menu.
-

3
Tap Activity. It’s the first option at the top of the screen. It’s next to an icon that resembles a ledger. This displays all your purchases and requests.
Advertisement
-

1
Open Google Pay. It has an icon with a blue, red, green, and yellow «G» with the word «Pay» next to it. Tap the icon to open the Google Pay app.
-

2
Tap ☰. It’s the icon with three vertical lines in the upper-right corner. This displays the menu.
-

3
Tap Settings. It’s next to an icon that resembles a gear in the Menu. This displays the Settings menu.
-

4
Tap General. This displays the General Settings menu. The General Settings menu has the following icons.
- Email Updates: If you want to receive email updates about Google Pay, tap the toggle switch next to «Email Updates».
- Gmail Imports: This option allows you to connect to Gmail so that they may send rewards and offers to your Gmail inbox. To turn this feature on, tap the toggle switch next to «Gmail Imports».
- Location Settings: This opens your Location Settings menu on your smartphone. You can turn on Locations in this menu.
-

5
Tap Edit account info. It’s in the General Settings menu in Google Pay. This menu has a few important account-related settings you may want to look at. They are as follows:
- Require a PIN to send money: This provides an extra layer of security. Tap the checkbox next to this option to require a PIN before sending money.
- Receive commercial payments: If you plan on using your Google Pay account for business-related transactions, tap the checkbox next to this option.
- Country/Region: If you need to change your country or region, tap the pencil icon next to this option and select your country or region.
- Tax exemption info: If you want to add any tax exemption info, tap the pencil icon next to this option and add your tax exemption info.
- Name and Address: If you need to change your name or address, tap the pencil icon next to this option and fill out the form to change your name and address.
- Document language preference: If you want to change your language preference, tap the pencil icon next to this option.
- Privacy Settings: There are three options below «Privacy Settings.» It is recommended that you review these and tap the checkbox to turn them off if you want to protect your privacy. The options are as follows:
- Allow Google Payment Corporation to share third party creditworthiness information about you with other companies owned and controlled by Google LLC for their everyday business purposes.
- Allow your personal information to be used by other companies owned and controlled by Google LLC to market to you.
- Allow Google LLC or its affiliates to inform a third party merchant, whose site or app you visit, whether you have a Google Payments account that can be used for payment to that merchant. Opting out may impact your ability to use Google Payments to transact with certain third party merchants.
-

6
Tap Save. It’s the blue button at the bottom of the General Settings menu.
-

7
Return to the Settings menu. If you are in the General Settings menu, tap the arrow icon in the upper-left corner to return to the Settings menu. Otherwise, tap the icon with three lines in the Google Pay app and then tap Settings.
-

8
Tap Notifications. This menu displays notifications. To turn off a notification, tap the toggle switch next to it. The notifications are as follows:
- Purchases: This allows you to receive notifications about transactions you make.
- Offers & Tips: This allows you to receive notifications about rewards and discounts.
- Where you can pay in store: This option allows you to receive notifications about stores near you that accept Google Pay.
- Where you can use passes: This allows you to receive notifications about where you can redeem rewards programs.
- Updates about your passes: This allows you to receive notifications about new rewards you earn.
- Money sent to you: This allows you to receive notifications when someone sends you money.
- Reminders to send money: This allows you to receive notifications when you need to send money.
-

9
Return to the Settings menu. If you are in the Notifications menu, tap the arrow icon in the upper-left corner to return to the Settings menu. Otherwise, tap the icon with three lines in the Google Pay app and then tap Settings.
-

10
Tap Sending Money. This menu has two settings. They are as follows:
- Require a PIN: If you want to require a PIN to send money, tap the toggle switch next to this option.
- Use biometrics instead: If you want to use your fingerprint scanner or eye scanner instead of a PIN, tap the toggle switch next to this option.
Advertisement
Ask a Question
200 characters left
Include your email address to get a message when this question is answered.
Submit
Advertisement
Thanks for submitting a tip for review!
References
About This Article
Article SummaryX
1. Open Google Pay.
2. Tap Payment methods.
3. Tap + Add Payment Method.
4. Select Debit or credit card or PayPal.
5. Follow the instructions to add a new payment method.
6. Tap Send.
7.. Tap + Send or request.
8. Select a contact.
9. Enter the dollar amount you want to send or request.
10. Tap Send or Request.
11. Tap Confirm & Send or Done.
12. Unlock your phone and hold it close to the payment scanner to pay during checkout at a store.
Did this summary help you?
Thanks to all authors for creating a page that has been read 19,780 times.
Is this article up to date?
![]()
Download Article
![]()
Download Article
Google Pay is a digital wallet that allows you to quickly send and receive money. In 2018, Google Pay replaced both Google Wallet and Android Pay. Google Pay allows you to add and manage your debit and credit cards, as well as your PayPal account. This information is stored on a secure server. Google Pay uses a virtual account number, instead of your credit or debit card number to make transactions.[1]
You can use Google pay to send and receive money from your contacts, as well as pay at stores that support Google Pay. You can also use Google Pay to add transit passes, loyalty cards, and gift cards to your account. This wikiHow teaches you how to use Google Pay.
-
1
Open Google Pay. It has an icon with a blue, red, green, and yellow «G» with the word «Pay» next to it. Tap the icon to open the Google Pay app.
- If you do not have the Google Pay app installed on your phone, you can download Google Pay for free using the Google Play Store on Android, or the App Store on iPhone.
-
2
Select your email address. If you are using an Android device, you will see a list of all Google accounts you have signed into on your device. Tap the email address you want to use to set up your Google Pay account to continue. On iPhone and iPad, use the drop-down menu at the bottom of the screen to select your email address and tap the blue button at the bottom to continue.
- If you don’ t see the email address you want to use listed, tap Use another account on iPhone and iPad and sign in with the username and password associated with your Google account. On Android, you will need to add another Google account in the Settings menu of your smartphone.
Advertisement
-
3
Tap Get Started. It’s the blue button at the bottom of the screen. This will take you to the Google Pay main menu.
- If you have Locations turned off, you may be asked to turn them on so that you can be notified when you can use Google Pay. You can either tap Turn on or No thanks at the bottom of the screen. Be aware that if you have Locations turned on, Google may use your information for targeted advertising.
Advertisement
-
1
Open Google Pay. It has an icon with a blue, red, green, and yellow «G» with the word «Pay» next to it. Tap the icon to open the Google Pay app.
-
2
Tap Payment or Payment Methods. It’s the second option at the bottom of the screen. It has an icon that resembles a credit card.
-
3
Tap + Add Payment Method. It’s the blue button at the bottom of the screen.
- If you already have a credit or debit card set up with another Google service, such as Google Play, you’ll be given the option to connect that card to your Google Pay account.
-
4
Tap Credit or debit card. It’s the first option at the bottom of the screen when adding a payment method.
-
5
Enter your credit card information. You will need to enter your credit card number, the month and year of your expiration date, and the CVC security code on the back of the card. You may also need to enter your name and billing address if it isn’t automatically populated by your Google account information.
- If you have the right kind of camera, you can line up your card with camera feed in the center of the screen to scan your card number automatically. Alternatively, you can tap Enter manually to skip using your camera.
-
6
Tap Save. It’s the blue button at the bottom of the screen. This saves your credit or debit card information.
-
7
Scroll to the bottom and tap Accept & continue. You must agree to the Issuer terms. To do so, read the text. When you get to the bottom, tap the button that says Accept & continue. Google Pay will contact your bank and verify your card.
-
8
Tap Got it. After your card has been verified, you will see a screen informing you phone security sign-in method will be used for Google Pay. This may be your password, screen-lock code, or pattern.
-
9
Tap Continue to confirm your identity. Most likely, this will open your Bank app and ask you to sign in to your bank account.
-
10
Sign in to your bank app. Your bank app will open automatically. To confirm your identity, sign in with your username and password or PIN. Once your identity is confirmed, you will see a screen informing you that you are ready to use Google Pay.
Advertisement
-
1
Open Google Pay. It has an icon with a blue, red, green, and yellow «G» with the word «Pay» next to it. Tap the icon to open the Google Pay app.
-
2
tap Payment or Payment Methods. It’s the second option at the bottom of the screen. It has an icon that resembles a credit card.
-
3
Tap + Add Payment Method. It’s the blue button at the bottom of the screen.
-
4
Tap PayPal. It’s the second option at the bottom of the screen when you add a payment method.
-
5
Enter the email. Use the first line to enter the email address associated with your PayPal account.
-
6
Tap Allow. It’s the blue button at the bottom of the screen.
-
7
Tap Next. It’s the blue button at the bottom of the screen that explains using PayPal with Google Pay.
-
8
Enter and confirm your PIN. Type a 4-digit number you want to use as your PIN. Then type it again to confirm it.
-
9
Tap Agree & Continue. It’s the blue button at the bottom of the screen.
-
10
Confirm your address and tap Continue. Check to make sure your address at the top is correct. If it is incorrect, tap it and enter your correct address. Tap Continue at the bottom of the screen when you are ready to continue.
Advertisement
-
1
Open Google Pay. It has an icon with a blue, red, green, and yellow «G» with the word «Pay» next to it. Tap the icon to open the Google Pay app.
-
2
Tap Send. It has an icon that resembles a paper airplane. It’s in the lower-right corner of the screen.
-
3
Tap + Send or request. It’s the blue button the blue button at the bottom of the screen.
-
4
Enter a contact you want to send or request money from. Use the search bar at the top to enter a contact’s name, phone number, or email address. Then tap the contact’s name when they appear in your list of search results.
-
5
Enter the amount you want to send or request. Use the on-screen number pad to enter the amount you want to send or request.
-
6
Add a note (optional). If you want to add a note, tap Add note below the amount. Type a brief note and tap Done.
-
7
Tap Send or Request. Both these options are at the bottom of the screen. If you want to send money to a contact, tap Send. If you want to request money, tap Request.
-
8
Tap Confirm & Send or Done. If you are sending money, tap Confirm & Send. If you are requesting money, tap Done to send your request.
- You can also send and request money using Gmail. To do so, open the Gmail app and compose a new email. Tap the paperclip icon to add an attachment. Then tap Send money or Request money. Enter the dollar amount you want to send or request.
Advertisement
-
1
Find a vendor or machine that supports Google Pay. Most merchants that support Google Pay have a sticker that says that they accept Google Pay. Look for this sticker during checkout.
-
2
Go through the checkout process. Place your items on the counter and let the cashier scan them. If you’re using a vending machine, make the order by pressing the correct buttons for the item you want.
-
3
Unlock your phone. To use Google Pay, you must unlock your phone. Use your password, on-screen pattern, or fingerprint scanner to unlock your phone.
-
4
Hold the back of your phone close to the payment scanner. A blue checkmark will appear on the screen.
- Some stores may require you to enter a PIN or signature in the payment reader.[2]
- You can also use Google Pay to withdraw cash at ATMs that support Google Pay. You will still need to enter your PIN on the ATM keypad.
- Some stores may require you to enter a PIN or signature in the payment reader.[2]
Advertisement
-
1
Open Google Pay. It has an icon with a blue, red, green, and yellow «G» with the word «Pay» next to it. Tap the icon to open the Google Pay app.
-
2
Tap Passes. It has an icon that resembles a ticket stub. It’s the third icon at the bottom of the screen. This menu allows you to add public transportation passes, loyalty cards, and gift cards to your Google Pay account.
-
3
Tap + Pass. It’s the blue button at the bottom of the screen.
-
4
Tap Transit, Loyalty program, or Gift card. Tap the type of pass you want to add. Tap Transit to add a public transportation pass. Tap Loyalty program to add a discount or rewards card for a store your frequently shop at. Tap Gift card to add a gift card to your Google Pay account.
- Transit is currently only available in a few select cities.
-
5
Tap the name of a store or business. You can either browse the list of stores and chains nearby, or you can use the search bar at the top of the screen to enter the name of a store or business you have a loyalty, discount, or gift card for.
-
6
Enter the card information. The way you enter the card information is different for each card type. Use one of the following steps to enter your card information:
-
7
«Transit:’ Transit is currently only available in a few select cities. To add a transit pass, you may be asked to buy tickets online, create or scan a transit card, or sign in to Token Transit or your local public transportation company.
-
8
Loyalty card: Hold your phone steady over the barcode on the card until it scans. If you are unable to scan the card, tap Enter manually and use the number pad to enter the card number.
- Gift card: Use the on-screen number pad to enter the card number, PIN or security code, and the balance on the card.
-
9
Tap Save. It’s the blue button at the bottom of the screen. This saves your card to your Google Pay account.
Advertisement
-
1
Go through the checkout process. When you are finished shopping, have the cashier scan your items.
-
2
Open Google Pay. It has an icon with a blue, red, green, and yellow «G» with the word «Pay» next to it. Tap the icon to open the Google Pay app.
-
3
Tap Passes. It has an icon that resembles a ticket stub. It’s the third icon at the bottom of the screen. This menu displays all the gift cards, loyalty cards, and offers you have added to your Google Pay account.
-
4
Tap the card you want to use. This displays a number and barcode for the card on-screen.
-
5
Ask the cashier to scan the barcode. The cashier can use their scanning device to scan the barcode directly from your phone.
- If your screen is dirty or cracked, the cashier may not be able to scan the barcode. If they are unable to scan the barcode, you can ask them to enter the card number manually.[3]
- If your screen is dirty or cracked, the cashier may not be able to scan the barcode. If they are unable to scan the barcode, you can ask them to enter the card number manually.[3]
Advertisement
-
1
Open Google Pay. It has an icon with a blue, red, green, and yellow «G» with the word «Pay» next to it. Tap the icon to open the Google Pay app.
-
2
Tap ☰. It’s the icon with three vertical lines in the upper-right corner. This displays the menu.
-
3
Tap Activity. It’s the first option at the top of the screen. It’s next to an icon that resembles a ledger. This displays all your purchases and requests.
Advertisement
-
1
Open Google Pay. It has an icon with a blue, red, green, and yellow «G» with the word «Pay» next to it. Tap the icon to open the Google Pay app.
-
2
Tap ☰. It’s the icon with three vertical lines in the upper-right corner. This displays the menu.
-
3
Tap Settings. It’s next to an icon that resembles a gear in the Menu. This displays the Settings menu.
-
4
Tap General. This displays the General Settings menu. The General Settings menu has the following icons.
- Email Updates: If you want to receive email updates about Google Pay, tap the toggle switch next to «Email Updates».
- Gmail Imports: This option allows you to connect to Gmail so that they may send rewards and offers to your Gmail inbox. To turn this feature on, tap the toggle switch next to «Gmail Imports».
- Location Settings: This opens your Location Settings menu on your smartphone. You can turn on Locations in this menu.
-
5
Tap Edit account info. It’s in the General Settings menu in Google Pay. This menu has a few important account-related settings you may want to look at. They are as follows:
- Require a PIN to send money: This provides an extra layer of security. Tap the checkbox next to this option to require a PIN before sending money.
- Receive commercial payments: If you plan on using your Google Pay account for business-related transactions, tap the checkbox next to this option.
- Country/Region: If you need to change your country or region, tap the pencil icon next to this option and select your country or region.
- Tax exemption info: If you want to add any tax exemption info, tap the pencil icon next to this option and add your tax exemption info.
- Name and Address: If you need to change your name or address, tap the pencil icon next to this option and fill out the form to change your name and address.
- Document language preference: If you want to change your language preference, tap the pencil icon next to this option.
- Privacy Settings: There are three options below «Privacy Settings.» It is recommended that you review these and tap the checkbox to turn them off if you want to protect your privacy. The options are as follows:
- Allow Google Payment Corporation to share third party creditworthiness information about you with other companies owned and controlled by Google LLC for their everyday business purposes.
- Allow your personal information to be used by other companies owned and controlled by Google LLC to market to you.
- Allow Google LLC or its affiliates to inform a third party merchant, whose site or app you visit, whether you have a Google Payments account that can be used for payment to that merchant. Opting out may impact your ability to use Google Payments to transact with certain third party merchants.
-
6
Tap Save. It’s the blue button at the bottom of the General Settings menu.
-
7
Return to the Settings menu. If you are in the General Settings menu, tap the arrow icon in the upper-left corner to return to the Settings menu. Otherwise, tap the icon with three lines in the Google Pay app and then tap Settings.
-
8
Tap Notifications. This menu displays notifications. To turn off a notification, tap the toggle switch next to it. The notifications are as follows:
- Purchases: This allows you to receive notifications about transactions you make.
- Offers & Tips: This allows you to receive notifications about rewards and discounts.
- Where you can pay in store: This option allows you to receive notifications about stores near you that accept Google Pay.
- Where you can use passes: This allows you to receive notifications about where you can redeem rewards programs.
- Updates about your passes: This allows you to receive notifications about new rewards you earn.
- Money sent to you: This allows you to receive notifications when someone sends you money.
- Reminders to send money: This allows you to receive notifications when you need to send money.
-
9
Return to the Settings menu. If you are in the Notifications menu, tap the arrow icon in the upper-left corner to return to the Settings menu. Otherwise, tap the icon with three lines in the Google Pay app and then tap Settings.
-
10
Tap Sending Money. This menu has two settings. They are as follows:
- Require a PIN: If you want to require a PIN to send money, tap the toggle switch next to this option.
- Use biometrics instead: If you want to use your fingerprint scanner or eye scanner instead of a PIN, tap the toggle switch next to this option.
Advertisement
Ask a Question
200 characters left
Include your email address to get a message when this question is answered.
Submit
Advertisement
Thanks for submitting a tip for review!
References
About This Article
Article SummaryX
1. Open Google Pay.
2. Tap Payment methods.
3. Tap + Add Payment Method.
4. Select Debit or credit card or PayPal.
5. Follow the instructions to add a new payment method.
6. Tap Send.
7.. Tap + Send or request.
8. Select a contact.
9. Enter the dollar amount you want to send or request.
10. Tap Send or Request.
11. Tap Confirm & Send or Done.
12. Unlock your phone and hold it close to the payment scanner to pay during checkout at a store.
Did this summary help you?
Thanks to all authors for creating a page that has been read 19,780 times.
Is this article up to date?
Android, Google Pay, Приложения
22.05.2018
Вы могли слышать о новой платежной системе от Google, которая называется Google Pay (ранее Android Pay). Если вы хотите узнать, как пользоваться Google Pay, то предлагаем ознакомиться с этим материалам. Здесь мы расскажем о том, как проверить свой телефон на совместимость с Google Pay, а также как его настроить.
Что такое Google Pay
 Google Pay – это платежная система от компании Google. Первоначально она появилась под названием Android Pay, но потом была переименована в Google Pay, поэтому Google Pay и Android Pay – это одно и то же.
Данная система оплаты недавно пришла в Россию и уже поддерживается практически всеми крупными банками. Сейчас Google Pay поддерживают такие банки как Альфа-банк, Ак Барс банк, Россельхозбанк, ВТБ24, Бинбанк, МТС-банк, Открытие, Русский стандарт, Райффайзенбанк, Промсвязьбанк, Сбербанк и Тинькофф банк. Полный список поддерживающих банков можно посмотреть в официальной справке.
Главная особенность платежной системы Google Pay – она бесконтактная и работает, используя NFC модуль смартфона. Благодаря этому, используя Google Pay вам больше не нужно носить с собой карты, все что нужно это телефон, который и так всегда с вами. Также вам не нужно передавать свою карту кассиру или самостоятельно проводить картой по терминалу. Более того, при небольших покупках вам даже не придется вводить PIN-код от карты, что во многих случаях значительно экономит время. Например, используя Google Pay можно мгновенно рассчитаться за проезд в метро, просто приложив телефон к терминалу.
Кроме этого, вы можете пользоваться Google Pay для оплаты в Интернете. Сейчас уже есть много сайтов, которые принимают платежи через эту систему. Для оплаты в онлайн нужно нажать на кнопку с логотипом Google Pay и дальше следовать инструкциям, которые будут появляться на экране.
Как добавить карту в Google Pay
Для того чтобы получить возможность пользоваться Google Pay, ваш телефон должен отвечать некоторым требованиям. Во-первых, телефон должен поддерживать технологию NFC, которая используется для бесконтактной оплаты. Если в телефоне NFC модуля, то ничего работать не будет. В этом случае нужно менять телефон, больше сделать ничего нельзя.
Для того чтобы проверить есть ли на вашем телефоне NFC модуль ознакомьтесь с его характеристиками. Также вы можете просто зайти в настройки Android и открыть раздел «Подключенные устройства». Если там есть функция NFC, значит такой модуль присутствует.

Во-вторых, для того чтобы пользоваться Google Pay у вас должна быть современная версия Android. Поддерживается только Android 4.4 и более новые версии. Чтобы посмотреть версию Android на вашем телефоне зайдите в настройки и откройте раздел «Система – О телефоне». Также на вашем смартфоне не должно быть Root-прав. Если вы получили Root-права, то вы не сможете пользоваться Google Pay. Кроме этого, проблемы могут возникнуть в том случае, если у вас установлена не официальная прошивка.

А в-третьих, на вашем телефоне должно установлено приложение Google Pay и в нем должна быть добавлена карта. Для этого нужно зайти в магазин приложений Play Market, ввести в поиск «Google Pay» или «Android Pay» и установить приложение.

После установки запускаем приложение и приступаем к его настройке.

Сама настройка Google Pay не представляет ничего сложного. Сначала вам нужно добавить карту, которая будет использоваться при оплате. Если ранее вы добавляли карту в сервис «Google кошелек», то система предложит использовать ее.

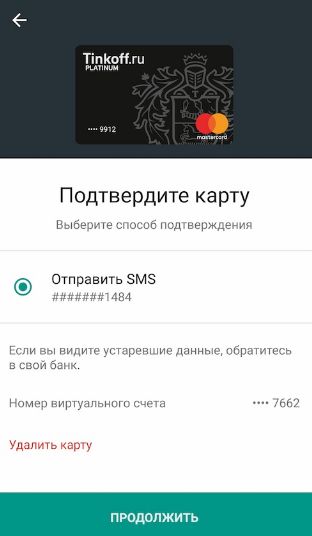
После добавления карты нужно принять условия использования Google Pay.

А потом подтвердить номер телефона с помощью SMS-сообщения.

После добавления карты и подтверждения номера появится интерфейс приложения Google Pay. Если там будут запросы доступ к NFC и геоданным, то их нужно подтвердить.

На этом настройка закончена можно начинать пользоваться Google Pay.
Как пользоваться Google Pay
Пользоваться Google Pay достаточно просто. Для того чтобы оплатить покупку вам нужно вывести телефон из спящего режима и разблокировать его. В некоторых странах разрешены небольшие покупки без разблокировки телефона.
Дальше нужно поднести заднюю сторону телефона к терминалу бесконтактной оплаты. Если оплата пройдет, то на экране телефона появится синий флажок. Если флажок не появляется, то попробуйте изменить положение телефона так чтобы NFC-антенна оказалась сразу над терминалом. NFC-антенна может быть расположена в верхней или нижней части корпуса. Также можно попробовать поднести телефон ближе к терминалу и подержать его чуть дольше. В некоторых случаях, флажок может появиться, но на кассе оплата не пройдет. Это означает, что данный магазин не поддерживает Google Pay.

После появления синего флажка у вас могут потребовать ввести PIN-код либо ввести PIN-код и расписаться. После этого оплата завершена.
Об авторе
Основатель проекта «Смартфонус» и автор более 2000 статей на тему ИТ для разных сайтов.
С выходом версии Android M осенью 2015 года в США начал функционировать платежный сервис Android Pay. Затем он был переименован в Google Pay, и стал доступен в России с мая 2017 года. В этой статье разберемся, что это за сервис и для чего он может быть полезен.
Что умеет Google Pay?
Google Pay позволяет вам, не прилагая особых усилий, оплачивать покупки с помощью вашего Android-смартфона в магазинах, в Интернете или в мобильных приложениях.
В обычном магазине на кассе вы можете просто приложить смартфон к терминалу оплаты, и ваша покупка будет оплачена — без наличных денег, без пластиковой карты и PIN-кода. Правда, если вы сделаете больше трех транзакций на сумму больше 1000 рублей, вам придется разблокировать телефон, чтобы одобрить платеж.

Оплату через Google Pay поддерживают практически все крупнейшие российские торговые сети — «Пятёрочка», «Перекресток», «Карусель», «Магнит», «Лента», а также сети быстрого питания (McDonald’s, KFC, Burger King), автозаправки (Роснефть, Башнефть) и некоторые магазины электроники («М-Видео», «Эльдорадо»).
В приложениях или Интернет-магазинах, которые вы посещаете со своего смартфона, вы тоже можете платить с помощью Google Pay, если продавец поддерживает такой способ оплаты. К примеру, с помощью Google Pay можно оплатить вызов такси через Uber, покупку на Lamoda и Pandao или заказ пиццы в «Додо».
Деньги за покупку в супермаркете или Интернет-магазине снимаются с вашей банковской карты Visa или Mastercard. В России сервис сотрудничает с 55 различными банками, как с крупными федеральными (Сбербанк, Тинькофф, Альфа-Банк, ВТБ24), так и с более мелкими региональными — полный список банков можно прочитать здесь.
Как воспользоваться Google Pay?
Система Google Pay поддерживается на всех Android-смартфонах, начиная с версии Android 4.4. Узнать версию Android на вашем смартфоне можно, найдя в настройках пункт «Система» > «О телефоне».
Для оплаты в обычных оффлайновых магазинах у вашего смартфона должен быть встроенный NFC-чип. В новых моделях смартфонов он, как правило, есть. Проверить его наличие можно, найдя соответствующий пункт в настройках смартфона, или же просто прочитав технические характеристики устройства в Интернете.
Чтобы использовать Google Pay, необходимо для начала загрузить и настроить бесплатное приложение Google Pay для Android. Скачать его можно по этой ссылке. Важно: для использования приложения на смартфоне должна быть установлена официальная прошивка.
Кроме того, приложение может не запуститься, если на смартфоне получен root-доступ, то есть права суперпользователя. Помимо этого, на телефоне обязательно должна быть включена блокировка экрана, чтобы никто другой не мог воспользоваться вашими данными для оплаты.
После установки приложения (оно, разумеется, бесплатное) нужно зайти в настройки смартфона и включить NFC. Затем нужно настроить блокировку экрана при помощи пароля или графического ключа в разделе «Экран блокировки и защита». После этого можно запустить приложение.
Чтобы пользоваться платежной системой, необходимо внести в приложение данные своей банковской карты (или карт, если у вас их несколько). Если вы привязали банковскую карту к своему аккаунту Google — некоторые смартфоны предлагают сделать это непосредственно при первичной настройке телефона, — то приложение «подцепит» ее автоматически.

Если карта не привязана, вам будет предложено ее отсканировать или вручную ввести ее номер и срок действия. Кроме того, в любом случае нужно будет вручную ввести код подлинности карты (CVC — три цифры на обороте карты), а также ваши личные данные: ФИО, полный адрес и номер телефона.
После этого нужно принять условия использования сервиса, дождаться проверки карты и подтвердить, что вы ее владелец, путем ввода кода из SMS, которую Google пришлет на ваш номер телефона. При этом с вашего счета спишется небольшая сумма (около 30 рублей). Через некоторое время она будет возвращена обратно — просто убедитесь перед настройкой, что у вас на счету есть деньги.
На этом настройка будет завершена, и вы сможете успешно пользоваться системой Google Pay. Даже если у вашего смартфона нет NFC-чипа, установить приложение все равно имеет смысл, чтобы безопасно расплачиваться в Интернет-магазинах и приложениях.
Действительно ли это безопасно? Да. Ваши данные всегда передаются в зашифрованном виде. Таким образом, их безопасности ничто не угрожает. Продавцы получают деньги от Google, банковские реквизиты ваших карт им не передаются. Затем Google списывает потраченную сумму с вашего счета.
Существует два небольших нюанса, связанных с самой компанией Google. Во-первых, за каждый платеж Google получает небольшую комиссию, но ее всегда платит продавец. Кроме того, Google использует ваши анонимизированные данные для изучения потребительского поведения.
Читайте также:
- Кто платит: Google Pay VS Apple Pay
- В России появится свой аналог Google Pay и Apple Pay
- 4 причины купить смартфон с NFC, если у вас его еще нет
Фото: Google, авторские, pxhere.com