
- Manuals
- Brands
- Xiaomi Manuals
- Cell Phone
- Redmi Note 9T
- User manual
-
Contents
-
Table of Contents
-
Bookmarks
Quick Links
Related Manuals for Xiaomi Redmi Note 9T
- Cell Phone Xiaomi Redmi Note 9S User Manual
(102 pages)
- Cell Phone Xiaomi Redmi Note 9 Pro User Manual
(9 pages)
- Cell Phone Xiaomi Redmi Note 10S Quick Start Manual
(46 pages)
- Cell Phone Xiaomi Redmi Note 10 5G Manual
(36 pages)
- Cell Phone Xiaomi Redmi Note 7 User Manual
(53 pages)
- Cell Phone Xiaomi Redmi Note 9 User Manual
(108 pages)
- Cell Phone Xiaomi Redmi Note 9 Pro User Manual
(102 pages)
- Cell Phone Xiaomi Redmi Note 10 JE Notes On Usage
(48 pages)
- Cell Phone Xiaomi Redmi Note 10 JE Quick Start Manual
(10 pages)
- Cell Phone Xiaomi Redmi Note 10 5G Quick Start Manual
(27 pages)
- Cell Phone Xiaomi Redmi 5A Manual
(9 pages)
- Cell Phone Xiaomi Redmi 7 User Manual
(53 pages)
- Cell Phone Xiaomi Redmi 9 User Manual
(102 pages)
- Cell Phone Xiaomi Mi 11 Lite User Manual
(27 pages)
- Cell Phone Xiaomi Mi phone User Manual
(37 pages)
- Cell Phone Xiaomi Mi 9 User Manual
(53 pages)
Summary of Contents for Xiaomi Redmi Note 9T
- Page 1
Redmi Note 9T User Guide… -
Page 3: Table Of Contents
Getting Started Parts & Functions………….. 6 SIM Card…………….7 Internal Storage and SD Card……….9 Charging Battery………….. 12 Power On/Off…………..13 Redmi Note 9T Making Initial Settings………… 14 User Guide Contents Using a Google Account……….. 17 Unlocking Screen……………20 Basic Operations Basic Operation…………..22 Using Touchscreen…………
- Page 4
About Phone (Handset Information) Settings….69 Data Usage Settings…………69 Lock Screen Settings…………70 Display Settings…………..70 Sound & Vibration Settings……….71 Home Screen Settings…………71 Password & Security Settings………72 Battery & Performance Settings……..73 Additional Settings…………75 Other Settings…………..75 Global Services Global Roaming…………..80 Making Calls while Abroad………. -
Page 5: About The User Guide
Introduction About the User Guide In the User Guide, most operation descriptions are based on handset at time of purchase. Unless noted otherwise, descriptions are for Home Screen. Some operation descriptions may be simplified. Before Using This Product Read «Quick Start» and «Safety Precautions» thoroughly for proper usage.
-
Page 7: Getting Started
Getting Started Parts & Functions………….. 6 SIM Card…………….7 Internal Storage and SD Card……….9 Charging Battery………….. 12 Power On/Off…………..13 Making Initial Settings………… 14 Using a Google Account……….. 17 Unlocking Screen……………20…
-
Page 8: Parts & Functions
Parts & Functions Handset (Back/Side) Handset (Front) Part Description Part Description Suppresses noise when speaking into Mic. Second Mic Front Infrared Use to shoot photos or videos of yourself. Not functional on this model. Camera Sensor Proximity/ SIM Card/ Detects ambient light level, etc. Install/remove SD Card and SIM Card.
-
Page 9: Sim Card
SIM Card Keys SIM Card is an IC card containing phone number and other customer information. Handling SIM Card For SIM card handling, see following items. IC chip Part Description For SIM card handling, see SoftBank Website. Adjust Volume. Volume Key https://www.softbank.jp/mobile/support/protect/usim/ Long Press for power on/off.
- Page 10
Removing SIM Card Pull out SIM Card/SD Card Tray straight Always power off handset beforehand. Insert SIM Removal Pin (complimentary sample) into Tray Removal Hole straight Place SIM Card in SIM Card/SD Card Tray ・Place gently, noting orientation of SIM Card (notch/IC (gold) Pull out SIM Card/SD Card Tray straight chip facing down). -
Page 11: Internal Storage And Sd Card
Internal Storage and SD Card Place SD Card in SIM Card/SD Card Tray Handset supports SD Cards up to 512 GB. Some SD Cards may not operate properly. When using a new SD card for the first time, always format it on handset.
- Page 12
Formatting SD Card Format SD card In Home Screen, (Settings) DONE All data on SD Card is erased. About phone Formatting SD Card Cautions Observe the following when formatting SD Card. ・Formatting erases all data on SD Card. Carefully check any SD Card that was used on another device before formatting. - Page 13
Unmounting SD Card Removing SD Card Always power off handset beforehand. In Home Screen, (Settings) Insert SIM Removal Pin (complimentary sample) into Tray Removal Hole straight Pull out SIM Card/SD Card Tray straight About phone Remove SD Card from SIM Card/SD Card Tray Storage Insert SIM Card/SD Card Tray in SIM Card/SD Card Slot straight… -
Page 14: Charging Battery
Charging Battery When charging is complete, unplug AC Charger (complimentary sample) and remove USB Type-C plug on USB Type-C™ Cable Indications while Charging (complimentary sample) from handset Charging progress appears in lock screen. ・»Charging»: normal charging ・»Fast charging»: rapid charging Charging ends.
-
Page 15: Power On/Off
Power On/Off Powering Off Powering On Press and hold Power Key for at least 1 second Press and hold Power Key for at least 5 seconds (Power off) Lock screen appears. ・For details on unlocking screen, see «Unlocking Screen.» ・Startup screen appears for the first time handset is powered on.
-
Page 16: Making Initial Settings
Making Initial Settings Check the terms of use and privacy policy, then I’ve read When powering on the first time, an initial settings wizard and agree to the User Agreement and Privacy Policy. appears for optionally making Wi-Fi, Google™ account, and other settings.
- Page 17
Set/check Google Services Accept Don’t copy ・ Tap Next to copy data from another mobile with Google account settings. Follow onscreen prompts. Continue Sign in with Google Account ・To finish initial settings later and receive a reminder, Tap Leave & get reminder ・For details on Google accounts, see «Creating a Google Account.»… - Page 18
Skip Fingerprint Only screen lock ・ After Tapping ・To not set fingerprint authentication or a screen lock, Tap Add a card , follow onscreen prompts to Skip this step save card information. Follow onscreen prompts to set unlocking using fingerprint Set each item Done for now and a screen lock… -
Page 19: Using A Google Account
Using a Google Account Google Use a Google account and get more convenience with Google services. A Google account is required to use some services or fully use some applications. Google Account Cautions Be careful not to forget your Google account mail address or password.
- Page 20
Set date of birth and gender Next Next Select Gmail address Next Check the privacy policy and terms of usage, then I agree ・ To create a Gmail address, Create your own Gmail address Enter username (mail address) Next Set/check Google Services Enter password Next Accept… - Page 21
Logging In with a Google Account Enter username (mail address or phone number) Next In Home Screen, (Settings) Enter password Next Accounts & sync Follow onscreen prompts Add account You are signed in to your Google Account. Google Window for signing in to a Google account opens. -
Page 22: Unlocking Screen
Unlocking Screen Unlocking Screen Screen Lock While screen is locked, press Power Key After a period of inactivity, Display turns off to save battery power (Screen lock active). Screen lock prevents accidental Touchscreen operation. Lock screen appears. Swipe/Flick lock screen up ・Press Power Key while Display is on to lock screen manually.
-
Page 23: Basic Operations
Basic Operations Basic Operation…………..22 Using Touchscreen…………22 Silent Mode…………… 23 Airplane Mode…………..24 Text Entry……………..24 Updating Software…………25…
-
Page 24: Basic Operation
Basic Operation Using Touchscreen Handset uses a touchscreen-type Display. Operate with your Selecting Options and Navigating fingers on Display. Screens Tap items, icons, onscreen keys, etc. to open assigned items. Contact Display lightly and briefly. Touch & Hold ・ To return to the previous screen, Tap Contact Display lightly;…
-
Page 25: Silent Mode
Silent Mode Pinch/Spread Mute ringtones and other handset sounds to avoid disturbing Contact Display lightly, then close/widen fingers. others around you. Silent Mode Cautions Camera shutter, video start/stop tones, Alarm, video/ music, etc. sound even in Silent mode. Using Silent Mode Press Volume Key Volume adjustment bar appears.
-
Page 26: Airplane Mode
Airplane Mode Text Entry Disable all functions that emit signals. Handset remains Keyboards powered on. Enter text with onscreen QWERTY keyboard by Tapping each Using Airplane Mode character individually, or by using Glide typing feature and sliding finger from character to character (on by default). Touch &…
-
Page 27: Updating Software
Updating Software Switching Character Types (Entry Modes) Check whether updates are required via the Internet, and update as required. In QWERTY keyboard, Tap Before Updating Software Saved data may be lost depending on condition of handset (malfunctioning, damaged, water seepage, etc.). It is recommended that you back up important data before updating software.
- Page 28
Check for update Continue by following onscreen prompts. Software update starts. -
Page 29: Handset Interface
Handset Interface Handset Screens…………… 28 Status Bar…………….. 29 Using Notifications Window……….30 Using Quick Settings…………30…
-
Page 30: Handset Screens
Handset Screens Navigation Bar Tap or Touch & Hold icons on Navigation Bar (Display bottom) Home Screen Layout for the following functions/operations. Also use gesture action. Item Description Item Description (Back) Return to previous screen. Swipe/Flick down for Notifications Tap for Home Screen. Status Bar Window.
-
Page 31: Status Bar
Status Bar Main Status Indicators Status Bar appears at the top of Display. Notification Status Indicators appearing in Status Bar include the Indicators for new mail, etc. and Status Indicators for handset following. appear here. Indicator Description Status Bar Layout Bluetooth ®…
-
Page 32: Using Notifications Window
Using Notifications Window Using Quick Settings Swipe/Flick Status Bar down for Notifications Window. Open Swipe/Flick Notifications Window down to open Quick notifications and check handset status. Settings. Tap icons in Quick Settings to enable/disable functions. Opening Notifications Window Opening Quick Settings Swipe/Flick Status Bar down Swipe/Flick Status Bar down Notifications Window opens.
- Page 33
Quick Settings Layout Showing Quick Settings in Lock Screen Swipe/Flick Status Bar down Toggle Wi-Fi on/off Toggle mobile data on/off Toggle Bluetooth on/off ® Capture screenshot Lock screen Toggle access to location on/off Turn flashlight on/off Enter/exit Silent mode Toggle screen auto brightness on/off Toggle Airplane mode on/off Activate (Scanner) - Page 34
Toggle NFC on/off Edit Quick Settings Position of function button sheet Adjust screen brightness… -
Page 35: Phone
Phone Placing/Answering Calls……….. 34 Optional Services…………..36 Phone Number…………..42 Using Contacts…………..42…
-
Page 36: Placing/Answering Calls
Placing/Answering Calls Placing Calls How to dial directly to make a call and answer a call, as well as options when a call is arriving/during a call are described. In Home Screen, (Phone) Phone Function Emergency Location Report Making emergency calls (110, 119 or 118) automatically reports handset location to corresponding agency (police, etc.).
- Page 37
Answering Calls Swipe/Flick up when call is arriving Handset dials number. Call begins when other party answers. Call begins. To end call, To end call, Call ends. Call ends. Calling the Emergency Number When the Phone’s Screen is Locked Arriving Call Operations In lock screen, Swipe/Flick up EMERGENCY Enter… -
Page 38: Optional Services
Optional Services In-Call Screen Layout/In-Call Operations While in a call, Tap an icon to use these functions. Optional Services The following optional services are available. Service Description Call Divert calls to a preset number when out forwarding of service area or unable to answer. Divert calls to a Voicemail Center to take Voicemail messages when out of service area or…
- Page 39
Using Call Forwarding Voice Mail / Call Forwarding Call Forwarding ON In Home Screen, (Phone) Ring Time Select ring time Settings Calls Telephone Number of Forwarding Destination Enter phone number to forward to REGISTER Call service settings Call service settings open. CONFIRM Voice Mail / Call Forwarding Set call forwarding. - Page 40
Using Voicemail Voice Mail / Call Forwarding Voice Mail ON In Home Screen, (Phone) Ring Time Select ring time Settings Calls CONFIRM Call service settings Voicemail is set. ・ appears in Status Bar for new message. Dial «1416» then Call service settings open. follow voice guidance. - Page 41
Using Call Waiting for «Call Waiting» ( Requires separate subscription. In Home Screen, (Phone) Call Waiting is set. ・When call arrives during another call, tone sounds. Swipe/ Flick up to begin call. Settings Calls Call Service settings Call service settings open. - Page 42
Using Group Calling Using Caller ID Notification Requires separate subscription. In Home Screen, (Phone) During a call, Add call Settings Calls Enter number Advanced settings Caller ID When call connects, Merge Caller ID Network default Hide number Show Group Calling starts. number Notify Caller ID is set. - Page 43
Using Call Barring Outgoing Call Barring Incoming Call Barring Restrict outgoing calls to specific numbers. outgoing/incoming restriction ・When attempting to place call while calling is restricted, a message appears. Message may take time to appear in some areas. In Home Screen, (Phone) Call Barring is set. -
Page 44: Phone Number
Phone Number Using Contacts Save phone numbers, mail addresses, etc. to Contacts. Checking Your Phone Number Contacts Cautions Information saved in Contacts may be lost or changed if In Home Screen, (Settings) About phone Battery is left uncharged. Accident or malfunction may also cause loss or change to information.
- Page 45
Set each item ・ Tap More fields to add a residential address, chat, etc. Save Contact is added. Saving Contacts from Call Window Save a number entered in call window directly to Contacts. In Home Screen, (Phone) Tap dialpad to enter number to save Create new contact each item… -
Page 47: Messaging
Messaging Using +Message…………..46 Using Gmail…………… 46…
-
Page 48: Using +Message
Using +Message Using Gmail Use Google’s webmail service as well as your work/personal Using +Message email. For information on +Message, see SoftBank Website below. Creating/Sending Mail http://help.mb.softbank.jp/app/plusmessage/sp/ (Japanese) In Home Screen, (Google) (Gmail) Mail list opens. Mail composition window opens.
- Page 49
Enter recipient/subject/mail text Mail is sent. Operations when Composing Mail Adding Cc/Bcc In mail composition window, in To field Enter recipient Attaching Files In mail composition window, Attach file Select where file is saved Select file to attach ・ Select Insert from Drive to attach files saved in Google Drive. -
Page 51: Internet
Internet Using Chrome…………..50…
-
Page 52: Using Chrome
Using Chrome Enter search words or URL Use Chrome simply by entering words to search and URLs. TLS (Transport Layer Security) is a protocol for encrypting sent/received data. While in a screen connected by TLS, data is encrypted to safely send/receive private information, credit card numbers, corporate secrets, etc., and provide protection against online threats (eavesdropping, falsification, impersonation, etc.).
- Page 53
Adding Bookmarks Show Web page to add Current Web page is added to Bookmarks. Bookmark Operations Editing Bookmarks In Chrome, Bookmarks Touch & Hold target bookmark Edit items Deleting Bookmarks In Chrome, Bookmarks Touch & Hold target bookmark… -
Page 55: Camera
Camera Capturing Still Images/Videos……… 54 Viewing Captured Still Images/Videos (Gallery)…. 56…
-
Page 56: Capturing Still Images/Videos
Capturing Still Images/Videos Aim Camera at subject Still Image/Video Formats File Format for Still Images File format for still images is JPEG. File Format for Videos File format for videos is MPEG-4. ・ Tap Display Swipe/Flick Display up/down to adjust Camera Cautions brightness.
- Page 57
Capturing Videos In Home Screen, (Camera) Video recording starts. ・Depending on setting, press Volume Key to start/stop video recording. To stop recording, Photo Viewfinder appears. ・If confirmation appears, follow onscreen instructions. Video Video recording stops and video is saved. Video Viewfinder appears. ・Alternatively, Drag shooting mode to the right for Video Viewfinder. -
Page 58: Viewing Captured Still Images/Videos (Gallery)
Viewing Captured Still Images/ Videos (Gallery) Tap still image/video Showing Still Images/Videos Show captured or downloaded still images and videos. Supported file formats are as follows. Type File Format JPEG, HEIF, GIF, PNG, BMP, WBMP, WEBP, Still image Still image/video window opens. MP4, MKV, AVI, WMV, WEBM, 3GP, ASF, Video MOV, TS…
-
Page 59: Application Basics
Application Basics Applications……………58 Adding/Deleting Application……….59…
-
Page 60: Applications
Applications ALLOW ONLY WHILE USING THE APP Setting Required Permissions for Applications Set the operation of applications when activating for the first time. The type and content of a confirmation differs with the application. Activating (Compass) for the first time is described as an example.
-
Page 61: Adding/Deleting Application
Adding/Deleting Application Install Download a variety of applications (free/paid) from Google Play. Change the setting of downloaded applications to enable manual or automatic updates. Log in to your Google account beforehand. Installing Applications Many different kinds of applications can be installed on handset from Google Play (provided by Google Inc.).
- Page 62
Purchasing Paid Applications Enter password for Google account Verify In Home Screen, (Play Store) Google Play appears. ・If confirmation appears, follow onscreen instructions. Tap paid application Application is downloaded and installed. ・If confirmation appears, follow onscreen instructions. Purchased Applications Payment Tap amount Pay only once. - Page 63
Updating Applications Setting Automatic Updates for Individual Applications In Google Play, My apps & games In Home Screen, (Play Store) application Enable auto update ・Auto-updating not settable for some applications. Google Play appears. ・If confirmation appears, follow onscreen instructions. My apps & games Tap application to update Update The application is downloaded and installed. -
Page 65: Wi-Fi Bluetooth
Wi-Fi Bluetooth Connecting by Wi-Fi…………64 Using Bluetooth Function……….65 ®…
-
Page 66: Connecting By Wi-Fi
Connecting by Wi-Fi Tap Wi-Fi network Handset supports Wi-Fi (wireless LAN). Access the Internet via a household Wi-Fi connection environment. Automatic Updates for Optimizing Wi- Fi Connection While using Wi-Fi, updates for optimizing connection may be received or applied automatically. Selecting and Connecting to a Wi-Fi Network Enter password…
-
Page 67: Using Bluetooth ® Function
Using Bluetooth Function ® Bluetooth Connect to a Bluetooth -capable wireless phone, etc. for calls ® or to a hands-free device such as a headset. Hints Cannot use Bluetooth ® Is handset in Airplane mode? If in Airplane mode, Bluetooth function is disabled.
- Page 69
Handset Settings Handset Settings………….. 68 About Phone (Handset Information) Settings….69 Data Usage Settings…………69 Lock Screen Settings…………70 Display Settings…………..70 Sound & Vibration Settings……….71 Home Screen Settings…………71 Password & Security Settings………72 Battery & Performance Settings……..73 Additional Settings…………75 Other Settings…………..75… -
Page 70: Handset Settings
Handset Settings Google Make settings for Google services. Accounts & Make account and sync settings. The User Guide describes main setting options. sync Make privacy settings such as a Privacy permissions manager and password Handset Settings display. Location Make settings for location information. Customize how each function operates on handset.
-
Page 71: About Phone (Handset Information) Settings
About Phone (Handset Data Usage Settings Information) Settings Check amount of mobile data transfers and set limit on usage. Check handset name, phone number, etc. Checking Data Usage About Phone (Handset Information) Settings In Home Screen, (Settings) Settable items are the following. Item Description Check whether updates are required via…
-
Page 72: Lock Screen Settings
Lock Screen Settings Display Settings Make lock screen settings. Make settings for Display such as brightness, text size, etc. Lock Screen Settings Display Settings Settable items are the following. Settable items are the following. Item Description Item Description Set delay until Display turns off after Light mode/ Sleep Set Light mode or Dark mode.
-
Page 73: Sound & Vibration Settings
Sound & Vibration Settings Home Screen Settings Make ringtone, operation tone, and other sound settings. Make settings for Home Screen and application history window. Sound & Vibration Settings Home Screen Settings Settable items are the following. Settable items are the following. Item Description Item…
-
Page 74: Password & Security Settings
Password & Security Settings Enabling SIM PIN Set password and security functions such as screen lock, PIN, When PIN is enabled, a window for entering PIN appears to etc. allow handset use each time handset is powered on with SIM Card installed.
-
Page 75: Battery & Performance Settings
Battery & Performance Settings Changing SIM PIN Check Battery usage and make settings to save battery power. First enable SIM PIN to change PIN. Battery & Performance Settings In Home Screen, (Settings) Passwords & security Settable items are the following. Privacy Item Description…
- Page 76
Setting Whether Display Remains Off (Screen Setting Whether to Receive Notification when Lock) when Notification Arrives Battery Consumed Quickly In Home Screen, (Settings) Battery & In Home Screen, (Settings) Battery & performance Battery saver Don’t wake performance Battery drain notifications screen for notifications ・… -
Page 77: Additional Settings
Additional Settings Other Settings Set date and time, language and input, accessibility, etc. Security Status Additional Settings Set location to be shown if handset is lost, whether to scan handset for security issues, etc. Settable items are the Settable items are the following. following.
- Page 78
Connection & Sharing Notifications & Control Center Make settings for VPN, Airplane mode, data usage, etc. Make settings for application notifications, Status Bar, etc. Settable items are the following. Settable items are the following. Item Description Item Description Mi Share Make Mi Share settings. - Page 79
Privacy Protection Digital Wellbeing & Parental Controls Make permission settings. Settable items are the following. Manage time that handset is used and set parental limitations on use. Settable items are the following. Item Description Item Description Location Allow use of location per application. XXm/XXh Contacts Allow use of contacts per application. - Page 80
Google Privacy Make settings for Google services. Settable items are the Make privacy settings such as a permissions manager and following. password display. Settable items are the following. Item Description Item Description Manage Set applications with permitted usage per your Google Make Google account settings. - Page 81
Global Services Global Roaming…………..80 Making Calls while Abroad……….81… - Page 82
Global Roaming Tap provider Handset is Global roaming Service eligible. Use the same handset number outside Japan. Handset connects to an appropriate cellular provider automatically be default. To use a specific provider, select manually. Be sure to also change network type and data roaming settings. - Page 83
Making Calls while Abroad Changing Data Roaming Setting See SoftBank Website to learn about roaming areas/services, etc. https://www.softbank.jp/en/mobile/service/global/ In Home Screen, (Settings) SIM card & mobile networks International Calls to Japan and Other Countries from Abroad In Home Screen, (Phone) Advanced settings Phone opens. - Page 84
Calls to Landline Phones/Cell Phones in Country of Stay Enter country code then other party number (omit first 0) Place calls the same way you would within Japan. ・Do not enter country code or omit first 0 from phone numbers. In Home Screen, (Phone) ・Do not omit first 0 from phone numbers when dialing Italy… - Page 85
Handset dials number. Call begins when other party answers. - Page 87
Warranty/Specifications/ Customer Services Warranty & After-Sales Service……..86 Specifications…………..86 Customer Service………….. 87… - Page 88
Warranty & After-Sales Service Specifications Warranty Handset ・The warranty period is 1 year from the date of newly Item Description purchase. Dimensions (W ・Repairs will be done based on terms of free repair service. Approx. 77.3 x 162.0 x 9.1 mm x H x D) Terms of free repair service is referred to SoftBank website. - Page 89
Customer Service If you encounter any difficulties or are unsure of anything, contact customer service. SoftBank Customer Support ・From a SoftBank handset, dial toll free at 157 ・From a landline/IP phone, dial toll free at 0800-919-0157 ・Business hours : Call 10:00am — 7:00pm / Chat 9:00am — 8:00pm Smartphone Technical Support Center ・From a SoftBank handset, dial toll free at 151… - Page 91
Safety Precautions Safety Precautions…………90 Material List…………..98 Important Product Information……..99 Bluetooth /Wi-Fi (WLAN)……….100 ® Intellectual Property Rights……….101 Declaration…………..102 Radio Wave Exposure and Specific Absorption Rate (SAR) Information…………..103… -
Page 92: Safety Precautions
Safety Precautions Handset, SIM Card, AC Charger (Complimentary Sample), USB Type- C™ Cable (Complimentary Sample), SIM Read safety precautions before using handset. Removal Pin (Complimentary Sample), Observe precautions to avoid injury to self or others, or Soft Case (Complimentary Sample) damage to property.
- Page 93
Do not subject handset to excessive force or break it. Especially when carrying it in your Do not drop, stomp, throw, or otherwise pocket, do not hit it or press it between other subject to strong force, impact, or vibration. objects. - Page 94
Handset Do not use damaged handsets or related accessories. May cause fire, burns, injury, etc. Do not throw handset into a fire or apply heat. May cause fire, burns, injury, etc. Do not place handset on unstable/uneven surfaces. Be extra careful while the vibrator is set. - Page 95
For use in hospitals, follow the medical facility’s instructions. Do not light up or flash the Flash/Light with the light-emitting part close to other people’s Power off handset in a place where its use is prohibited. eyes. Keep away from infants. Cancel any functions that turn on handset automatically. - Page 96
If Display or Camera lens breaks, be careful with broken parts and exposed handset parts. When using the motion sensor, ensure the safety of the surroundings and hold handset Touching the broken or exposed part may cause burns, firmly, not swinging around more than injury, electric shock, etc. - Page 97
AC Charger (Complimentary Sample) / USB Type-C™ Cable (Complimentary Sample) Before using handset in a car, check with the car manufacturer or dealer for information about the effects of radio waves. Handset radio waves may affect the vehicle’s electronic equipment in some car models. In that case, stop using handset immediately. - Page 98
Do not apply unnecessary force where Insert or remove the connector of USB Type- connected when handset and USB Type-C™ C™ Cable (complimentary sample) straight Cable (complimentary sample) are connected. against the port without applying force such as pulling the cord. May cause fire, burns, injury, electric shock, etc. - Page 99
SIM Card Handset Use & Electronic Medical Equipment When handling SIM Cards, be careful of the cut surface so as not to hurt your body parts such Persons with an implanted pacemaker or as fingers. defibrillator should keep handset at least 15 cm away from the device. -
Page 100: Material List
Material List USB Type-C™ Cable (Complimentary Sample) Redmi Note 9T Main Unit Part Material/Surface Treatment USB Type-A Copper/gold plating Part Material/Surface Treatment Terminal Earpiece/ USB Type-A PC plastic/- Steel/nickel plating Speaker Slot SIM Card/SD USB Type-A PC plastic (10% GF)/coated…
-
Page 101: Important Product Information
Important Product Information Internal Battery ・Battery is built in and is not removable. Handset, AC Charger (Complimentary ・Internal Battery replacement incurs fees and requires Sample), USB Type-C™ Cable handset submission to a SoftBank Shop. Contact a SoftBank (Complimentary Sample), SIM Removal Shop or Customer Service.
-
Page 102: Bluetooth /Wi-Fi (Wlan)
Bluetooth /Wi-Fi (WLAN) ® Emergency Alerts Connection/operation may not be possible with some ・Receive setting is enabled at time of purchase. Bluetooth /Wi-Fi (wireless LAN) devices. ® ・If «Use full volume» is disabled, alarm does not sound in Handset Bluetooth /Wi-Fi (wireless LAN) communication is ®…
-
Page 103: Intellectual Property Rights
Intellectual Property Rights Cautions for General Use The frequency band used by handset Bluetooth /Wi-Fi ® Copyrights and Portrait Rights (wireless LAN) functions is also used for operation by household appliances (microwave ovens) and industrial/ scientific/medical equipment as well as by in-place radio Copyrighted contents you recorded or obtained from Websites stations (requiring a license) and specific low-power radio pages using this product by downloading or other means, such…
-
Page 104: Declaration
・To the maximum extent permitted by applicable law, under trademarks or registered trademarks of BB Softservice Corp. no circumstances shall Xiaomi or any of its licensees be ・McAfee and the McAfee logo are trademarks of McAfee LLC responsible for any loss of data or income or any special, in the United States and other countries.
-
Page 105: Radio Wave Exposure And Specific Absorption Rate (Sar) Information
Absorption Rate (SAR) Information smartphone/3G model https://www.softbank.jp/mobile/support/sar/ (Japanese) «A001XM» here refers to this mobile phone «Redmi Note 9T». European RF Exposure Information Specific Absorption Rate (SAR) for This Product (for Japan) Your mobile device is a radio transmitter and receiver. It is designed not to exceed the limits for exposure to radio waves This mobile phone 【A001XM】…
- Page 106
FCC RF Exposure Information Your handset is a radio transmitter and receiver. It is designed and manufactured not to exceed the emission limits for exposure to radio frequency (RF) energy set by the Federal Communications Commission of the U.S. Government. The guidelines are based on standards that were developed by independent scientific organization through periodic and thorough evaluation of scientific studies. - Page 107
About Phone (Handset Information) Settings….69 About the User Guide…………3 Adding/Deleting Application……….59 Additional Settings…………75 Airplane Mode…………..24 Applications……………58 Redmi Note 9T User Guide Index B Basic Operation…………..22 Battery & Performance Settings……..73 Bluetooth /Wi-Fi (WLAN)……….100 ®… - Page 108
O Optional Services…………..36 Other Settings…………..75 P Parts & Functions………….. 6 Password & Security Settings………72 Phone Number…………..42 Placing/Answering Calls……….. 34 Power On/Off…………..13 R Radio Wave Exposure and Specific Absorption Rate (SAR) Information…………..103 S Safety Precautions…………90 SAR……………….103 Silent Mode…………… - Page 110
Redmi Note 9T User Guide April 2021, First Edition SoftBank Corp. Visit SoftBank Shop for assistance Model : Redmi Note 9T Importer : Xiaomi Technology Japan Co., Ltd. Manufacturer : Xiaomi Communications Co., Ltd.
Перейти к контенту
![]()
Русские электронные инструкции по эксплуатации
Постоянно обновляемый большой каталог документации по эксплуатации и использованию современных устройств и оборудования на русском языке. Бесплатное скачивание файлов.
Поиск:
Главная
♥ В закладки
Просмотр инструкции в pdf


Инструкция по эксплуатации смартфона Xiaomi Redmi 9T 4+64GB Blue.
Скачать инструкцию к смартфону Xiaomi Redmi 9T 4+64GB Blue (631,04 КБ)

Инструкции по эксплуатации смартфонов Xiaomi
« Инструкция к смартфону Xiaomi Redmi 9T 4+64GB Green
» Инструкция к смартфону Xiaomi Mi 9 64GB Ocean Blue
Вам также может быть интересно

Инструкция к фитнес-браслетам Xiaomi Mi Band 1S Pulse

Инструкция к смартфону Xiaomi Mi 11 Lite 4G 8+128GB Black

Инструкция к фитнес-браслетам Xiaomi Smart Band 7 Pro Black

Инструкция к смартфону Xiaomi Redmi Note 10 Pro 128GB Gradient Bronze

Инструкция к смартфону Xiaomi Redmi 8 64GB Ruby Red

Инструкция к фитнес-браслетам Xiaomi Smart Band 7 Pro White

Инструкция к смартфону Xiaomi Redmi Note 8 Pro 6+128GB Forest Green

Инструкция к смартфону Xiaomi Redmi Note 7 64GB Blue
Добавить комментарий
Имя *
Email *
Сайт
Комментарий


![]()


Сохранить моё имя, email и адрес сайта в этом браузере для последующих моих комментариев.
- Добавить инструкцию
- Заказать инструкцию
На самом деле эта модель отлично резонирует со словами песни Игоря Николаева, потому что с первых минут знакомства создается впечатление, что ты держал этот телефон в руках всю жизнь. Для тех, кто опасается форм-фактора «лопата», можем успокоить — смартфон отлично управляется одной (взрослой) рукой. После нескольких дней использования вам вряд ли захочется возвращаться к экрану меньшего размера
Коротко про спеки
Всего у Редми 9 четыре варианта исполнения:
- 3 гб оперативной памяти / 32 Гб постоянной
- 4 гб оперативной памяти / 64 Гб постоянной
- 4 гб оперативной памяти / 128 Гб постоянной
- 6 гб оперативной памяти / 128 Гб постоянной
Все модели поддерживают технологию быстрой зарядки Quick Charge 3.0 (18 Вт = 9 вольт, 2 ампера) и имеют сканер отпечатков пальцев. К огромному сожалению фанатов Xiaomi и конкретной модели в частности, процессор не Snapdragon, а MediaTek Helio G80 (2 × 2.0 GHz Cortex-A75 & 6 × 1.8 GHz Cortex-A55).
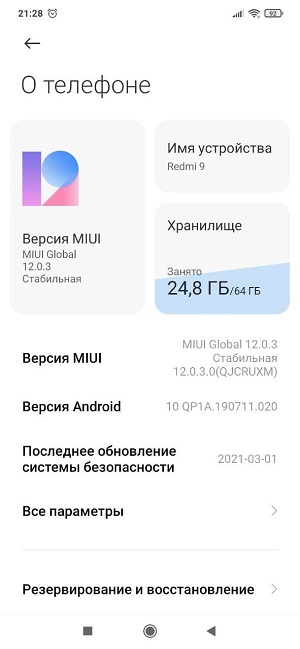
Спереди у смартфона стекло Gorilla Glass 3, задняя часть — пластиковая. Redmi 9 работает на Android 10 (Q) и MIUI 11, которая со временем обновилась до 12 версии. На июнь 2021 года это 12.0.3
Практически все настройки и проблемы ниже актуальны для других моделей линейки Redmi: Redmi 9 Power / 9T, Redmi Note 9T, Redmi Note 10, Xiaomi Redmi 8A Dual, Xiaomi Redmi 8A, Redmi 9C/9A
Настройки
Как сделать верхний бар (часы, батарею) крупнее на стандартной теме?
Если размер верхних элементов вас не устраивает, то их можно увеличить без получения root-доступа и не меняя стандартную тему. Для этого необходимо зайти в режим разработчика — тапнуть 5-7 раз по версии MIUI в настройках «О телефоне» (скрин чуть выше). После того, как система отрапортует о том, что вы стали разработчиком, возвращаемся в «Настройки» и выбираем «Расширенные настройки»
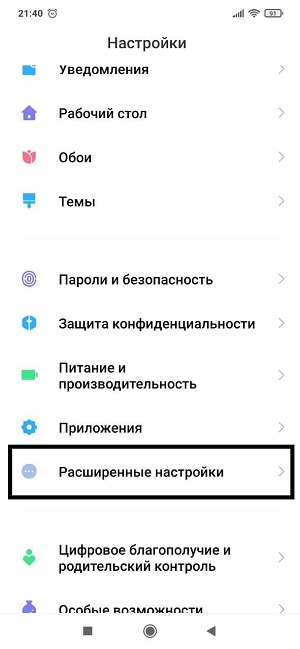
Спускаемся в самый низ и выбираем «Для разработчиков»
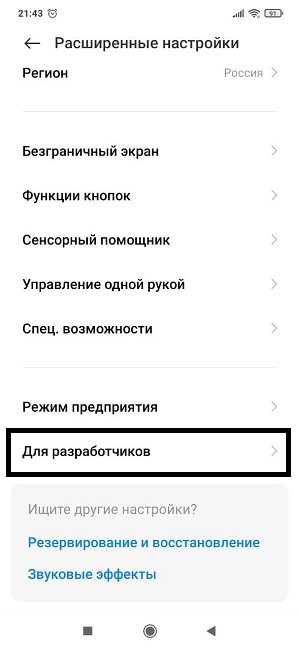
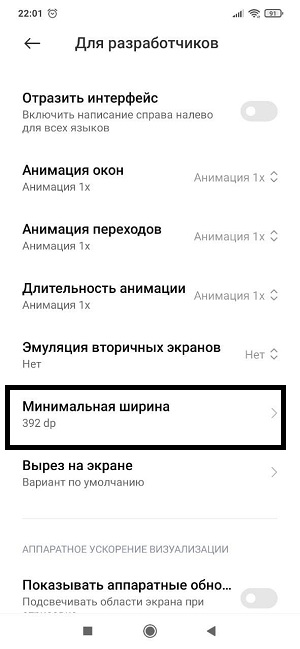
Мотаем вниз до параметра «Минимальная ширина». По умолчанию стоит 392 dp (density-independent pixels — абстрактная единица измерения, позволяющая приложениям выглядеть одинаково на различных экранах и разрешениях). Попробуйте увеличить этот параметр
Как увеличить количество кнопок в нижней части?
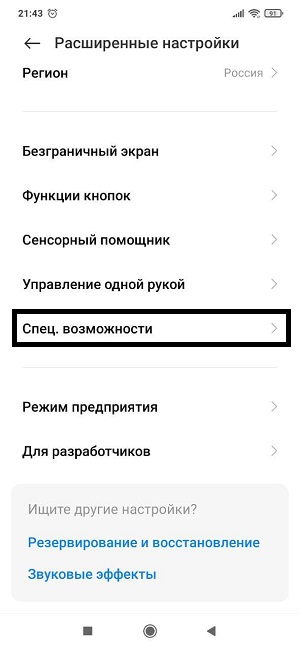
По умолчанию на смартфоне в нижней части рабочего стола расположены 3 иконки — телефон, сообщения и камера. Просто так перетащить drag&drop’ом в эту область система не даст. Но если этого количества недостаточно, то можно увеличить его одним простым приёмом. Заходим в «Расширенные настройки» и выбираем вкладку «Спец.возможности»
Заходим в «Зрение» и выбираем «Масштаб изображения на экране«. Меняем параметр на XS
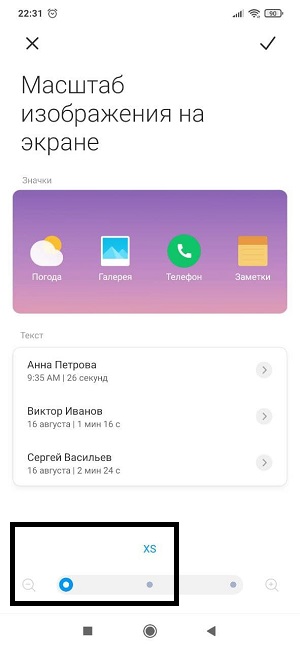
После этого вы сможете добавить еще несколько иконок в нижнюю панель
Когда закончите настройку иконок, зайдите снова в «Масштаб изображения на экране» и верните настройки на S.Добавленные иконки останутся на своём месте
Как убрать уведомления о карте памяти?
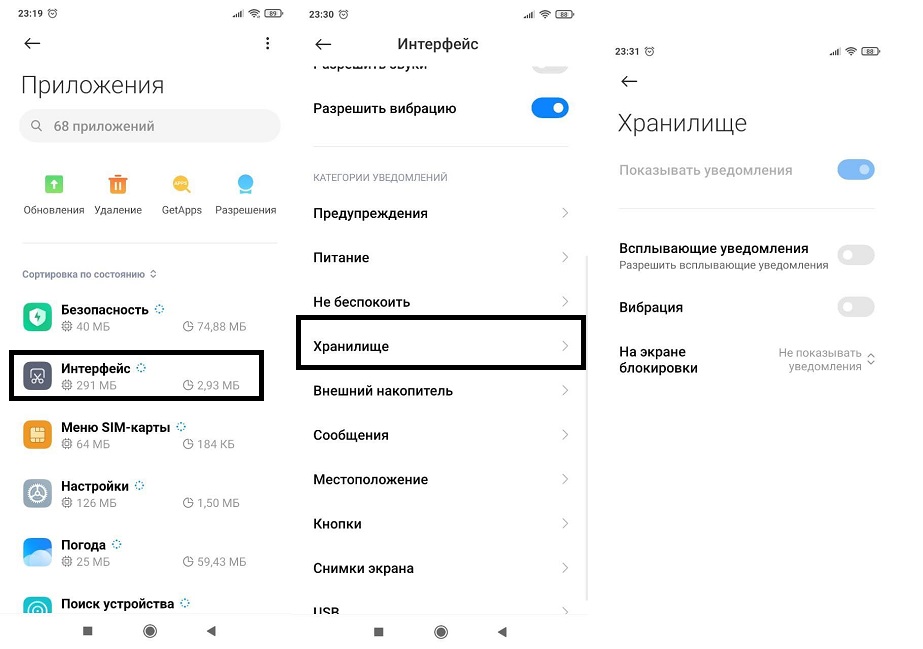
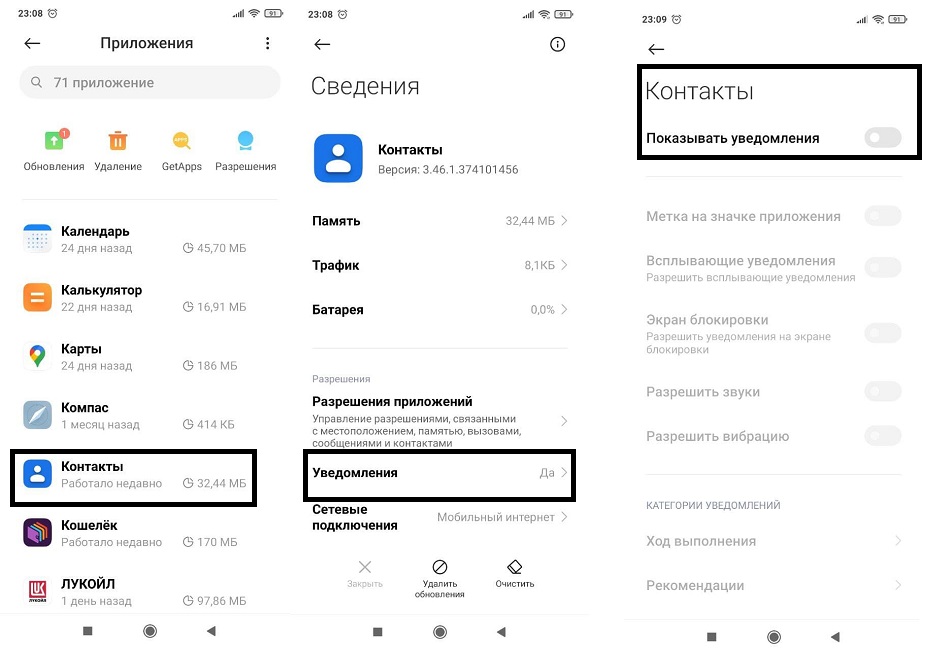
Если у вас вставлена карта памяти, то после перезагрузки/включения телефона у вас будет постоянно выскакивать уведомление. Чтобы это отключить достаточно зайти в «Настройки» -> «Приложения» -> «Интерфейс» -> «Уведомления» -> «Хранилище» и свайпнуть настройку «Показывать уведомления»
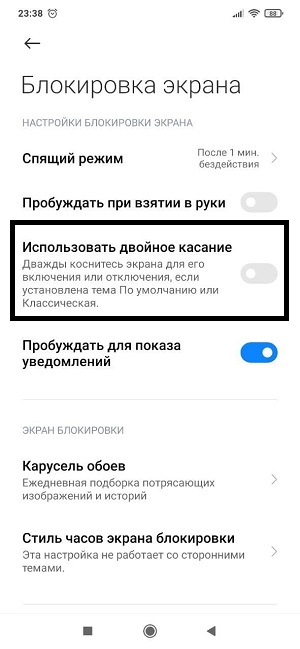
Разблокировка по двум касаниям
Надоело постоянно тянуться к кнопке блокировки, чтобы включить экран? Есть выход — настроить показ экрана по двум тапам по нему. Заходим в «Настройки» -> «Блокировка экрана» -> «Использовать двойное касание»
Скриншот тремя пальцами
Стандартный способ сделать скриншот экрана — зажать VOL- и кнопку блокировки. Это почти всегда неудобно, особенно с таким размером телефона. Есть метод гораздо проще — провести тремя пальцами по экрану вниз.
Запись звонков
К сожалению, стоковая «звонилка» не даёт возможности записывать звонки. По крайней мере без root-доступа сделать это нельзя. Но это умеет делать стороннее приложение — True Phone (Google Play). Правда, многие пользователи приложения жалуются на проблему отсутствия на экране хоть какого-либо уведомления о том, что поступает входящий звонок — играет только рингтон и/или идёт вибрация. Возможно, это исправят в следующих версиях
Есть еще один вариант с записью звонков — прошить смартфон на Индию или Индонезию, но вряд ли оно того стоит.
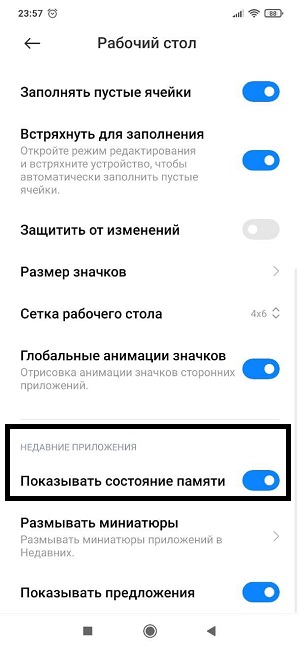
Как показать количество свободной оперативной памяти?
Особенно актуально для владельцев версии 3/32. Как узнать сколько осталось свободной оперативной памяти в реальном времени? Заходим в «Настройки» -> Рабочий стол«. Свайпаем настройку «Показывать состояние памяти»
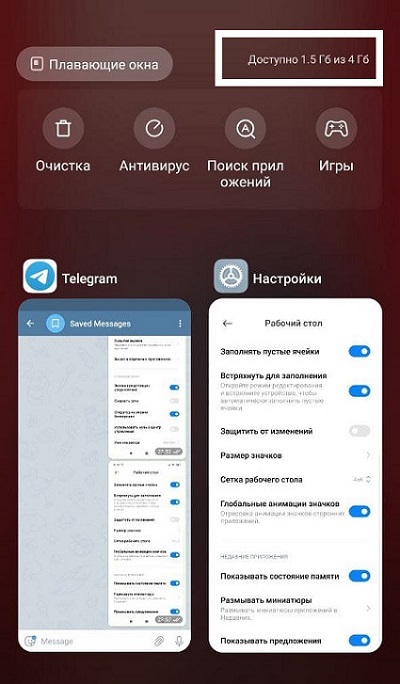
Теперь в режиме переключения между окнами мы видим количество оставшейся (свободной) оперативной памяти
Захват экрана
Скрин рекордер находится в «расширенной» версии шторки. Свайпните вправо от основой и увидите иконку «Запись экрана»
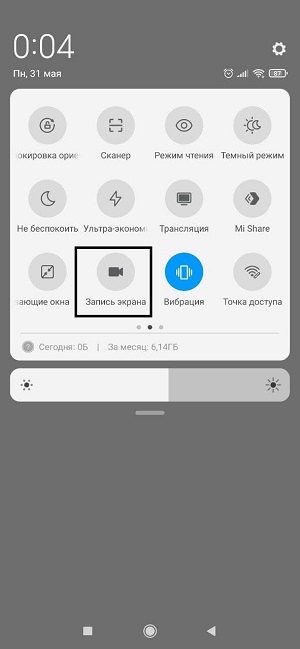
Показывать скорость передачи данных (интернета) в реальном времени
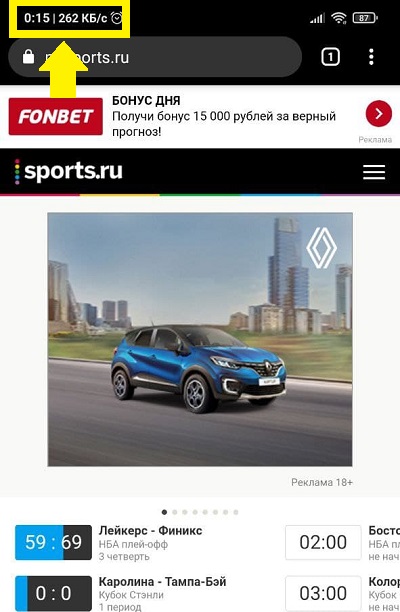
Так как «стрелочки» показывающие входящий/исходящий трафик в верхней панели чудовищно мелкие, то не всегда можно понять глючит ли приложение/сайт или реально не хватает скорости при передаче данных. Чтобы исправить это, можно вывести скорость на рабочий стол (цифры тоже не ахти какие большие, но хоть что-то). Заходим в «Экран» и мотаем до «Центра уведомлений и шторка уведомлений»
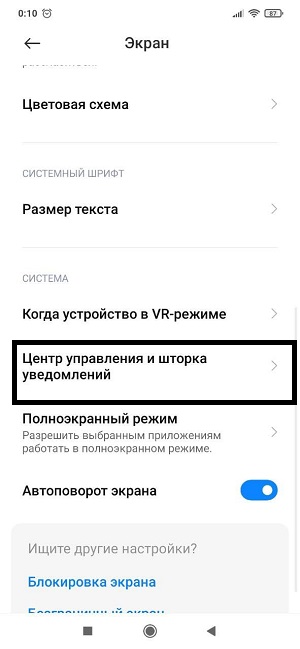
Включаем «Скорость сети»

Теперь в правом верхнем углу у нас отображается скорость загрузки
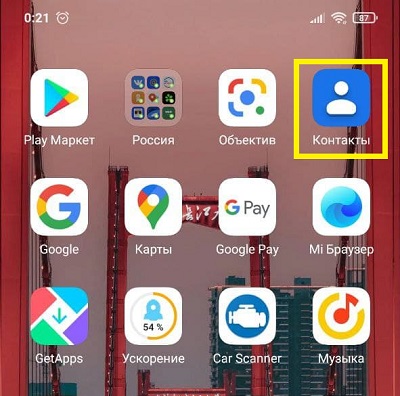
Как скопировать (и экспорировать) контакты?
Чтобы скопировать контакты нужно зайти в «Контакты«. Заходить нужно НЕ через «Телефон«, а напрямую открыть приложение «Контакты»:
Далее нажимаем на три точки и тапаем на пункт «Выбрать все»
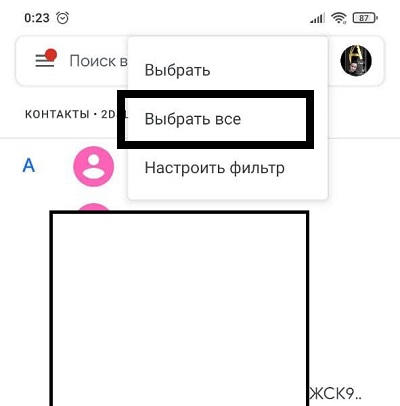
Затем нажимаем на кнопку «Поделиться»
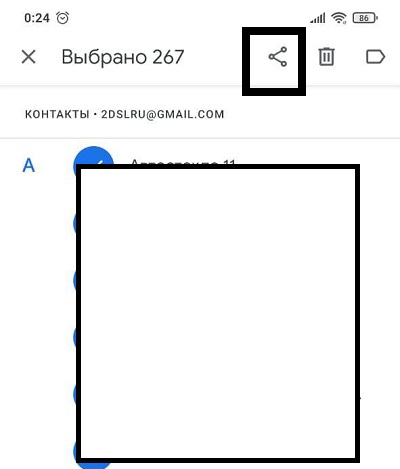
Пойдет процесс экспорта. Занимает считанные секунды
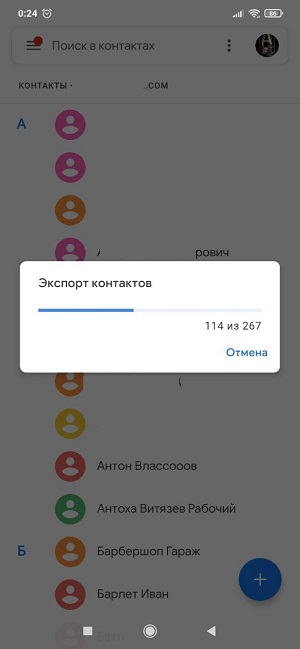
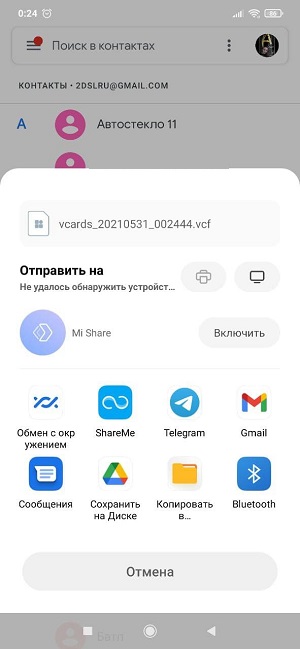
В итоге у нас будет сформированный .vcf-файл
Отключение рекламы через DNS
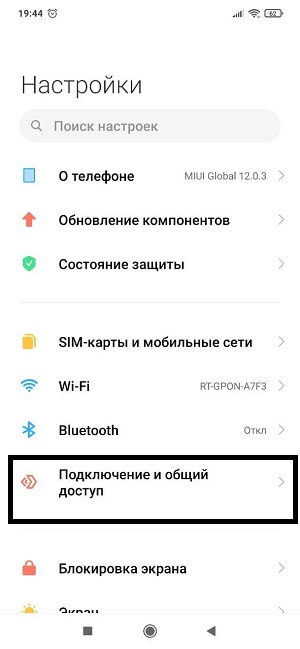
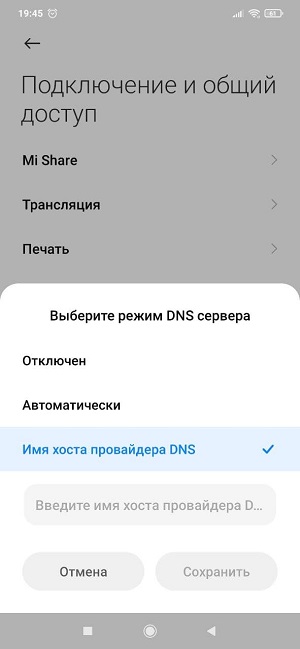
Чтобы отключить назойливую рекламу — есть отличный и простой способ. В настройках нужно зайти в «Подключение и общий доступ»
Тапаем на «Частный DNS сервер»

Во всплывающем окне выбираем «Имя хоста провайдера DNS» и прописываем dns.adguard.com
Отключение карусели обоев (рекламы на экране блокировки)
Приложение «Карусель обоев» — это приложение, которое позволяет пользователям устанавливать несколько обоев. Не самая нужная функция. В MIUI 12 карусель обоев вновь появилась в виде приложения. Способ, работающий в MIUI11 уже не работает в двенадцатой версии. Напомним, что удалить карусель обоев можно было через «»Хранилище» -> «Информация о приложении» -> «Карусель обоев»

Но кнопки «Удалить приложение» теперь нет
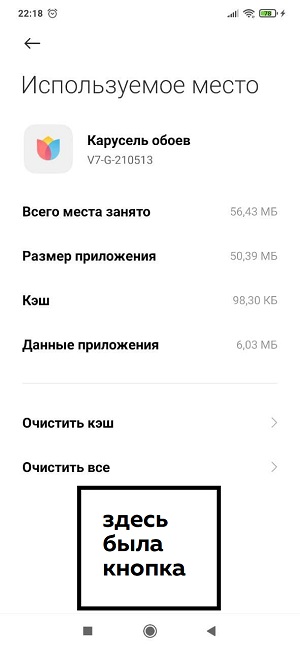
Через «Экран блокировки» тоже нельзя этого сделать.
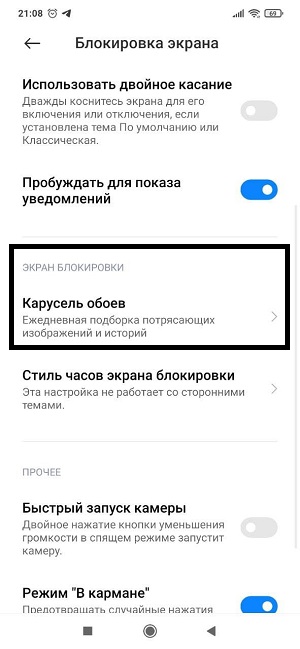
Кнопка «Включить» относится вовсе не к карусели, а к разблокировке телефона. Этакая обманка для невнимательных
Кстати, трюк с переключением региона на «Индию» теперь тоже не работает. Единственный способ удалить карусель обоев — это воспользоваться приложением для удаления системных приложений, вроде Xiaomi ADB Fastboot Tools
Вход в инженерное меню №1: CIT Mode (калибровка и проверка телефона)
Секретный чит-код для входа в инженерное меню — *#*#6484#*#*. Для того, чтобы он сработал, вы должны активировать режим разработчика (как это сделать писали в начале статьи).
Настроек там маловато, в основном в меню присутствует огромное количество тестов: экрана, микрофона, вибро-режима, сенсора и так далее
Вход в инженерное меню №2: Engineer mode
Другое инженерное меню, где настроек гораздо больше, вызывается командой *#*#3646633#*#*. Для доступа так же должен быть активирован режим разработчика.
Как увеличить громкость в наушниках через инженерное меню?
Некоторые пользователи Redmi 9 отмечают, что звук в наушниках необычно тихий и хотелось бы, чтобы звук был громче. На основном экране нужно свайпнуть вправо, чтобы попасть в Hardware Testing
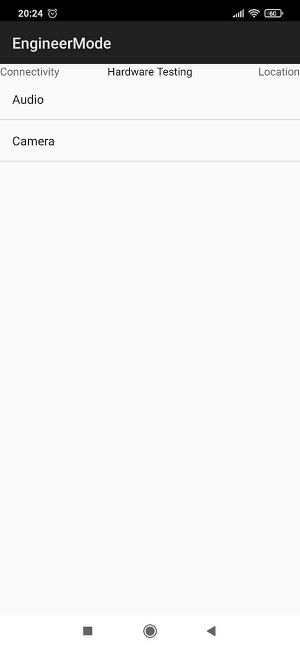
Далее заходим в «Volume»
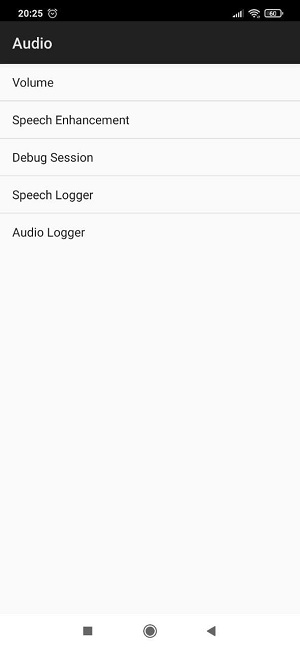
Затем «Audio Playback»

В третьем пункте сверху (там будет выбрано BT A2DP). Нам нужно выбрать в нём «3/4-pole headset«. После этого появится параметр «Headset PGA». Измените его значение на 160 (это максимум, что можно поставить)
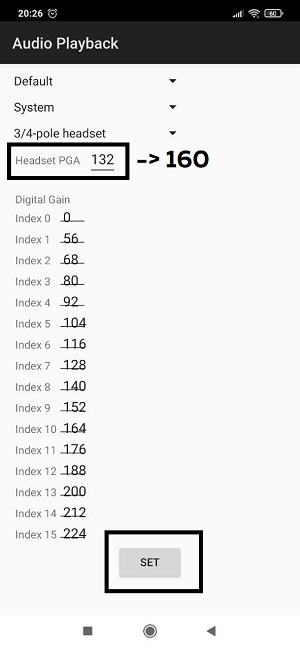
Не забудьте нажать кнопку «Set» для сохранения настроек
Проблемы с телефоном
Не отображаются входящие (и исходящие тоже) звонки
Как мы уже писали выше, такая проблема наблюдается при использовании приложения True Phone. Но что, если это происходит со стандартным приложением? Идёт звук и вибрация, но на экране ничего не высвечивается. Это касается как входящих, так и исходящем звонке (при исходящем при этом сам звонок происходит, просто не реагирует экран). Ненадолго помогает перезагрузка телефона.
Причиной может то, что программа, отвечающая за звонки банально выгружается из оперативной памяти из-за её нехватки. Следует проверить загруженность операционной системы (как отследить количество свободной оперативки писали чуть выше). Если у вас есть root-доступ, то проблему можно решить внесением программы для звонка в белый список в подсистему Low Memory Killer — это специальный системный механизм, который выгружает фоновые приложения из операционной системы. Параметры находятся в файле /sys/module/lowmemorykiller/parameters/minfree
Ошибка «Не удалось объединить вызовы»
Если вы хотите создать конференцию и добавить собеседника в текущий разговор, то, вероятно, вы столкнетесь с ошибкой «Не удалось объединить вызовы». Дело в том, что конференц-связь — обычно платная услуга у операторов сотовой связи. Поэтому «из коробки» конференцколиться у вас не получится. Стоит эта услуга недорого. Вот расценки у «Ростелекома»:
Перезагрузка телефона из-за microSD-карты каждый час/два/три
Здесь причиной может быть банальная несовместимость. Для Redmi 9 лучше использовать microSD-карту так называемого 10 класса, который позволяют вести запись в самом высоком на сегодня формате видео Full HD, снимать и сохранять фотоизображения в формате RAW. Продаётся в любых цифровых ритейлерах. Сам класс обычно пишут даже на ценнике

Так же попробуйте отформатировать карту на компьютере через кард-ридер. Только не забудьте убрать галочку с пункта «Быстрое форматирование»
Быстрая зарядка идёт «через раз»
Бывает, что при подключении зарядки, режим Quick Charge включается не всегда. То быстрая зарядка, то обычная. Почему это происходит? Такое может быть, если у вас не родной кабель с зарядки, а купленный на Aliexpress. У таких кабелей быстрая зарядка действительно идёт только в одном положении штекера в разъеме. Поэтому, в случае с китайским кабелем, стоит просто запомнить положение в которой работает Quick Charge. Либо купить оригинальный кабель
Не срабатывает датчик приближения (горит экран во время разговора)
Одна из неприятных конструктивных особенностей Redmi 9 заключается в не очень удачном расположении датчика приближения (справа от фронтальный камеры на 10 мм). Это становится проблемой, когда подносишь телефон во время разговора к левому уху. Экран не блокируется и вы щекой или тем же самым ухом начинаете удерживать вызов или выключать микрофон. Поэтому для комфортного разговора по этому телефону у нас только одно ухо — правое. Сделать тут ничего нельзя, но некоторые нашли небольшой лайфхак — победить глюк помогает обыкновенный чехол-книжка
«Левые» звуковые уведомления
Владельцы телефонов подмечают, что иногда приходят какие-то непонятные звуковые уведомления, при этом на экране, в шторке ничего нет, т.е. телефон сам включается, срабатывает вибрация засвечивается экран и сразу тухнет. Как от этого избавиться? Закатайте рукава:
«Настройки» -> «Все приложения» -> «Хранилище контактов» -> «Уведомления«. Отключаем
Следующее: «Настройки» -> «Пароли и безопасность» — «Экстренные оповещения«.
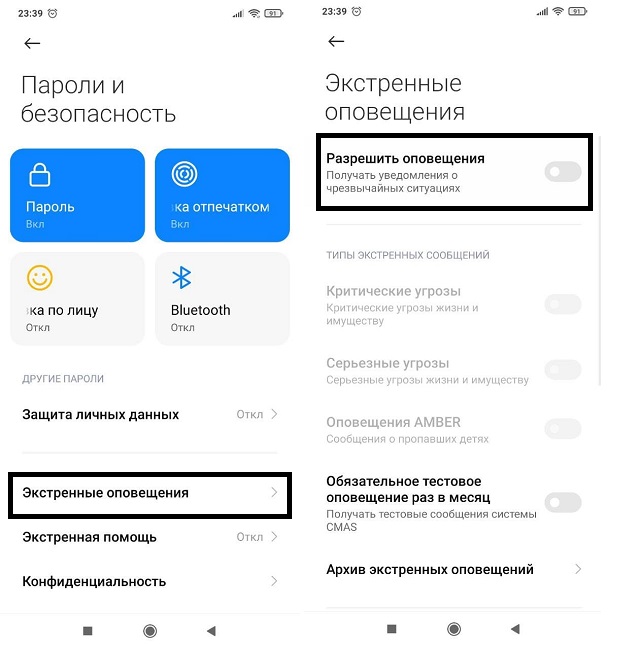
Дополнительно: «Настройки» — «Уведомления» — «Система Android«. Скроллим вниз до пункта «Оповещения сети» и отключаем уведомления
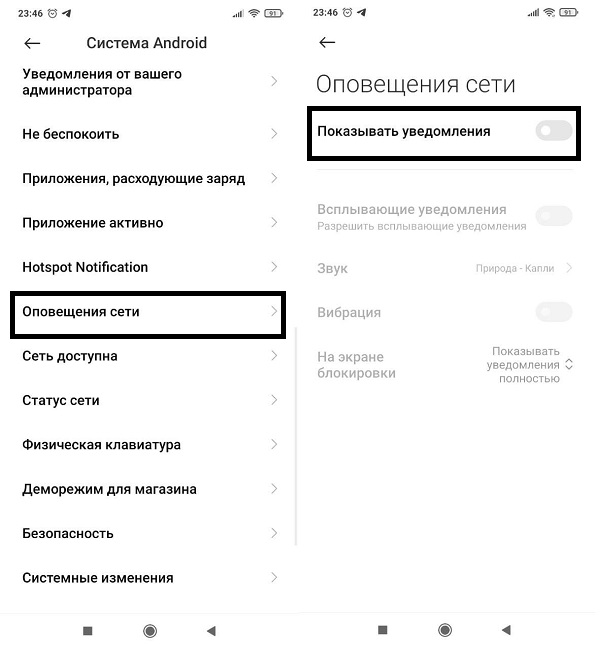
Лечим фантомные нажатия
Если вас беспокоят фантомные нажатия (т.е. в разных областях телефона самопроизвольно происходит тап), то попробуйте отключить полноэкранные жесты, если они у вас активированы. Включаются они в «Настройках» ->»Расширенных настройках» -> «Безграничный экран»
Допустим, вы привыкли к управлению телефоном с помощью жестов и менять ничего не хотите. В таком случае проследите, чтобы настройка «Защита от ошибочных жестов» была включена
Не работает NFC
По умолчанию NFC всегда «заводится с полтычка». Настройки Google Pay незамысловатые и что-то перепутать сложно. Однако, если вы сталкиваетесь с ошибкой «Не удалось настроить бесконтактную оплату», то причинами может быть:
- У вас получен root-доступ на телефоне (Google Pay не работает на рутованном устройстве)
- У вас разблокирован загрузчик (для вас решение здесь)
- У вас карта «Мир» (UPD: вроде как проблема с привязкой карт «Мир» уже решилась)
Не устанавливается YouTube
По идее, приложение YouTube в стоковой глобальной прошивке установлено по умолчанию. Но если у вас по какой-то причине его нет, а он еще, зараза, и не устанавливается с Play Market’a, то попробуйте очистить все данные в приложении Play Market. Делается это через «Настройки» -> «Приложения» -> «Все приложения»
Ищем «Google Play Маркет»
И нажимаем кнопку «Очистить»
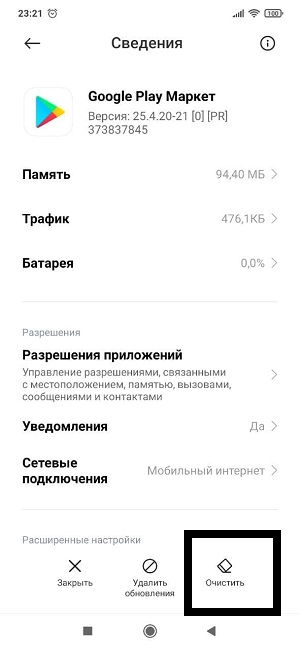
Как вариант, можно установить другой клиент — YouTube Vanced. Многие продвинутые пользователи считают, что оно намного удобней стокового приложения. Сделать это можно через Vanced Manager (установка через проводник, т.к. APK-файл). Если при установке возникает ошибка…
…то попробуйте установить эту версию YouTube Vanced напрямую, без менеджера (рут не требуется)
Телефон теряет сеть (отваливается sim-карта)
После обновления до последней версии MIUI на некоторых телефонах наблюдается проблема сброса разговора, если в это же время вам пытается дозвониться кто-то еще. Т.е. текущий входящий вызов обрывается (в левом верхнем углу будет «крест» на sim-карте в этот момент — телефон теряет сеть). Для начала симптоматика:
- У вас стоковая прошивка, не получен рут и вообще всё по дефолту
- Проблемы начались в какой-то момент после обновления MIUI
- Сим-карта в другом телефоне ведёт себя корректно
Что делать?
- Убрать переадресацию при занятой линии. Если у вас стоит переадресация с рабочего телефона на мобильный, то в момент разговора с абонентом, если кто-то попытается дозвониться на ваш рабочий (а затем, соответственно, сработает переадресация на мобильный), у вас произойдет кратковременная потеря сети.
- Перейти на глобальную прошивку. Такие проблемы наблюдаются на ру-прошивках
- Попробуйте вставить SIM-карту в другой слот.
- Проверьте и выставьте режим сети. Наберите на телефоне *#*#4636#*#* и зайдите в настройки SIM-карты. В пункте «Настройте предпочтительный тип сети» попробуйте выставить что-то иное, кроме LTE (если у вас слабый сигнал, то нужен WCDMA, а еще лучше GSM)
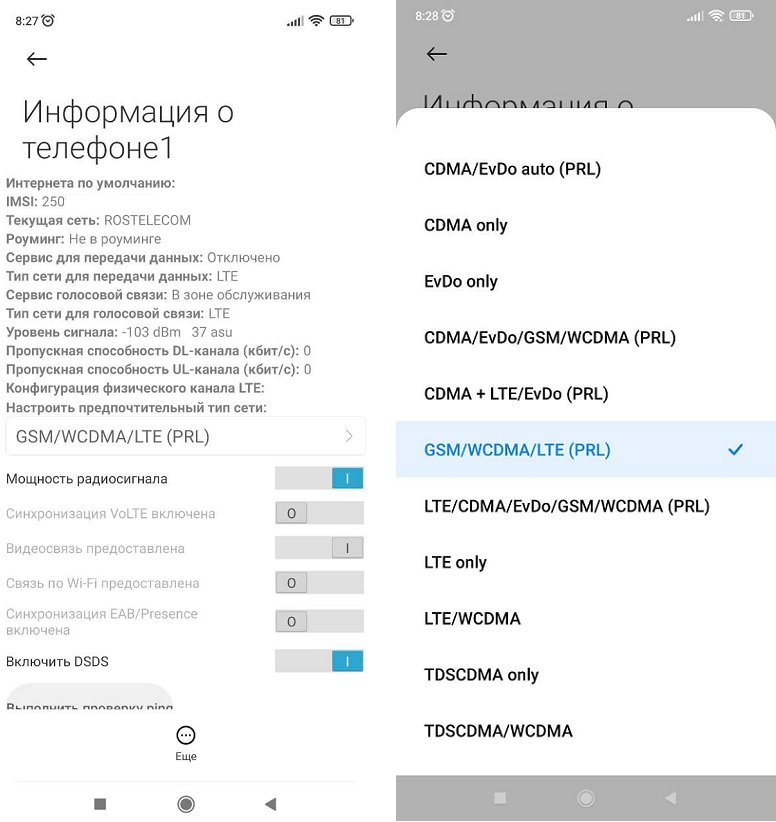
Сборка / Производительность / Автономность
Чем точно может похвастать Redmi 9, так это перфомансом и временем автономной работы. И то, и другое — на высоте. Даже если вы усилено сёрфите в браузере и бесконечно скроллите ленты социальных сетей в течении дня, то запаса батареи вам хватит на два, а то и на три дня. Единственное, что более менее быстро высаживает батарею — это режим точки доступа и игры. Если мы говорим про версию 4/64 (про 3/32 мы поговорим ниже)
Качество сборки на хорошем уровне. Даже задняя крышка отчасти напоминает металлическую (на самом деле она пластиковая). Никаких люфтов или отваливающихся кнопок. Оценивать дизайн — это довольно субъективная история, но всё же осмелимся сказать, что он неплох. Экран на максимальной яркости виден даже в самое палящее солнце. До красок AMOLED дисплеев ему, конечно, далеко, но не будем забывать про стоимость телефона
Результаты тестирования с помощью приложения AnTuTu для версии 4/64 по сравнению со своими конкурентами в классе
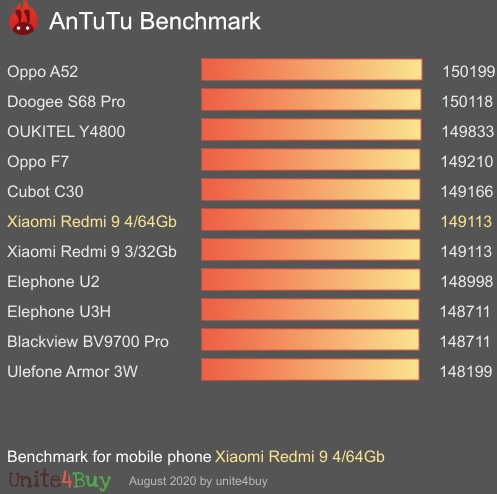
Обратите внимание, что у 3/32 и 4/64 одинаковый результат в тесте. Об этом мы как раз будем говорить дальше.
Версия 3/32 — стоит ли её брать?
Младшая серия с 3 Гб оперативной памяти и 32 гб постоянной вызывает огромное количество споров: тянет ли она функционал телефона? Хватает ли её для просмотра видео или запуска игр? 3Гб много это или мало? Давайте попробуем разобраться.
Несмотря на то, что тесты показывают либо минимальную разницу между 3/32 и 4/64, либо не показывают её вовсе, при ежедневном и интенсивном использовании телефона лишний гигабайт оперативной памяти не сказаться не может. Особенно это стало ощущаться после обновления MIUI до 12 версии. На стоковой прошивке начались глубокие зависания при одновременном запуске всего пары приложений (например, камеры и инстаграмма)
Сразу после включения у 3гб-версии свободной остается всего 800-900мб. Плюс не стоит забывать, о том, что тормоза начинаются, когда и постоянной памяти становится мало — желательно держать свободными хотя бы 5-8 гигабайт, что для 32гб версии уже достаточно весомо. А с использованием мессенджеров и качественных фотографий данный ресурс улетает только в путь. Единственный вариант, который улучшит производительность 3/32 — это установка кастомной прошивки, которую еще нужно правильно подобрать. Ниже очень хорошее видео про разницу между версиями 3/32 и 4/64:
Так покупать в итоге версию 3/32? Мы считаем, что экономия лишних пару тысяч не стоит вероятных проблем с нехваткой ресурсов. Впрочем, если бюджет ограничен и в игры вы играть не собираетесь, такой вариант имеет право на существования. Тем более, если воспользоваться советами ниже по бусту производительности
Оптимизация MIUI
На форуме 4pda есть отличный свод рекомендаций и твиков по оптимизации работы оболочки MIUI (ссылка на пост). Там вы найдете огромное количество советов: как отключить рекламу, как убрать анимацию или как экономить батарею по расписанию. В общем, однозначный мастрид для всех владельцев бюджетных Xiaomi
Еще один момент: если вы переносите данные с одного телефона Xiaomi на другой, то лучше воздержитесь от переноса настроек системы (через mi mover). На MIUI12 замечено, что это приводит к тормозам и жутким лагам.
Отключение встроенных приложений
Есть мнение, что отключить встроенные приложения на Redmi невозможно без получения root-прав на телефоне. К счастью, этот миф легко развеивает утилита «Redmi System manager | Disable System Apps No Root» (Google Play). Это приложение поможет вам отключить системные приложения, которые предварительно установлены на мобильных телефонах Redmi.
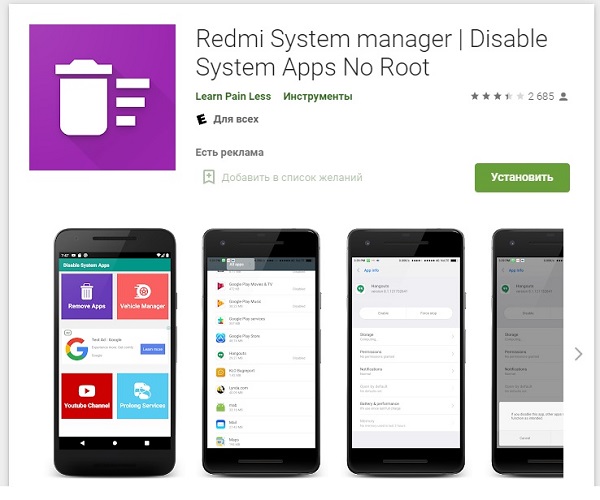
Приложения от Xiaomi (там тоже много откровенного хлама) можно удалить с помощью утилиты Xiaomi ADB Fastboot Tools, но для этой программы крайне желателен root-доступ.
Камера
Еще один предмет вечных холиваров форумных баталий — камера на бюджетниках Xiaomi. И здесь, как нам кажется, придирки владельцев рождаются не на пустом месте. Стоковая камера откровенно звёзд с неба не хватает. Во-первых, она очень долго ловит резкость. ОЧЕНЬ долго. О съемке падающей звезды можно точно забыть.
Справедливости ради стоит заметить, что камера на redmi 9 снимает лучше, чем на аналогичных моделях Xiaomi (например, redmi 8), особенно это касается режима макросъемки, но всё равно качество оставляет желать лучшего. Что можно сделать, чтобы улучшить качество и скорость фотографий?
- Для максимального разрешения снимка, т.е. 13 мегапикселей, необходимо выставить соотношение сторон 4:3 (если проблема сохраняется, то, скорее всего, версия приложения не подходит под ваш телефон)
- Протереть линзы, если получаются смазанные снимки. Кстати, это может быть из-за того, что стоковая камера вместо вспышки использует фонарик. В таком случае можно попробовать установить другое приложение (см. следующий раздел)
- Пробовать изменить доп. настройки в камере. Для этого через проводник заходим в каталог DCIM/Camera/ и создаем новую папку Lab_options_visible. Дальше перезапускаем камеру (выгружаем с оперативной памяти) и в настройках нам будут доступны некоторые экспериментальные функции
Google Camera
Самый популярный альтернативный «клиент» для фотосъемки — Google Camera. Он достаточно популярен по нескольким причинам: выше детализация, лучше цветопередача в HDR+, банально быстрей запускается и не тормозит видеоискатель. Многие отмечают, что качество фотографий куда лучше, чем на стоковой камере (например, текст на дальних расстояниях остается читаемым). При этом сравнить стандартную и гугл-камеру можно легко, т.к. Gcam не заменяет её, а добавляется еще одна.
Но есть и огромный половник дёгтя. Приложение Google Camera нещадно тормозит на устройствах с процессором MediaTek, т.е. Redmi 9 в том числе. Нормально она работает только на процессоре Snapdragon, в ином случае приготовьтесь к фризам на любой версии GCam начиная с 7 версии. Еще один нюанс: гугл-камера сохраняет фотографии только во внутреннюю память — на карту памяти засейвить не получится.
В итоге мы имеем три варианта:
- Смириться с медлительностью Gcam, получая взамен более качественные фотографии. Все последнии версии Google Camera выкладывают здесь
- Установить шестую версию приложения. Это последняя из Gcam, которая нормально (читай: быстро) работает на процессорах MediaTek. В ней есть некоторые ограничения: нет широкоформатной съемки в режиме фотографии (в видео — есть), максимальное разрешение фотографий — 8 Мп, долго «думает» в режиме HDR. Зато отличная ночная съемка (если тапнуть по экрану, чтобы фокус поймало заново). Скачать можно с нашего Яндекс. Диска: камера + конфиг. Кстати, про углублённую настройку Gcam можно почитать здесь
- Третий вариант: использовать версию NGCam_7.4.104-v1.8-fix (скачать с Я.Диска). Она точно фоткает лучше стоковой, но так же слегка тормозит
Важно: для работы Gcam требуется установить конфиг. Без него работать не будет. Для этого закиньте файл конфигурации (XML-файл) в папку KillerCam/Configs. Если камера не заработает, сделайте двойной тап на чёрное поле внизу экрана
Сравнение снимков с разных камер
NGCam:


Google Camera:

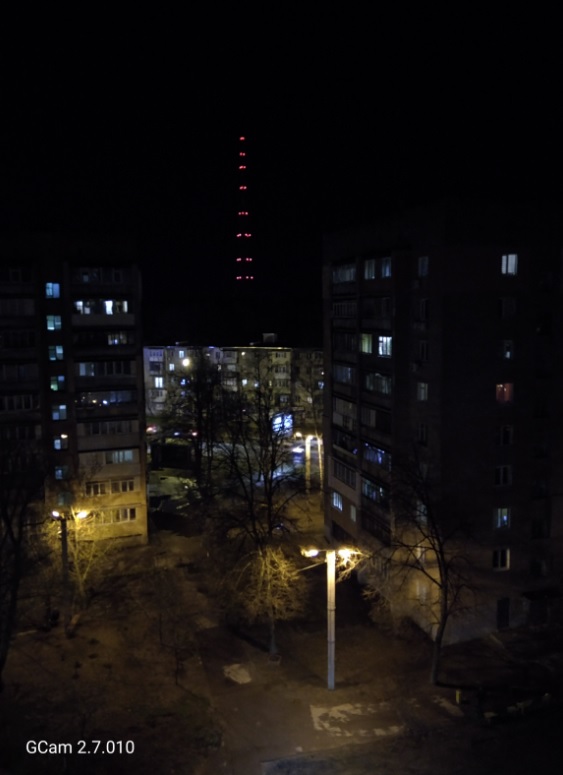
Стоковая камера:

Footej Camera

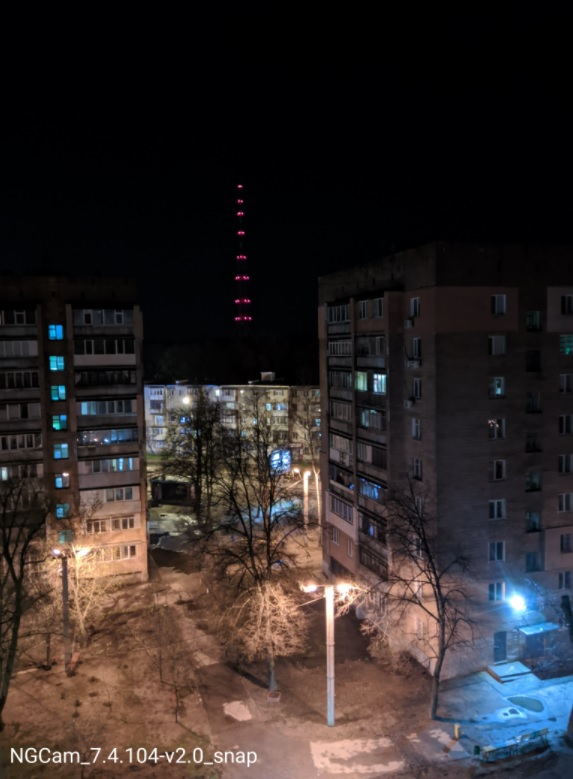
Немного про прошивки
Прошивки MIUI
Скорее всего, на вашем телефоне установлена MIUI Global Stable — это самая официальная из всех официальных прошивок. При покупке телефона в салонах сотовой связи или в магазинах-партнёрах Xiaomi вы на 99% получите именно такую. Многим при покупке с Aliexpress приходят телефоны с так называемой «прошивкой от продавца» — это может быть глобальная (global), русская или вообще китайская (MIUI China Stable). Посмотреть текущую можно посмотреть в «Настройках» -> «О телефоне«.
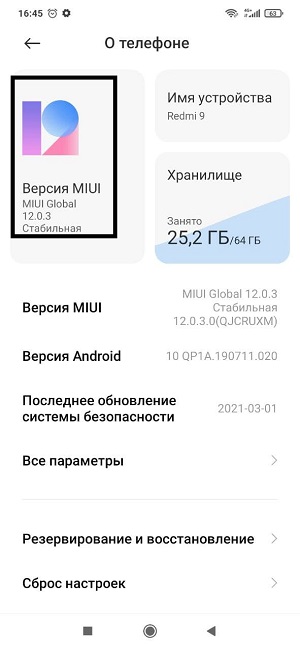
Даже если вы получаете такую «модицифированную» прошивку от продавца, то в этом нет никаких проблем, т.к. она создана из официальной. И если вас устраивает её работа, то можно спокойно её дальше использовать, если нет — можно легко прошить телефон под global-версию. На Redmi 9 такие прошивки есть, но в линейке Xiaomi есть телефоны у которых нет Global ROM, т.к. они не предназначались для продажи на мировых рынках — исключительно на внутреннем китайском.
Приписка стабильная (Stable) означает, что в данной версии исправлены все насущные проблемы и количество багов стремится к нулю — в общем, полностью оптимизированная прошивка, рекомендованная Xiaomi и гарантирующая стабильную работу. Существует еще developer-версия, которая выходит гораздо чаще, чем Stable. Данная прошивка, как следует из названия, создана специально для тестирования нововведений и новых фич. Соответственно, вероятность крашей и прочих проблем с операционной системой возрастает в разы, зато есть вероятность первым опробовать новый функционал
Как вернуться на стоковую прошивку MIUI?
Окей, вы совсем не хотите заморачиваться с выбором прошивки — вы хотите, чтобы телефон работал на дефолтной прошивке, т.е. как «из коробки». При этом способ не требует рут прав, копания в проводнике или перезагрузки в рекавери мод. Единственное условие для успешной перепрошивки — заряд телефона должен составлять не менее 70%.
Заходим в «Настройки» -> «О телефоне«. Нажимаем на версию MIUI.

На следующем экране нажимаем на три точки и выбираем «Скачать полную прошивку»
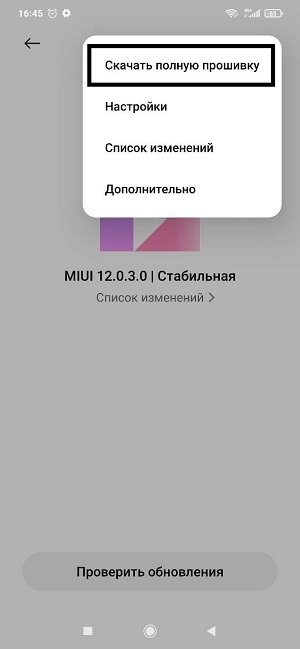
Дальше от вас ничего не требуется. Телефон самостоятельно скачает файл прошивки, распакует его и потребует перезагрузку. Во время перезагрузки будет установлена последняя версия прошивки, т.е. скачиваться будет абсолютно та же прошивка, что и была у вас до начала процесса.
Как сделать хард резет?
Скинуть телефон на настройки по умолчанию не сложнее, чем…чем всё, что угодно. Поехали:
- Выключаем телефон
- Зажимаем кнопку включения/блокировки и VOL+
- При срабатывании вибросигнала кнопку включения/блокировки отпускаем, но продолжаем держать VOL+
- После открытия окна отпускаем и VOL+ тоже
- Перед вами откроется т.н. Recovery Mode. Сенсор в нём не работает, перемещение по меню осуществляется с помощью кнопок VOL+ и VOL-, подтвердить выбор — кнопка включения/блокировки
- Нам нужно выбрать сделать следующий выбор: «Wipe Data» -> «Wipe All Data» -> «Confirm«
- По окончании возвращаемся на стартовую страницу меню, и перезагружаемся в Систему через «Reboot to System».
- Вы, конечно, в курсе, но мы всё же напомним, что сброс до заводских настроек сотрёт всю информацию с внутренней памяти (данные на microSD-карте останутся)
Покупка телефона
Можно ли покупать на Aliexpress?
Да, на Aliexpress есть несколько проверенных магазинов, где можно купить телефон не боясь, что приедет сломанный экземпляр. Среди них:
Hong Kong Goldway
Mi Global Store
К тому же, в китайских маркетплейсах часто бывают скидки, которых не дождёшься от отечественных федеральных сетей электроники
После того, как вы достали его из коробки и убедились, что он у нас под рукой, пора приступить к действиям, чтобы настроить смартфон Xiaomi с MIUI . Показания, которые мы вам дадим, действительны для обоих смартфонов марки Xiaomi, Redman суббренд или фирма Poco. Все они используют уровень MIUI, и это делает конфигурацию идентичной для всех из них, во многих случаях интегрируясь с Android система конфигурации.

Содержание
- Шаги по завершению настройки нового Xiaomi
- Добавить соединение Wi-Fi и учетную запись Google
- Скопируйте данные и приложения со своего старого мобильного телефона
- Время SIM-карты
- Запуск сервисов Google
- Выберите поисковую систему и настройте Google Ассистент
- Xiaomi Cloud, дополнительное преимущество
- Защита и безопасность
- Что мы делаем дальше?
Хотя для многих это может быть чем-то «раздражающим» и лишь отсрочивает момент, чтобы начать использовать терминал, делать фотографии или играть в игры на мобильном телефоне Xiaomi, правда в том, что первоначальная конфигурация смартфона является чем-то ключевым для любого пользователя. По этой причине мы приглашаем вас взять свой смартфон, нажать кнопку питания на несколько секунд и проследить весь процесс, который мы собираемся объяснить вам в том же темпе на вашем новом терминале.
Добавить соединение Wi-Fi и учетную запись Google
Первое, о чем нас спросит смартфон, — это язык, и после выбора мы полностью перейдем к этапам процесса. Первый и самый важный — поставить пароль от Wi-Fi сеть, к которой мы собираемся подключиться. Как только смартфон установит соединение с WiFi-роутером, пора добавить нашу учетную запись Google, пока мы будем делать это только с основной учетной записью, но позже мы можем добавить другие альтернативные варианты. Этот момент является ключевым, потому что привязка аккаунта Google к мобильному мы добавляем дополнительную защиту, с помощью которой телефон привязывается к учетной записи.
Скопируйте данные и приложения со своего старого мобильного телефона
Теперь, когда телефон подключен к сети и с помощью нашей учетной записи он смог идентифицировать приложения, которые мы установили на нашем старом мобильном телефоне, мы можем перейти к настройке данных и приложений. Просто нажав на следующий экран на устройстве, соответствующие данные о предпочтениях будут добавлены из предыдущего терминала. Если мы пришли с мобильного телефона Xiaomi, данные конфигурации можно импортировать в новый Xiaomi, от режима «Не беспокоить» до настроек звука, но если он от другого производителя, будут импортированы только основные параметры.
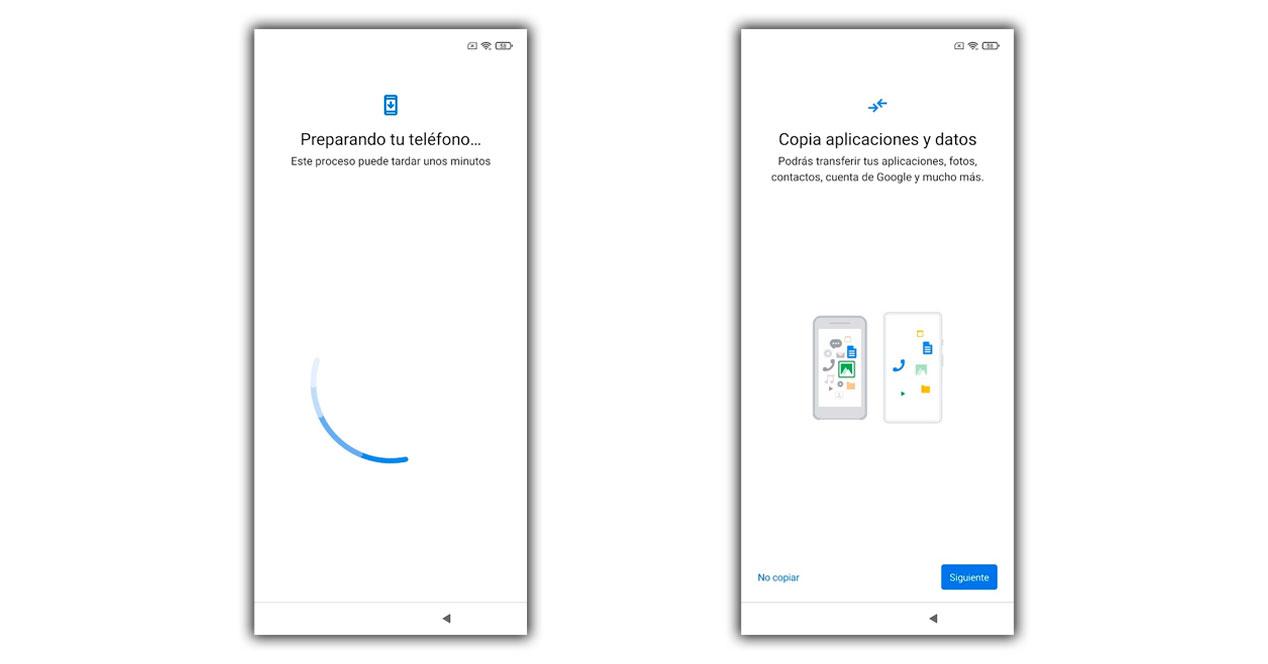
Что касается приложений, появится экран конфигурации, где мы можем скопировать все приложения, которые у нас были, или пометить их одно за другим. Наша рекомендация — выбрать основные, чтобы завершить процесс быстро, а остальные, пора установить их вручную и постепенно настраивать.
Время SIM-карты
Следующее, что появится на экране, — это сообщение с просьбой вставить SIM-карту с помощью шипа, который идет в коробке телефона. После размещения появится маркер для ввода секретного ПИН-кода, если мы ранее не удаляли его. Затем он свяжется с нашим оператором чтобы сообщить ему, что мы запускаем мобильный телефон, а затем отправить мастер автоматической настройки APN.
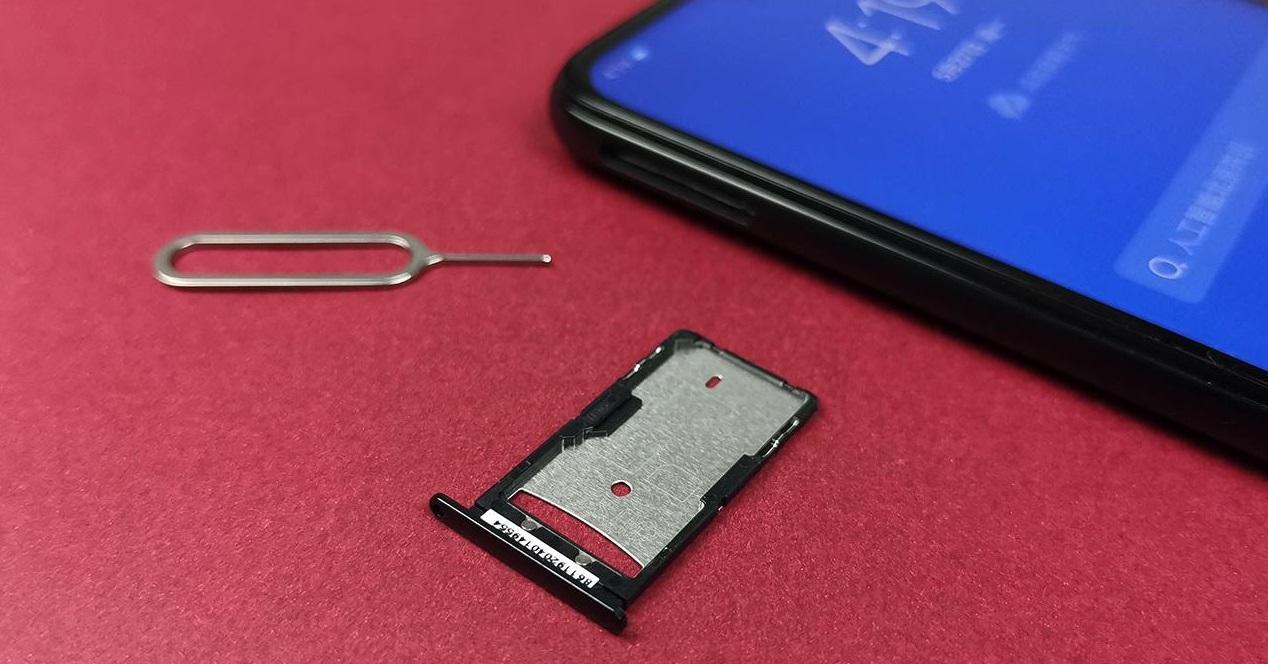
В некоторых случаях они устанавливаются без каких-либо действий, а в других случаях, когда мобильный телефон доступен, мы увидим SMS от оператора с кнопкой установки, которую нужно нажать. Если хотите, мы можем пропустить этот процесс и вставить SIM-карту, когда все остальное будет завершено.
Запуск сервисов Google
Важный шаг, который мы не можем пропустить столько, сколько хотим в конфигурация нового мобильного телефона Xiaomi должен принять условия Google. Это дает нам доступ к услугам компании, которые варьируются от возможности создавать резервные копии для нашего душевного спокойствия до возможности сбора данных об использовании. Некоторые из этих данных, если мы можем отклонить их, нажав синюю кнопку, и когда все будет готово, вам просто нужно нажать «Да, я принимаю».
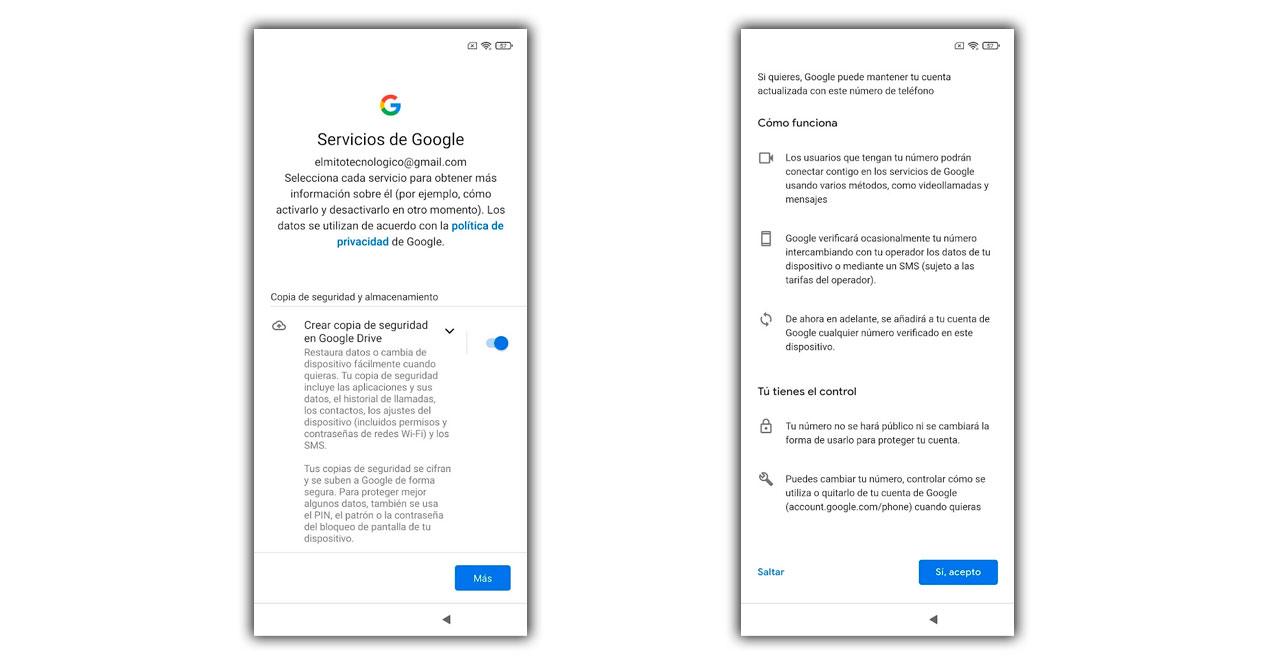
Выберите поисковую систему и настройте Google Ассистент
Следующее, что появится на экране, — это инструмент, позволяющий выбрать нашу поисковую систему по умолчанию, где в настоящее время отображаются четыре варианта: Google, Bing, Info.com или PrivacyWall. В любом случае процесс продолжится с помощью меню конфигурации мастера, которое всегда будет использоваться для поиска в Google.
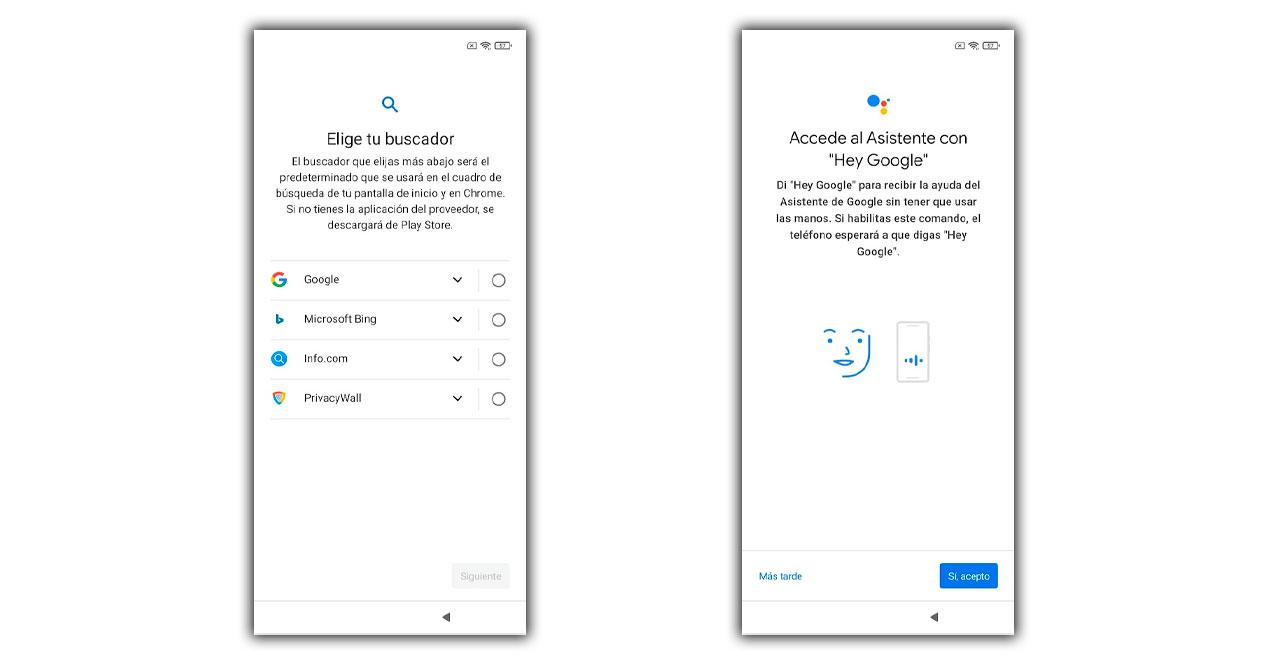
Если мы хотим использовать помощника, мы коснемся синей кнопки или коснемся «Позже». В этом процессе нам придется повторить фразу «Окей, Google» или «Окей, Google» до трех раз.
Xiaomi Cloud, дополнительное преимущество
В следующем появившемся окне нам нужно будет принять условия и разрешение Xiaomi, чтобы получить доступ к возможностям Xiaomi. облако. Это Собственное облако Xiaomi , где мы сможем получить доступ с существующей учетной записью или создать ее, если у нас ее еще нет. Оказавшись внутри учетной записи, мы можем активировать опцию поиска устройства, что добавит дополнительную опцию восстановления через веб-сайт Mi Cloud в случае его исчезновения. Если нам нужно больше преимуществ, после завершения процесса мы переходим в «Настройки»> «Моя учетная запись» и можем сделать резервные копии фотографий или других элементов.
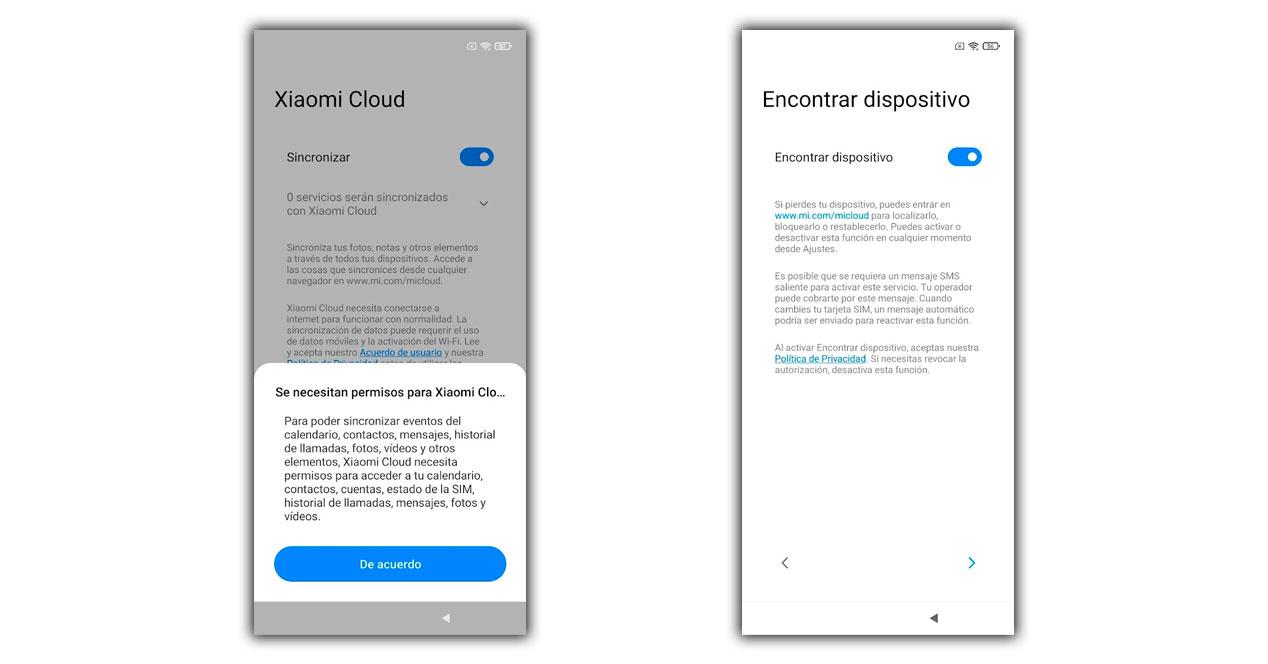
Защита и безопасность
И последнее, но не менее важное: смартфон Xiaomi попросит нас выбрать наш любимая система идентификации. Как бы то ни было, для этого также потребуется графический ключ, пин-код или пароль, чтобы в случае отказа основного из них мы могли получить доступ к смартфону. Он также будет запрашиваться после выключения и включения смартфона. Если мы хотим, мы можем пропустить этот шаг и сделать это позже в настройках, но мы не советуем этого, иначе телефон будет незащищен.
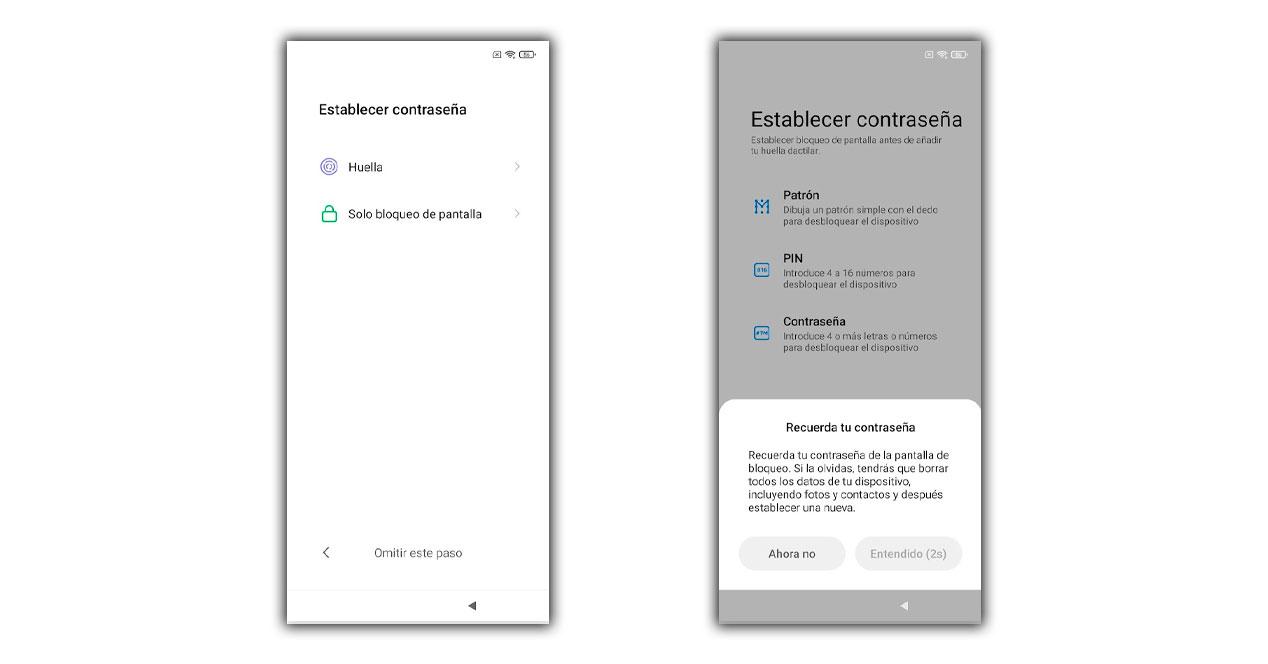
Что мы делаем дальше?
Хотя после выполнения всех этих шагов смартфон будет готов к использованию, как мы обычно, мы не можем игнорировать то, что приложения, которые были экспортированы с предыдущего смартфона, будут по-прежнему установлены в панели уведомлений или даже настройка устройства будет завершена. Поэтому важно дать ему несколько минут отдыха и чтобы он оставался подключенным к Wi-Fi, чтобы терминал был полностью подготовлен.

Мы также должны посмотреть на аккумулятор, который есть в смартфоне, так как не рекомендуется опускаться ниже 20%, и в процессе настройки, который мы выполнили, а также при установке приложений, которые могут происходить, он будет разряжаться. аккумулятор быстрее. Используя оригинальное зарядное устройство, мы подключаем мобилу к источнику питания и позволяем процессу продолжаться.
Как только все будет готово, наш мобильный телефон Xiaomi войдет в Настройки> Средство обновления системных приложений . Здесь у нас будет как минимум одно приложение, готовое к обновлению с серверов Xiaomi, потому что они являются нашими собственными элементами и поэтому никогда не будут обновляться с помощью Гугл игры.
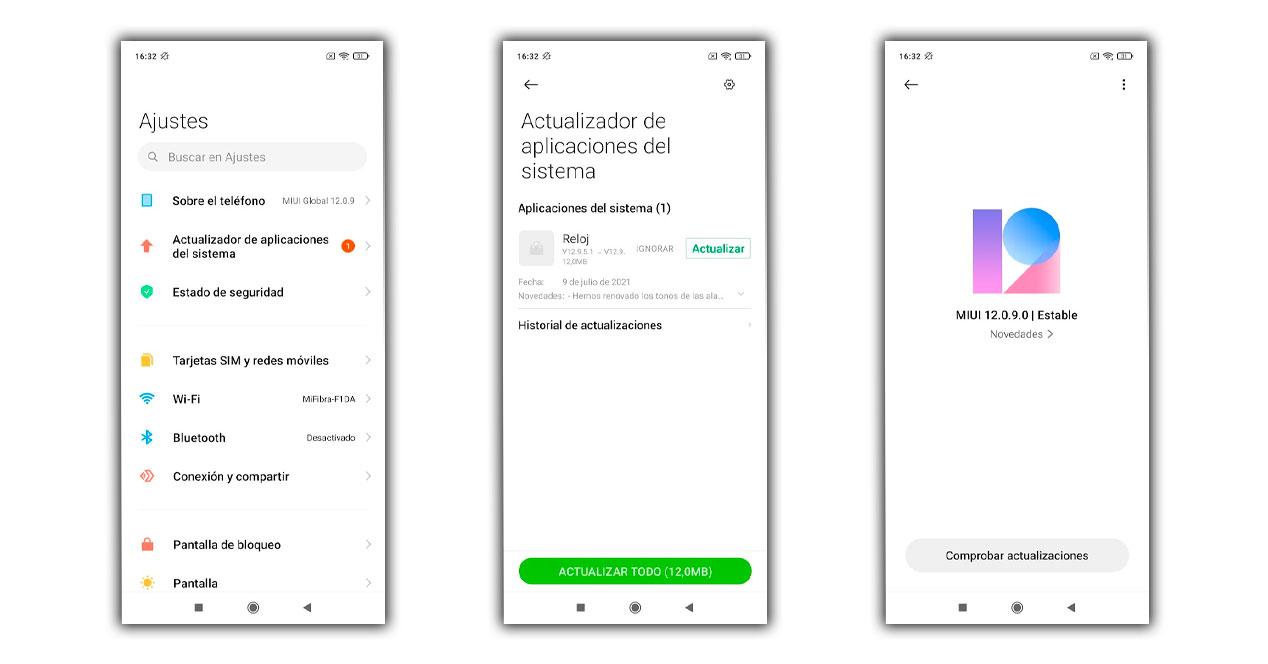
Но также не забываем зайти в Настройки> О телефоне> Версия MIUI, чтобы проверить наличие новых системные обновления и установите их перед добавлением дополнительных файлов в терминал. Чем чище обновления, тем меньше вероятность ошибок.