Привет, посетитель сайта ZametkiNaPolyah.ru! Продолжаем изучать основы работы компьютерных сетей, в этой теме я предлагаю разобраться со структурой IP-адреса и откуда вообще берутся какие-то номера сети и номера узлов, ведь IP-адрес с виду цельная и неделимая сущность. Также в этой записи мы коротко поговорим о маске подсети и зачем она нужна, увидим, что когда-то было всё плохо и сети были классовыми, а сейчас всё стало хорошо благодаря CIDR и VLSM и сети стали бесклассовые и в завершении посмотрим на формы записи IP-адресов в протоколе IPv4.
Если тема компьютерных сетей вам интересна, то можете ознакомиться с другими записями курса.
Оглавление первой части: «Основы взаимодействия в компьютерных сетях».
Оглавление четвертой части: «Сетевой уровень: протокол IP и его версия IPv4».
4.2.1 Введение
Содержание статьи:
- 4.2.1 Введение
- 4.2.2 Структура IP-адреса и маска подсети
- 4.2.3 Классовые сети
- 4.2.4 Бесклассовые сети (CIDR) и маска подсети переменной длины (VLSM)
- 4.2.5 Форма записи IP-адреса и сокращения
- 4.2.6 Выводы
Структура IP-адреса — это одна из самых важных тем для понимания принципов работы протокола IP, эта тема очень тесно связана с маршрутизацией, механизмом работы классовых сетей и механизмом маски подсети переменной длинны, если вы не разберетесь со структурой IP-адреса, вы, конечно, не будете испытывать проблем с тем, чтобы настроить на своем ПК доступ в Интернет, но у вас не будет понимания принципов работы IP сетей. Надеюсь, я вас убедил в том, что тема важная, хоть и небольшая.
4.2.2 Структура IP-адреса и маска подсети
В протоколе IP есть две очень важные вещи, которые сделали его вездесущим. Первое – это заголовок IP-пакета, который определяет функционал протокола, а второе – это IP-адрес, который, следует заметить, является частью заголовка, но о нем стоит поговорить отдельно, чем мы сейчас и займемся. Я более чем уверен, что вы уже видели IP-адреса и более того, работали с ними, но если нет, то вот вам пример: 192.168.1.0. Для человека IP-адреса в протоколе IPv4 чаще всего представлены вот в таком виде.
Тут ничего сложного нет. Для нас IP-адрес разбит на четыре кусочка, разделителем между кусочками служат точки, каждый такой кусочек представляет собой один байт или один октет, следовательно, максимально возможное число, которое можно записать равно 255, а минимальное число ноль. Получается, что чисто теоретически можно использовать адреса от 0.0.0.0 до 255.255.255.255. Правда часть из этих адресов зарезервирована под специальные нужды, это мы обсудим в отдельной теме. Сейчас же будем считать, что нам доступно два в тридцать второй степени IP-адресов или 4 294 967 296, которых уже катастрофически не хватает, поэтому происходить плавное внедрение протокола IPv6.
На самом деле IP-адрес – это не просто четыре числа, разделенных точками, а более интересная и сложная сущность. Во-первых, следует заметить, что маршрутизаторы не знают десятичной системы счисления, так же, как и абонентские узлы, для них IP-адрес представлен набором нулей и единиц в нашем случае (192.168.1.0), IP-адрес для машины выглядит как-то так: 11000000 (192) 10101000 (168) 00000001 (1) 00000000 (0). Октеты в данном случае я разделил пробелами, думаю, тут всё очевидно: каждый байт – это восемь двоичных значений (0 или 1), а всего у нас для IP-адреса выделено четыре байта, то есть 32 бита, отсюда вытекает и два в тридцать второй степени IP-адресов.
Я сразу оговорился, что IP-адрес более сложная штука, чем кажется на первый взгляд. Дело всё в том, что IP-адрес включает в себя два параметра, которые позволяют идентифицировать узел в глобальной сети: номер узла и номер сети. Вообще, протокол IP предусматривает два механизма разбиения IP-адреса на номер сети и номер узла. Первый механизм называется классовая адресация, а второй механизм называется CIDR (Classless Inter-Domain Routing) или бесклассовая адресация. В этой теме мы сделаем поверхностный обзор этих механизмов, а в дальнейшем разберемся с ними детально.
Сейчас же сделаем небольшое отступление и поговорим про байты и биты, а если быть более точным, то про порядок нумерации байтов и битов в байте. Для примера возьмем IP-адрес 192.168.1.0 и запишем его в двоичном виде.

Рисунок 4.2.1 Номера октетов и битов в IP-адресе
В таблице показана нумерация октетов и бит в октетах так, как это реализуется в сетях модели TCP/IP. Эта нумерация справедлива как для IP-адреса в отдельности, так для всего заголовка IP-пакета. Крайний левый байт или самый первый байт называется старшим и его порядковый номер ноль, последний байт — младший и его порядковый номер три. То же самое относится и к битам: самый старший бит имеет порядковый номер ноль, а самый младший бит в байте имеет порядковый номер семь. Такая нумерация называется от старшего к младшему или big-endian, иногда такой порядок называется сетевым порядком.
Кстати, если у вас процессор интеловской архитектуры, то он нумерует байты и биты в обратном порядке, то есть от младшего к старшему, big-endian или интеловский порядок нумерации. Есть еще смешанный порядок и переключаемый порядок, но это нам уже не очень интересно. Почему в компьютерных сетях используется прямой порядок? Да очень просто, дело в том, что в таком порядке числа удобнее сравнивать, а сетевые устройства в основном только и делают, что сравнивают то, что им пришло в пакетах с тем, что записано в их конфигурациях или памяти.
4.2.3 Классовые сети
Классовые сети были единственным способом разделить пространство IP-адресов между всеми желающими до 1993 года, то есть с 1981 по 1993 год, в 1993 году появился механизмы VLSM и CIDR, которые сделали процесс деления более гибким, из этого можно сделать вывод, что в начале девяностых уже появились первые проблемы с нехваткой IP-адресов в протоколе IPv4.
Классовая адресация, как ясно из названия, делит всё пространство IP-адресов на классы, всего этих классов пять: A, B, C, D, E. Как понять к какому классу принадлежит IP-адрес? Да очень просто! Посмотреть на его первые биты. Приведу небольшой список, чтобы было понятно, к какому классу какой IP-адрес относится:
- сети класса А определяются значением первого бита, если первый бит IP-адреса нулевой, то это означает, что он относится к сети класса А, во всех остальных случаях – это другой класс;
- сети класса B определяются по значениям первых двух бит IP-адреса, IP-адрес относится к сети класса B в том случае, если первый бит имеет значение 1, а второй 0;
- IP-адрес будет принадлежать к сети класса C, если первый бит адреса будет равен 1, второй бит тоже 1, а третий будет 0;
- сети класса D определяются по первым четырем битам IP-адреса, при этом первый бит 1, второй бит 1, третий бит 1, а четвертый 0, стоит добавить, что сети класса D использовались для многоадресной рассылки или иначе multicast;
- и наконец сети класса E были зарезервированы и их нельзя было использовать простым смертным, определялись они первыми четырьмя битами, каждый из которых должен был иметь значение 1.
Для ясности давайте посмотрим на примере IP-адресов для каждого класса:
- Сеть класса А. IP-адрес в десятичном виде: 10.10.0.1. IP-адрес в двоичном виде: 00001010 00001010 00000000 00000001. Обратите внимание на то, что первый бит равен нулю, он как раз и определяет, что данный IP-адрес принадлежит к сети класса A.
- Сеть класса B. IP-адрес в десятичном виде: 130.25.25.12. IP-адрес в двоичном виде: 1000 0010 00011001 00011001 000011000. Принадлежность к данному классу определяют первых два бита: 10.
- Сеть класса C. IP-адрес в десятичном виде: 192.168.1.0. IP-адрес в двоичном виде: 11000000 10101000 00000001 00000000. Значение первых трех бит определяют принадлежность этого адреса к классу C.
- Сеть класса D. IP-адрес в десятичном виде: 224.0.0.6. IP-адрес в двоичном виде: 11100000 00000000 00000000 00000110. Значение первых четырех бит выделены жирным.
- Сеть класса E. IP-адрес в десятичном виде: 240.10.10.10. IP-адрес в двоичном виде: 11110000 00001010 00001010 00001010.
С классами сетей всё ясно и понятно, остается нераскрытым вопрос: как понять из какой подсети тот или иной IP-адрес, но об этом мы поговорим в теме про классовые сети, сейчас же только отмечу, что принадлежность IP-адреса к той или иной подсети определяется значением некоторых бит в самом IP-адресе и фиксированной маской, которая в любом случае будет сопровождать этот адрес.
4.2.4 Бесклассовые сети (CIDR) и маска подсети переменной длины (VLSM)
Бесклассовая адресация или CIDR – это механизм разделения сети на подсети в современных сетях передачи данных, этот механизм позволил существенно экономить адреса и не тратить лишнего. CIDR тесно связан с понятием VLSM (variable length subnet mask) или маска подсети переменной длинны, можно просто маска подсети или маска, на данный момент вас поймут верно. Становится понятно, что здесь уже нет жестких рамок классов, поскольку и самих классов нет. Теперь для того чтобы понять к какой подсети относится IP-адрес, самого IP-адреса недостаточно, нужна еще и маска подсети, которая, следует сказать, не передается по сети, она указывается только на конечных узлах и маршрутизаторах (а, например, L2 коммутаторы и хабы вообще ничего не знают про IP-адреса, первые работают на канальном уровне, а вторые реализуют механизмы физического уровня модели OSI 7, про разницу между хабами, коммутаторами и роутерами читайте здесь), и для нее нет отдельного поля в IP-пакете.
Как выглядит маска подсети? Да на самом деле, как IP-адрес, вот несколько примеров маски: 255.255.255.0, 255.255.254.0, 255.248.0.0. Заметили, здесь общего? Ну, кроме того, что во всех примерах первый октет 255. Общая составляющая будет заметна, если написать все эти маски в двоичном виде:
- 255.255.255.0: 11111111 11111111 11111111 00000000;
- 255.255.254.0: 11111111 11111111 11111110 00000000;
- 255.248.0.0: 11111111 11111000 00000000 00000000.
Обратите внимание: у каждой маски вначале идут только единицы, затем идут только нули, чередоваться нули и единицы в маске подсети не могут. Например, не может быть вот такой маски: 255.254.255.0 или в двоичной системе: 11111111 11111110 11111111 00000000. И это очень важно, поскольку именно на границе нулей и единиц маски подсети находится граница между номером сети и номером узла в IP-адресе.
На примере будет все немного яснее, давайте возьмем следующий IP-адрес и маску: 192.168.1.25/24, иначе это можно было бы записать так: 192.168.1.25 с маской 255.255.255.0, число 24 означает количество единиц в маске. Если вам просто дать этот IP-адрес без маски, то вы не сможете сказать: какие биты этого IP-адреса отданы под номер сети, а какие под номер узла, с маской же все становится понятно. Чтобы понять где здесь номер сети, а где номер узла, нужно перевести и маску, и IP-адрес в двоичную систему счисления. Давайте сделаем всё это в виде таблицы.
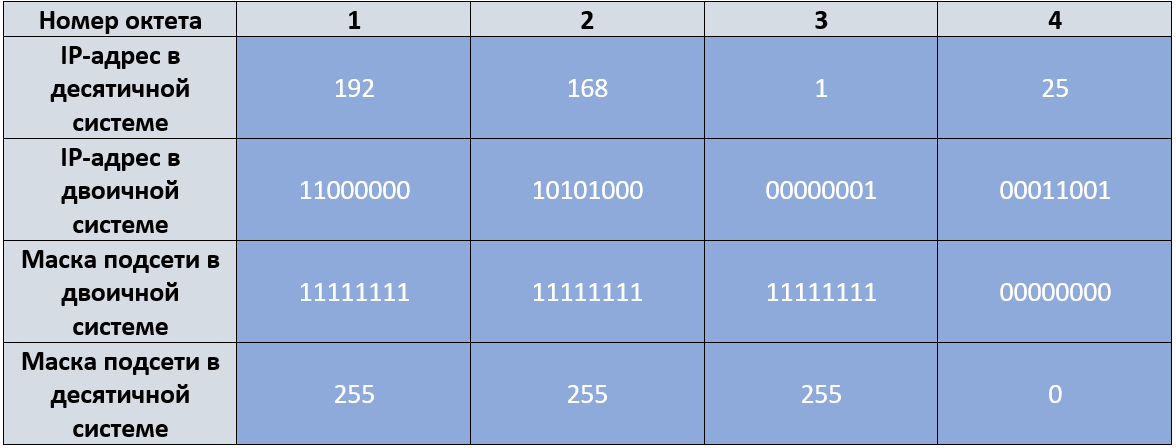
Рисунок 4.2.2 Переводим IP-адрес и маску подсети в двоичный вид
Сразу отметим, что те биты IP-адреса, напротив которых в маске подсети стоят единицы, будут относиться к номеру сети, а те биты адреса, напротив которых у маски нули, относятся к номеру хоста. Чтобы узнать номер узла и номер сети нужно выполнить операцию «логическое И» между соответствующими битами IP-адреса и маски. Операция «логическое И» в двоичной системе счисления эквивалентна операции умножения в десятичной: 1×1=1, 1×0=0, 0×0=0. Вы уже понимаете, что номер сети в IP-адресе при использовании CIDR и VLSM определяется маской, а именно единичными битами маски, то есть для нашего случая номер сети это: 192.168.1.0, а под номера узлов у нас остается диапазон с 192.168.1.1 по 192.168.1.254, заметьте, что есть еще 192.168.1.255 — это широковещательный IP-адрес для данной сети и его нельзя назначить узлу или интерфейсу маршрутизатора.
Мы рассмотрели простой пример использования маски подсети, в данном случае граница между номером сети и номером узла в IP-адресе проходит по границе предпоследнего октета, но не всегда бывает так, например, маска 255.248.0.0 проводит границу между номером сети и номером узла посередине октета, но о таких случаях мы поговорим в отдельной теме, посвященной бесклассовой адресации (CIDR) и механизму маски подсети (VLSM).
4.2.5 Форма записи IP-адреса и сокращения
Теперь вас стоит немного удивить и сказать, что ни один официальный документ, посвященный IP протоколу, не говорит нам о том, как правильно записывать IP-адрес в документах, на бумаге или в конфигурациях того или иного устройства. На самом деле IP-адрес — это число, которое можно записать в любой системе счисления, хоть в восьмеричной.
Форма записи октетов, разделенных точками, просто удобна для человека: 127.0.0.1. Но для машины IP-адрес число, которое может находиться в диапазоне от 00000000 00000000 00000000 00000000 до 11111111 11111111 11111111 11111111 или в десятичной системе счисления: от 0 до 4 294 967 295. И вы понимаете, что IP-адрес 127.0.0.1 — это не число 127001, это вот такое число 01111111 00000000 00000000 00000001 или в десятичной системе: 2 130 706 433. Более того, если вы запустите командую строку или эмулятор терминала в своей операционной системе, то сможете пропинговать IP-адрес 127.0.0.1, используя число выше, если не верите, то смотрите листинг ниже.
| 1 2 3 4 5 6 7 8 9 10 11 12 13 14 15 16 17 18 | Microsoft Windows [Version 10.0.17134.228] (c) Корпорация Майкрософт (Microsoft Corporation), 2018. Все права защищены. C:UsersDell>ping 2130706433 Обмен пакетами с 127.0.0.1 по с 32 байтами данных: Ответ от 127.0.0.1: число байт=32 время<1мс TTL=128 Ответ от 127.0.0.1: число байт=32 время<1мс TTL=128 Ответ от 127.0.0.1: число байт=32 время<1мс TTL=128 Ответ от 127.0.0.1: число байт=32 время<1мс TTL=128 Статистика Ping для 127.0.0.1: Пакетов: отправлено = 4, получено = 4, потеряно = 0 (0% потерь) Приблизительное время приема—передачи в мс: Минимальное = 0мсек, Максимальное = 0 мсек, Среднее = 0 мсек C:UsersDell> |
Эстетами или проще говоря тем, кому хочется понтанутся, было придумано еще два способа записи IP-адресов в десятичном виде, эти способы идут к нам из стека BSD и функции inet_aton (). Первый способ записи выглядит так: 8bit.24bit. Вот так будет выглядеть IP-адрес в 127.0.0.1: 127.1, в двоичном виде он будет выглядеть так: 01111111.000000000000000000000001. То есть под первое число выделено 8 бит, а под второе 24. Windows вполне себе понимает такую форму записи.
| C:UsersDell>ping 127.1 Обмен пакетами с 127.0.0.1 по с 32 байтами данных: Ответ от 127.0.0.1: число байт=32 время<1мс TTL=128 Ответ от 127.0.0.1: число байт=32 время<1мс TTL=128 Ответ от 127.0.0.1: число байт=32 время<1мс TTL=128 Ответ от 127.0.0.1: число байт=32 время<1мс TTL=128 Статистика Ping для 127.0.0.1: Пакетов: отправлено = 4, получено = 4, потеряно = 0 (0% потерь) Приблизительное время приема—передачи в мс: Минимальное = 0мсек, Максимальное = 0 мсек, Среднее = 0 мсек |
Чтобы было понятнее, приведу еще один пример: 127.267894, чтобы понять, что это за IP, вам нужно будет перевести его в двоичный вид, разбить на октеты и восстановить его в том виде, к которому мы привыкли или просто попробовать пропинговать адрес:
| C:UsersDell>ping 127.267894 Обмен пакетами с 127.4.22.118 по с 32 байтами данных: Ответ от 127.4.22.118: число байт=32 время<1мс TTL=128 Ответ от 127.4.22.118: число байт=32 время<1мс TTL=128 Ответ от 127.4.22.118: число байт=32 время<1мс TTL=128 Ответ от 127.4.22.118: число байт=32 время<1мс TTL=128 Статистика Ping для 127.4.22.118: Пакетов: отправлено = 4, получено = 4, потеряно = 0 (0% потерь) Приблизительное время приема—передачи в мс: Минимальное = 0мсек, Максимальное = 0 мсек, Среднее = 0 мсек |
Вторая сокращенная форма записи IP-адреса выглядит так: 8bit.8bit.16bit. Адрес 127.0.0.1 в этой форме можно записать так: 127.0.1. Винда понимает и эту форму:
| C:UsersDell>ping 127.0.1 Обмен пакетами с 127.0.0.1 по с 32 байтами данных: Ответ от 127.0.0.1: число байт=32 время<1мс TTL=128 Ответ от 127.0.0.1: число байт=32 время<1мс TTL=128 Ответ от 127.0.0.1: число байт=32 время<1мс TTL=128 Ответ от 127.0.0.1: число байт=32 время<1мс TTL=128 Статистика Ping для 127.0.0.1: Пакетов: отправлено = 4, получено = 4, потеряно = 0 (0% потерь) Приблизительное время приема—передачи в мс: Минимальное = 0мсек, Максимальное = 0 мсек, Среднее = 0 мсек |
Для примера давайте пропингуем адрес 127.99.259, чтобы посмотреть как происходит преобразование:
| C:UsersDell>ping 127.99.259 Обмен пакетами с 127.99.1.3 по с 32 байтами данных: Ответ от 127.99.1.3: число байт=32 время<1мс TTL=128 Ответ от 127.99.1.3: число байт=32 время<1мс TTL=128 Ответ от 127.99.1.3: число байт=32 время<1мс TTL=128 Ответ от 127.99.1.3: число байт=32 время<1мс TTL=128 Статистика Ping для 127.99.1.3: Пакетов: отправлено = 4, получено = 4, потеряно = 0 (0% потерь) Приблизительное время приема—передачи в мс: Минимальное = 0мсек, Максимальное = 0 мсек, Среднее = 0 мсек |
Нормальный человек никогда не будет вам рекомендовать использовать для записи IP-адреса обычные числа или формы 8bit.24bit, 8bit.8bit.16bit. Дело в том, что эти формы записи IP-адресов настолько непривычны, что не всем удобно и понятно с ними работать, вас могут просто банально не понять, если вместо IP-адреса вы напишите огромное число или сокращенную форму записи. Второй момент заключается в том, что не всё оборудование и не каждая программа сможет работать с такими формами записи IP-адресов, нет никакой гарантии того, что разработчик софта вообще знал о том, что такие формы допустимы в протоколе IP.
4.2.6 Выводы
Итак, какие выводы можно сделать по IP-адресам в протоколе IPv4 и их структуре? IP-адрес состоит из двух частей: номера сети и номера узла. Для отделения мух от котлет у нас есть два механизма: классовая адресация, которая уже не используется из-за неэкономного расходования ограниченного ресурса IP-адресов, а также механизмы VLSM и CIDR, которые позволяют очень гибко делить сети на подсети. Оба этих механизма мы рассмотрим более подробно, сейчас же был просто поверхностный взгляд.
Также стоит сказать, что IP-адреса узлам назначаются администратором вручную или при помощи DHCP-сервера, который настраивает администратор. Если же у вас сеть разделена на подсети, то у каждой подсети должен быть уникальный номер, а еще внутри подсети каждый узел должен иметь уникальный номер.
Нужно сказать еще и о том, что очень часто вместе с IP-адресом узла, нам нужно будет использовать IP-адрес шлюза и маску сети, обе эти настройки никак не передаются по сети, поскольку для них нет поля в заголовке IP-пакета. В заголовке есть только IP-адрес источника и IP-адрес назначения, этой информации хватает маршрутизатору для того, чтобы выбрать направление, по которому будет направлен пакет.
Калькулятор производит расчет адреса сети IPv4, широковещательного адреса, ip-адрес первого узла, ip-адрес последнего узла, количество узлов в заданной сети, маску подсети и инверсию маски (wildcard mask).
Данные представлены в десятичной и двоичных системах исчисления.
При построении сети, классы подсетей выбираются исходя из предполагаемого количества узлов в компьютерной сети. Если изначально выбрана подсеть вмещающая малое количество узлов (например, класс С c маской 255.255.255.0), при большом росте компьютерной сети часто приходится менять подсеть и маску подсети, чтобы не усложнять адресацию.
И наоборот, если изначально выбрана подсеть включающая в себя огромное количество хостов (например, класса А с маской 255.0.0.0), то при возникновении в компании филиальной сети, приходится сжимать подсети чтобы выделять подсети под филиалы.
Использование:
Для того, чтобы рассчитать сетевые параметры, укажите IP-адрес хоста и маску подсети.
Справочная информация для IPv4:
Адреса зарезервированные для особых целей:
| Подсеть | Назначение |
|---|---|
| 0.0.0.0/8 | Адреса источников пакетов «этой» («своей») сети, предназначены для локального использования на хосте при создании сокетов IP. Адрес 0.0.0.0/32 используется для указания адреса источника самого хоста. |
| 10.0.0.0/8 | Для использования в частных сетях. |
| 127.0.0.0/8 | Подсеть для коммуникаций внутри хоста. |
| 169.254.0.0/16 | Канальные адреса; подсеть используется для автоматического конфигурирования адресов IP в случает отсутствия сервера DHCP. |
| 172.16.0.0/12 | Для использования в частных сетях. |
| 100.64.0.0/10 | Для использования в сетях сервис-провайдера. |
| 192.0.0.0/24 | Регистрация адресов специального назначения. |
| 192.0.2.0/24 | Для примеров в документации. |
| 192.168.0.0/16 | Для использования в частных сетях. |
| 198.51.100.0/24 | Для примеров в документации. |
| 198.18.0.0/15 | Для стендов тестирования производительности. |
| 203.0.113.0/24 | Для примеров в документации. |
| 240.0.0.0/4 | Зарезервировано для использования в будущем. |
| 255.255.255.255 | Ограниченный широковещательный адрес. |
Зарезервированные адреса, которые маршрутизируются глобально.
| Подсеть | Назначение |
|---|---|
| 192.88.99.0/24 | Используются для рассылки ближайшему узлу. Адрес 192.88.99.0/32 применяется в качестве ретранслятора при инкапсуляции IPv6 в IPv4 (6to4) |
| 224.0.0.0/4 | Используются для многоадресной рассылки. |
Маски и размеры подсетей
| Маска подсети | Префикс, бит | Количество подсетей | Количество хостов | Количество адресов | Класс подсети |
|---|---|---|---|---|---|
| 128.0.0.0 | /1 | 2147483646 | 2147483648 | А | |
| 192.0.0.0 | /2 | 1073741822 | 1073741824 | А | |
| 224.0.0.0 | /3 | 536870910 | 536870912 | А | |
| 240.0.0.0 | /4 | 268435454 | 268435456 | А | |
| 248.0.0.0 | /5 | 134217726 | 134217728 | А | |
| 252.0.0.0 | /6 | 67108862 | 67108864 | А | |
| 254.0.0.0 | /7 | 33554430 | 33554432 | А | |
| 255.0.0.0 | /8 | 16777214 | 16777216 | А | |
| 255.128.0.0 | /9 | 8388606 | 8388608 | B | |
| 255.192.0.0 | /10 | 4194302 | 4194304 | B | |
| 255.224.0.0 | /11 | 2097150 | 2097152 | B | |
| 255.240.0.0 | /12 | 1048574 | 1048576 | B | |
| 255.248.0.0 | /13 | 524286 | 524288 | B | |
| 255.252.0.0 | /14 | 262142 | 262144 | B | |
| 255.254.0.0 | /15 | 131070 | 131072 | B | |
| 255.255.0.0 | /16 | 65534 | 65536 | B | |
| 255.255.128.0 | /17 | 2 | 32766 | 32768 | C |
| 255.255.192.0 | /18 | 4 | 16382 | 16384 | C |
| 255.255.224.0 | /19 | 8 | 8190 | 8192 | C |
| 255.255.240.0 | /20 | 16 | 4094 | 4096 | C |
| 255.255.248.0 | /21 | 32 | 2046 | 2048 | C |
| 255.255.252.0 | /22 | 64 | 1022 | 1024 | C |
| 255.255.254.0 | /23 | 128 | 510 | 512 | C |
| 255.255.255.0 | /24 | 256 | 254 | 256 | C |
| 255.255.255.128 | /25 | 2 | 126 | 128 | C |
| 255.255.255.192 | /26 | 4 | 62 | 64 | C |
| 255.255.255.224 | /27 | 8 | 30 | 32 | C |
| 255.255.255.240 | /28 | 16 | 14 | 16 | C |
| 255.255.255.248 | /29 | 32 | 6 | 8 | C |
| 255.255.255.252 | /30 | 64 | 2 | 4 | C |
| 255.255.255.254 | /31 | 2* | 2 | C | |
| 255.255.255.255 | /32 | 1* | 1 | C |
![]()
Download Article
![]()
Download Article
Do you need to find or change the subnet mask for your computer, phone, or tablet? If you’re using a device that has a static (permanent) IP address that must be configured manually, making sure the subnet mask is correct is crucial when troubleshooting network issues. This wikiHow article will teach you how to find and change the subnet mask on a computer running Windows, macOS, or Linux, as well as on your Android, iPhone, or iPad. We’ll also show you how to calculate a subnet mask based on an IP address range if you’re not sure which subnet mask to use.
Things You Should Know
- Most people don’t have to enter a subnet mask manually—the router you’re connected to assigns it automatically using DHCP.
- If your device has a static IP address that is not assigned automatically, you can manually update your subnet mask on your computer, phone, or tablet if needed.
- If you don’t know which subnet mask to use, you can figure it out based on the range of IP addresses from which your IP address was assigned.
-

1
You’ll need to know the range your IP address is a part of to find its subnet mask. Unfortunately, you can’t determine the correct subnet just by looking at an IP address. Each IPv4 subnet has a subnet mask, also known as a netmask, which is basically an alias for the range of IP addresses allocated to that network. If you use a subnet mask that isn’t correct for your IP range, your device won’t be able to access the internet.
- If your IP address is assigned automatically, so is your subnet mask. In this case, if you’re connected to the internet, don’t worry about finding or changing your subnet mask.
- But, if you’re setting up a static IP address that isn’t assigned automatically, you’ll need to find the right subnet mask to get online.
- The easiest way to find out what subnet mask you should be using is to ask your network administrator. If that’s not possible right now, read on!
-

2
If there’s another device you’re sure is on the same subnet, try its subnet mask. You can use the instructions in this article to find the IP address and subnet mask for other Windows, Linux, macOS, Android, and iOS devices on the network and simply use the same subnet mask.
- This is not foolproof, as network administrators can divide up IP ranges into many subnets. But for smaller networks, this might be all you need to do to find the subnet mask.
- Once signed in, compare the other device’s IP address to your static IP. Do they appear to be in the same range or from a similar-sized range? If so, using that device’s subnet mask might work.
- For example, if your static IP address is 192.168.0.5 and the other device is 192.168.0.12, having the first three octets in common means you’re likely on the same subnet. However, subnets can be broken up in a multitude of ways so there’s a chance your network administrator has sub-divided the network even further.
Advertisement
-

3
Once you know the range of IP addresses (or you think you can guess it), use a subnet calculator or cheat sheet to find the subnet mask. There’s no need to do complicated math to calculate the subnet mask once you have the range thanks to these handy tools:
- Spiceworks’ Subnet Calculator is easy to use if you know the IP range. Just enter the first and last IP addresses in the range, then choose 1 as the number of subnets (if you’re sure the range you’ve entered is a single subnet).
- Subnet Calculator and Cheat Sheet provides a subnet mask based on a starting IP address and its associated CIDR notation, which is a special value that explains how many addresses are in that range. If you’re not sure what to enter here, just refer to the CIDR cheat sheet at the bottom of the tool.
- For example, if you’re working with a range of 256 IP addresses (a common subnet size for homes and small offices), you’ll use /24. For /24 ranges, the subnet mask will be 255.255.255.0.
- The cheat sheet at the bottom is also helpful if you just want to try to guess the subnet mask based on the presumed size of the subnet. For example, you’ll see that when a subnet contains 1024 IP addresses, its mask will be 255.255.252.0, which is /22 in CIDR notation.
Advertisement
-

1
Open the Command Prompt. The easiest way to find your subnet mask on Windows is to use a quick command in the command prompt. Press the Windows key, type Command, and then click Command Prompt in the search results.
-

2
Type ipconfig /all and press ↵ Enter. This displays the details of all of your active TCP/IP connections.[1]
-

3
Find the subnet mask for each connection. Look for «Subnet Mask» in the section below your network adapter. For example, if you’re connected to Wi-Fi, you’ll typically see an adapter called «Wireless LAN adapter» (or similar)—the subnet for your wireless connection appears here. The address you’re looking for begins with 255.
-

4
Change your subnet mask. If you need to update the subnet mask on your PC due to changes in your network, it’s easy. Note that you should only do this if you’re using a static IP address that isn’t assigned automatically:
- Open your Windows Settings and select Network & Internet.[2]
- For Wi-Fi, select Wi-Fi > Manage Known Networks. For Ethernet, select Ethernet, then choose your network.
- Click Edit under «IP assignment.»
- Select Manual, then choose IPv4.
- Update your subnet mask and other details and save.
- Open your Windows Settings and select Network & Internet.[2]
Advertisement
-

1
Click the Apple menu and select System Preferences. You’ll find the Apple menu at the top-left corner of your screen.[3]
-

2
Click the Network icon. It’s the globe icon in your System Preferences.
-

3
Select your internet connection. For example, if you want to find the subnet for your wireless connection, select Wi-Fi here.
- If you’re using an ethernet connection, you will now see your IP address and subnet mask in the right panel. If you’re using Wi-Fi, continue with this method to find your subnet mask.
-

4
Click Advanced if you’re using Wi-Fi. You’ll see this button at the bottom-right corner.
-

5
Click the TCP/IP tab. You’ll see this at the top of the window. Here you’ll find your IP address and subnet mask clearly labeled. The address you’re looking for begins with 255.
- If the only numbers you see are on the lower half of the screen underneath «Configure IPv6,» you are on a local IPv6 network which does not use subnet masks. If you’re having internet trouble, select Using DHCP from the drop-down menu, then click Renew DHCP Lease to receive a new IP address and subnet mask.
-

6
Change your subnet mask. If you need to update the subnet mask on your Mac due to changes in your network, it’s easy. Note that you should only do this if you’re using a dedicated (static) IP address that must be configured manually:
- Select the network in the Network panel of System Preferences.
- Click Configure IPv4 in the menu, then select Manually.
- Replace the current subnet mask with the new one and save your changes.[4]
Advertisement
-

1
Open a terminal window. You can open a terminal by pressing Ctrl+Alt+T or by clicking the Terminal icon in your app list.
-

2
Type ifconfig and press ↵ Enter. This displays the name of each of your network interfaces along with information about each connection.
- If you see «command not found,» type whereis ifconfig to get the full path, such as /sbin/ifconfig, then simply type the full path to ifconfig and press ↵ Enter.
-

3
Find the subnet mask. Look for the «Mask» value next to the interface you’re curious about, such as eth0 for ethernet or wlan0 for Wi-Fi. The subnet mask is typically labeled «Mask» and begins with 255.
-

4
Change the subnet mask. If your Linux workstation or server has a static IP address that isn’t assigned automatically by the router by DHCP, you can use ifconfig to change the subnet mask. Here’s how:
- Find the adapter name for the connection you want to modify using ifconfig. For example, eth0 for your ethernet connection.
- If the subnet mask is the only thing you need to change, use sudo ifconfig <adaptername> netmask <subnet mask>.[5]
- For example, to change the subnet mask for the adapter wlan0 to 255.255.255.0, you’d use: sudo ifconfig wlan0 netmask 255.255.255.0.
Advertisement
-

1
Open your Android’s Settings

. You can do this by tapping the Settings icon in your app list or by swiping down from the top of your Home screen and tapping the gear icon.
- The steps to view your subnet mask on Android will be a little different depending on your platform, such as Samsung Galaxy or stock Android.
-

2
Tap Wireless & Networks or Connections. This option displays Wi-Fi information, such as whether you’re connected and if any other networks are available.
- If you don’t see this option, tap Network & Internet (or similar) and select Wi-Fi instead. [6]
- If you don’t see this option, tap Network & Internet (or similar) and select Wi-Fi instead. [6]
-

3
Tap the network you’re connected to. Depending on your model, you may need to tap a gear icon to view the details. This displays your connection details, including your IP address and subnet mask, which begins with 255.
- If you don’t see your subnet mask, tap Advanced or similar to show more options.
- Some Androids connected through DHCP may not display the subnet mask at all. If you’re not able to find the subnet mask with these steps, download Termux, a free terminal app, from the Play Store. Once downloaded, open the app, type ifconfig, and press Enter. You will see your subnet mask under «wlan0.»
-

4
Change the subnet mask. If your Android has a static IP address and you need to update the subnet mask, it’s pretty easy to do:
- Select the Advanced or Manage option in your network’s settings. If you don’t see it, tap and hold the name of your wireless network in the list of networks, then tap Modify network.
- Tap the IP Settings option if you see it—this is common on Samsung Galaxy models.
- If DHCP is selected, you’ll need to change it to Static. Then, you’ll be able to modify the subnet mask, IP address, gateway, and other details.
Advertisement
-

1
Open your Settings

. You’ll find this gear icon on your Home screen, in your app drawer, or by searching.
-

2
Tap Wi-Fi. This option is near the top of the list.
-

3
Tap your current connection. You’ll see it at the top of the screen below the «Wi-Fi» button.
-

4
Find your subnet mask. Your subnet mask begins with 255 and is just below your IP address about halfway down the page.
-

5
Change the subnet mask. If your iPhone or iPad has a static IP address and you need to update the subnet mask, it’s pretty easy to do from this screen:
- Just above your IP address, tap Configure IP.
- If you have a static IP address already, you’ll see the option to modify the subnet mask here. If not, you can tap Manual and enter your new static IP address information, including your subnet and gateway address (referred to here as «router»).
Advertisement
Add New Question
-
Question
Why do I have the same subnet mask on multiple devices?

Stan Kats is a Professional Technologist and the COO and Chief Technologist for The STG IT Consulting Group in West Hollywood, California. Stan provides comprehensive technology solutions to businesses through managed IT services, and for individuals through his consumer service business, Stan’s Tech Garage. Stan holds a BA in International Relations from The University of Southern California. He began his career working in the Fortune 500 IT world. Stan founded his companies to offer an enterprise-level of expertise for small businesses and individuals.
Professional Technologist
Expert Answer
Are the last four digits 2550? That’s the subnet mask for most consumer class devices, so it’d make sense if you see the same subnet mask on multiple devices.
-
Question
Is this process the same on any device?
Stan Kats is a Professional Technologist and the COO and Chief Technologist for The STG IT Consulting Group in West Hollywood, California. Stan provides comprehensive technology solutions to businesses through managed IT services, and for individuals through his consumer service business, Stan’s Tech Garage. Stan holds a BA in International Relations from The University of Southern California. He began his career working in the Fortune 500 IT world. Stan founded his companies to offer an enterprise-level of expertise for small businesses and individuals.
Professional Technologist
Expert Answer
It’s going to be different from operating system to operating system. But if you have two Windows computers, for example, it should be the same.
-
Question
How do you do this on a Mac?
Stan Kats is a Professional Technologist and the COO and Chief Technologist for The STG IT Consulting Group in West Hollywood, California. Stan provides comprehensive technology solutions to businesses through managed IT services, and for individuals through his consumer service business, Stan’s Tech Garage. Stan holds a BA in International Relations from The University of Southern California. He began his career working in the Fortune 500 IT world. Stan founded his companies to offer an enterprise-level of expertise for small businesses and individuals.
Professional Technologist
Expert Answer
Go into your system preferences and select «networks.» Pick whatever device you want to find the subnet mask for and open it. There should be a tab for IP addresses in that window. Your subnet mask will be listed there alongside the IP.
See more answers
Ask a Question
200 characters left
Include your email address to get a message when this question is answered.
Submit
Advertisement
Video
-
When devices on a network communicate, they check to see if the address they’re trying to reach is in the same subnet range. If the address is in range, the devices can communicate without much help from the router. If the address is in another range, the router routes the traffic to the proper subnet.[7]
-
If your subnet mask reads all zeros (0.0.0.0), you may not have an active Internet connection.
-
IPv6–only networks do not use subnet masks. The subnet ID is built into the IP address instead. The fourth group of digits separated by colons describes your subnet (or the 49th–64th binary digits).
Show More Tips
Advertisement
About This Article
Thanks to all authors for creating a page that has been read 790,136 times.
Is this article up to date?
![]()
Download Article
![]()
Download Article
Do you need to find or change the subnet mask for your computer, phone, or tablet? If you’re using a device that has a static (permanent) IP address that must be configured manually, making sure the subnet mask is correct is crucial when troubleshooting network issues. This wikiHow article will teach you how to find and change the subnet mask on a computer running Windows, macOS, or Linux, as well as on your Android, iPhone, or iPad. We’ll also show you how to calculate a subnet mask based on an IP address range if you’re not sure which subnet mask to use.
Things You Should Know
- Most people don’t have to enter a subnet mask manually—the router you’re connected to assigns it automatically using DHCP.
- If your device has a static IP address that is not assigned automatically, you can manually update your subnet mask on your computer, phone, or tablet if needed.
- If you don’t know which subnet mask to use, you can figure it out based on the range of IP addresses from which your IP address was assigned.
-
1
You’ll need to know the range your IP address is a part of to find its subnet mask. Unfortunately, you can’t determine the correct subnet just by looking at an IP address. Each IPv4 subnet has a subnet mask, also known as a netmask, which is basically an alias for the range of IP addresses allocated to that network. If you use a subnet mask that isn’t correct for your IP range, your device won’t be able to access the internet.
- If your IP address is assigned automatically, so is your subnet mask. In this case, if you’re connected to the internet, don’t worry about finding or changing your subnet mask.
- But, if you’re setting up a static IP address that isn’t assigned automatically, you’ll need to find the right subnet mask to get online.
- The easiest way to find out what subnet mask you should be using is to ask your network administrator. If that’s not possible right now, read on!
-
2
If there’s another device you’re sure is on the same subnet, try its subnet mask. You can use the instructions in this article to find the IP address and subnet mask for other Windows, Linux, macOS, Android, and iOS devices on the network and simply use the same subnet mask.
- This is not foolproof, as network administrators can divide up IP ranges into many subnets. But for smaller networks, this might be all you need to do to find the subnet mask.
- Once signed in, compare the other device’s IP address to your static IP. Do they appear to be in the same range or from a similar-sized range? If so, using that device’s subnet mask might work.
- For example, if your static IP address is 192.168.0.5 and the other device is 192.168.0.12, having the first three octets in common means you’re likely on the same subnet. However, subnets can be broken up in a multitude of ways so there’s a chance your network administrator has sub-divided the network even further.
Advertisement
-
3
Once you know the range of IP addresses (or you think you can guess it), use a subnet calculator or cheat sheet to find the subnet mask. There’s no need to do complicated math to calculate the subnet mask once you have the range thanks to these handy tools:
- Spiceworks’ Subnet Calculator is easy to use if you know the IP range. Just enter the first and last IP addresses in the range, then choose 1 as the number of subnets (if you’re sure the range you’ve entered is a single subnet).
- Subnet Calculator and Cheat Sheet provides a subnet mask based on a starting IP address and its associated CIDR notation, which is a special value that explains how many addresses are in that range. If you’re not sure what to enter here, just refer to the CIDR cheat sheet at the bottom of the tool.
- For example, if you’re working with a range of 256 IP addresses (a common subnet size for homes and small offices), you’ll use /24. For /24 ranges, the subnet mask will be 255.255.255.0.
- The cheat sheet at the bottom is also helpful if you just want to try to guess the subnet mask based on the presumed size of the subnet. For example, you’ll see that when a subnet contains 1024 IP addresses, its mask will be 255.255.252.0, which is /22 in CIDR notation.
Advertisement
-
1
Open the Command Prompt. The easiest way to find your subnet mask on Windows is to use a quick command in the command prompt. Press the Windows key, type Command, and then click Command Prompt in the search results.
-
2
Type ipconfig /all and press ↵ Enter. This displays the details of all of your active TCP/IP connections.[1]
-
3
Find the subnet mask for each connection. Look for «Subnet Mask» in the section below your network adapter. For example, if you’re connected to Wi-Fi, you’ll typically see an adapter called «Wireless LAN adapter» (or similar)—the subnet for your wireless connection appears here. The address you’re looking for begins with 255.
-
4
Change your subnet mask. If you need to update the subnet mask on your PC due to changes in your network, it’s easy. Note that you should only do this if you’re using a static IP address that isn’t assigned automatically:
- Open your Windows Settings and select Network & Internet.[2]
- For Wi-Fi, select Wi-Fi > Manage Known Networks. For Ethernet, select Ethernet, then choose your network.
- Click Edit under «IP assignment.»
- Select Manual, then choose IPv4.
- Update your subnet mask and other details and save.
- Open your Windows Settings and select Network & Internet.[2]
Advertisement
-
1
Click the Apple menu and select System Preferences. You’ll find the Apple menu at the top-left corner of your screen.[3]
-
2
Click the Network icon. It’s the globe icon in your System Preferences.
-
3
Select your internet connection. For example, if you want to find the subnet for your wireless connection, select Wi-Fi here.
- If you’re using an ethernet connection, you will now see your IP address and subnet mask in the right panel. If you’re using Wi-Fi, continue with this method to find your subnet mask.
-
4
Click Advanced if you’re using Wi-Fi. You’ll see this button at the bottom-right corner.
-
5
Click the TCP/IP tab. You’ll see this at the top of the window. Here you’ll find your IP address and subnet mask clearly labeled. The address you’re looking for begins with 255.
- If the only numbers you see are on the lower half of the screen underneath «Configure IPv6,» you are on a local IPv6 network which does not use subnet masks. If you’re having internet trouble, select Using DHCP from the drop-down menu, then click Renew DHCP Lease to receive a new IP address and subnet mask.
-
6
Change your subnet mask. If you need to update the subnet mask on your Mac due to changes in your network, it’s easy. Note that you should only do this if you’re using a dedicated (static) IP address that must be configured manually:
- Select the network in the Network panel of System Preferences.
- Click Configure IPv4 in the menu, then select Manually.
- Replace the current subnet mask with the new one and save your changes.[4]
Advertisement
-
1
Open a terminal window. You can open a terminal by pressing Ctrl+Alt+T or by clicking the Terminal icon in your app list.
-
2
Type ifconfig and press ↵ Enter. This displays the name of each of your network interfaces along with information about each connection.
- If you see «command not found,» type whereis ifconfig to get the full path, such as /sbin/ifconfig, then simply type the full path to ifconfig and press ↵ Enter.
-
3
Find the subnet mask. Look for the «Mask» value next to the interface you’re curious about, such as eth0 for ethernet or wlan0 for Wi-Fi. The subnet mask is typically labeled «Mask» and begins with 255.
-
4
Change the subnet mask. If your Linux workstation or server has a static IP address that isn’t assigned automatically by the router by DHCP, you can use ifconfig to change the subnet mask. Here’s how:
- Find the adapter name for the connection you want to modify using ifconfig. For example, eth0 for your ethernet connection.
- If the subnet mask is the only thing you need to change, use sudo ifconfig <adaptername> netmask <subnet mask>.[5]
- For example, to change the subnet mask for the adapter wlan0 to 255.255.255.0, you’d use: sudo ifconfig wlan0 netmask 255.255.255.0.
Advertisement
-
1
Open your Android’s Settings
. You can do this by tapping the Settings icon in your app list or by swiping down from the top of your Home screen and tapping the gear icon.
- The steps to view your subnet mask on Android will be a little different depending on your platform, such as Samsung Galaxy or stock Android.
-
2
Tap Wireless & Networks or Connections. This option displays Wi-Fi information, such as whether you’re connected and if any other networks are available.
- If you don’t see this option, tap Network & Internet (or similar) and select Wi-Fi instead. [6]
- If you don’t see this option, tap Network & Internet (or similar) and select Wi-Fi instead. [6]
-
3
Tap the network you’re connected to. Depending on your model, you may need to tap a gear icon to view the details. This displays your connection details, including your IP address and subnet mask, which begins with 255.
- If you don’t see your subnet mask, tap Advanced or similar to show more options.
- Some Androids connected through DHCP may not display the subnet mask at all. If you’re not able to find the subnet mask with these steps, download Termux, a free terminal app, from the Play Store. Once downloaded, open the app, type ifconfig, and press Enter. You will see your subnet mask under «wlan0.»
-
4
Change the subnet mask. If your Android has a static IP address and you need to update the subnet mask, it’s pretty easy to do:
- Select the Advanced or Manage option in your network’s settings. If you don’t see it, tap and hold the name of your wireless network in the list of networks, then tap Modify network.
- Tap the IP Settings option if you see it—this is common on Samsung Galaxy models.
- If DHCP is selected, you’ll need to change it to Static. Then, you’ll be able to modify the subnet mask, IP address, gateway, and other details.
Advertisement
-
1
Open your Settings
. You’ll find this gear icon on your Home screen, in your app drawer, or by searching.
-
2
Tap Wi-Fi. This option is near the top of the list.
-
3
Tap your current connection. You’ll see it at the top of the screen below the «Wi-Fi» button.
-
4
Find your subnet mask. Your subnet mask begins with 255 and is just below your IP address about halfway down the page.
-
5
Change the subnet mask. If your iPhone or iPad has a static IP address and you need to update the subnet mask, it’s pretty easy to do from this screen:
- Just above your IP address, tap Configure IP.
- If you have a static IP address already, you’ll see the option to modify the subnet mask here. If not, you can tap Manual and enter your new static IP address information, including your subnet and gateway address (referred to here as «router»).
Advertisement
Add New Question
-
Question
Why do I have the same subnet mask on multiple devices?
Stan Kats is a Professional Technologist and the COO and Chief Technologist for The STG IT Consulting Group in West Hollywood, California. Stan provides comprehensive technology solutions to businesses through managed IT services, and for individuals through his consumer service business, Stan’s Tech Garage. Stan holds a BA in International Relations from The University of Southern California. He began his career working in the Fortune 500 IT world. Stan founded his companies to offer an enterprise-level of expertise for small businesses and individuals.
Professional Technologist
Expert Answer
Are the last four digits 2550? That’s the subnet mask for most consumer class devices, so it’d make sense if you see the same subnet mask on multiple devices.
-
Question
Is this process the same on any device?
Stan Kats is a Professional Technologist and the COO and Chief Technologist for The STG IT Consulting Group in West Hollywood, California. Stan provides comprehensive technology solutions to businesses through managed IT services, and for individuals through his consumer service business, Stan’s Tech Garage. Stan holds a BA in International Relations from The University of Southern California. He began his career working in the Fortune 500 IT world. Stan founded his companies to offer an enterprise-level of expertise for small businesses and individuals.
Professional Technologist
Expert Answer
It’s going to be different from operating system to operating system. But if you have two Windows computers, for example, it should be the same.
-
Question
How do you do this on a Mac?
Stan Kats is a Professional Technologist and the COO and Chief Technologist for The STG IT Consulting Group in West Hollywood, California. Stan provides comprehensive technology solutions to businesses through managed IT services, and for individuals through his consumer service business, Stan’s Tech Garage. Stan holds a BA in International Relations from The University of Southern California. He began his career working in the Fortune 500 IT world. Stan founded his companies to offer an enterprise-level of expertise for small businesses and individuals.
Professional Technologist
Expert Answer
Go into your system preferences and select «networks.» Pick whatever device you want to find the subnet mask for and open it. There should be a tab for IP addresses in that window. Your subnet mask will be listed there alongside the IP.
See more answers
Ask a Question
200 characters left
Include your email address to get a message when this question is answered.
Submit
Advertisement
Video
-
When devices on a network communicate, they check to see if the address they’re trying to reach is in the same subnet range. If the address is in range, the devices can communicate without much help from the router. If the address is in another range, the router routes the traffic to the proper subnet.[7]
-
If your subnet mask reads all zeros (0.0.0.0), you may not have an active Internet connection.
-
IPv6–only networks do not use subnet masks. The subnet ID is built into the IP address instead. The fourth group of digits separated by colons describes your subnet (or the 49th–64th binary digits).
Show More Tips
Advertisement
About This Article
Thanks to all authors for creating a page that has been read 790,136 times.
Is this article up to date?
| Параметр | Десятичная запись | Шестнадцатеричная запись | Двоичная запись |
| IP адрес | 176.194.91.112 | B0.C2.5B.70 | 10110000.11000010.01011011.01110000 |
|---|---|---|---|
| Префикс маски подсети | /24 | ||
| Маска подсети | 255.255.255.0 | FF.FF.FF.00 | 11111111.11111111.11111111.00000000 |
| Обратная маска подсети (wildcard mask) | 0.0.0.255 | 00.00.00.FF | 00000000.00000000.00000000.11111111 |
| IP адрес сети | 176.194.91.0 | B0.C2.5B.00 | 10110000.11000010.01011011.00000000 |
| Широковещательный адрес | 176.194.91.255 | B0.C2.5B.FF | 10110000.11000010.01011011.11111111 |
| IP адрес первого хоста | 176.194.91.1 | B0.C2.5B.01 | 10110000.11000010.01011011.00000001 |
| IP адрес последнего хоста | 176.194.91.254 | B0.C2.5B.FE | 10110000.11000010.01011011.11111110 |
| Количество доступных адресов | 256 | ||
| Количество рабочих адресов для хостов | 254 |
Ссылка на эту страницу: shootnick.ru/ip_calc/176.194.91.112/24
Так же у нас есть IPv6 калькулятор подсетей
Познавательное о IPv4 …
IPv4 (англ. Internet Protocol version 4) — четвёртая версия интернет протокола (IP). Первая широко используемая версия. Протокол описан в RFC 791 (сентябрь 1981 года), заменившем RFC 760 (январь 1980 года).
IPv4 использует 32-битные (четырёхбайтные) адреса, ограничивающие адресное пространство 4 294 967 296 (232) возможными уникальными адресами.
Традиционной формой записи IPv4 адреса является запись в виде четырёх десятичных чисел (от 0 до 255), разделённых точками. Через дробь указывается длина маски подсети.
IP-адрес состоит из двух частей: номера сети и номера узла. В случае изолированной сети её адрес может быть выбран администратором из специально зарезервированных для таких сетей блоков адресов (10.0.0.0/8, 172.16.0.0/12 или 192.168.0.0/16). Если же сеть должна работать как составная часть Интернета, то адрес сети выдаётся провайдером либо региональным интернет-регистратором (Regional Internet Registry, RIR). Согласно данным на сайте IANA, существует пять RIR: ARIN, обслуживающий Северную Америку, а также Багамы, Пуэрто-Рико и Ямайку; APNIC, обслуживающий страны Южной, Восточной и Юго-Восточной Азии, а также Австралии и Океании; AfriNIC, обслуживающий страны Африки; LACNIC, обслуживающий страны Южной Америки и бассейна Карибского моря; и RIPE NCC, обслуживающий Европу, Центральную Азию, Ближний Восток. Региональные регистраторы получают номера автономных систем и большие блоки адресов у IANA, а затем выдают номера автономных систем и блоки адресов меньшего размера локальным интернет-регистраторам (Local Internet Registries, LIR), обычно являющимся крупными провайдерами. Номер узла в протоколе IP назначается независимо от локального адреса узла. Маршрутизатор по определению входит сразу в несколько сетей. Поэтому каждый порт маршрутизатора имеет собственный IP-адрес. Конечный узел также может входить в несколько IP-сетей. В этом случае компьютер должен иметь несколько IP-адресов, по числу сетевых связей. Таким образом, IP-адрес характеризует не отдельный компьютер или маршрутизатор, а одно сетевое соединение.
Есть два способа определения того, сколько бит отводится на маску подсети, а сколько — на IP-адрес. Изначально использовалась классовая адресация (INET), но со второй половины 90-х годов XX века она была вытеснена бесклассовой адресацией (CIDR), при которой количество адресов в сети определяется маской подсети.
Иногда встречается запись IP-адресов вида «192.168.5.0/24». Данный вид записи заменяет собой указание диапазона IP-адресов. Число после косой черты означает количество единичных разрядов в маске подсети. Для приведённого примера маска подсети будет иметь двоичный вид 11111111 11111111 11111111 00000000 или то же самое в десятичном виде: «255.255.255.0». 24 разряда IP-адреса отводятся под номер сети, а остальные 32-24=8 разрядов полного адреса — под адреса хостов этой сети, адрес этой сети и широковещательный адрес этой сети. Итого, 192.168.5.0/24 означает диапазон адресов хостов от 192.168.5.1 до 192.168.5.254, а также 192.168.5.0 — адрес сети и 192.168.5.255 — широковещательный адрес сети. Для вычисления адреса сети и широковещательного адреса сети используются формулы:
- адрес сети = IP.любого_компьютера_этой_сети AND MASK (адрес сети позволяет определить, что компьютеры в одной сети)
- широковещательный адрес сети = IP.любого_компьютера_этой_сети OR NOT(MASK) (широковещательный адрес сети воспринимается всеми компьютерами сети как дополнительный свой адрес, то есть пакет на этот адрес получат все хосты сети как адресованные лично им. Если на сетевой интерфейс хоста, который не является маршрутизатором пакетов, попадёт пакет, адресованный не ему, то он будет отброшен).
Запись IP-адресов с указанием через слэш маски подсети переменной длины также называют CIDR-адресом в противоположность обычной записи без указания маски, в операционных системах типа UNIX также именуемой INET-адресом.
В протоколе IP существует несколько соглашений об особой интерпретации IP-адресов: если все двоичные разряды IP-адреса равны 1, то пакет с таким адресом назначения должен рассылаться всем узлам, находящимся в той же сети, что и источник этого пакета. Такая рассылка называется ограниченным широковещательным сообщением (limited broadcast). Если в поле номера узла назначения стоят только единицы, то пакет, имеющий такой адрес, рассылается всем узлам сети с заданным номером сети. Например, в сети 192.168.5.0 с маской 255.255.255.0 пакет с адресом 192.168.5.255 доставляется всем узлам этой сети. Такая рассылка называется широковещательным сообщением (direct broadcast).
IP-адрес называют статическим (постоянным, неизменяемым), если он назначается пользователем в настройках устройства, либо назначается автоматически при подключении устройства к сети и не может быть присвоен другому устройству.
IP-адрес называют динамическим (непостоянным, изменяемым), если он назначается автоматически при подключении устройства к сети и используется в течение ограниченного промежутка времени, указанного в сервисе назначавшего IP-адрес (DHCP).
Для получения IP-адреса клиент может использовать один из следующих протоколов:
- DHCP (RFC 2131) — наиболее распространённый протокол настройки сетевых параметров.
- BOOTP (RFC 951) — простой протокол настройки сетевого адреса, обычно используется для бездисковых станций.
- IPCP (RFC 1332) в рамках протокола PPP (RFC 1661).
- Zeroconf (RFC 3927) — протокол настройки сетевого адреса, определения имени, поиск служб.
- RARP (RFC 903) Устаревший протокол, использующий обратную логику (из аппаратного адреса — в логический) популярного и поныне в широковещательных сетях протокола ARP. Не поддерживает распространения информации о длине маски (не поддерживает VLSM).
Адреса, используемые в локальных сетях, относят к частным. К частным относятся IP-адреса из следующих сетей:
- 10.0.0.0/8
- 172.16.0.0/12
- 192.168.0.0/16
Также для внутреннего использования:
- 127.0.0.0/8 — используется для коммуникаций внутри хоста.
- 169.254.0.0/16 — используется для автоматической настройки сетевого интерфейса в случае отсутствия DHCP (за исключением первой и последней /24 подсети).
Полный список описания сетей для IPv4 представлен в RFC 6890.