Делаем простое приспособление для просмотра 3D голограмм на вашем смартфоне или планшете. Вы когда-нибудь хотели лицезреть видео или смотреть картинки в 3D без очков? Из этого урока вы узнаете, как сделать очень простое устройство для просмотра 3D-голограмм на вашем смартфоне или планшете. Все, что вам нужно для этого, — пять минут вашего времени. И да, сегодня нам не понадобятся Ардуино, Raspberry и другие платы.
Комплектующие
Для нашего устройства нам понадобится простой набор комплектующих:
- Прозрачный акриловый / пластиковый лист 0,5 мм (вы можете использовать пластиковые листы, используемые в упаковке)
- Доступ к принтеру (если возможно)
- Ножницы
- Режущее лезвие
- Прозрачная лента
- Линейка
- Карандаш/ручка
- Смартфон
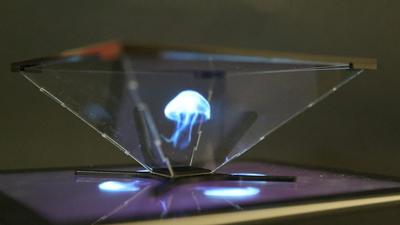
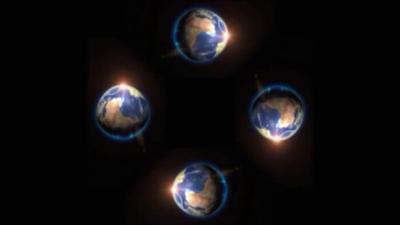
Голографическая пирамида — это простое устройство, которое может быть изготовлено путем создания из листа пластика фигуры в форме пирамиды с обрезанным верхом. Устройство создает трехмерную иллюзию для зрителя и делает изображение или видео таким, как если бы оно находилось в воздухе. Работает по принципу Призрака Пеппера (англ. википедия). Четыре симметрично противоположных варианта одного и того же изображения проецируются на четыре грани пирамиды. В принципе, каждая сторона проецирует изображение, падающее на нее, в центр пирамиды. Эти проекции работают в унисон, образуя целую фигуру, которая создает трехмерную иллюзию.
Создаем пирамиду для 3D-голограмм
1. Распечатайте шаблон, показанный ниже, на листе бумаги формата A4.

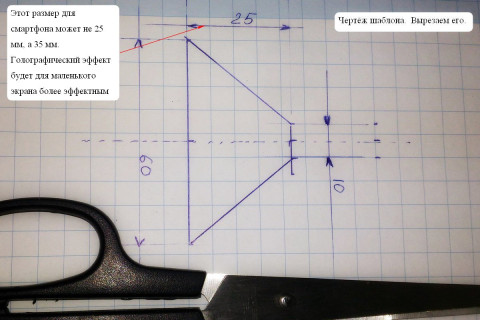
ПРИМЕЧАНИЕ. Если у вас нет доступа к принтеру, вы также можете создать шаблон самостоятельно. Нарисуйте основную «трапецию» на листе бумаги, используя размеры на рисунке выше. Параллельные стороны = 1 см и 6 см, две другие стороны равны 4,5 см каждая. Вы всегда можете удвоить или утроить размеры пропорционально для использования на большом дисплее.
2. Обведите форму на пластиковом листе, используя линейку и ручку. Для трапециевидного шаблона выделите четыре аналогичных контура на пластиковом листе. Теперь аккуратно вырежьте контуры режущим лезвием и линейкой. Постарайтесь сделать свои разрезы как можно более точными для создания более идеальной пирамиды.
3. Если вы использовали шаблон распечатки: очень легко надрежьте красные края с помощью режущего лезвия. Это позволит вам лучше сложить края и сформировать форму пирамиды. Склейте открытые края листа, используя прозрачную ленту.
Если вы использовали трапециевидный шаблон: соедините четыре края, чтобы сформировать форму пирамиды. Соедините их. В любом случае, в итоге у вас будет пирамида, подобная той, что показана ниже.

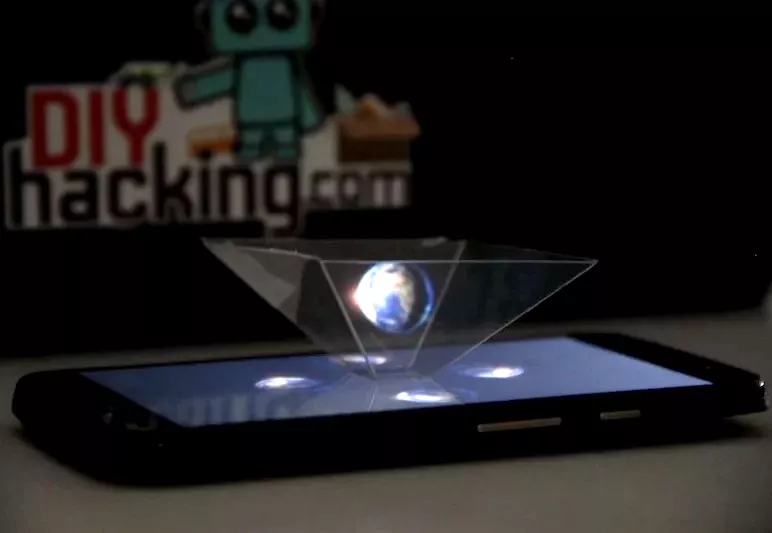
4. Вот и все! Вы сделали себе пирамиду для будущих голограмм! Все, что вам нужно сделать сейчас, это воспроизвести голограмму на вашем телефоне. Поместите голограмму в центре экрана, как показано на рисунке ниже, и наслаждайтесь шоу. Не забудьте выключить свет в комнате, прежде чем начать воспроизведение видео.

5. Теперь самое важное! Можно найти множество голограмм на YouTube. То что может получиться — вы можете увидеть на видео ниже.
12 августа 2019 в 18:52
| Обновлено 1 мая 2020 в 03:29 (редакция)
Опубликовано:
Уроки
В плане развития мелкой моторики рук, а заодно и навыков работы с различными материалами, я провел небольшой домашний мастер класс по созданию простеньких голограмм при помощи мобильного телефона или планшета и прозрачного поликарбоната. В сети я нашел два варианта создания голограмм, но оба они используют одни и те же принципы получения трехмерной оптической иллюзии. Возможно, что если как следует покопаться, то можно найти еще варианты. Поэтому, если вдруг вам удалось нагуглить еще способы для создания простой голограммы при помощи экрана смартфона, то смело отписывайтесь в комментарии с соответствующими ссылками.
Итак, оба варианта используют особенности оптики, а именно преломление лучей света при переходе между средами с различной оптической плотностью, да побьют меня оптики палками за дилетантские термины, но я продолжу. Суть в том, что при прохождении луча света от экрана мобильного телефона, планшета, дисплея монитора или вообще телевизора через границу воздуха и прозрачного поликарбоната происходит частичное отражение света. Именно благодаря этому отражению и создается эффект голографического, т. е. полностью объемного, изображения. Исходя из этого можно сообразить, что для создания голограммы нужен прозрачный поликарбонат. А где его взять?
В современном мире отличным источником поликарбоната могут служить обычные коробки для CD дисков, которые можно безвозвратно позаимствовать из домашней аудиотеки или просто купить в компьютерном или стоковом магазине. В таких магазинах, как правило, продаются записываемые CD или DVD в упаковке «на шпинделе». А заодно, дабы заработать еще немного денег, магазины продают отдельно коробочки к ним. Лучше всего использовать прозрачные, неокрашенные коробочки, дабы не терять драгоценную яркость экрана, изображение при этом будет наилучшим из возможного.
Вариант 1. Holho — пирамидальная голограмма
Для пирамидальной голограммы, даже придумали особое название Holho. Суть данной техники в трансляции сразу четырех изображений на слегка усеченную пирамиду, поставленную «на попа», т. е. вершиной вниз, на экран смартфона. При проигрывании специально подготовленного ролика на экране телефона, изображение отражается от граней пирамиды и создается полная иллюзия парящего в воздухе объекта. Суть пирамидальной голограммы в том, что каждое из изображений проецируется на свою грань, а при просмотре наблюдатель видит сразу все четыре изображения, сведенные в единую трехмерную картинку гранями пирамиды.
Пирамида собирается просто, не нужно оканчивать курсы ораторского мастерства Феликса Кирсанова и Высшую Школу Экономики, дабы вырезать из крышечки от коробочки диска требуемые заготовки. Нужно их всего четыре штуки, а вырезаются они по шаблону, любезно заготовленному мною.
| Как собрать пирамидальный голографический проектор. |
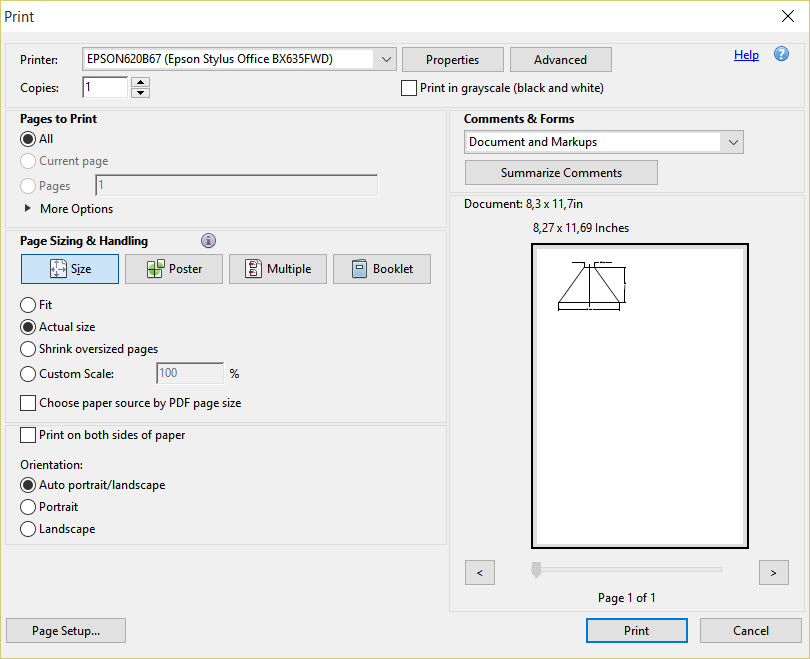
Сам шаблон для вырезки доступен по этой ссылке. При печати необходимо точно выбрать размер бумаги и включить печать в настоящем размере.
Вырезать поликарбонат не составит труда, если распечатанный шаблон подкладывать под крышечку, а затем делать глубокие прорези на нем по линиям при помощи острого обойного ножа. Сделанный таким образом рез, затем с легкостью позволяет отломить ненужный участок крышки. Только рез нужно делать на всю ширину крышки, иначе надлома не cлучится. Вырезанные заготовки можно склеить при помощи суперклея или просто скрепить их липкой лентой типа Scotch.
| Одно из демонстрационных видео. |
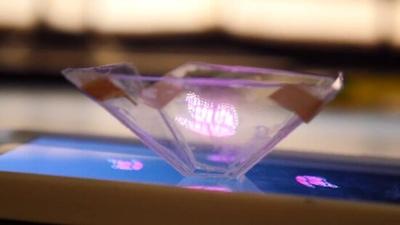
Для получения эффекта голограммы необходимо перебраться в помещение с приглушенным светом, установить на экране смартфона пирамиду, острием вниз, отцентрировать ее по меткам на видео. И в принципе все, можно наслаждаться просмотром чудесных образчиков «домашней магии».
| И еще одно демонстрационное видео. |
На YouTube загружено порядочное количество демонстрационных видео под Holho, поэтому можно смело подобрать даже что-то совсем необычное. Более того, уже появились промышленно изготовленные и приятно выглядящие конвертеры пирамидальной технологии Holho. И помните, что в качестве источника видео для голограммы может выступать не только экран телефона или планшета, но и любой другой источник, тут важно сопоставить размер пирамидки и экрана.
Вариант 2. Фронтальная линейная голограмма
В качестве альтернативы Holho можно упомянуть линейную голограмму, которая создается посредством проецирования изображения на последовательно установленные отражатели. Если пирамидальная голограмма выглядит голограммой с любой стороны, то линейная позволяет насладиться нереальным эффектом только с одной стороны, с фронтальной. Суть устройства для воспроизведения линейной голограммы заключается почти в том же самом, что и у пирамидальной, но здесь производится трансляция изображения на несколько, обычно три, мини экранчика из прозрачного поликарбоната. Экранчики устанавливаются под углом в 45 градусов и друг за другом. Сами экраны различаются по высоте, что добавляет еще большего реализма в получаемое изображение.
| Как собрать фронтальный голографический проектор. |
Для изготовления устройства идеально подходят те же самые коробочки от компакт-дисков, только тут в ход они идут полностью, за что отдельное спасибо автору устройства. Разрезать коробку можно применяя методику, использованную при построении пирамидального устройства, только отмерять размеры экранов придется самостоятельно. Да и для фиксации частей устройства применяется термо-клей, а не липкая лента. Но при наличии хотя бы минимально прямых рук, все получается с первого раза. При сборке, немного придерживайте экраны, пока клей полностью не затвердеет.
| Фронтальная голограмма — видео. |
Для воспроизведения голограммы необходимо положить устройство линейной голограммы на экран планшета или более крупное устройство. Кстати, и линейную, и пирамидальную голограммы можно использовать так как в оригинальном видео, так и в перевернутом состоянии. Эффект от этого не меняется, хотя видео может оказаться перевернутым.
| Фронтальная голограмма — видео. |
Если сравнивать оба устройства, то Holho версия мне нравится больше, поскольку позволяет создать голограмму без каких-либо ограничений по количеству планов сцен. В линейной версии, пользователю доступна лишь несколько уровней объема, равных количеству установленных поликарбонатных экранов. При трех экранах — соответственно три уровня глубины сцены.
| Фронтальная голограмма — видео. |
Другими словами, если версия Holho создает действительно объемное изображение, парящее в воздухе, то вариант с фронтальной линейной голограммой больше напоминает эффект 3D-телевидения на плоском экране. Хотя, безусловно, тот и другой варианты смотрятся неплохо и их стоит собрать оба, благо ничего сверхординарного для создания подобной игрушки не требуется, а времени на сборку сразу двух устройств вряд ли уйдет более часа.
Получение голграфического эффекта HOLHO с помощью мобильного устройства.
Holho представляет собой систему отражателей в виде пирамидки, которые позволяют создать ощущение объемности изображения,которое транслирется с мобильного устройства.
У нас должен получиться вот такой эффект:
Инструменты и материалы
Для получения такого эффекта нам потребуется изготовить небольшую пирамидку из прозрачного материала:
- Мобильное устройство с подключенным интернетом
- Коробка от компакт-диска
- Клей
- Ножницы
- Бумага
- Ручка (карандаш)
- Канцелярский нож
- Надфиль (пилка для ногтей, мелкий напильник)
- Линейка

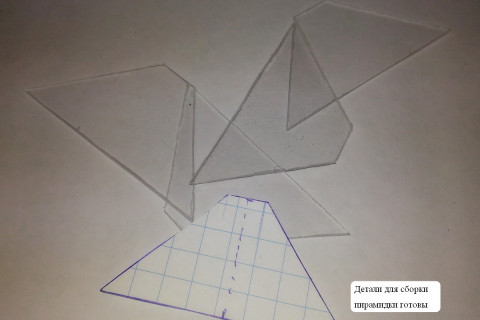
Шаг 1. Создаём шаблон
На листе бумаги создаём шаблон боковой грани пирамидки. Обратите внимание, что для большого экран, если используется планшет, используется одна высота пирамидки, а если планируется использовать обычный смартфон, то более эффектно работать будет другая высота пирамидки. Вырезаем его ножницами.
Шаг 2. Готовимся для вырезания по шаблону
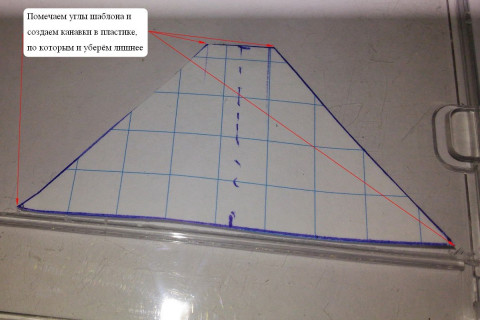
Накладываем вырезанный ножницами шаблон на прозрачную крышку от компакт диска. Намечаем вершины. Наметить вершины можнокончиком канцелярского ножа.
Шаг 3. Все четыре стороны вырезаны
С помощью канцелярского ножа и линейки вырезаем четыре заготовки.Из этих заготовок мы и будет строить пирамидку. Обратите внимание на осторожность обращения с острым режущим инструментом (канцелярский нож).
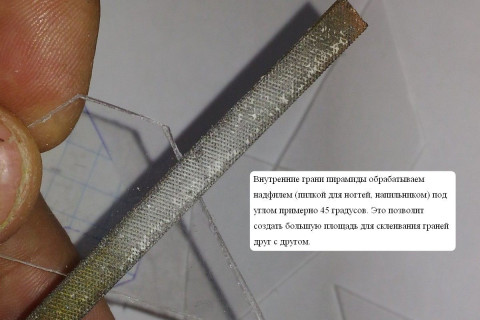
Шаг 4. Обрабатываем грани
С помощью надфиля обрабатываем под углом примерно 45 градусов боковые внутренние грани будущей пирамидки. Это позволит создать лучший контакт для склеивания сторон. Пирамидка получится более крепкая.
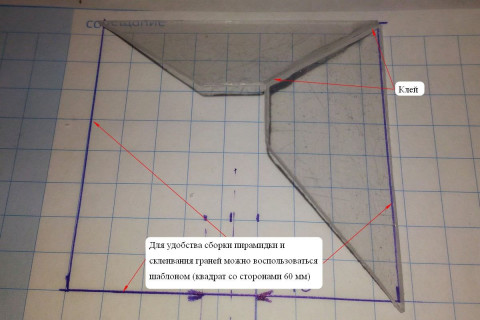
Шаг 5. Склеиваем пирамидку
Для удобства склеивания можно начертить квадрат со сторонами 60 мм. Это позволит тщательно подобрать углы склеивания. Наносим тонкий слой клея на одну из внутренних граней (мы их обрабатывали надфилем) и, легко прижав строны друг к другу внутренними гранями, получаем две склеенные грани пирамидки. Нужно чуть придержать стороны для хорошего схватывания. Таким образом приклеиваем и две остальные стороны пирамидки. Нужно быть аккуратным при склеивании- можно приклеить грани пирамидки к пальчикам. 
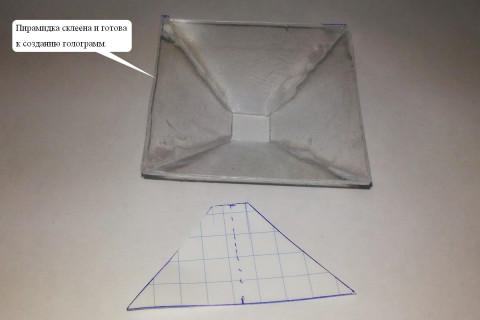
Шаг 6. Пирамидка готова
Пирамидка готова к использованию.
Теперь необходимо мобильное устройство. Видео для будущей голограммы на мобильном устройстве можно запустить по ссылке здесь. Подобных видеороликов в сети несколько В поисковике можно задать видео HOLHO и выбрать видео из предложенных ссылок.
Запускаем видео. На экране появится пересечение линий (здесь будут расположены грани пирамидки). Можно поставить воспроизведение на паузу для подготовки пирамидки. Устанавливаем пирамидку вершиной вниз, запускаем воспроизведение. Тушим свет… (можно просто затенить комнату) и наслаждаемся удивительной по красоте объемной голограммой!
…
Заключение
Итак, работа завершена. У всех наверняка получились и пирамидки и голограмы на мобильных устройствах.
Создать такое устройство для получения голографического видео просто. Можно использовать в урочной и внеурочной деятельности, для своих собственных детей…
Успешной работы!
![]()
Download Article
![]()
Download Article
- Creating a Template
- Creating the Projector Screen
- Making the Hologram
|
|
It’s easier to make a 3D hologram-like illusion than you think. With just a smartphone and a few pieces of plastic, you can bring a simple 2D image into three dimensions right in your living room — actually in the palm of your hand. All you need is a few household materials and 30 minutes.
-

1
Gather your materials. Most of the items you’ll need will be laying around the house. For instance, you probably have some old CD cases around. You’ll also need tape or glue, graph paper, a pen, a ruler and a smartphone.
-

2
Map out the dimensions of the template on the graph paper. The template you’re going to make is for your hologram projector. It will take a rhombus shape when all the pieces are put together, resembling a square with slanted sides.
- A rhombus is a parallelogram. It has four equal sides that are parallel to each other and diagonals that bisect each other at right angles.[1]
- You are going to make a template to form the side of this 2-D shape, which will be the projector screen for your hologram. The final shape of the projector will resemble a pyramid with a short flat top.
Advertisement
- A rhombus is a parallelogram. It has four equal sides that are parallel to each other and diagonals that bisect each other at right angles.[1]
-

3
Use a pen and a ruler to draw the lines on graph paper. Line up your ruler with lines on the graph paper. The dimensions of your shape are 1 centimeter (0.39 inches) on the top, 3.5 centimeters (1.37 inches) on the sides and 6 centimeters (2.36 inches) on the bottom. Then, draw your lines. Connect all of the lines to complete the outline of the shape.
- The finished shape should look similar to an isosceles trapezoid.[2]
In other words, the template will show resemblance to a flat-topped pyramid.[3]
- If you want to make your template bigger you can double or triple each of the sides. For instance, the dimensions should be 2 cm by 7 cm by 12 cm if you want to double it. If you’re wondering why it matters, it’s because increasing the size of the template increases the size of your hologram. You might get a better quality hologram with a smaller template, but how big you choose to make your hologram is ultimately your choice. Just use the same proportions of the provided dimensions when you’re increasing the size.
- The finished shape should look similar to an isosceles trapezoid.[2]
-

4
Cut out the shape from the graph paper. Cut along the lines as precisely as possible, making sure that none of the edges are jagged or uneven. You can use scissors if you want, but you’ll get a more exact cut if you use a box cutter or a utility blade. Use the tool that you’re the most comfortable using.
Advertisement
-

1
Prep the CD case by removing the unnecessary material. Cut off the sides of the CD case with a utility blade. You only need the front plastic cover because it is going to be the source material for your projector screen, which will project the hologram. If your CD case is dusty, clean it off with some glass cleaner. The cleaner and clearer your plastic pieces are the more clarity your hologram will have.
- Don’t worry if the plastic has some scratches on it. That doesn’t matter as much, but if you have a CD case with fewer scratches or none at all, it would be a better option.
-

2
Trace the template on the plastic CD case. Try to orientate the template in such a way that you can fit it on the plastic four times. Flip it in the opposite direction, so you have one template upright and one upside down. You’ll need four of these pieces to construct the projector, and it’s easier to cut them out of the same piece of plastic — especially if you don’t have several CD cases laying around. Then, with your pen, trace the template four times on the plastic if are able.
- If you have increased the size of your template, you may not be able to cut out four templates from a single plastic CD case. If not, salvage a few more plastic CD cases to cut out your templates.
-

3
Cut out the templates from the plastic CD case. With your utility blade, follow the line that you traced on the plastic. Use your ruler as a guide to help you cut straight. Line it up along the line that you traced, press firmly on the ruler so it doesn’t move. Then with your other hand, trace over your lines with your utility blade. Go over the lines with the blades several times until you have cut through the plastic. When you finish you should have four plastic pieces that look just like your template.[4]
- If you have removed the sides of the plastic from the CD case, then cutting out the templates will be much easier because you’ll be able to press down.
Advertisement
-

1
Tape or glue the templates together. Line up two of the plastic template pieces side by side. Then put a piece of tape at the top and the bottom where their edges meet. Make sure the tape overlaps onto both sides of the template so that it holds them together well. Then, tape the remaining two pieces to each end in the same manner. All four of the plastic pieces should be taped together.
- You can glue the pieces together instead of taping them. However, this will likely take longer because you have to hold the pieces together until they dry.
-

2
Shape the figure. Stand up the taped pieces on the bottom edge. Bend the pieces where you have applied the tape to create corners or creases at each edge. Then tape the two open ends together to close the shape. This is your hologram projector.[5]
It should now resemble a pyramid with a flat top. -

3
Display a simple video or moving image on your smartphone. A single fish swimming or a flower moving back and forth works fine. Use a screensaver image or a video. Whatever image you display is the image that is going to be projected into a hologram.[6]
-

4
Place your hologram projector on your smartphone screen. With the moving image still displayed on your smartphone, set your screen projector with the short end — the 1-centimeter end— down on your smartphone. The side facing up at you should be the 6-centimeter end, and it should now have the shape of the rhombus. If your image on your smartphone is still moving, you should now see a 3D hologram of it projected through your CD case projector..[7]
Advertisement
Add New Question
-
Question
Can you do this with any picture or device?

With any device yes, but not with any picture. My favorite picture is of a hummingbird, I just Google «hummingbird hologram 3D».
-
Question
How do I increase the scale of the illusion?

You would have to make bigger-sized pieces of the CD templates, so instead of using centimeters, use inches.
-
Question
Can I make this into a triangular shape instead of rhombus?
First of all, the figure above is a trapezoid, not a rhombus. Second, you cannot make it into a triangle because then you wouldn’t be able to make it stand.
See more answers
Ask a Question
200 characters left
Include your email address to get a message when this question is answered.
Submit
Advertisement
-
Press down firmly with the utility knife to get a clean cut.
-
Use the ruler as a guide when you’re cutting by sliding the blade along the edge of the ruler.
-
Use a simple moving image with one or two focal points. Anything too complicated might not project well.
Thanks for submitting a tip for review!
Advertisement
-
Be careful when you’re cutting the plastic so that you don’t cut yourself.
-
If you are under the age of 12, ask for adult supervision when using a utility knife.
Advertisement
Things You’ll Need
- Graph paper,
- The plastic cover from a CD case or jewel case
- Tape or super glue
- A pen
- Scissors
- A smartphone
- An X-acto knife, glass cutter or utility blade
References
About This Article
Article SummaryX
To make a holographic illusion pyramid, draw a flat-topped pyramid on a piece of graph paper. Cut off the sides of a CD case and trace your template on the case 4 times. Next, cut out your templates and tape them together. Stand your pyramid on the bottom edge, and create the corners and creases by bending the sections where you applied the tape. Then, close off the shape by taping the two open ends together. For detailed instructions on making a holographic illusion pyramid, including how to use your pyramid to display moving images on your smartphone, scroll down.
Did this summary help you?
Thanks to all authors for creating a page that has been read 82,037 times.
Did this article help you?
![]()
Download Article
![]()
Download Article
- Creating a Template
- Creating the Projector Screen
- Making the Hologram
|
|
It’s easier to make a 3D hologram-like illusion than you think. With just a smartphone and a few pieces of plastic, you can bring a simple 2D image into three dimensions right in your living room — actually in the palm of your hand. All you need is a few household materials and 30 minutes.
-
1
Gather your materials. Most of the items you’ll need will be laying around the house. For instance, you probably have some old CD cases around. You’ll also need tape or glue, graph paper, a pen, a ruler and a smartphone.
-
2
Map out the dimensions of the template on the graph paper. The template you’re going to make is for your hologram projector. It will take a rhombus shape when all the pieces are put together, resembling a square with slanted sides.
- A rhombus is a parallelogram. It has four equal sides that are parallel to each other and diagonals that bisect each other at right angles.[1]
- You are going to make a template to form the side of this 2-D shape, which will be the projector screen for your hologram. The final shape of the projector will resemble a pyramid with a short flat top.
Advertisement
- A rhombus is a parallelogram. It has four equal sides that are parallel to each other and diagonals that bisect each other at right angles.[1]
-
3
Use a pen and a ruler to draw the lines on graph paper. Line up your ruler with lines on the graph paper. The dimensions of your shape are 1 centimeter (0.39 inches) on the top, 3.5 centimeters (1.37 inches) on the sides and 6 centimeters (2.36 inches) on the bottom. Then, draw your lines. Connect all of the lines to complete the outline of the shape.
- The finished shape should look similar to an isosceles trapezoid.[2]
In other words, the template will show resemblance to a flat-topped pyramid.[3]
- If you want to make your template bigger you can double or triple each of the sides. For instance, the dimensions should be 2 cm by 7 cm by 12 cm if you want to double it. If you’re wondering why it matters, it’s because increasing the size of the template increases the size of your hologram. You might get a better quality hologram with a smaller template, but how big you choose to make your hologram is ultimately your choice. Just use the same proportions of the provided dimensions when you’re increasing the size.
- The finished shape should look similar to an isosceles trapezoid.[2]
-
4
Cut out the shape from the graph paper. Cut along the lines as precisely as possible, making sure that none of the edges are jagged or uneven. You can use scissors if you want, but you’ll get a more exact cut if you use a box cutter or a utility blade. Use the tool that you’re the most comfortable using.
Advertisement
-
1
Prep the CD case by removing the unnecessary material. Cut off the sides of the CD case with a utility blade. You only need the front plastic cover because it is going to be the source material for your projector screen, which will project the hologram. If your CD case is dusty, clean it off with some glass cleaner. The cleaner and clearer your plastic pieces are the more clarity your hologram will have.
- Don’t worry if the plastic has some scratches on it. That doesn’t matter as much, but if you have a CD case with fewer scratches or none at all, it would be a better option.
-
2
Trace the template on the plastic CD case. Try to orientate the template in such a way that you can fit it on the plastic four times. Flip it in the opposite direction, so you have one template upright and one upside down. You’ll need four of these pieces to construct the projector, and it’s easier to cut them out of the same piece of plastic — especially if you don’t have several CD cases laying around. Then, with your pen, trace the template four times on the plastic if are able.
- If you have increased the size of your template, you may not be able to cut out four templates from a single plastic CD case. If not, salvage a few more plastic CD cases to cut out your templates.
-
3
Cut out the templates from the plastic CD case. With your utility blade, follow the line that you traced on the plastic. Use your ruler as a guide to help you cut straight. Line it up along the line that you traced, press firmly on the ruler so it doesn’t move. Then with your other hand, trace over your lines with your utility blade. Go over the lines with the blades several times until you have cut through the plastic. When you finish you should have four plastic pieces that look just like your template.[4]
- If you have removed the sides of the plastic from the CD case, then cutting out the templates will be much easier because you’ll be able to press down.
Advertisement
-
1
Tape or glue the templates together. Line up two of the plastic template pieces side by side. Then put a piece of tape at the top and the bottom where their edges meet. Make sure the tape overlaps onto both sides of the template so that it holds them together well. Then, tape the remaining two pieces to each end in the same manner. All four of the plastic pieces should be taped together.
- You can glue the pieces together instead of taping them. However, this will likely take longer because you have to hold the pieces together until they dry.
-
2
Shape the figure. Stand up the taped pieces on the bottom edge. Bend the pieces where you have applied the tape to create corners or creases at each edge. Then tape the two open ends together to close the shape. This is your hologram projector.[5]
It should now resemble a pyramid with a flat top. -
3
Display a simple video or moving image on your smartphone. A single fish swimming or a flower moving back and forth works fine. Use a screensaver image or a video. Whatever image you display is the image that is going to be projected into a hologram.[6]
-
4
Place your hologram projector on your smartphone screen. With the moving image still displayed on your smartphone, set your screen projector with the short end — the 1-centimeter end— down on your smartphone. The side facing up at you should be the 6-centimeter end, and it should now have the shape of the rhombus. If your image on your smartphone is still moving, you should now see a 3D hologram of it projected through your CD case projector..[7]
Advertisement
Add New Question
-
Question
Can you do this with any picture or device?
With any device yes, but not with any picture. My favorite picture is of a hummingbird, I just Google «hummingbird hologram 3D».
-
Question
How do I increase the scale of the illusion?
You would have to make bigger-sized pieces of the CD templates, so instead of using centimeters, use inches.
-
Question
Can I make this into a triangular shape instead of rhombus?
First of all, the figure above is a trapezoid, not a rhombus. Second, you cannot make it into a triangle because then you wouldn’t be able to make it stand.
See more answers
Ask a Question
200 characters left
Include your email address to get a message when this question is answered.
Submit
Advertisement
-
Press down firmly with the utility knife to get a clean cut.
-
Use the ruler as a guide when you’re cutting by sliding the blade along the edge of the ruler.
-
Use a simple moving image with one or two focal points. Anything too complicated might not project well.
Thanks for submitting a tip for review!
Advertisement
-
Be careful when you’re cutting the plastic so that you don’t cut yourself.
-
If you are under the age of 12, ask for adult supervision when using a utility knife.
Advertisement
Things You’ll Need
- Graph paper,
- The plastic cover from a CD case or jewel case
- Tape or super glue
- A pen
- Scissors
- A smartphone
- An X-acto knife, glass cutter or utility blade
References
About This Article
Article SummaryX
To make a holographic illusion pyramid, draw a flat-topped pyramid on a piece of graph paper. Cut off the sides of a CD case and trace your template on the case 4 times. Next, cut out your templates and tape them together. Stand your pyramid on the bottom edge, and create the corners and creases by bending the sections where you applied the tape. Then, close off the shape by taping the two open ends together. For detailed instructions on making a holographic illusion pyramid, including how to use your pyramid to display moving images on your smartphone, scroll down.
Did this summary help you?
Thanks to all authors for creating a page that has been read 82,037 times.
Did this article help you?
Голограмма представляет собой трехмерное изображение, которое придает ему ощущение глубины. С момента создания метавселенная они стали популярными, поэтому за последний год на рынке появились различные приложения. Проблема в том, что рынок еще очень короткий, надежных мало и большинство из них не найти на iOS, Помнить не путать голографические приложения с симуляторами или приложениями дополненной реальности , которые проецируют свой контент внутрь мобильного телефона, а не за его пределы.

Для всех этих приложений вам понадобится мобиль и пластиковая пирамида что прилипает к экрану. Таким образом, вы воспроизведете изображение на своем телефоне, и оно будет спроецировано на упомянутую пирамиду. Вы можете сделать его вручную или купить на таких сайтах, как Amazon, где самые надежные из них стоят от 10 до 20 евро.
Содержание
- ХОЛАПЕКС
- Голограмма Пирамида видео
- Vyomy 3D голографический проектор
- Другие приложения, которые позволяют вам видеть голограммы
ХОЛАПЕКС
Это безусловно самое надежное и интуитивно понятное приложение в списке, а также самые скачиваемые. С HOLAPEX вам не придется долго редактировать видео, потому что и процесс, и само приложение довольно просты. Он не требует длинных меню или широких возможностей редактирования кода. Возможность объединения видео для объединения их в одно, в отличие от других форматов, которые обычно ограничиваются изображением или видео. Он доступен для обоих Android и iOS, и в обоих есть платная версия за 9.99 евро.

Голограмма Пирамида видео
Это простая программа для просмотра голограмм, которая позволяет проецировать самые простые логотипы, начиная с Twitter символ к другим брендам и символам, таким как Инь и Ян. Это очень рудиментарно, но позволяет комбинировать шрифты. Он также доступен как для Android, так и для iOS.

Vyomy 3D голографический проектор
Он выделяется своей способностью адаптироваться к особенностям вашего мобильного телефона. Одним из преимуществ этого приложения является его вариация цветов для голограмм, поскольку приложение способно создавать более красивые комбинации. Пожалуй, самый большой недостаток, который мы можем ему приписать, — это скудный видеоконтент. К сожалению, он доступен только для Android.
Другие приложения, которые позволяют вам видеть голограммы
В дополнение к упомянутым выше, у нас есть другие, которые не позволяют создавать видео или фотографии, но позволяют просматривать заранее определенные изображения. Следующее доступно только для Android.
3D голографический проектор
Это один из самых популярных на рынке способов отображения предопределенного контента в приложении, но он не позволяет вам его создавать. Это просто, но чрезвычайно популярно. Вам не нужно подключение к Интернету с ним.
Голограмма плеер
Это очень простое приложение, которое позволяет вам конвертировать ваши локальные видео в голограммы. В некотором смысле, это позволяет вам создавать свой собственный контент и изменять скорость, но вряд ли модифицирует его или объединяет слои.
Голограмма 3D
Это очень примитивно, так как вы вряд ли сможете выбрать между базовыми моделями Земли, черепа или диско-огней, среди прочего. Кроме того, он пронизан рекламой.