Что такое рекламный аккаунт в бизнес-менеджере
Facebook Business Manager — это инструмент для ведения нескольких рекламных аккаунтов одновременно. А рекламный аккаунт — это профиль компаниибренда, который продвигает свои товары и услуги. Чтобы управлять аккаунтами, их нужно предварительно добавить. Как это сделать, вы узнаете ниже.
Существует инструмент от Фейсбук, который называется Ads manager. Он подойдёт новичкам, но если вы уже давно не джун, а уже мидл или даже сеньор, лучше пользоваться именно бизнес-менеджером, т.к. он бесплатный и в нём нет таких ограничений, которые имеет ADS менеджер. К примеру, в ADS можно создать только один пиксель, а в бизнес-менеджере до десяти.
Прежде чем начать, вам нужно знать: вы не сможете добавить рекламный аккаунт, если другая компания добавила его. Вы можете лишь запросить доступ. Также вы не можете добавить аккаунт, если уже достигли лимита. Лимит — 25 аккаунтов, но он может индивидуально меняться в зависимости от ваших затрат на рекламу.
Как зайти в бизнес-менеджер и создать там аккаунт? Сначала кликните по этой ссылке, а после читайте пошаговую инструкцию:
Создание аккаунта
Прочитайте ознакомительную информацию, предоставленную от Facebook. Нажмите кнопку “создать аккаунт”, которая находится вверху справа.
Введение первичных данных
Теперь заполните форму по пунктам: название компании и аккаунта, ваше имя, рабочий электронный адрес.
Дополнительная информация
Подтвердите адрес электронной почты и укажите дополнительную информацию, такую, как способы оплаты и другое. Воспользуйтесь меню слева и заполните все пустые поля.
Способы добавления рекламных аккаунтов
Создание нового
Сложнее всего создать новый рекламный аккаунт, но благодаря нашей инструкции вы сможете сделать это быстро и не запутаться. Создание рекламного аккаунта состоит из четырёх основных шагов:
Начало
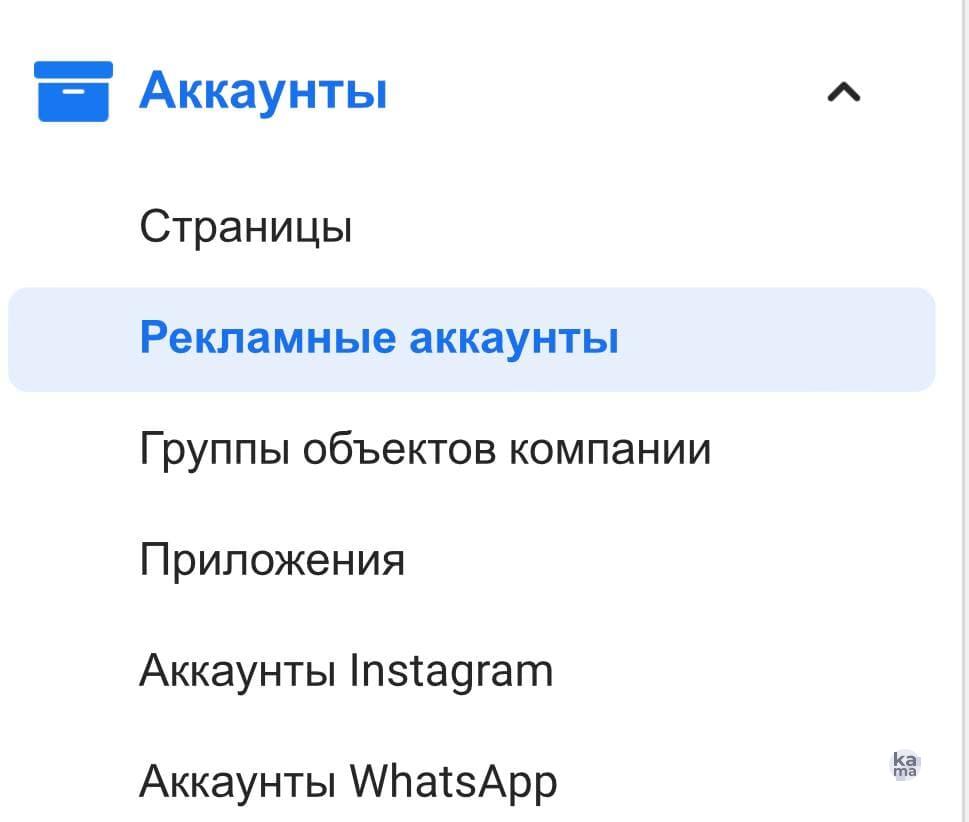
В меню под названием “Настройки компании” выберите пункт “Аккаунты”, а затем “Рекламные аккаунты”. Откройте меню “добавить” и выберите “Создать”. Нажмите на кнопку и перейдите в следующее окно.
Информация
В открывшемся окне напишите название рекламного аккаунта, выберите валюту, которую будете использовать. Также нужно настроить часовой пояс, выбрав из списка.
Распределение
Прежде чем Facebook создаст новый рекламный аккаунт, он даст вам выбор, кто будет его использовать: вы или другой клиент. Выберите подходящий вариант.
Завершение
Нажмите “создать”. Готово! Теперь можно приступать к дальнейшему заполнению и настроить рекламный кабинет так, как вам это необходимо.
Добавление существующего
Если вы работаете с компаниями и несколькими заказчиками, добавьте созданный ими ранее рекламный аккаунт. Добавление уже имеющегося рекламного аккаунта намного проще, чем создание нового. Делается это за пару шагов:
1
В главном меню “настройки компании” выберите раздел “Аккаунты”, подраздел “Рекламные аккаунты”. Теперь нажмите на синюю кнопку “Добавить”, а затем выберите “Добавьте рекламный аккаунт”.
2
Введите уникальный ID страницы Facebook. О том, где найти его, читайте ниже.
3
Нажмите кнопку “Добавить рекламный аккаунт”. Готово! Теперь можно создать первую рекламную кампанию.
Добавление аккаунта из другого менеджера
Если вы собираетесь использовать аккаунт другой компании, вам нужно будет следовать этой инструкции:
Вам снова нужно всё тоже меню “Настройки компании”, раздел “Аккаунты” и подраздел “Рекламные аккаунты”. Нажмите синюю кнопку “добавить”, затем пролистайте до пункта под названием “Запросите доступ к рекламному аккаунту”. Теперь вам понадобится настроить основную страницу. Нужна она для того, чтобы запрашивать доступ.
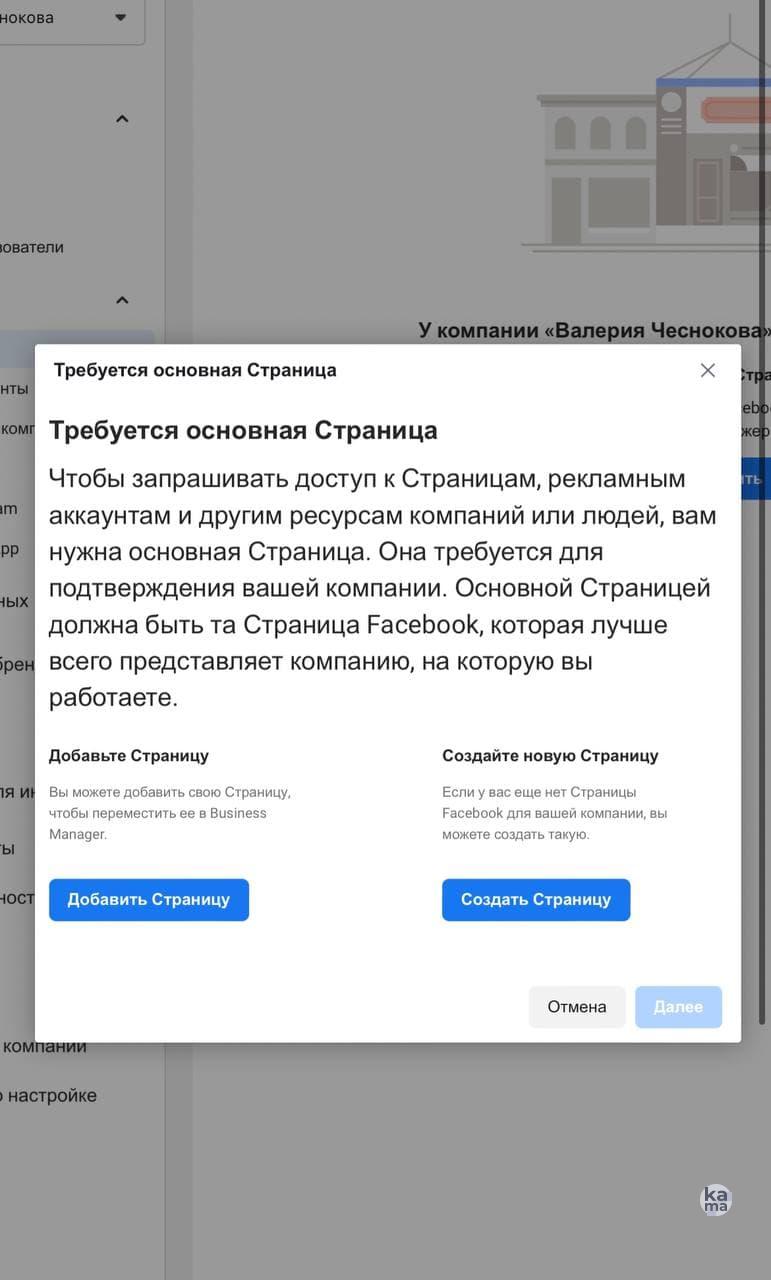
Добавьте основную страницу или создайте её прямо сейчас. Как закончите, нажмите “далее”. Потом введите ID рекламного аккаунта, к которому хотите запросить доступ. Нужно будет подождать, когда пользователь, владеющий аккаунтом, даст своё согласие. Как только операция пройдёт успешно, аккаунт появится в бизнес-менеджере.
Как найти ID

ID — это уникальный идентификатор аккаунта, который присваивается при создании. ID нужен при добавлении рекламного аккаунта в бизнес-менеджер, но где его найти и как скопировать? Всё просто, листайте дальше.
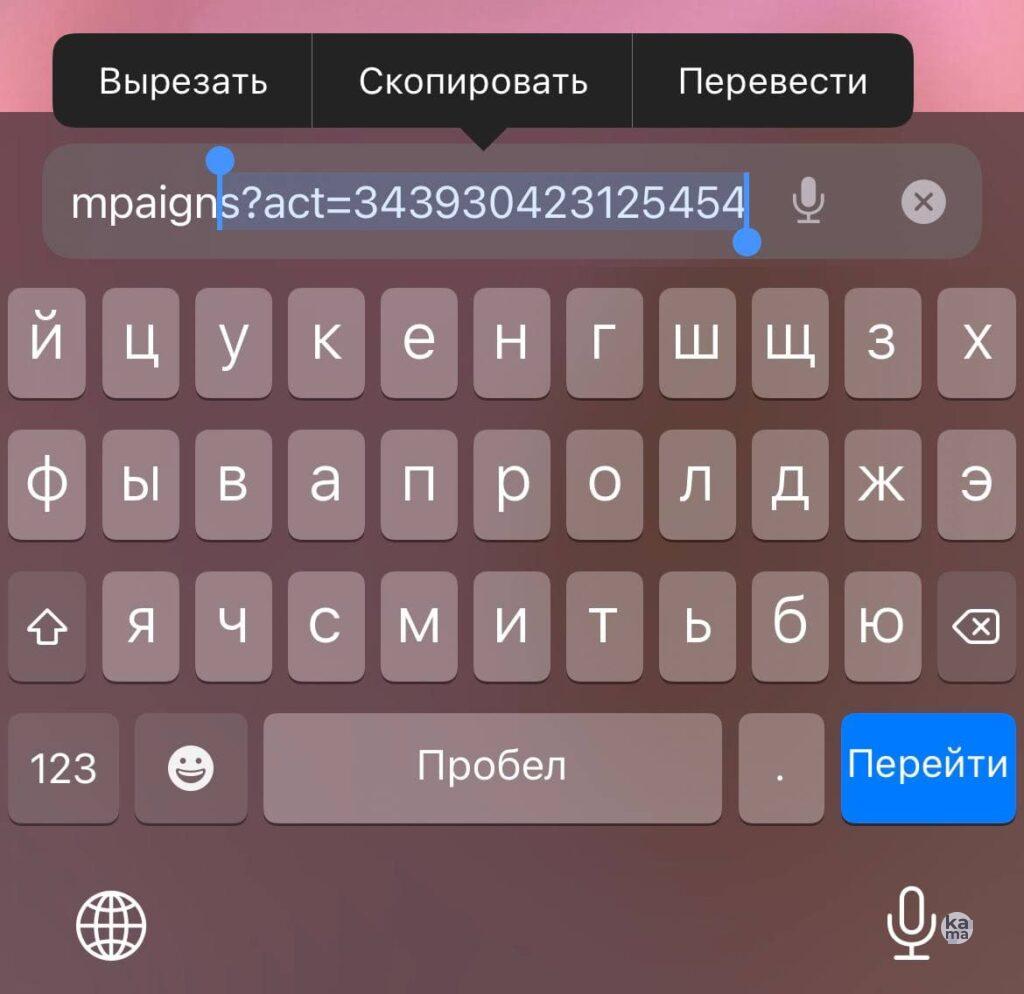
Откройте страницу аккаунта, который вам нужен. Посмотрите в строку браузера со ссылкой. Всё, что вы увидите после надписи «act=» — и есть идентификатор. Скопируйте его, кликнув и выделив.
Предоставление доступа к аккаунту
Если вам необходимо предоставить доступ к аккаунту своим сотрудникам или подрядчикам, В сквозном меню бизнес-менеджера выберите пункт «Рекламные аккаунты». Затем в среднем блоке кликните по нужному аккаунту.
В панели справа переключитесь на вкладку «Люди». Нажмите кнопку «Добавить людей», после этого у вас откроется новое окно, в нем слева отметьте нужного человека. В панели справа установите разрешения для сотрудника. Нажмите «Назначить». После этого сотрудник сможет создавать рекламные кампании в этом аккаунте.
Предоставляйте доступ к аккаунту только доверенным людям, которых знаете лично или работаете с ними долгое время. Будьте аккуратны, предоставляя людям личную информацию.
Итог
Теперь вы знаете, как создать рекламные аккаунты в Фейсбук через бизнес менеджер. Если вы хотите научиться запускать рекламу, построить имидж бизнес страницы и получить много новых клиентов, перейдите по одной из ссылок и читайте статью: 10 лайфахов для привлечения клиентов, Как провести конкурс в социальных сетях: пошаговая инструкция и полезные советы, 10 способов повысить активность в социальных сетях.
Рекламный аккаунт — это профиль компаниибренда, который продвигает свои товары и услуги
Лимит для бизнес-менеджера — 25 аккаунтов, но он может индивидуально меняться в зависимости от ваших затрат на рекламу
Facebook Business Manager — это инструмент для ведения нескольких рекламных аккаунтов одновременно
Понятно ли вам, как добавить рекламный аккаунт в Фейсбук?
Частые вопросы
Как добавить способы оплаты рекламных объявлений?
Чтобы оплатить рекламу, вам нужно зайти в настройки компании, в раздел «платежи». Теперь нужно добавить способ оплаты, указав банковскую карту или другие реквизиты. Впишите номер карты, имя владельца, срок действия и CVV код.
Будет ли аудитория видеть мои личные данные (имя, email)?
Нет, вашу информацию смогут видеть только сотрудники или подрядчики, которым вы будете предоставлять доступ к рекламным аккаунтам.
Стоит ли пользоваться бизнес-менеджером, если я работаю с одним проектом?
Нет, в этом совсем нет необходимости.
Как создать рекламный аккаунт в Facebook 2021
Подпишитесь и получайте новости первыми
Поделитесь статьей и оцените
У социальной сети Facebook есть много инструментов для продвижения бизнеса и офферов, но разобраться с ними бывает немного тяжеловато. Сегодня мы с ребятами из партнерки LeadRock покажем, где найти ID рекламного аккаунта в «Фейсбук».
Смотрим ID рекламного аккаунта в ФБ
При регистрации начинающие вебмастера часто думают, какой ID рекламного аккаунта Facebook написать. Обычно система присваивает его автоматически, ничего писать не нужно.
А то, где посмотреть ID рекламного аккаунта Facebook, зависит от того, что вам нужно. Есть личные страницы и страницы компаний с подключенным бизнес-менеджером. На личных страницах можно заводить один рекламный кабинет. В бизнес-менеджере — до 5. Можно узнать ID и на личной странице, и в бизнес-менеджере.

Акция от OFFERRUM: переходи с нутры на SP
Если хотите узнать ID рекламного кабинета на личной странице, зайдите в Ads Manager. На первом же экране можно будет посмотреть ID аккаунта: для этого нажмите на свое имя, а потом посмотрите номер аккаунта — это и есть ID.
Также цифровое обозначение вашего аккаунта можно найти в адресной строке браузера. Оно расположено после act= и заканчивается знаком &.
Есть другой способ посмотреть номер — посетить настройки. Нажмите на шестеренку в верхнем правом углу экрана.
Перед вами откроется окно настроек. Первая же вкладка — «Рекламные аккаунты» — будет отображена автоматически. Вам покажут ID рекламного аккаунта Facebook на первом же экране.
Номера личного кабинета и рекламного аккаунта совпадают. С бизнес-менеджером немного сложнее: там странице компании присваивают один ID, а рекламным кабинетам внутри — другие.
— Чтобы посмотреть номер компании, тоже посетите Ads Manager. Обратите внимание на верхний правый угол экрана — там должна быть именно компания, а не ваша личная страница. Если стоит ваше фото, переключите систему на бизнес-страницу: нажмите на имя и выберите название компании, — объясняют в сапорте LeadRock.
Когда переключитесь на страницу компании, вам покажут ID рекламных кабинетов. Можно будет выбрать их в специальной вкладке сверху.
Если не знаете, как создать рекламный кабинет в Фейсбук для дополнительного запуска рекламных кампаний, посмотрите материал по ссылке. Предоставили в нем подробную инструкцию по добавлению нового Ads Manager: со скриншотами и объясненеим действий.
Здесь будут видны номера всех аккаунтов, которые так или иначе связаны с вашей страницей. Можно увидеть их и другим способом — зайти в настройки так же, как мы описывали выше. Сами настройки будут немного другими. Нужно будет выбрать «Рекламные аккаунты» в левой части экрана сбоку.
Сбоку вам покажут список аккаунтов. Когда нажмете на нужный, увидите сверху его ID и другую информацию.
Также в настройках можно узнать идентификатор бизнес-менеджера. Для этого зайдите во вкладку «Информация о компании» — он будет указан сверху.
Запомните: то, как узнать ID рекламного аккаунта в Facebook, зависит от типа профиля. В обоих случаях информация находится в Ads Manager. Но ID личного аккаунта и рекламного кабинета на нем совпадают, а у аккаунта компании может быть несколько рекламных. И у всех них будут разные номера.
Зачем нужен ID рекламного аккаунта в Facebook
Узнать номер рекламного аккаунта нужно в нескольких случаях:
При заполнении автоматических форм. Если ваш аккаунт заблокировали из-за рекламы, не соответствующей правилам социальной сети, или если группа объявлений не прошла модерацию, можно оспорить решения с помощью специальных форм. Чтобы заполнить их, понадобятся ваши ID. Иначе специалисты не смогут посмотреть, в чем именно дело, и помочь вам.
При переписке с техподдержкой. Если обращаетесь в поддержку не через специальную форму, а напрямую, нужно тоже указать ID рекламного кабинета. А если проблема в конкретном объявлении или кампании, можно указать их ID — так специалист быстрее разберется, в чем именно дело.
Для добавления кабинета в бизнес-менеджер. В бизнес-менеджер можно добавлять несколько рекламных кабинетов, чтобы работать командой или просто распределять кампании между несколькими сотрудниками. Для этого нужно знать ID кабинета сотрудника.
Но можно отлично лить в соло! Если вы пошли по пути белых офферов, подключайтесь к LeadRock — топовой партнерке с белыми офферами, высоким апрувом и проверенными лендингами. Никаких банов и волокиты с аккаунтами, лей в удовольствие!
А знаете ли вы свой ID и были ли ситуации, в которых приходилось его искать? Поделитесь опытом в комментариях. И подпишитесь на наш канал в Telegram, чтобы первыми получать уведомления о выходе новых материалов по арбитражу трафика.
Краткое резюме по статье
Для чего нужен ID рекламного аккаунта в Facebook?
+
В статье мы детально рассказываем для чего нужен айди рекламного аккаунта в Facebook. Читайте!
Как посмотреть ID рекламного аккаунта в ФБ?
+
Даем пошаговую инструкцию со скриншотами о том, как быстро найти айди рекламного кабинета.
Где искать ID личного РК и рекламного кабинета в бизнес-менеджере?
+
Посмотреть ID рекламного кабинета можно в Ads Manager. Показываем на скриншотах как это сделать. Смотрите!

Еще материалы на эту тему:
If your business uses Facebook, you should be using Facebook Business Manager. It’s an important tool that keeps your Facebook business assets centralized, safe, and organized.
If you’ve been putting off setting up Facebook Business Manager because you weren’t quite sure how it works, we’ve got good news. In just 10 simple steps, this tutorial will teach you how to do everything from setting up your account to placing your first ad.
But, first, let’s answer an important question: Exactly what is Facebook Manager, anyway?
Bonus: Download a free guide that teaches you how to turn Facebook traffic into sales in four simple steps using Hootsuite.
As Facebook itself explains, “Business Manager serves as a one-stop shop to manage business tools, business assets and employee access to these assets.”
Basically, it’s the place to manage all of your Facebook marketing and advertising activities. It’s also where you can control multiple users’ access to additional resources like your Instagram account and product catalogs. Here are some of its key functions:
- It keeps your business activities separate from your personal profile, so you don’t have to worry about posting in the wrong place (or getting distracted by cat videos when you’re trying to work).
- It’s a central place to track Facebook ads, with detailed reports that show how your ads are performing.
- It allows you to give vendors, partners, and agencies access to your pages and ads, without handing over ownership of the assets.
- Coworkers don’t see your personal Facebook information—just your name, work email, and pages and ad accounts.
Now that you know why you might want to use Facebook Business Manager, let’s get you set up.
How to set up Facebook Business Manager
Step 1. Create a Facebook Business Manager account
The first stage of setting up Business Manager is to create an account. You’ll need to use a personal Facebook profile to confirm your identity but, as mentioned above, your coworkers and partners won’t have access to the personal information in that account.
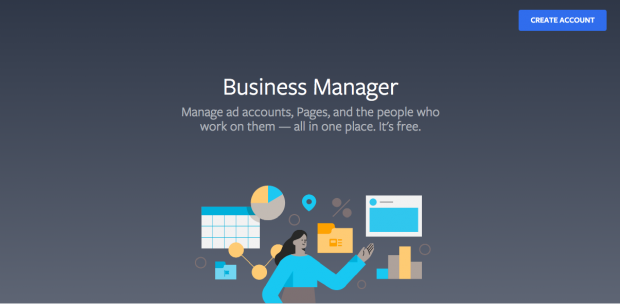
- Go to business.Facebook.com and click the big blue Create Account button in the top right.
- Enter your business name, your name, and the business email address you want to use to manage your Facebook Business Manager account, then click Next.

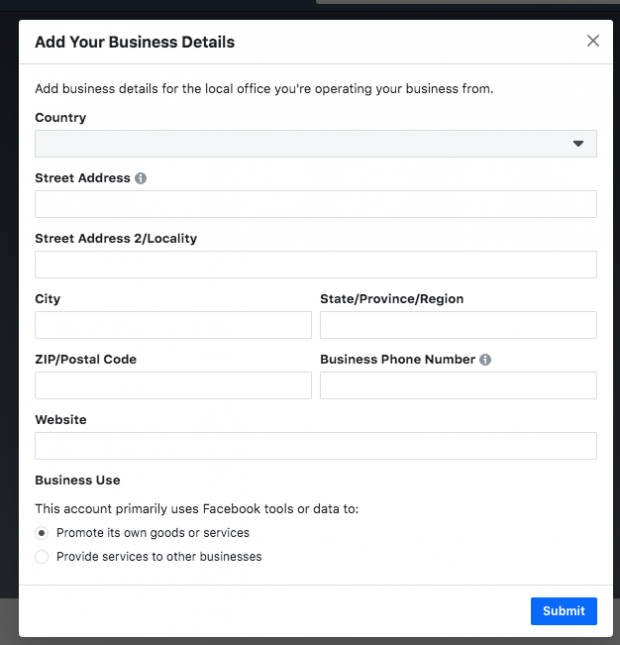
- Enter your business details: address, phone number, and website. You’ll also need to specify whether you’ll use this Business Manager account to promote your own business, or to provide services to other businesses (like an agency). When you’re finished, click Submit.
- Check your email for a message with the subject line “Confirm your business email.” Within the message click Confirm Now.
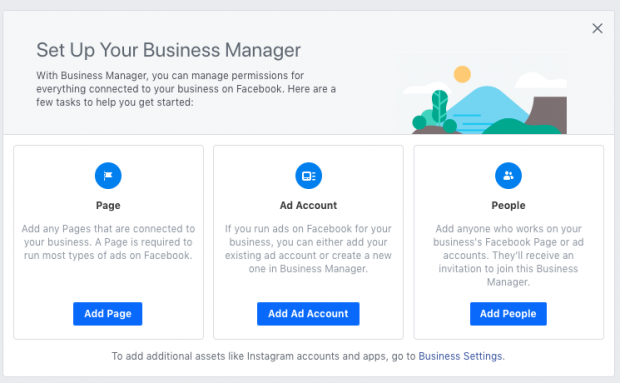
Step 2. Add your Facebook business page(s)
In this step, you have a couple of different choices. You can add an existing Facebook business page or create a new one. If you manage Facebook pages for clients or other businesses, you can also request access to someone else’s page.
That last distinction is important. While you can use Business Manager to manage clients’ Facebook pages and ad accounts, it’s important to use the Request Access option rather than the Add Page option. If you add your client’s pages and ad accounts to your Business Manager, they’ll have limited access to their own business assets. That’s a sure way to cause tension in your business relationship.
For the purposes of this post, we’ll assume you’re managing your own assets, rather than acting as an agency, so we won’t get into the Request Access process. But be sure to keep this difference in mind.
We have a guide that shows you how to set up a Facebook business page, so we’ll assume you already have one to add to Business Manager. If you haven’t created your page yet, hop on over to that post and come back here to add your page to Facebook Business Manager when you’re done.
To add your Facebook page to Facebook Business Manager:
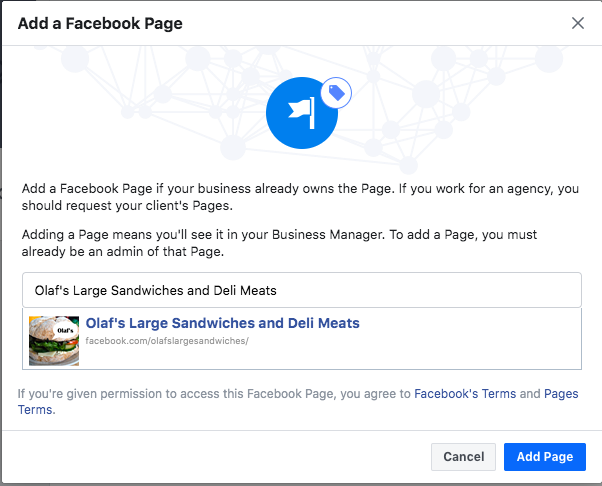
- From the Business Manager dashboard, click Add Page.Then, in the pop-up box, click Add Page again.
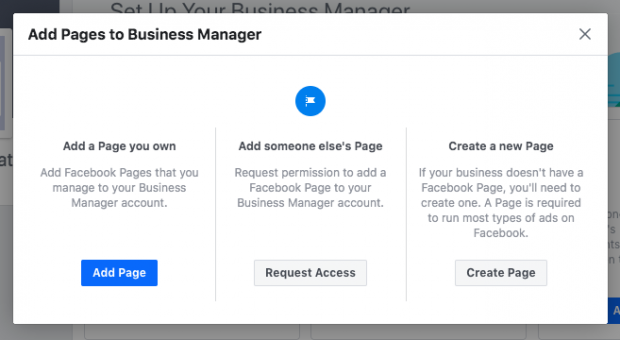
- Start typing the name of your Facebook business page in the text box. Your business page name should autocomplete below, so you can just click on it. Then click Add Page. Assuming you have administrator access to the page you’re trying to add, your request will be approved automatically.
- If you have more than one Facebook page associated with your business, add the remaining pages by following the same steps.
Step 3. Add your Facebook ad account(s)
Note that once you add your ad account to Facebook Business Manager, you can’t remove it, so it’s especially important only to add accounts you own. To access a client account, click Request Access instead.
If you’re already using Facebook ads, you can link your existing ad account as follows:
- From the Business Manager dashboard, click Add Ad Account, then Add Ad Account again, and then enter the ad account ID, which you can find in Ads Manager.
If you don’t already have a Facebook ads account, here’s how to set one up.
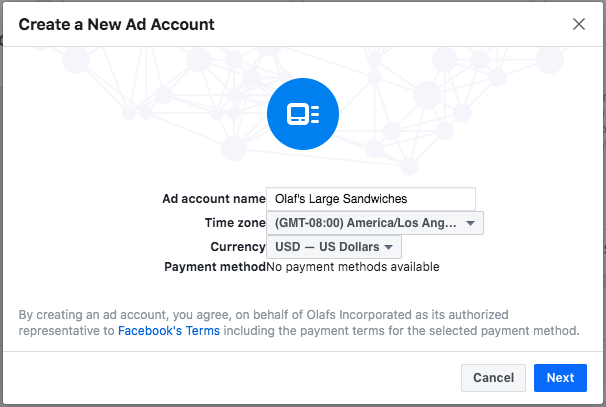
- From the Business Manager dashboard, click Add Ad Account, then Create Account.

- Enter your account details, then click Next.
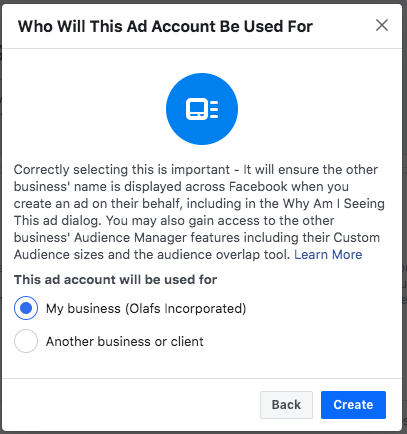
- Indicate that you are using the ad account for your own business, then click Create.
Each business can create one ad account right from the start. Once you are actively spending money in your first ad account, you will be able to add more based on your advertising spend. There is no option to request more ad accounts.
Step 4: Add people to help you manage your Facebook assets
Keeping on top of your Facebook marketing can be a big job, and you may not want to do it alone. Facebook Business Manager allows you to add team members so you can have a whole group of people working on your Facebook business page and ad campaigns. Here’s how to set up your team.
- From your Business Manager dashboard, click Add people.
- In the pop-up box, enter the business email address of a team member you want to add. This might include employees, freelance contractors, or business partners, In this step, you are specifically adding individuals, rather than an agency or another business (you can do that in the next step).
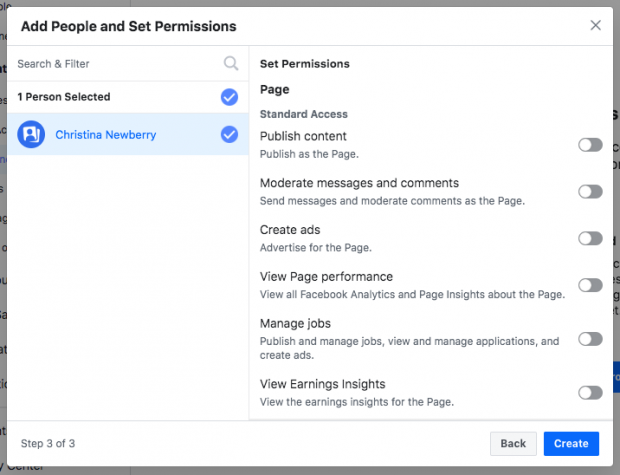
You can decide whether to give these individuals limited account access (choose Employee access) or full access (choose Admin access). You can get more specific in the next stage. Make sure to add people using their work email addresses. Then click Next.
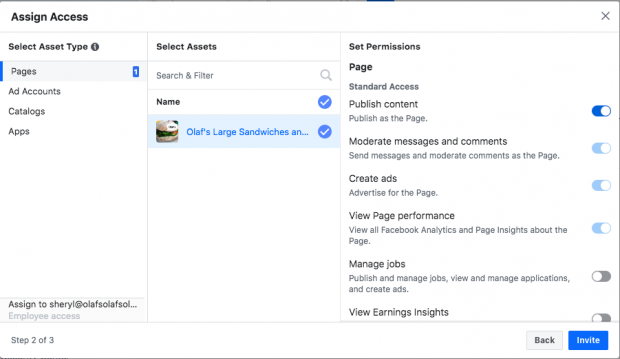
- In the left menu, click on Pages. Choose which pages you want this team member to work on. Customize the individual’s access using the toggle switches.
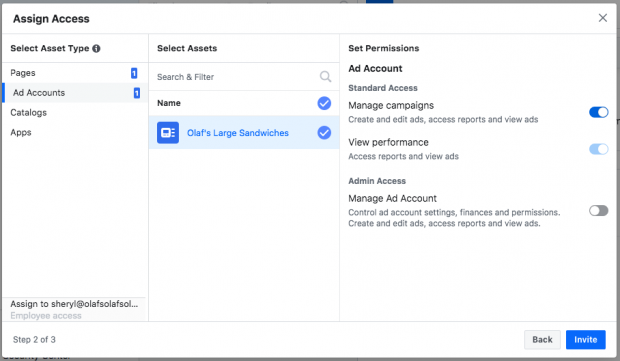
- Go back to the left menu and click on Ad Accounts. Again, customize the user’s access using the toggle switches. When you’re finished, click Invite.
In the left menu, you’ll also see options to add people to catalogs and apps, but you can skip these for now.
- To add more team members, click Add More People. When you’re finished, click Done.
- Now you need to wait for each of the individuals to accept your invitation to be part of your Facebook Business Manager team.
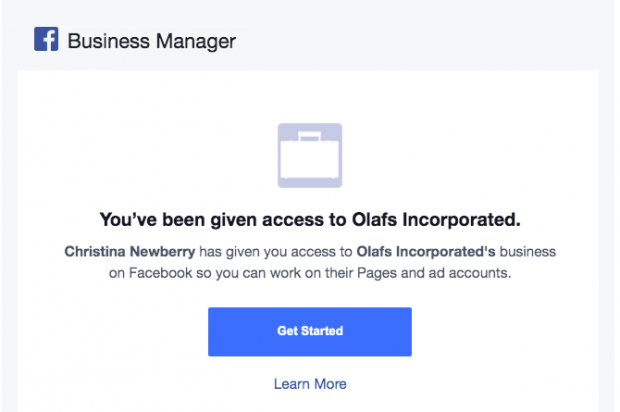
They will each receive an email with information about the access you’ve given them and a link to get started, but it would be a good idea for you to send them a personal note or let them know directly that you’re giving them this access and they should expect the automated email with the link.
You can see all of your pending requests from your dashboard, and withdraw them at any time for people who have not responded.
If someone with access leaves your company or switches to a different role, you can revoke their permissions. Here’s how:
- From your Business Manager dashboard, click Business Settings at the top right.
- In the left menu, click People.
- Click on the name of the appropriate person. To remove them from your team, click Remove. Or, hover over the name of an individual asset and click the trash can icon to remove it.
Step 5: Connect your business partners or ad agency
This might not apply to you if you’re just getting started with Facebook advertising, but you can always come back to this step later.
- From your Business Manager dashboard, click Business Settings at the top right.
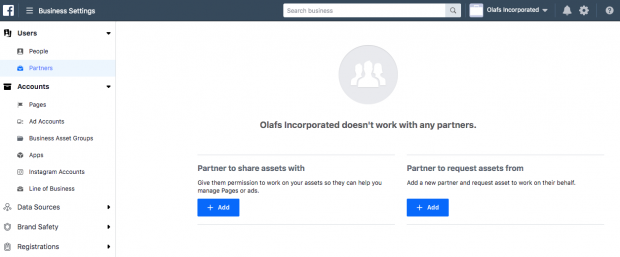
- In the left menu, click Partners. Under Partner to share assets with, click Add.
- Your partner must have an existing Business Manager ID. Ask them to provide it to you. They can find it in their own Business Manager under Business Settings>Business Info. Enter the ID and click Add.
The business you’ve just added can manage permissions for the individuals on their own teams from their own Facebook Business Manager account. That means you don’t need to worry about assigning and managing permissions for all the individual people who service your account at your agency or partner company, just the partner company itself.
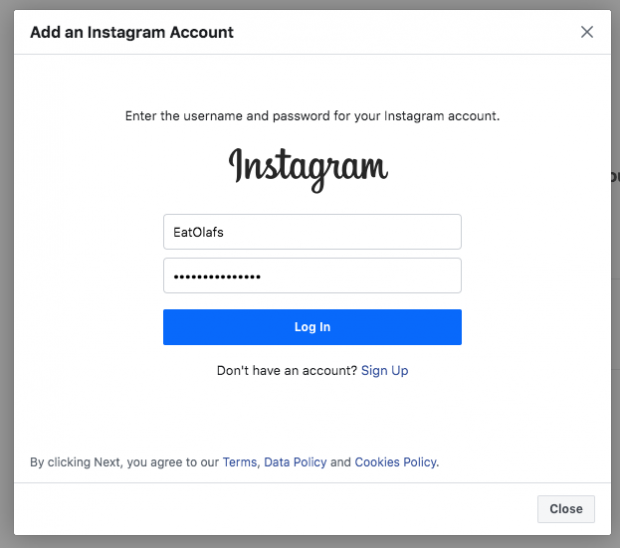
Step 6: Add your Instagram account
Now that you’ve got your Facebook assets set up, you can connect your Instagram account to Facebook Business Manager as well.
- From your Business Manager dashboard, click Business Settings at the top right.
- In the left column, click Instagram Accounts, then click Add. In the pop-up box, enter your Instagram login information and click Log In.
Step 7: Set up Facebook Pixels
What’s a Facebook Pixel? Put simply, it’s a small bit of code that Facebook generates for you. When you place this code on your website, it gives you access to information that will allow you to track conversions, optimize Facebook ads, build targeted audiences for your ads, and remarket to leads.
We recommend setting up your Facebook pixel right away, even if you’re not ready to start your first ad campaign yet, because the information it provides now will be valuable when you are ready to start advertising.
Our complete guide to using Facebook pixels is a great resource that walks you through everything you need to know about making the best use of the information a Facebook pixel can provide. For now, let’s get your pixel set up from within Facebook Business Manager.
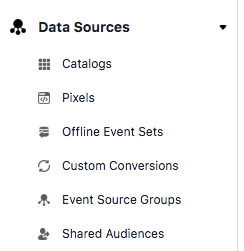
- From your Business Manager dashboard, click Business Settings.
- In the left column, expand the Data Sources menu and click Pixels, then click Add.
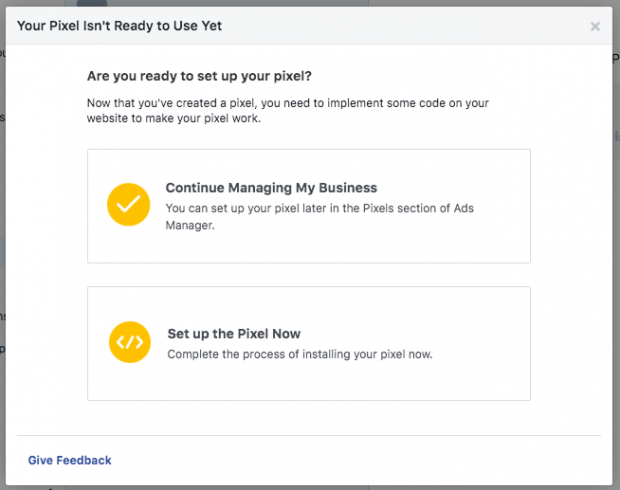
- Enter a name (up to 50 characters) for your pixel. Enter your website so Facebook can provide the best recommendations for how to set up your pixel, then click Continue. When you click Continue, you are agreeing to the pixel terms and conditions, so you should read those before you go any further.

- Click Set up the Pixel Now.
- Follow the detailed instructions in our Facebook pixel guide to get the pixel set up on your website and start collecting data.
You can create up to 10 pixels with your Business Manager.
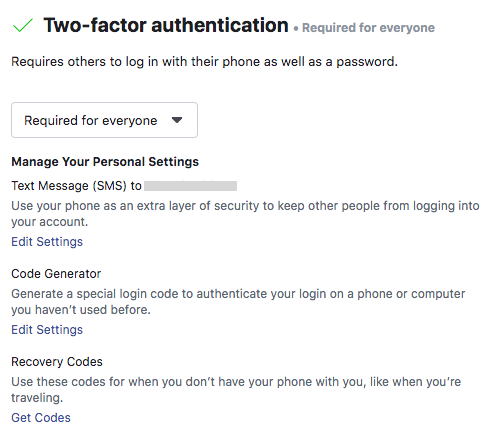
Step 8. Increase security on your account
One of the advantages of using Facebook Business Manager is that it offers extra security for your business assets.
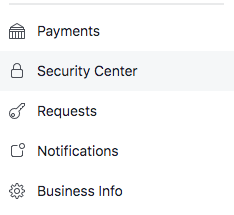
- From the Business Manager dashboard, click Business Settings.
- In the left menu, click Security Center.
- Set up two-factor authentication. Setting it as Required for Everyone offers the highest security.
How to create your first campaign in Facebook Business Manager
Now that your account is set up and your pixels are in place, it’s time to launch your first Facebook ad.
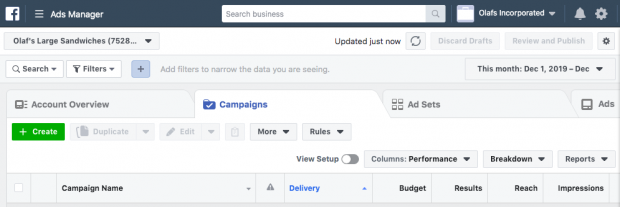
Step 9: Place your first ad
We’ve got a full guide that explains all the strategy and specific details you need to know to create compelling and effective Facebook ads. So here, we’ll just walk you through the steps you need to take to get an ad up and running in Business Manager.
- From your Business Manager dashboard, click Business Manager on the top left.
- Under the Advertise tab, click Ads Manager, then click the green Create button.
- Choose your campaign objective, target your audience, set your budget and schedule, and choose your specific ad types and placements following our step-by-step instructions.
Organize Facebook Business Manager with business asset groups
As the number of assets in your Facebook Business Manager grows, it can become difficult to keep track of everything. Business asset groups help keep your pages, ad accounts, and team members organized and clear.
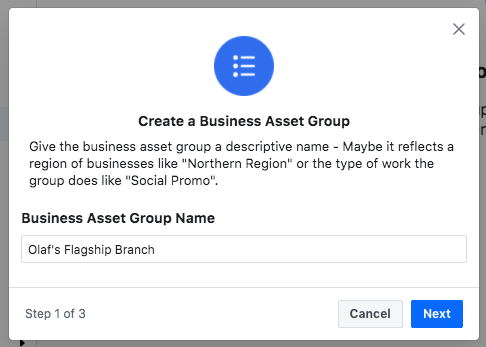
Step 10: Create your first business asset group
- From the Business Manager dashboard, click Business Settings.
- From the left menu, under Accounts, click Business Asset Groups, then click Create Business Assets Group.

- Choose whether to organize your assets based on brand, region, agency, or another category, then click Confirm.

- Name your business asset group, then click Next.
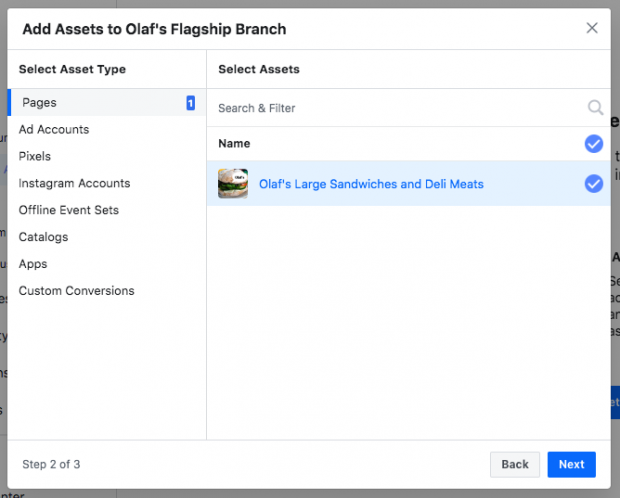
- Choose which assets to add to this asset group. You can add pages, ad accounts, pixels, and Instagram accounts, as well as offline events, catalogs, apps, and custom conversions. When you’ve selected all of the relevant assets, click Next.
- Choose which people to add to this asset group. You can control their access to all assets within the group from one screen. When you’re finished, click Create.
And that’s it! With the small amount of effort invested today, you’ve got everything centralized in one spot, and you’re ready to use Facebook Business Manager to make the most of your Facebook ads and marketing efforts.
Get the most out of your Facebook ad budget and save time with Hootsuite. From a single dashboard you can manage ad campaigns and organic content across multiple networks. Try it free today!
Get Started
Grow your Facebook presence faster with Hootsuite. Schedule all your social posts and track their performance in one dashboard.
Free 30-Day Trial
If your business uses Facebook, you should be using Facebook Business Manager. It’s an important tool that keeps your Facebook business assets centralized, safe, and organized.
If you’ve been putting off setting up Facebook Business Manager because you weren’t quite sure how it works, we’ve got good news. In just 10 simple steps, this tutorial will teach you how to do everything from setting up your account to placing your first ad.
But, first, let’s answer an important question: Exactly what is Facebook Manager, anyway?
Bonus: Download a free guide that teaches you how to turn Facebook traffic into sales in four simple steps using Hootsuite.
As Facebook itself explains, “Business Manager serves as a one-stop shop to manage business tools, business assets and employee access to these assets.”
Basically, it’s the place to manage all of your Facebook marketing and advertising activities. It’s also where you can control multiple users’ access to additional resources like your Instagram account and product catalogs. Here are some of its key functions:
- It keeps your business activities separate from your personal profile, so you don’t have to worry about posting in the wrong place (or getting distracted by cat videos when you’re trying to work).
- It’s a central place to track Facebook ads, with detailed reports that show how your ads are performing.
- It allows you to give vendors, partners, and agencies access to your pages and ads, without handing over ownership of the assets.
- Coworkers don’t see your personal Facebook information—just your name, work email, and pages and ad accounts.
Now that you know why you might want to use Facebook Business Manager, let’s get you set up.
How to set up Facebook Business Manager
Step 1. Create a Facebook Business Manager account
The first stage of setting up Business Manager is to create an account. You’ll need to use a personal Facebook profile to confirm your identity but, as mentioned above, your coworkers and partners won’t have access to the personal information in that account.
- Go to business.Facebook.com and click the big blue Create Account button in the top right.
- Enter your business name, your name, and the business email address you want to use to manage your Facebook Business Manager account, then click Next.
- Enter your business details: address, phone number, and website. You’ll also need to specify whether you’ll use this Business Manager account to promote your own business, or to provide services to other businesses (like an agency). When you’re finished, click Submit.
- Check your email for a message with the subject line “Confirm your business email.” Within the message click Confirm Now.
Step 2. Add your Facebook business page(s)
In this step, you have a couple of different choices. You can add an existing Facebook business page or create a new one. If you manage Facebook pages for clients or other businesses, you can also request access to someone else’s page.
That last distinction is important. While you can use Business Manager to manage clients’ Facebook pages and ad accounts, it’s important to use the Request Access option rather than the Add Page option. If you add your client’s pages and ad accounts to your Business Manager, they’ll have limited access to their own business assets. That’s a sure way to cause tension in your business relationship.
For the purposes of this post, we’ll assume you’re managing your own assets, rather than acting as an agency, so we won’t get into the Request Access process. But be sure to keep this difference in mind.
We have a guide that shows you how to set up a Facebook business page, so we’ll assume you already have one to add to Business Manager. If you haven’t created your page yet, hop on over to that post and come back here to add your page to Facebook Business Manager when you’re done.
To add your Facebook page to Facebook Business Manager:
- From the Business Manager dashboard, click Add Page.Then, in the pop-up box, click Add Page again.
- Start typing the name of your Facebook business page in the text box. Your business page name should autocomplete below, so you can just click on it. Then click Add Page. Assuming you have administrator access to the page you’re trying to add, your request will be approved automatically.
- If you have more than one Facebook page associated with your business, add the remaining pages by following the same steps.
Step 3. Add your Facebook ad account(s)
Note that once you add your ad account to Facebook Business Manager, you can’t remove it, so it’s especially important only to add accounts you own. To access a client account, click Request Access instead.
If you’re already using Facebook ads, you can link your existing ad account as follows:
- From the Business Manager dashboard, click Add Ad Account, then Add Ad Account again, and then enter the ad account ID, which you can find in Ads Manager.
If you don’t already have a Facebook ads account, here’s how to set one up.
- From the Business Manager dashboard, click Add Ad Account, then Create Account.
- Enter your account details, then click Next.
- Indicate that you are using the ad account for your own business, then click Create.
Each business can create one ad account right from the start. Once you are actively spending money in your first ad account, you will be able to add more based on your advertising spend. There is no option to request more ad accounts.
Step 4: Add people to help you manage your Facebook assets
Keeping on top of your Facebook marketing can be a big job, and you may not want to do it alone. Facebook Business Manager allows you to add team members so you can have a whole group of people working on your Facebook business page and ad campaigns. Here’s how to set up your team.
- From your Business Manager dashboard, click Add people.
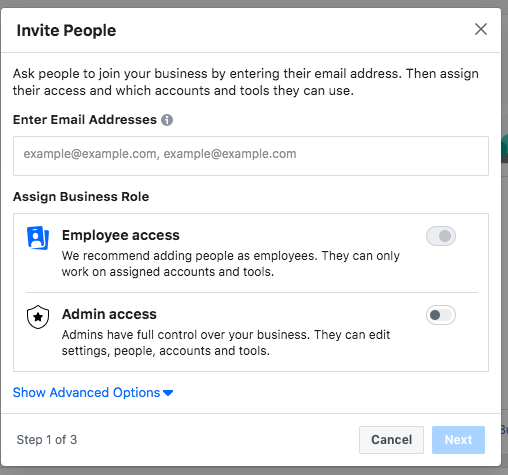
- In the pop-up box, enter the business email address of a team member you want to add. This might include employees, freelance contractors, or business partners, In this step, you are specifically adding individuals, rather than an agency or another business (you can do that in the next step).
You can decide whether to give these individuals limited account access (choose Employee access) or full access (choose Admin access). You can get more specific in the next stage. Make sure to add people using their work email addresses. Then click Next.
- In the left menu, click on Pages. Choose which pages you want this team member to work on. Customize the individual’s access using the toggle switches.
- Go back to the left menu and click on Ad Accounts. Again, customize the user’s access using the toggle switches. When you’re finished, click Invite.
In the left menu, you’ll also see options to add people to catalogs and apps, but you can skip these for now.
- To add more team members, click Add More People. When you’re finished, click Done.
- Now you need to wait for each of the individuals to accept your invitation to be part of your Facebook Business Manager team.
They will each receive an email with information about the access you’ve given them and a link to get started, but it would be a good idea for you to send them a personal note or let them know directly that you’re giving them this access and they should expect the automated email with the link.
You can see all of your pending requests from your dashboard, and withdraw them at any time for people who have not responded.
If someone with access leaves your company or switches to a different role, you can revoke their permissions. Here’s how:
- From your Business Manager dashboard, click Business Settings at the top right.
- In the left menu, click People.
- Click on the name of the appropriate person. To remove them from your team, click Remove. Or, hover over the name of an individual asset and click the trash can icon to remove it.
Step 5: Connect your business partners or ad agency
This might not apply to you if you’re just getting started with Facebook advertising, but you can always come back to this step later.
- From your Business Manager dashboard, click Business Settings at the top right.
- In the left menu, click Partners. Under Partner to share assets with, click Add.
- Your partner must have an existing Business Manager ID. Ask them to provide it to you. They can find it in their own Business Manager under Business Settings>Business Info. Enter the ID and click Add.
The business you’ve just added can manage permissions for the individuals on their own teams from their own Facebook Business Manager account. That means you don’t need to worry about assigning and managing permissions for all the individual people who service your account at your agency or partner company, just the partner company itself.
Step 6: Add your Instagram account
Now that you’ve got your Facebook assets set up, you can connect your Instagram account to Facebook Business Manager as well.
- From your Business Manager dashboard, click Business Settings at the top right.
- In the left column, click Instagram Accounts, then click Add. In the pop-up box, enter your Instagram login information and click Log In.
Step 7: Set up Facebook Pixels
What’s a Facebook Pixel? Put simply, it’s a small bit of code that Facebook generates for you. When you place this code on your website, it gives you access to information that will allow you to track conversions, optimize Facebook ads, build targeted audiences for your ads, and remarket to leads.
We recommend setting up your Facebook pixel right away, even if you’re not ready to start your first ad campaign yet, because the information it provides now will be valuable when you are ready to start advertising.
Our complete guide to using Facebook pixels is a great resource that walks you through everything you need to know about making the best use of the information a Facebook pixel can provide. For now, let’s get your pixel set up from within Facebook Business Manager.
- From your Business Manager dashboard, click Business Settings.
- In the left column, expand the Data Sources menu and click Pixels, then click Add.
- Enter a name (up to 50 characters) for your pixel. Enter your website so Facebook can provide the best recommendations for how to set up your pixel, then click Continue. When you click Continue, you are agreeing to the pixel terms and conditions, so you should read those before you go any further.
- Click Set up the Pixel Now.
- Follow the detailed instructions in our Facebook pixel guide to get the pixel set up on your website and start collecting data.
You can create up to 10 pixels with your Business Manager.
Step 8. Increase security on your account
One of the advantages of using Facebook Business Manager is that it offers extra security for your business assets.
- From the Business Manager dashboard, click Business Settings.
- In the left menu, click Security Center.
- Set up two-factor authentication. Setting it as Required for Everyone offers the highest security.
How to create your first campaign in Facebook Business Manager
Now that your account is set up and your pixels are in place, it’s time to launch your first Facebook ad.
Step 9: Place your first ad
We’ve got a full guide that explains all the strategy and specific details you need to know to create compelling and effective Facebook ads. So here, we’ll just walk you through the steps you need to take to get an ad up and running in Business Manager.
- From your Business Manager dashboard, click Business Manager on the top left.
- Under the Advertise tab, click Ads Manager, then click the green Create button.
- Choose your campaign objective, target your audience, set your budget and schedule, and choose your specific ad types and placements following our step-by-step instructions.
Organize Facebook Business Manager with business asset groups
As the number of assets in your Facebook Business Manager grows, it can become difficult to keep track of everything. Business asset groups help keep your pages, ad accounts, and team members organized and clear.
Step 10: Create your first business asset group
- From the Business Manager dashboard, click Business Settings.
- From the left menu, under Accounts, click Business Asset Groups, then click Create Business Assets Group.
- Choose whether to organize your assets based on brand, region, agency, or another category, then click Confirm.
- Name your business asset group, then click Next.
- Choose which assets to add to this asset group. You can add pages, ad accounts, pixels, and Instagram accounts, as well as offline events, catalogs, apps, and custom conversions. When you’ve selected all of the relevant assets, click Next.
- Choose which people to add to this asset group. You can control their access to all assets within the group from one screen. When you’re finished, click Create.
And that’s it! With the small amount of effort invested today, you’ve got everything centralized in one spot, and you’re ready to use Facebook Business Manager to make the most of your Facebook ads and marketing efforts.
Get the most out of your Facebook ad budget and save time with Hootsuite. From a single dashboard you can manage ad campaigns and organic content across multiple networks. Try it free today!
Get Started
Grow your Facebook presence faster with Hootsuite. Schedule all your social posts and track their performance in one dashboard.
Free 30-Day Trial