Download Article
The easiest ways to record high-quality audio with your phone
Download Article
- Using WO Mic for Windows
- Use an iPhone as a Mic on Mac
- Recording on an Android
- Recording on an iPhone
|
|
|
Whether you are a podcaster, singer, or simply need to record a voiceover for a project, you may be interested in using your phone as a microphone. It’s a cheap and effective alternative to investing in a mic, and advancements in technology have even made smartphones quite good at capturing high-quality audio! This makes your Android or iPhone a viable option as a mic for conference calling on your computer as well. There are a variety of great free apps available, each catering to different needs. This wikiHow will teach you how to use your phone as a computer mic on Windows and macOS, with either a built-in or downloaded app.
Things You Should Know
- Use the WO Mic mobile app and computer client to connect your phone to a PC as a mic.
- You can use your mobile phone as a mic on a Mac using the Microphone Live mobile app, and adjusting your Mac’s Audio MIDI Setup.
- There are several audio-recording apps available for Android, including Smart Voice Recorder.
- The iPhone’s built-in Voice Memos app remains the best way to use your iPhone as a mic.
-
1
Download the WO Mic PC client and mobile app. The free WO Mic download links for Windows are available on their website at https://wolicheng.com/womic/download.html.
- On your PC, you’ll also need to install the VC runtime re-distributable, which is available on the same page.
- You can also find the WO Mic app for free for your iPhone in the App Store, and for Android in the Google Play Store.
-
2
Open WO Mic on your phone and computer. The app is represented by an orange microphone icon against a white background on both your PC and phone.
Advertisement
-
3
In the mobile app, tap the three dots and select Settings.
-
4
Tap Transport and select a transport mode. A menu will pop-up and you can tap to select to connect via USB, Wi-Fi, Wi-Fi Direct, or Bluetooth. We recommend connecting your phone to your computer via USB as it offers the highest bit rate.[1]
- For Wi-Fi and Wi-Fi Direct, ensure your phone is connected to the same Wi-Fi network as your computer. There will almost always be a small Wi-Fi icon on your phone’s home screen that shows your connection to a network.
- To connect your Android to your PC with Bluetooth, ensure that Bluetooth is enabled on your phone and computer, then pair your phone in Windows.
-
5
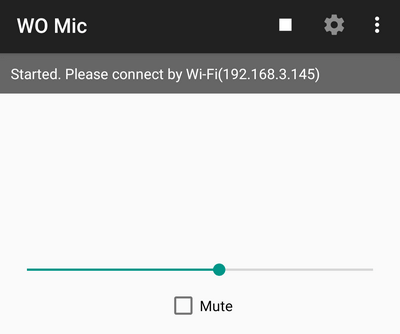
Return to the main screen in the mobile app and tap the start icon
. You’ll see this in the top right corner of your screen. It will start the server.
- You can set aside your phone and work on your computer now.
-
6
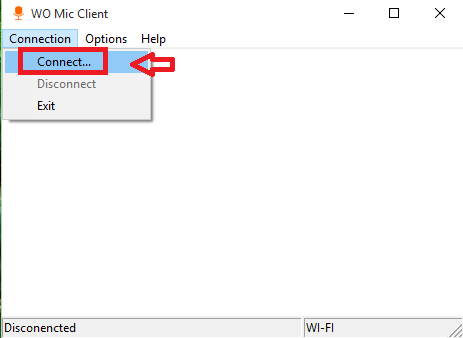
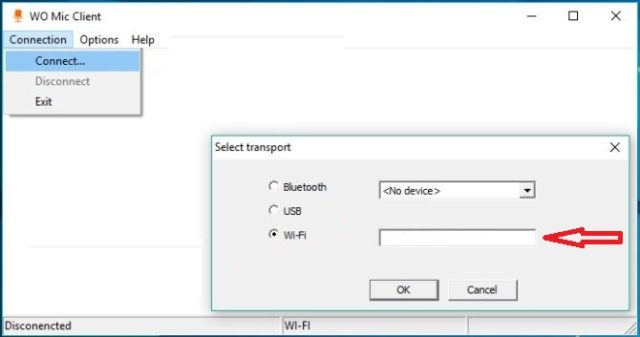
Click the Connection tab in the WO Mic computer app. You’ll see this in the top left corner of the client window.
-
7
Click Connect. This is usually the first option in the menu.
-
8
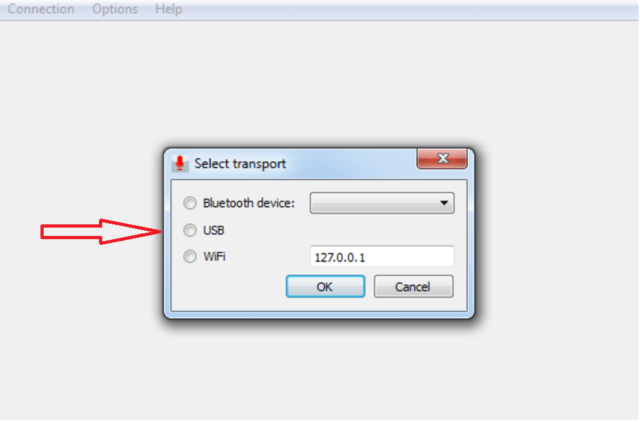
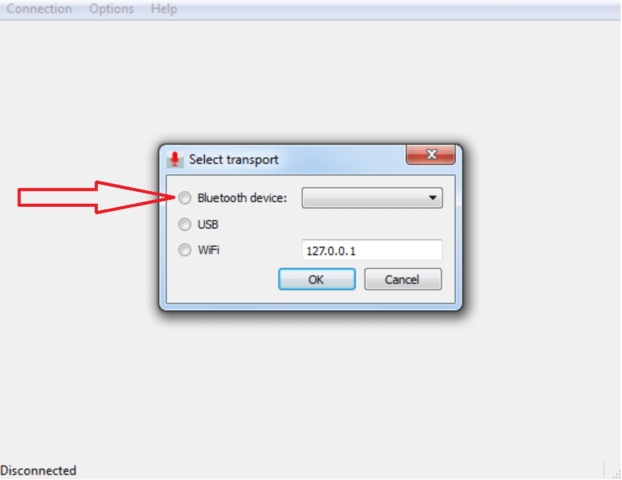
Click to select a transport (connection) type. You’ll see a list of options in the panel on the left side of the window. You’ll need to select the same connection type that you chose earlier.
-
9
Select the information in the «Details» pane. You’ll need to specify certain parameters for the connection before you can continue, unless you’re using USB, in which case you don’t need to add any specific information.
-
10
Click Connect. You’ll see this at the bottom of the window.
- You should see your current status (Connected, disconnected) and connection type (USB, Bluetooth, Wi-Fi, Wi-Fi Direct) in the panels at the bottom of the client window.
- As soon as the connection is successful, any noise picked up by your phone will be transmitted to your computer. If you want to hear the sounds that are picked up, go to «Options > Play in speaker» on your computer client.[2]
- Consider wearing headphones while listening to your audio, preventing your phone from picking up any echo or interference.
- You can click through «Connection > Disconnect» on your computer or tap the stop button on your phone to end the connection and recording.
- If you can’t establish a wireless connection with WO Mic, make sure TCP outgoing port 8125 and UDP incoming port 8126 are not blocked by your Firewall program. See the WO Mic FAQ (frequently-asked questions) page for additional help.

Advertisement
-
1
Download the Microphone Live app from the App Store
on your iPhone. The microphone app is free and highly rated on the App Store.[3]
- Search «Microphone Live» in the search tab that’s located at the bottom of your screen. The app’s developer is Von Bruno.
- This app is only available on the App Store for iPhones.
-
2
Connect the iPhone to your Mac. The available ports on your Mac will vary across different models, but the lightning cable that came with your iPhone should plug into your iPhone’s charging port and connect to an open port on your MacBook or Mac desktop.
- Depending on which iPhone and Mac you have, you will need either a lightning to USB, or a lightning to USB-C cable.
-
3
Open Audio MIDI Setup on your Mac. You can open this by clicking the Spotlight icon in your menu tray, typing «MIDI» and clicking the first search result that says «Audio MIDI Setup.»[4]
- If your iPhone is plugged in and unlocked, you’ll see it listed as an option in the left panel.
-
4
Click Enable under your iPhone icon. You’ll see this in the panel on the left side of the window.
-
5
Open System Settings. This is either a gear icon in your Dock or you can click the Apple logo in the top right corner of your menu, then click System Settings.[5]
-
6
Click Sound. You should find this in the second row with an icon of a speaker.
-
7
Click iPhone in the Input tab. If this is already selected, you can skip this step.
-
8
Open the Microphone Live app on your iPhone. This app icon looks like a microphone icon on a grey background that you’ll find on one of your Home screens.
-
9
Tap the power button
centered in your screen. It will turn from red to grey to indicate it is on.
- Tap Front iPhone Mic if it isn’t already selected at the lower left corner of your screen.
- You can swipe your finger up and down the screen to adjust the volume of the microphone.
-
10
Tap No output (if that’s what you see). If this is already displaying correct information, you can skip this step.
- Tap Dock Connector in the menu that slides up.
- You should see on your computer that the input level in the System Preferences screen shows you the sounds picked up by the microphone in your iPhone.[6]
- You’ll need to keep the Microphone Live app open on your iPhone for it to continuously work.


Advertisement
-
1
Download and install Smart Voice Recorder from the Google Play Store
. Smart Voice Recorder is a free app that’s supported by ads, but you can get rid of ads by paying a monthly Google Play Pass fee for $4.99/month.[7]
- Make sure you are downloading the app developed by SmartMob.
- Many skins of Android come with a manufacturer-provided voice recorder built-in to the phone. You are welcome to use a voice recorder from Samsung or OnePlus, but Smart Voice Recorder will offer greater quality and reliability.[8]
-
2
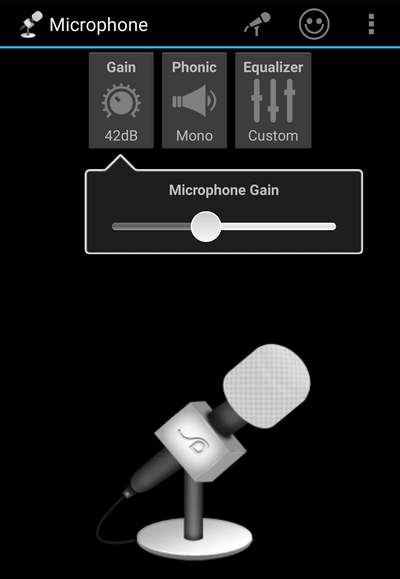
Open Smart Voice Recorder. The app icon looks like a microphone next to a red dot. [Image:Use Your Phone As a Mic Step 23.jpg|center]]
-
3
Tap the record button. This looks like a red circle with another microphone icon inside it.
- If this is your first time using Smart Voice Recorder, you’ll need to tap Allow so the app can access files for storage and your microphone to record audio.
-
4
Point your phone’s mic towards the sound. On most smartphones, the mic is at the bottom of the phone, on the same side as the screen so it’s near your mouth. For the best results, put the mic as near as you can to the source of the noise (up to an inch or two away). If you can’t get very near to it, just point the microphone towards the noise.
- If the volume isn’t an issue (i.e. if you’re in a silent room), you can usually place your phone face-up on a table next to you.
-
5
Tap the checkmark to end recording. To end and save your recording, tap the circle around the checkmark at the bottom of your screen.
- If you want to pause the recording and start it again later, tap the circular button with the timer running. You’ll see the word «Pause» change to «Resume,» which indicates that you can resume recording.
-
6
Preview your recording (optional). If you want to make sure your recording is clear and free of noise issues, you can tap the play icon to preview the file.
- You can also change the name of the file by tapping in the area that displays the default name (usually it is something similar to «Recording 1»).
- Your audio file is saved and you can find it by tapping Recordings in the bottom left corner of the app’s main screen
- You can share the recording by tapping Share under the recording’s preview.


Advertisement
-
1
Open Voice Memos. This app icon looks like a red and white wavelength that you’ll find on one of your Home screens or inside the Utilities folder.[9]
-
2
Tap the circular button. You’ll see this recording button at the bottom of your screen.
-
3
Point your phone’s mic towards the sound. On most smartphones, the mic is at the bottom of the phone, on the same side as the screen so it’s near your mouth. For the best results, put the mic as near as you can to the source of the noise (up to an inch or two away). If you can’t get very near to it, just point the microphone towards the noise.
-
4
Tap the stop icon. You’ll see this button at the bottom of your screen where the recording button was.
- After you tap the stop icon, your voice memo is automatically saved. You can edit it with any device (like an iPad) logged in with the same Apple ID.[10]
- If Voice Memos on iPhone isn’t working for you, you can Voice Recorder.
- After you tap the stop icon, your voice memo is automatically saved. You can edit it with any device (like an iPad) logged in with the same Apple ID.[10]

Advertisement
Ask a Question
200 characters left
Include your email address to get a message when this question is answered.
Submit
Advertisement
Video
-
There are other mic apps for specialized purposes, but there are too many good audio-recording apps to list. A few more quality choices that are intended for narrow uses include:
- StoryCorps, which is designed to record family stories. The app can capture up to 45 minutes of audio at a time and has easy options for sharing and archiving stories.
- Crowd Mics lets audience members at large gatherings use their smartphones as mics.[11]
- Voice Changer Plus (and similar apps), which let you modify voice clips with amusing effects.[12]
-
If you want an app that will record multiple tracks (which is useful for musicians), try J4T Multitrack Recorder (Android) or FourTrack (iOS). Note that these multitrack recorder are not free.
-
When you’re recording, beware of your surroundings and noise issues. Don’t record in a large, empty room full of hard surfaces because all of these can give your recording a distracting echo. Rugs, carpets, soft furniture, and blankets all work to dampen an echo. Don’t record with ambient noise in the background like construction work, lawnmowers, and airplanes, which can be very loud on the final recording. Also, don’t record outdoors. It may seem completely silent, but even minor breezes can sound like windstorms on the mic.
Show More Tips
Thanks for submitting a tip for review!
Advertisement
About This Article
Article SummaryX
1. Download the computer client in addition to the mobile app.
2. Open WO Mic on your phone and computer.
3. Tap the Settings icon in the mobile app.
4. Tap Transport and select a transport mode.
5. Return to the main screen of the mobile app.
6. Tap the start icon in the mobile app.
7. Click the Connection tab in the WO Mic computer client.
8. Click Connect.
9. Click to select a transport (connection) type (the same transport type you selected in the mobile app).
Did this summary help you?
Thanks to all authors for creating a page that has been read 274,008 times.
Is this article up to date?
Download Article
The easiest ways to record high-quality audio with your phone
Download Article
- Using WO Mic for Windows
- Use an iPhone as a Mic on Mac
- Recording on an Android
- Recording on an iPhone
|
|
|
Whether you are a podcaster, singer, or simply need to record a voiceover for a project, you may be interested in using your phone as a microphone. It’s a cheap and effective alternative to investing in a mic, and advancements in technology have even made smartphones quite good at capturing high-quality audio! This makes your Android or iPhone a viable option as a mic for conference calling on your computer as well. There are a variety of great free apps available, each catering to different needs. This wikiHow will teach you how to use your phone as a computer mic on Windows and macOS, with either a built-in or downloaded app.
Things You Should Know
- Use the WO Mic mobile app and computer client to connect your phone to a PC as a mic.
- You can use your mobile phone as a mic on a Mac using the Microphone Live mobile app, and adjusting your Mac’s Audio MIDI Setup.
- There are several audio-recording apps available for Android, including Smart Voice Recorder.
- The iPhone’s built-in Voice Memos app remains the best way to use your iPhone as a mic.
-
1
Download the WO Mic PC client and mobile app. The free WO Mic download links for Windows are available on their website at https://wolicheng.com/womic/download.html.
- On your PC, you’ll also need to install the VC runtime re-distributable, which is available on the same page.
- You can also find the WO Mic app for free for your iPhone in the App Store, and for Android in the Google Play Store.
-
2
Open WO Mic on your phone and computer. The app is represented by an orange microphone icon against a white background on both your PC and phone.
Advertisement
-
3
In the mobile app, tap the three dots and select Settings.
-
4
Tap Transport and select a transport mode. A menu will pop-up and you can tap to select to connect via USB, Wi-Fi, Wi-Fi Direct, or Bluetooth. We recommend connecting your phone to your computer via USB as it offers the highest bit rate.[1]
- For Wi-Fi and Wi-Fi Direct, ensure your phone is connected to the same Wi-Fi network as your computer. There will almost always be a small Wi-Fi icon on your phone’s home screen that shows your connection to a network.
- To connect your Android to your PC with Bluetooth, ensure that Bluetooth is enabled on your phone and computer, then pair your phone in Windows.
-
5
Return to the main screen in the mobile app and tap the start icon
. You’ll see this in the top right corner of your screen. It will start the server.
- You can set aside your phone and work on your computer now.
-
6
Click the Connection tab in the WO Mic computer app. You’ll see this in the top left corner of the client window.
-
7
Click Connect. This is usually the first option in the menu.
-
8
Click to select a transport (connection) type. You’ll see a list of options in the panel on the left side of the window. You’ll need to select the same connection type that you chose earlier.
-
9
Select the information in the «Details» pane. You’ll need to specify certain parameters for the connection before you can continue, unless you’re using USB, in which case you don’t need to add any specific information.
-
10
Click Connect. You’ll see this at the bottom of the window.
- You should see your current status (Connected, disconnected) and connection type (USB, Bluetooth, Wi-Fi, Wi-Fi Direct) in the panels at the bottom of the client window.
- As soon as the connection is successful, any noise picked up by your phone will be transmitted to your computer. If you want to hear the sounds that are picked up, go to «Options > Play in speaker» on your computer client.[2]
- Consider wearing headphones while listening to your audio, preventing your phone from picking up any echo or interference.
- You can click through «Connection > Disconnect» on your computer or tap the stop button on your phone to end the connection and recording.
- If you can’t establish a wireless connection with WO Mic, make sure TCP outgoing port 8125 and UDP incoming port 8126 are not blocked by your Firewall program. See the WO Mic FAQ (frequently-asked questions) page for additional help.
Advertisement
-
1
Download the Microphone Live app from the App Store
on your iPhone. The microphone app is free and highly rated on the App Store.[3]
- Search «Microphone Live» in the search tab that’s located at the bottom of your screen. The app’s developer is Von Bruno.
- This app is only available on the App Store for iPhones.
-
2
Connect the iPhone to your Mac. The available ports on your Mac will vary across different models, but the lightning cable that came with your iPhone should plug into your iPhone’s charging port and connect to an open port on your MacBook or Mac desktop.
- Depending on which iPhone and Mac you have, you will need either a lightning to USB, or a lightning to USB-C cable.
-
3
Open Audio MIDI Setup on your Mac. You can open this by clicking the Spotlight icon in your menu tray, typing «MIDI» and clicking the first search result that says «Audio MIDI Setup.»[4]
- If your iPhone is plugged in and unlocked, you’ll see it listed as an option in the left panel.
-
4
Click Enable under your iPhone icon. You’ll see this in the panel on the left side of the window.
-
5
Open System Settings. This is either a gear icon in your Dock or you can click the Apple logo in the top right corner of your menu, then click System Settings.[5]
-
6
Click Sound. You should find this in the second row with an icon of a speaker.
-
7
Click iPhone in the Input tab. If this is already selected, you can skip this step.
-
8
Open the Microphone Live app on your iPhone. This app icon looks like a microphone icon on a grey background that you’ll find on one of your Home screens.
-
9
Tap the power button
centered in your screen. It will turn from red to grey to indicate it is on.
- Tap Front iPhone Mic if it isn’t already selected at the lower left corner of your screen.
- You can swipe your finger up and down the screen to adjust the volume of the microphone.
-
10
Tap No output (if that’s what you see). If this is already displaying correct information, you can skip this step.
- Tap Dock Connector in the menu that slides up.
- You should see on your computer that the input level in the System Preferences screen shows you the sounds picked up by the microphone in your iPhone.[6]
- You’ll need to keep the Microphone Live app open on your iPhone for it to continuously work.
Advertisement
-
1
Download and install Smart Voice Recorder from the Google Play Store
. Smart Voice Recorder is a free app that’s supported by ads, but you can get rid of ads by paying a monthly Google Play Pass fee for $4.99/month.[7]
- Make sure you are downloading the app developed by SmartMob.
- Many skins of Android come with a manufacturer-provided voice recorder built-in to the phone. You are welcome to use a voice recorder from Samsung or OnePlus, but Smart Voice Recorder will offer greater quality and reliability.[8]
-
2
Open Smart Voice Recorder. The app icon looks like a microphone next to a red dot. [Image:Use Your Phone As a Mic Step 23.jpg|center]]
-
3
Tap the record button. This looks like a red circle with another microphone icon inside it.
- If this is your first time using Smart Voice Recorder, you’ll need to tap Allow so the app can access files for storage and your microphone to record audio.
-
4
Point your phone’s mic towards the sound. On most smartphones, the mic is at the bottom of the phone, on the same side as the screen so it’s near your mouth. For the best results, put the mic as near as you can to the source of the noise (up to an inch or two away). If you can’t get very near to it, just point the microphone towards the noise.
- If the volume isn’t an issue (i.e. if you’re in a silent room), you can usually place your phone face-up on a table next to you.
-
5
Tap the checkmark to end recording. To end and save your recording, tap the circle around the checkmark at the bottom of your screen.
- If you want to pause the recording and start it again later, tap the circular button with the timer running. You’ll see the word «Pause» change to «Resume,» which indicates that you can resume recording.
-
6
Preview your recording (optional). If you want to make sure your recording is clear and free of noise issues, you can tap the play icon to preview the file.
- You can also change the name of the file by tapping in the area that displays the default name (usually it is something similar to «Recording 1»).
- Your audio file is saved and you can find it by tapping Recordings in the bottom left corner of the app’s main screen
- You can share the recording by tapping Share under the recording’s preview.
Advertisement
-
1
Open Voice Memos. This app icon looks like a red and white wavelength that you’ll find on one of your Home screens or inside the Utilities folder.[9]
-
2
Tap the circular button. You’ll see this recording button at the bottom of your screen.
-
3
Point your phone’s mic towards the sound. On most smartphones, the mic is at the bottom of the phone, on the same side as the screen so it’s near your mouth. For the best results, put the mic as near as you can to the source of the noise (up to an inch or two away). If you can’t get very near to it, just point the microphone towards the noise.
-
4
Tap the stop icon. You’ll see this button at the bottom of your screen where the recording button was.
- After you tap the stop icon, your voice memo is automatically saved. You can edit it with any device (like an iPad) logged in with the same Apple ID.[10]
- If Voice Memos on iPhone isn’t working for you, you can Voice Recorder.
- After you tap the stop icon, your voice memo is automatically saved. You can edit it with any device (like an iPad) logged in with the same Apple ID.[10]
Advertisement
Ask a Question
200 characters left
Include your email address to get a message when this question is answered.
Submit
Advertisement
Video
-
There are other mic apps for specialized purposes, but there are too many good audio-recording apps to list. A few more quality choices that are intended for narrow uses include:
- StoryCorps, which is designed to record family stories. The app can capture up to 45 minutes of audio at a time and has easy options for sharing and archiving stories.
- Crowd Mics lets audience members at large gatherings use their smartphones as mics.[11]
- Voice Changer Plus (and similar apps), which let you modify voice clips with amusing effects.[12]
-
If you want an app that will record multiple tracks (which is useful for musicians), try J4T Multitrack Recorder (Android) or FourTrack (iOS). Note that these multitrack recorder are not free.
-
When you’re recording, beware of your surroundings and noise issues. Don’t record in a large, empty room full of hard surfaces because all of these can give your recording a distracting echo. Rugs, carpets, soft furniture, and blankets all work to dampen an echo. Don’t record with ambient noise in the background like construction work, lawnmowers, and airplanes, which can be very loud on the final recording. Also, don’t record outdoors. It may seem completely silent, but even minor breezes can sound like windstorms on the mic.
Show More Tips
Thanks for submitting a tip for review!
Advertisement
About This Article
Article SummaryX
1. Download the computer client in addition to the mobile app.
2. Open WO Mic on your phone and computer.
3. Tap the Settings icon in the mobile app.
4. Tap Transport and select a transport mode.
5. Return to the main screen of the mobile app.
6. Tap the start icon in the mobile app.
7. Click the Connection tab in the WO Mic computer client.
8. Click Connect.
9. Click to select a transport (connection) type (the same transport type you selected in the mobile app).
Did this summary help you?
Thanks to all authors for creating a page that has been read 274,008 times.
Is this article up to date?
Использование телефона как микрофона на ПК через программу WO Mic и USB-подключение.
Чтобы записать подкаст или поговорить с другом в Skype нужен микрофон. Если его нет на компьютере и ноутбуке, в качестве устройства для записи голоса и общения можно использовать обычный смартфон. Для синхронизации ПК и гаджета достаточно воспользоваться специальными программами.
Приложение Microphone и AUX
Загрузите утилиту Microphone из Google Play. Устанавливать софт на компьютер не нужно. Когда закончится установка утилиты на смартфон, подключите гаджет к ПК через AUX-кабель: один конец вставляете в мобильное устройств, другой — в разъем для микрофона на компьютере.
Система автоматически определит гаджет как сторонний микрофон. Чтобы начать запись голоса, нажмите на иконку микрофона в приложении Microphone — она загорится красным цветом. Это значит, что процесс синхронизации прошел успешно. Единственный недостаток этого типа использования смартфона в качестве микрофона — на записи может быть эхо. Устранить этот дефект можно с помощью специального софта для редактирования звука на ПК, например, Adobe Audition и Audacity.
Программа WO Mic — FREE Microphone
Загрузите и установите приложение WO Mic на смартфон из Google Play — оно бесплатное. Утилита дает возможность использовать смартфон в качестве микрофона на компьютере:
- для голосового общения в Skype, TeamSpeak, Discord;
- для записи голоса;
- для общения в видеочатах.
После установки приложения на телефон нужно скачать программу WO Mic на компьютер. Далее выполните инсталляцию WO Mic Driver — это специальный драйвер, который используется для автоматической настройки звука.
Как подключить смартфон к ПК?
Подключить мобильное устройство к компьютеру можно тремя способами. Рассмотрим каждый отдельно.
Первый метод — USB. Подсоедините гаджет к ПК через USB-кабель. Запустите приложение на смартфоне и выберите тип соединения — USB. Выполните аналогичное действие на компьютере: откройте клиент программы WO Mic, в окне «Select transport» выберите USB и нажмите «ОК». В нижней части интерфейса программы для ПК появится надпись «Connected». Это значит, что смартфон подключен, и его можно использовать в качестве микрофона.
Второй метод подключения — Wi-Fi. Воспользоваться беспроводным соединением можно только в том случае, если смартфон и компьютер находятся в одной сети — подключены к одному роутеру или точке доступа. Запустите WO Mic на смартфоне, выберите тип подключения Wi-Fi. В главном окне (над иконкой микрофона) отобразится IP-адрес.
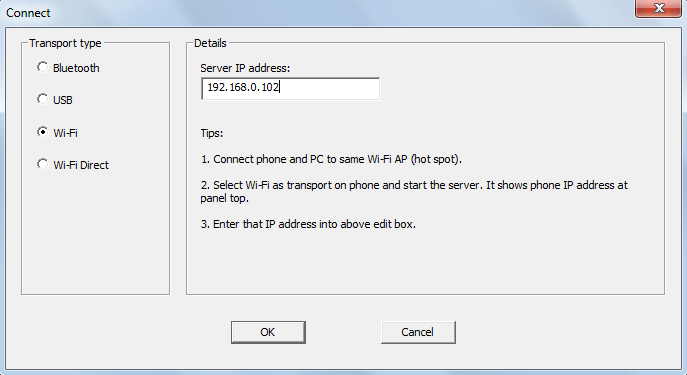
Откройте клиент программы на компьютере и выберите беспроводное соединение. Теперь укажите IP-адрес, который отображается в мобильном приложении. На этом процесс подключения смартфона к ПК успешно завершен. Можно записывать голос или общаться в Skype с друзьями.
Утилита WO Mic дает возможность подключать смартфон к компьютеру через Bluetooth. Для этого на ПК должен быть специальный Bluetooth-модуль — это касается стационарных компьютеров. На ноутбуках он обычно встроен. Чтобы использовать телефон как микрофон, запустите утилиту на смартфоне и выберите тип соединения через Bluetooth. Выполните аналогичное действие в клиенте для ПК. Через 5-10 секунд будет выполнена синхронизация устройств. Теперь можно использовать мобильный телефон в качестве микрофона на компьютере: общаться в видеочате или мессенджерах, записывать голос, играть в онлайн-игры с поддержкой голосового чата.

В статье расскажем, как использовать телефон как микрофон и что для этого нужно.
Иногда возникает необходимость в записи звука на ПК, но покупать для этого отдельный микрофон дорого, а часто и вовсе нецелесообразно. В этом случае можно использовать смартфон на андроид, как микрофон. Это просто, удобно, да и качество звука, в большинстве случаев, будет достаточно хорошим.
Что нужно, чтобы использовать телефон как микрофон
Для того чтобы превратить свой смартфон в микрофон для компьютера, понадобится установить на ПК и смартфон некоторое программное обеспечение. В частности, обычно для этого используется программа Wo Mic. Она совместима с Windows 7, 8, 10, XP, Vista и Mac OS X, а для подключения устройств можно использовать Wi-Fi, Bluetooth, USB-кабель или даже AUX-соединение.
Нужно установить на ПК Wo Mic и соответствующие драйвера, а также клиент Wo Mic Андроид.
Также в настройках смартфона понадобится включить отладку по USB: перейдите в настройки, выберите раздел «О телефоне» и найдите «Сведения о ПО». Нажимайте на строку «Номер сборки» до тех пор, пока не увидите сообщение о том, что вы стали разработчиком. После этого в настройках появится новый раздел «Для разработчиков», перейдя в который нужно найти пункт «Отладка по USB» и активировать его.
Остается запустить программу на смартфоне и компьютере, удобным для вас способом установить между ними соединение, и можно записывать звук.
Как подключить телефон как микрофон через USB-кабель
Подключите телефон к ПК, используя USB-кабель. Запустите на обоих устройствах Wo Mic. В настройках программы для Андроид выберите «USB-подключение», а затем «Start». В настройках клиента для ПК найдите «Connection», нажмите и в открывшемся меню кликните на «Connect», а затем на USB и на OK.
В нижнем левом углу должна появиться надпись Connected, что свидетельствует об установке соединения.
Теперь смартфон можно использовать как микрофон.
Обратите внимание: если по каким-то причинам у вас не получилось установить соединение через USB-кабель, попробуйте беспроводные подключения.
Установка соединения через Wi-Fi
Для установки соединения через Wi-Fi, и смартфон и ПК обязательно должны быть подключены к одной сети!
На смартфоне и ПК запустите Wo Mic. В настройках программы на смартфоне выберите «Wi-Fi-подключение», а затем «Start». На экране появится IP-адрес, который нужно будет ввести при подключении на ПК.
В настройках клиента для ПК найдите «Connection», в открывшемся меню кликните на «Connect», а затем Wi-Fi. В строке рядом нужно ввести IP-адрес, который вы видите на смартфоне (вместе с точками) и нажать на OK.
Соединение через Bluetooth
Для этого вида подключения нужно чтобы и смартфон и ПК были оснащены модулем Bluetooth. После этого выполните стандартное сопряжение между устройствами, откройте на смартфоне и ПК Wo Mic и установите подключение. Процесс будет аналогичен подключению через USB или Wi-Fi, только при выборе типа подключения укажите Bluetooth.
Подключение смартфона к ПК через кабель AUX и приложение «Микрофон»
Часто используемый метод, для реализации которого вам понадобится только скачать и установить на смартфон приложение «Микрофон» от Gaz Davidson из магазина Google Play и AUX-кабель.
Откройте приложение, подключите телефон к компьютеру с помощью AUX-кабеля и нажатием одной кнопки можно начинать запись звука.
Главным достоинством этого метода является простота, а недостатком — наличие эха.
Итог
Если ваша деятельность связана с записью звука, то рекомендуем приобрести хороший микрофон. Однако если запись звука нужна нечасто или же вы попали в ситуацию, когда под рукой нет необходимого оборудования, вполне можно использовать смартфон как микрофон для ПК.
Читайте также: Топ-10 диктофонов на Андроид.
Данный материал является частной записью члена сообщества Club.CNews.
Редакция CNews не несет ответственности за его содержание.