Download Article
Download Article
Want to add some extra pizazz to your phone? Phone charms and wrist straps are trendy gadgets that are super cute and practical. In this article, we’ll take you through the motions of attaching a phone charm to just about any case and even explain how to make a simple phone charm yourself. Read on to get started!
-
1
Take your phone out of its case. Working with an empty phone case will allow you to attach the charm correctly and ensure that your phone doesn’t get damaged in the process. So, pop your phone out and set it aside.
-
2
Locate the mute button hole on the phone case. This hole is usually above the volume buttons on the phone’s left edge.[1]
- If your phone case doesn’t have a mute button hole, no worries! See if there are any other holes in the case you’d be able to attach a charm to, such as the audio jack or charging port.
Advertisement
-
3
Slide the looped end of the phone charm through the mute button hole. Hold the phone case in one hand while grasping the charm in the other. Pull the looped string at the end of the charm through the mute button’s hole until the string is on the other side.[2]
- The beads or charm should not go through the hole.
-
4
Tie a knot using the phone charm’s loop. Use the hand holding the case to open the charm’s string loop. Gather the charm or beads with your other hand and weave them through the loop. This will create a simple knot, tying your phone charm or strap to the case.[3]
-
5
Pop the phone back into the case. And that’s it! Your phone should slide into the case with ease. Now, all that’s left to do is show off your beautiful charm.


Advertisement
-
1
Decide where you want the phone charm to be. Some people prefer the charm to dangle from the top of their phone, while others like the charm hanging from the bottom. Remove your phone from the case, and mark on the case where you’d like the charm to go with a fine-tip permanent marker.[4]
-
2
Pierce two holes in a soft or hard plastic case with a needle. Heat the sharp end of a sewing needle over an open flame. The flame can be from a candle or lighter. Hold the needle over the flame for a few seconds, and then quickly press it onto the mark you put on the case. Apply gentle pressure to create the first hole, and move onto the second.[5]
- The process of heating and pushing the needle through may take a few times, depending on the thickness of your case.
- Place the two holes about a centimeter apart. They’ll be close but not touching.
-
3
Use a 5/64 drill bit to drill a hole into a plastic case. Set a piece of cardboard on the inside backing of the phone case. Position the drill on the mark you previously made and drill at a 45-degree angle.[6]
- This method is riskier as the drill could scratch the case if you don’t have a steady hand, but is known to work on sturdier cases like those from OtterBox.
-
4
Slide the phone charm’s string through the hole(s) you’ve created. Thread the loop of the phone charm through the hole. If the loop doesn’t fit, no worries! Attach the loop to a string and needle and pull the needle through the hole.[7]
- If you made two holes, slide the charm’s loop through both holes.[8]
- If you made two holes, slide the charm’s loop through both holes.[8]
-
5
Secure the phone charm to the case with a simple knot. Thread the charms or beads through the loop, and voila! You attached a phone charm to a case without a hole.[9]


Advertisement
-
1
Locate the audio jack on your phone. The audio jack is where you plug in your headphones and can be found on the bottom or top edge of your phone, depending on the model.
- Newer phones don’t have audio jacks, so this method works best on older models or Android devices.
-
2
Insert a premade phone jack charm. There are hundreds of already made audio jack charms on the market. Simply pop the charm’s base into the audio jack.[10]
- Go for a charm that’s your favorite color, animal, or sport.
-
3
Pop in a phone jack charm holder. If you want to attach a dangling charm or bracelet to your phone, insert an audio jack plug with a lobster claw or ring. These will let you connect any charm seamlessly, and all you do is tie the charm to the end of the plug.


Advertisement
-
1
Determine how long you want your phone charm to be. Are you planning on making a phone charm strap to wear on your wrist? Do you want a long or short charm? Now’s your time to decide! Use a ruler to measure the desired length of your charm to find how long your pattern of beads needs to be.
- If you’re making a phone charm strap, use a cloth measuring tape to measure around your wrist.
- Think of this like starting a charm bracelet.
-
2
Line up your beads and charms. The great thing about making your own phone charm is customizing it! Layout a pattern of your desired length to visualize what the final product will look like.[11]
- For example, if you want your charm to be 5 inches (13 cm) long, layout a row of beads that’s 5 inches (13 cm).
- Try using all different types of beads for a funky, colorful look everyone will be dazzled by.
- Consider a simple color pattern that matches your phone case for a more sophisticated look.
-
3
Thread a stretchy string or elastic cord through the beads. Start with the bead at the top of your pattern, as this will be the top of your charm. Follow your pattern until all the beads are on the string.[12]
- Use a transparent string to emphasize the color of your beads or go for a colored cord for even more fun.
- Keep the string on the roll while you thread the beads. This way, you’re sure to have plenty of string to finish your design.[13]
-
4
Fold and tie the ends of the beaded string together for a phone charm strap. Cut the string from the roll, leaving about 4 to 6 inches (10 to 15 cm) of excess string, and secure the beads with a double knot. With the excess string, make another double knot to create a smaller loop about 1 inch (2.5 cm) long.[14]
- The first double knot creates the bracelet-like portion of the phone charm.
- The second double knot forms the loop to connect the phone charm to the phone.
- If making two double knots is tricky, use a keychain lariat by attaching the lobster claw end to the first double knot.[15]
-
5
Rethread the string through the beads for a single-stringed charm. Bring the end of the string through the bead you last threaded, repeating the rethreading process until you reach the top of the pattern. Cut the string from the roll once you’re done—you’ll be left with two ends of string sticking out of the top bead.[16]
- Leave roughly 2 inches (5.1 cm) of excess string.[17]
- Leave roughly 2 inches (5.1 cm) of excess string.[17]
-
6
Fasten a jump ring and lariat to the charm for a single-stringed phone charm. Secure the beads in place by tying a surgeon’s knot. Cut the excess string away from the knot and slip an open jump ring through it. Attach the lariat to the jump ring, and close the jump ring with a pliers.[18]
- To make a surgeon’s knot, make an overhand knot, passing the right cord over the left and under. Then, pass the left cord over the right and wrap it under twice.[19]
- To make a surgeon’s knot, make an overhand knot, passing the right cord over the left and under. Then, pass the left cord over the right and wrap it under twice.[19]
-
7
Attach the phone charm to your phone case. Congratulations! You’ve made your very own super cool and trendy phone charm. Now, don’t be afraid to show off your hard work.


Advertisement
Ask a Question
200 characters left
Include your email address to get a message when this question is answered.
Submit
Advertisement
Things You’ll Need
- Fine tip permanent marker
- Needle
- Candle or lighter
- Drill (optional)
-
Beads and/or charms
-
Stretchy string or elastic cord
- Scissors
-
Keychain lariat (optional)
-
Jump ring (optional)
-
Lariat (optional)
About This Article
Thanks to all authors for creating a page that has been read 57,081 times.
If you buy through links on our site, we may earn a commission.
Is this article up to date?
Download Article
Download Article
Want to add some extra pizazz to your phone? Phone charms and wrist straps are trendy gadgets that are super cute and practical. In this article, we’ll take you through the motions of attaching a phone charm to just about any case and even explain how to make a simple phone charm yourself. Read on to get started!
-
1
Take your phone out of its case. Working with an empty phone case will allow you to attach the charm correctly and ensure that your phone doesn’t get damaged in the process. So, pop your phone out and set it aside.
-
2
Locate the mute button hole on the phone case. This hole is usually above the volume buttons on the phone’s left edge.[1]
- If your phone case doesn’t have a mute button hole, no worries! See if there are any other holes in the case you’d be able to attach a charm to, such as the audio jack or charging port.
Advertisement
-
3
Slide the looped end of the phone charm through the mute button hole. Hold the phone case in one hand while grasping the charm in the other. Pull the looped string at the end of the charm through the mute button’s hole until the string is on the other side.[2]
- The beads or charm should not go through the hole.
-
4
Tie a knot using the phone charm’s loop. Use the hand holding the case to open the charm’s string loop. Gather the charm or beads with your other hand and weave them through the loop. This will create a simple knot, tying your phone charm or strap to the case.[3]
-
5
Pop the phone back into the case. And that’s it! Your phone should slide into the case with ease. Now, all that’s left to do is show off your beautiful charm.
Advertisement
-
1
Decide where you want the phone charm to be. Some people prefer the charm to dangle from the top of their phone, while others like the charm hanging from the bottom. Remove your phone from the case, and mark on the case where you’d like the charm to go with a fine-tip permanent marker.[4]
-
2
Pierce two holes in a soft or hard plastic case with a needle. Heat the sharp end of a sewing needle over an open flame. The flame can be from a candle or lighter. Hold the needle over the flame for a few seconds, and then quickly press it onto the mark you put on the case. Apply gentle pressure to create the first hole, and move onto the second.[5]
- The process of heating and pushing the needle through may take a few times, depending on the thickness of your case.
- Place the two holes about a centimeter apart. They’ll be close but not touching.
-
3
Use a 5/64 drill bit to drill a hole into a plastic case. Set a piece of cardboard on the inside backing of the phone case. Position the drill on the mark you previously made and drill at a 45-degree angle.[6]
- This method is riskier as the drill could scratch the case if you don’t have a steady hand, but is known to work on sturdier cases like those from OtterBox.
-
4
Slide the phone charm’s string through the hole(s) you’ve created. Thread the loop of the phone charm through the hole. If the loop doesn’t fit, no worries! Attach the loop to a string and needle and pull the needle through the hole.[7]
- If you made two holes, slide the charm’s loop through both holes.[8]
- If you made two holes, slide the charm’s loop through both holes.[8]
-
5
Secure the phone charm to the case with a simple knot. Thread the charms or beads through the loop, and voila! You attached a phone charm to a case without a hole.[9]
Advertisement
-
1
Locate the audio jack on your phone. The audio jack is where you plug in your headphones and can be found on the bottom or top edge of your phone, depending on the model.
- Newer phones don’t have audio jacks, so this method works best on older models or Android devices.
-
2
Insert a premade phone jack charm. There are hundreds of already made audio jack charms on the market. Simply pop the charm’s base into the audio jack.[10]
- Go for a charm that’s your favorite color, animal, or sport.
-
3
Pop in a phone jack charm holder. If you want to attach a dangling charm or bracelet to your phone, insert an audio jack plug with a lobster claw or ring. These will let you connect any charm seamlessly, and all you do is tie the charm to the end of the plug.
Advertisement
-
1
Determine how long you want your phone charm to be. Are you planning on making a phone charm strap to wear on your wrist? Do you want a long or short charm? Now’s your time to decide! Use a ruler to measure the desired length of your charm to find how long your pattern of beads needs to be.
- If you’re making a phone charm strap, use a cloth measuring tape to measure around your wrist.
- Think of this like starting a charm bracelet.
-
2
Line up your beads and charms. The great thing about making your own phone charm is customizing it! Layout a pattern of your desired length to visualize what the final product will look like.[11]
- For example, if you want your charm to be 5 inches (13 cm) long, layout a row of beads that’s 5 inches (13 cm).
- Try using all different types of beads for a funky, colorful look everyone will be dazzled by.
- Consider a simple color pattern that matches your phone case for a more sophisticated look.
-
3
Thread a stretchy string or elastic cord through the beads. Start with the bead at the top of your pattern, as this will be the top of your charm. Follow your pattern until all the beads are on the string.[12]
- Use a transparent string to emphasize the color of your beads or go for a colored cord for even more fun.
- Keep the string on the roll while you thread the beads. This way, you’re sure to have plenty of string to finish your design.[13]
-
4
Fold and tie the ends of the beaded string together for a phone charm strap. Cut the string from the roll, leaving about 4 to 6 inches (10 to 15 cm) of excess string, and secure the beads with a double knot. With the excess string, make another double knot to create a smaller loop about 1 inch (2.5 cm) long.[14]
- The first double knot creates the bracelet-like portion of the phone charm.
- The second double knot forms the loop to connect the phone charm to the phone.
- If making two double knots is tricky, use a keychain lariat by attaching the lobster claw end to the first double knot.[15]
-
5
Rethread the string through the beads for a single-stringed charm. Bring the end of the string through the bead you last threaded, repeating the rethreading process until you reach the top of the pattern. Cut the string from the roll once you’re done—you’ll be left with two ends of string sticking out of the top bead.[16]
- Leave roughly 2 inches (5.1 cm) of excess string.[17]
- Leave roughly 2 inches (5.1 cm) of excess string.[17]
-
6
Fasten a jump ring and lariat to the charm for a single-stringed phone charm. Secure the beads in place by tying a surgeon’s knot. Cut the excess string away from the knot and slip an open jump ring through it. Attach the lariat to the jump ring, and close the jump ring with a pliers.[18]
- To make a surgeon’s knot, make an overhand knot, passing the right cord over the left and under. Then, pass the left cord over the right and wrap it under twice.[19]
- To make a surgeon’s knot, make an overhand knot, passing the right cord over the left and under. Then, pass the left cord over the right and wrap it under twice.[19]
-
7
Attach the phone charm to your phone case. Congratulations! You’ve made your very own super cool and trendy phone charm. Now, don’t be afraid to show off your hard work.
Advertisement
Ask a Question
200 characters left
Include your email address to get a message when this question is answered.
Submit
Advertisement
Things You’ll Need
- Fine tip permanent marker
- Needle
- Candle or lighter
- Drill (optional)
-
Beads and/or charms
-
Stretchy string or elastic cord
- Scissors
-
Keychain lariat (optional)
-
Jump ring (optional)
-
Lariat (optional)
About This Article
Thanks to all authors for creating a page that has been read 57,081 times.
If you buy through links on our site, we may earn a commission.
Is this article up to date?
Ношу в одном кармане (так мне удобно, привык), но есть подозрение, что воздействие магнита наносит вред телефону.
Не телефону-а пенису.
Гость1
Всего 1 ответ.
Другие интересные вопросы и ответы
Есть ли IMEI номер на коробке Samsung Galaxy S8 или s8+?
Хочу заказать телефон через интернет и запросить у продавца IMEI без вскрытия коробки. Указан ли он на наклейке на коробке? Просто попадалась информация, что наклейка наклеена сзади на сам телефон.
Пожалуйста, кто покупал, откликнитесь.
Если получится еще и фото коробки (имеи можете замазать), то вообще было бы замечательно.
З1
Приобрела данную модель. Продавец перед покупкой предоставил мне IMEI без вскрытия коробки. Я позвонила на горячую линию SAMSUNG, они пробили номер по базе. Да, действительно, телефон оригинал и Ростест (ЕАС).
Когда получила товар, то он был в заводской пленке, и на коробке, все же, была наклейка с номером IMEI. Скорее всего, когда телефон проходит Российскую сертификацию ( а точнее, сертифткацию ЕАС), то его вскрывают, наклеивают наклейку и запаковывают обратно в пленку, как на заводе. Но сам продавец ничего не вскрывал, продал запечатанный новый телефон.
А вот если покупать модели для рынка азии, америки, европы, то, возможно, что наклеек, действительно, на коробке не будет, но точно говорить не могу, просто предполагаю, судя по комментарию Gaipred.
Приложу фотки с моей коробкой, с пометкой, где IMEI. Может, кому пригодится.
IMEI
З2
Всего 2 ответа.
Как брелок одеть на телефон Как надеть брелок на samsung j3 (2017)?
Kirill bagamanov5
Мдя… жертвы ЕГ…BERDYSH4
Всего 3 ответа.
Что носят буддисты вместо крестика?
Евгения Ефремова1
Буддисты не носят ничего. Но у них есть свой символ (что-то вроде креста у христиан) об учении – Дхармачакра – “колесо закона”, символ учения Будды о пути к просветлению, освобождению от кармических перерождений в сансаре. Традиционно изображается в виде стилизованного колеса с восемью спицами. Но он может носится, так скажем, посредственно, т.е. обязательной роли не играет, по типу кулона.
Символ “колесо закона” изображён на флаге Индии:
Денис Вагнер-Кузнецов5
Всего 2 ответа.
Умные брелоки Chipolo: и ничего не потеряется!
Чуть ли не ежедневно многие из нас теряют какие-то вещи, на поиски которых может уйти от нескольких минут до пары недель. Одни забывают ключи от дома в автомобиле, другие каждый раз не могут найти очки, кто-то и вовсе оставляет детей без присмотра на площадке. Задачу облегчить ваши поиски берут на себя мини-маячки Chipolo, которые можно прикрепить к любому предмету, если вы очень не хотите где-нибудь забыть его или вовсе потерять.

Как это работает? Закрепленный на объекте брелок подключается к вашему смартфону при помощи технологии Bluetooth 4.0, а затем в специальном приложении показывается местоположение предмета, температура его окружающей среды и даже расположение маячка на карте. В случае, если вы уверены, что находитесь с предметом в одной комнате, достаточно активировать звуковой сигнал на Chipolo.


Можно приступать к работе! Как только вы начнете удаляться от предмета с закрепленным Chipolo, в приложении будет показано расстояние до него. Нажав на большую красную кнопку в виде гудка, можно воспроизвести звук на маячке, чтобы вы нашли свой предмет или домашнее животное как можно скорее. В обычном режиме в программе отображается температура окружающей среды вокруг маячка и его тег. А в случае, если под вашим надзором находятся несколько объектов с Chipolo, вы сможете одним кликом переключаться между ними.


В разделе «Настройки» предусмотрена возможность включения/отключения звукового сопровождения при поиске Chipolo, настройка уведомлений, калибровка температуры, а также изменение название объекта и его тега.


Все реализовано невероятно здорово и просто. Маячок весит всего 10 грамм, а его толщина не превышает пяти миллиметров. Как только Chipolo выходит за радиус действия, он сообщает об этом звуковым сигналом и сообщением на смартфон. В приложении тем временем показывается последнее местонахождение маячка на карте, к которому можно запросто проложить маршрут.


Кстати, если вдруг у вас случилась обратная ситуация — вы потеряли смартфон, но держите в руках Chipolo, просто потрясите его. Телефон начнет издавать звуковой сигнал, и вы очень быстро его найдете.
В новом обновлении приложения Chipolo, которое выйдет в начале ноября, разработчики добавят ряд улучшений и новшеств: появится поддержка русского языка, добавится поддержка устройств на Windows Phone, а все устройства Chipolo в вашем распоряжении будут объединены в единую сеть. Например, несколько человек смогут видеть один и тот же брелок — на ключах от дачи или портфеле ребенка.
Кроме того, использование единой сети позволит находить потерянные предметы чаще, поскольку брелоки смогут «общаться» между собой. Устройство будут видеть друг друга, за счет чего на смартфон придет уведомление с новыми координатами объекта. Чем больше людей с брелоками, тем больше сеть, больше возможностей.
Источник
Используйте iPhone или Apple Watch вместо ключа от автомобиля
Узнайте, как добавить ключи от автомобиля в Apple Wallet и как разблокировать или запустить автомобиль с помощью iPhone или Apple Watch.
Некоторые производители автомобилей предоставляют возможность использования цифрового ключа от автомобиля. Если ваш автомобиль поддерживает эту функцию, вы можете добавить цифровой ключ в приложение Wallet на iPhone.
После регистрации ключа в Wallet вы сможете разблокировать или запустить автомобиль с помощью iPhone или Apple Watch — для этого просто поднесите устройство к одной из заданных точек. Кроме того, с помощью приложения Wallet вы сможете использовать ключ от автомобиля совместно с другими людьми.
Требования
Чтобы узнать, поддерживает ли ваш автомобиль Apple Wallet, обратитесь к производителю автомобиля или в дилерский центр.
Вы можете добавить ключ от автомобиля на следующих моделях iPhone, если на них установлена iOS 13.6 или более поздней версии:
В качестве ключа от автомобиля можно использовать Apple Watch Series 5 с watchOS 6.2.8 или более поздней версии.
Кроме того, должны быть выполнены следующие требования.
- Вы должны быть владельцем учетной записи, предоставленной производителем автомобиля, а ваш автомобиль должен быть привязан к этой учетной записи. Выполнить это требование вам поможет производитель автомобиля или дилерский центр.
- Вам необходимо войти в систему iPhone с помощью Apple ID.
- Ваш iPhone должен быть защищен кодом-паролем для возможности авторизоваться с помощью Face ID, Touch ID или кода-пароля.

Добавление ключа от автомобиля в Apple Wallet на iPhone
- Убедитесь, что ваш автомобиль связан с учетной записью, предоставленной производителем автомобиля.
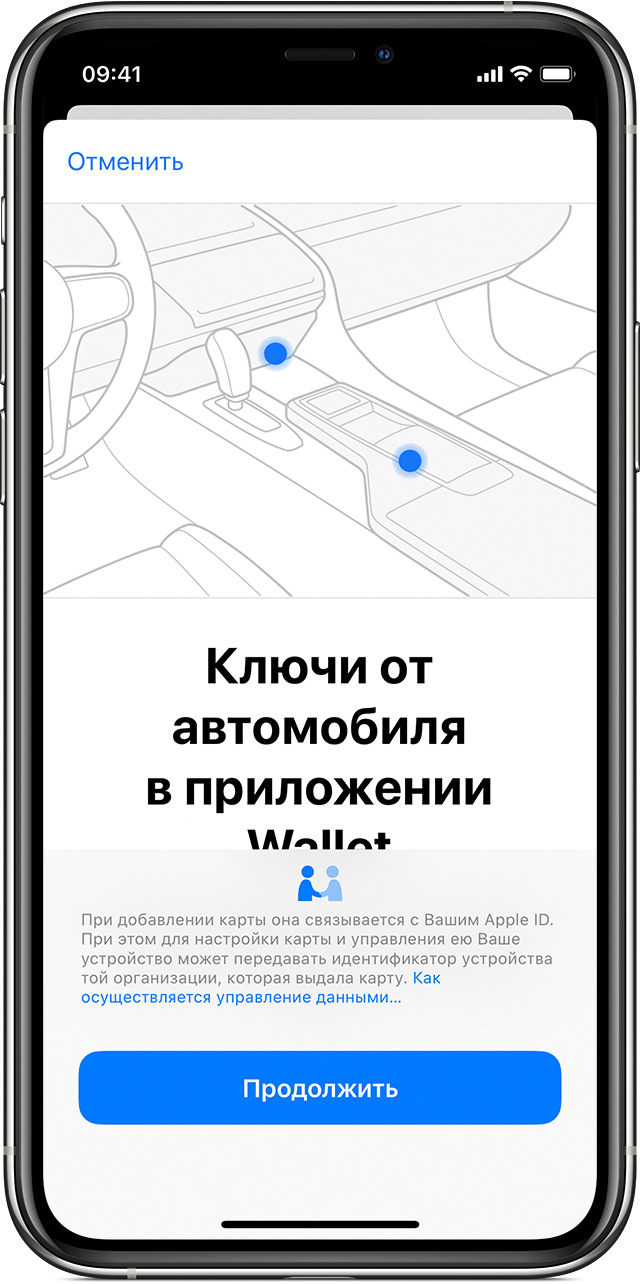
- Откройте приложение производителя автомобиля и выполните указания по настройке ключа. Приложение перенаправит вас в Apple Wallet.
- Коснитесь «Продолжить».
- Поместите iPhone на считыватель ключей, как указано в инструкции на экране, и дождитесь сопряжения iPhone и автомобиля.
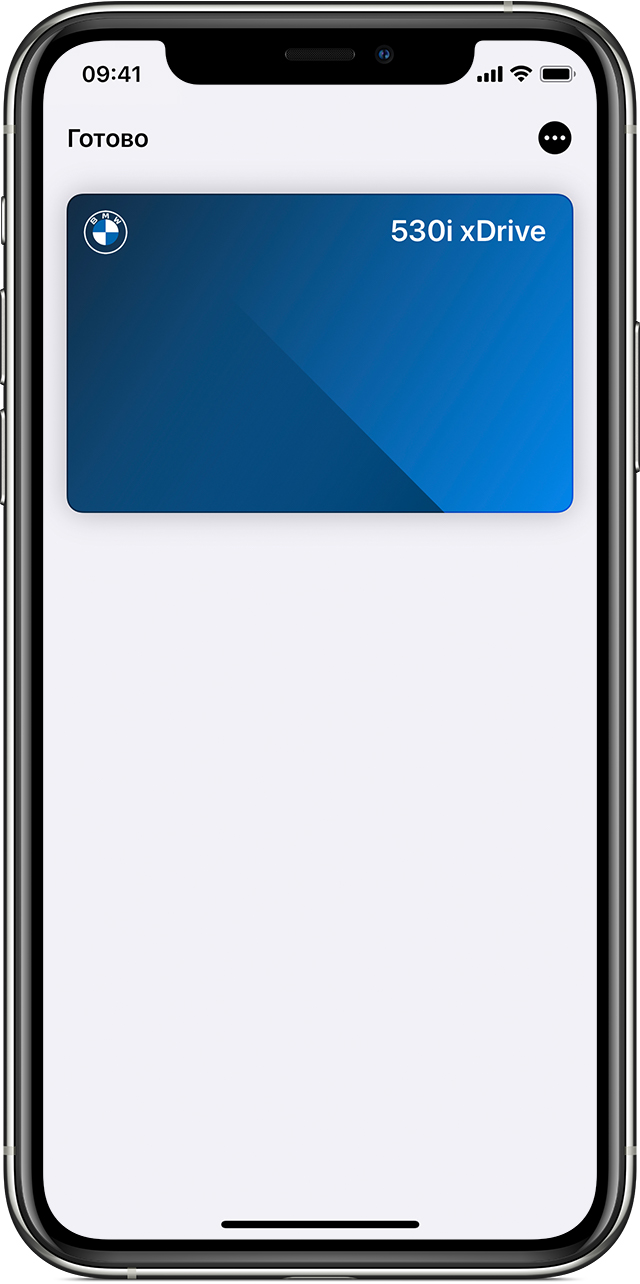
- Коснитесь «Готово».
Добавление ключей с помощью электронной почты
После добавления автомобиля в учетную запись, предоставленную производителем, вы получите сообщение электронной почты, с помощью которого сможете начать процесс регистрации ключа от автомобиля. Перейдите по ссылке из письма и выполните в приложении Wallet шаги 3–5, приведенные выше.
Добавление ключей с помощью информационного дисплея
На информационном дисплее автомобиля перейдите в раздел, посвященный работе с ключом, и выполните необходимые инструкции. При появлении запроса выполните в приложении Wallet шаги 3–5, приведенные выше.
В случае приобретения нового iPhone или при сбросе настроек имеющегося iPhone необходимо заново настроить ключи от автомобиля в Wallet с помощью одного из вышеперечисленных способов.
Добавление ключей от автомобиля в Apple Watch
- Выполните следующие шаги по настройке ключа от автомобиля в приложении Wallet на iPhone. Если у вас есть устройство Apple Watch, сопряженное с iPhone, вы получите в Wallet запрос на добавление автомобильного ключа в Watch.
- Коснитесь «Добавить сейчас».
- Чтобы подтвердить, что вы хотите добавить ключ от автомобиля в Apple Watch, дважды нажмите боковую кнопку на iPhone.
Кроме того, можно добавить ключ от автомобиля позже.
- Откройте приложение Watch на iPhone.
- На вкладке «Мои часы» прокрутите вниз и коснитесь «Wallet и Apple Pay».
- Коснитесь «Добавить» рядом с картой ключа от автомобиля.
Управление автомобилем с помощью устройства Apple
После настройки ключа от автомобиля в Wallet поднесите iPhone или Apple Watch к дверной ручке автомобиля. При включенном экспресс-режиме дверь автомобиля автоматически разблокируется. Чтобы заблокировать автомобиль при выходе из него, поднесите устройство Apple к дверной ручке.
Для запуска автомобиля поместите iPhone на считыватель ключей или поднесите к нему Apple Watch. Затем нажмите кнопку запуска автомобиля.
Использование экспресс-режима
В экспресс-режиме поднесите устройство Apple к дверной ручке автомобиля, и он автоматически откроется. Чтобы быстро запустить автомобиль, поместите устройство на считыватель ключей. Экспресс-режим включен на iPhone и в Apple Watch по умолчанию, если вы добавили ключ от автомобиля в Wallet.
Вы можете выключить экспресс-режим.
- Откройте приложение Wallet на iPhone.
- Коснитесь карты ключа от автомобиля.
- Коснитесь кнопки «Еще» .
- Выключите экспресс-режим.
Если экспресс-режим выключен, вам придется выполнять авторизацию при каждом использовании устройства Apple в качестве ключа от автомобиля:
- На iPhone откройте приложение Wallet и коснитесь карты ключа от автомобиля. Поднесите iPhone к дверной ручке автомобиля или считывателю ключей и авторизуйтесь с помощью кода-пароля, Face ID или Touch ID.
- На Apple Watch дважды нажмите боковую кнопку, чтобы перейти к картам. Коснитесь карты ключа от автомобиля, затем поднесите часы к дверной ручке автомобиля или считывателю ключей.
Если iPhone разрядился
Вы можете разблокировать и запустить автомобиль с помощью iPhone, даже если iPhone разряжен.
Если заряд аккумулятора iPhone очень низкий, устройство переходит в режим энергосбережения. В экспресс-режиме можно использовать его как ключ от автомобиля в течение пяти часов с момента включения режима энергосбережения.
Чтобы проверить, доступна ли на iPhone функция ключа от автомобиля, нажмите боковую кнопку.
Источник